
There are countless guitar plugins available to give you access to realistic amp and pedal tones.
In this guide, I’ll go through some of the best guitar VST plugins available today for both free and paid options.
Whether you want to record your own guitar tracks or use your computer as an amp, these guitar plugins will give you an impressive range of amp and effects models to play around with.
After you read this guide, check out these other helpful guides to make the most of your plugins:
- Best DAWs for Guitar (with Tutorials)
- Best Audio Interfaces for Guitar
- How to Connect Your Guitar to a PC
- Ultimate Guide to Recording Guitar at Home
- How to Run Any VST Plugin as Standalone
- Best DAW Controllers
- Recording Guitar FAQ (Ask Your Questions Here)
Understanding Guitar Plugins
If you’ve never used guitar plugins before, there are a few things to know before you get started.
Let’s go through the basics of guitar plugins (skip this section if you already know about plugins).
What is a Guitar Plugin?
A plugin is a separate piece of software that can either run on its own (called standalone) or run inside of a DAW (such as Ableton or Cubase). Plugins allow you to access different sounds or process your recordings in different ways.
For guitarists, the most common use of a plugin is to process your recorded guitar parts to simulate guitar amps and effects.
Outside of guitar effects and amp simulation plugins, there is a massive range of plugins you might be interested in using.
With other plugins, you can create full backing tracks and program your own drums, bass, keyboards, or any other instrument.
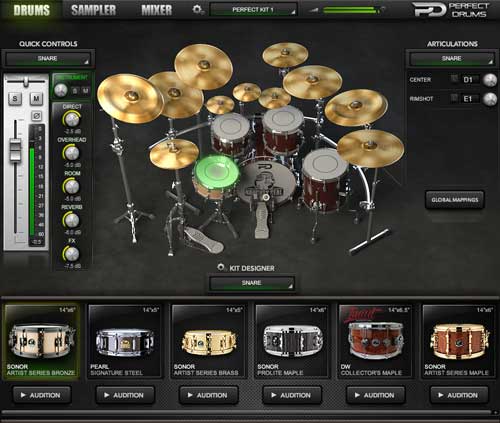
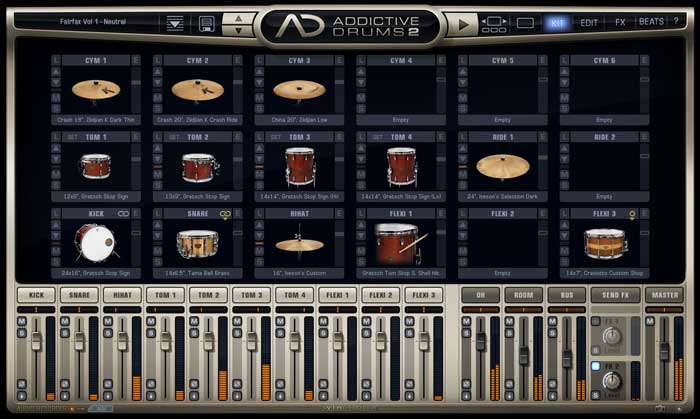
The above screenshot is a great example of a plugin you can use to create realistic-sounding drums on any track you want without needing to go through the hassle of recording an actual drum kit. Learn more about drum plugins in this guide and why you might want to get one (there are free and paid options).
Most of the plugins in this guide will focus on guitar effects and amp plugins, but I’ll also cover a few plugins you might want to look at if you want to create tracks using other instruments.
Guitar Plugin Formats
There are a few different formats plugins come in and the format you use depends on the DAW (Digital Audio Workstation) you use.
The four types of audio plugin formats are:
- VST: used in most DAWs
- AU: Ableton Live, Logic Pro
- AAX: Pro Tools 10 and later
- RTAS: Pro Tools 10 and earlier
Each of these plugin formats can come in different versions, so you may see mentions of VST2, VST3, AU2, etc.
The reason most musicians talk mainly about VST plugins is that they’re the most common across DAWs.
The good news is that when you download a free or paid plugin, most of them will download in multiple versions so you can use with any DAW.
Be sure to check that the plugin you want comes in a format compatible with your DAW.
Plugin Bit Versions
Plugins can come in two bit versions: 32-bit and 64-bit. When you see mentions of different plugin format versions (eg: VST2 and VST3), the difference is due to the bit version.
VST2 comes in 32 and 64-bit, while VST3 is only 64-bit.
The plugin bit needs to match the bit of your DAW. If you run a 32-bit DAW, you won’t be able to use 64-bit plugins (there are ways around this using a plugin wrapper).
DAW Limitations
As mentioned above, different DAWs use different plugin formats. So it’s important you match the required format with any DAW you download.
It’s also important to understand that many DAWs come in different ‘editions’ which may or may not be compatible with third-party plugins.
Most ‘lite’ editions of DAWs don’t allow you to use third-party plugins. They may come with their own plugins, but you won’t be able to add any extras.
If you got a free version of a DAW after buying some hardware, you probably have a lite version.
Check out my guide on the Best DAWs for Guitar to learn more about DAW editions and plugin compatibility.
How to Use Guitar VST Plugins
Depending on the plugin you download, there are two ways you can use them. You can either run the plugin on its own as a standalone program or add it to a DAW.
To use a VST plugin, you either run it standalone and connect your audio interface or load your DAW and add the plugin to a track.
Let’s go through each option so you know which option is right for you.
Standalone Plugins
Some plugins can be run as standalone programs. This means you don’t need to have a DAW to use them.
This is handy if you’re not interested in recording your guitar right now and just want to jam with some different amp models or effects.
In the below screenshot, you can see that I’m able to open AmpliTube 5 and jam with different amp and pedals without using a DAW:
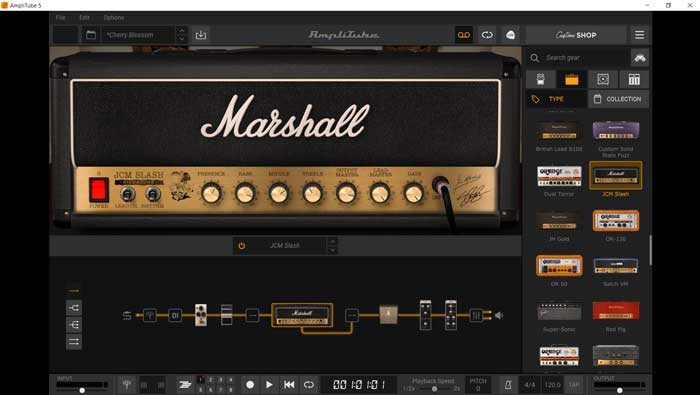
Having the option to run a plugin as standalone is great if you don’t have an amp. You can use your computer as an amp and easily use the standalone plugin to produce all of your guitar tones.
Read this guide to learn how to play electric guitar without an amp.
While some plugins come with a standalone version, many don’t.
For example, the popular Line 6 Helix Native plugin doesn’t include a standalone version.
Fortunately, there is an easy way around this and you are able to run any VST plugin you want as standalone.
Read this tutorial if you want to run any VST plugin as standalone.
Plugins in a DAW
To use a plugin inside of a DAW, you will need to install the plugin into a folder that the DAW knows contains your plugins.
Most plugins will automatically install into a suitable folder that your DAW will scan to find any new plugins.
If not, you can go to plugins settings in your DAW and select the folder that includes your plugin.
Your DAW will add the plugin to a library and you can add the plugin to a track at any time.
For example, the below screenshot shows the list of plugins I have available in Studio One:
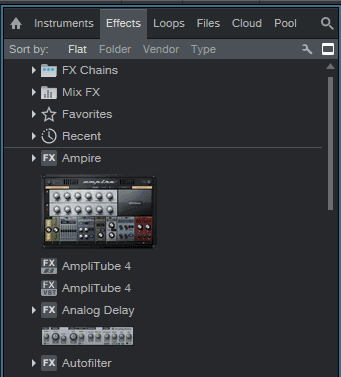
At any time, I can drag one of these plugins onto a track.
To learn how to add plugins to your DAW, check out my tutorials on DAWs here.
Best Guitar VST Plugins
There are so many guitar VST plugins out there with new ones showing up all the time.
The plugins covered below are some of the best plugins I’ve used. Many of the plugins are interchangeable, so you may only need one of them to cover everything you need.
I’ll add to this guide over time if any new plugin is worth including.
AmpliTube 5 by IK Multimedia
AmpliTube 5 is my go-to guitar amp and effects modeling plugin at the moment for when I’m recording guitar parts.
Check out my full review of AmpliTube 5 here.
AmpliTube 3 was impressive back in the day and version 4 saw a massive jump in quality. AmpliTube 5 released at the end of 2020 and gave the plugin’s interface a big upgrade.
The basic idea with AmpliTube is that it can be used to simulate an entire guitar rig from pedals, amp models, cabinets, mic models, and rack effects.
You can build up a rig from scratch or load one of the many presets to suit different types of music and guitar tones.
You load in pedals, choose between different amp models, select different cabinet options, mic those cabinets up with different microphones, set the cabinet in different types of rooms, and can add in some rack effects.
Being able to control every aspect of the virtual rig from the placement and type of microphones on the cab to the type of room is a great way to learn about recording guitar.
Alternatively, you can load from a wide range of presets to give you specific tones:
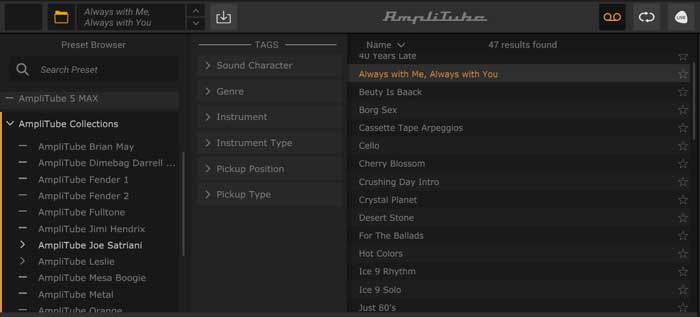
The above screenshot shows the presets in the ‘AmpliTube Joe Satriani’ collection, with presets that match many of his songs. As a Satriani fan, I was seriously impressed with how close these tones sounded to the actual songs.
AmpliTube 5 is a powerful plugin that can be used as a standalone program or with any DAW. It comes in AAX, VST, and AU formats in 64-bit.
The below screenshot shows how easily you can add pedals to the rig. You can drag and move around the pedals in any order you want as well as shifting them into the amp’s effects loop (learn why this is handy in my guide on the 4-cable method) or even after the amp with rack effects.

Read my full review and tutorial on AmpliTube 5 here to find out whether it suits you or not.
Recommendation: AmpliTube 5 sounds fantastic and the updated interface is extremely easy to use. It’s a nice upgrade from version 4 and a great option if you’re after authentic-sounding guitar tones.
TONEX by IK Multimedia
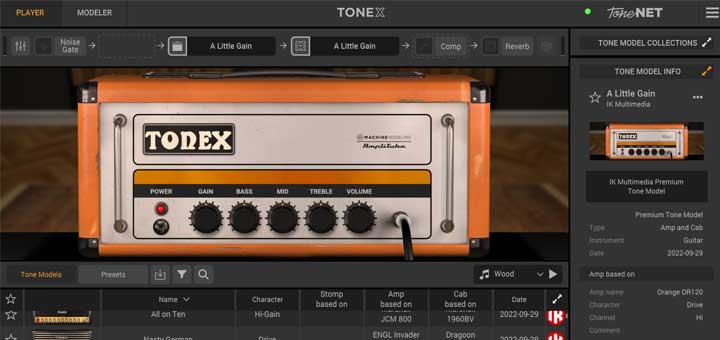
TONEX is a bit different than the other plugins in this list and gives us a glimpse of the future of modeling technology.
TONEX is a plugin and standalone program you can use to create models of your own real-life gear as well as download models other TONEX users have created of their gear.
As explained in my review and tutorial of TONEX, you can easily capture high-quality virtual models of your own drive/boost/fuzz/EQ pedals and amps.
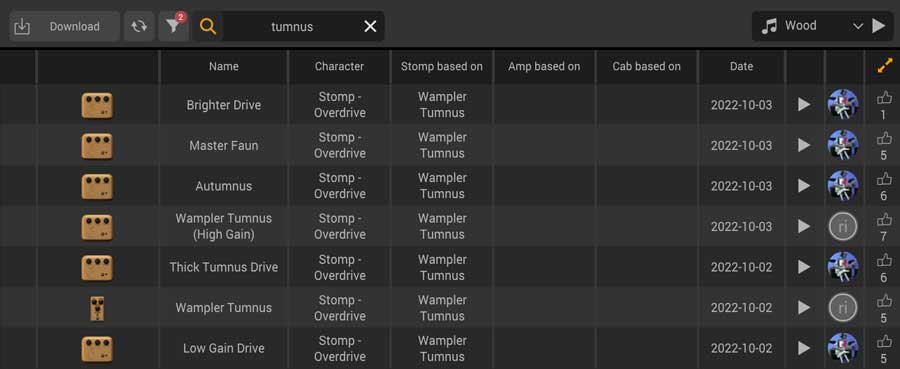
My personal favorite feature of TONEX is that you can share and download models with other users all within the plugin.
You’re able to find rare and vintage pedal and amp models TONEX users have created that aren’t available in any other plugin. The list of user-created models is growing every day, so there’s always something new to try out.
The great thing about these shared models is that they are all free when you own TONEX – you don’t have to pay anything extra to download user-created models.
If you like the idea of being able to access a massive (and growing) range of drive pedals and amp models, TONEX is worth checking out.
TONEX also integrates with AmpliTube 5 so you can use TONEX models inside of your AmpliTube rigs.
Check out my full review and tutorial of TONEX here.
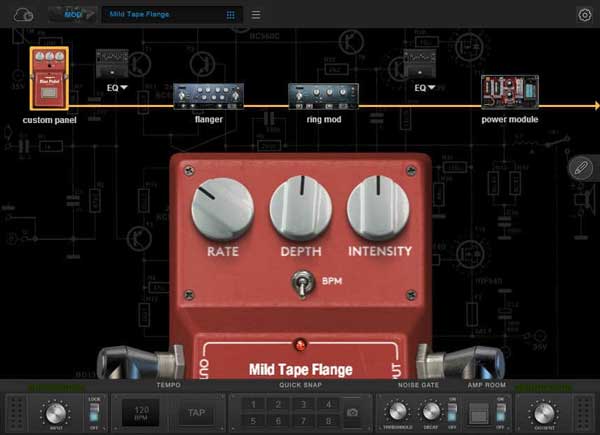
BIAS FX 2 by Positive Grid
I was blown away when I first tried BIAS FX 2. The audio quality and the level of control you have over the amps and effects is incredible.
BIAS FX 2 gives you access to a massive number of amp and effects models.
What I like about BIAS FX 2 compared to some other plugins is how the effects and amps are displayed:
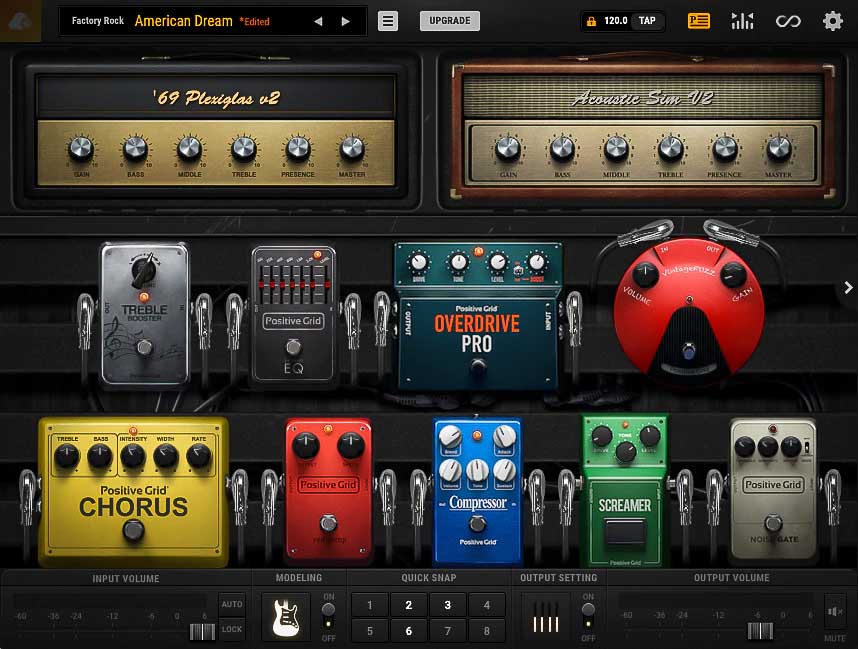
One glance at the above screenshot and you have no doubts over what type of effects and amps you’re using.
You might even instantly recognize some of the pedals shown above and know what they are based on.
This makes BIAS FX 2 a great way to learn about real pedals and gear without having to buy them.
In my Guitar Effects Course, I talk about why it’s important to experiment with changing pedal positions to learn how they impact your tone. Being able to easily swap pedals around in BIAS FX 2 is a fantastic way to improve your sense of tone.
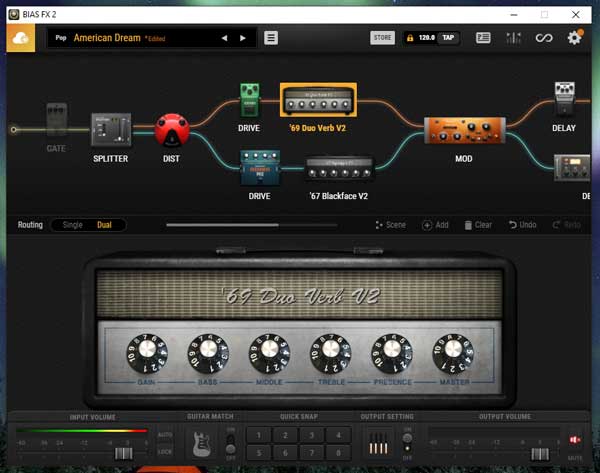
You can see in the above screenshot that you can easily create complex rigs that split into multiple amps or use stereo effects.
You can easily drag pedals or amps around to create effects loops (find out about effects loops and the 4 cable method here).
I personally prefer the interface in BIAS FX 2 compared to some other similar plugins such as Line 6 Helix Native.
If you look on Positive Grid’s website, you’ll see that they offer three plugins: BIAS FX 2, BIAS AMP 2, and BIAS PEDAL.
This can confuse some people because it sounds like you need all three plugins if you want to play around with effects and amp models.
The way to think about it is that BIAS FX is the main plugin. It includes amp and pedal models and works fine on its own.
Recommendation: if you’re serious about having the best quality effects and amp simulations, want an easy to use interface and want a high level of control over everything, BIAS FX 2 is hard to beat.
Check out the pricing of the different versions of BIAS FX 2 here.
BIAS AMP 2 by Positive Grid
BIAS AMP 2 is for guitarists who really want to dig into the amp settings and tweak things to an insane level.
While BIAS FX gives you access to amp and effects models, BIAS AMP 2 focuses completely on amps. You get a wide range of amps and you’re able to customize them in ways that aren’t possible in BIAS FX.
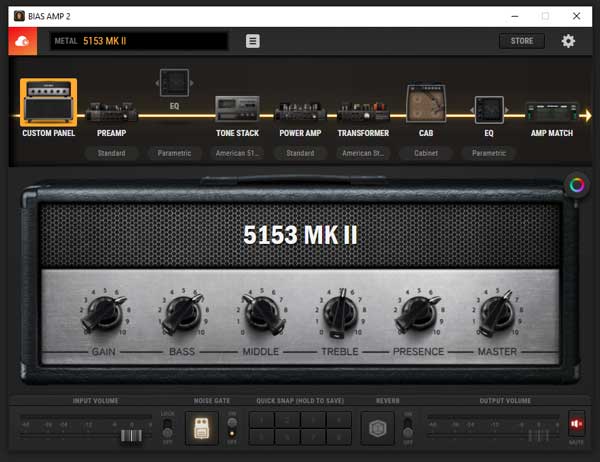
You can swap out tubes, customize the preamp, power amp, and transformers as you like, tweak EQ at different points, or use different cabinets.
For most guitarists, this is overkill. But if you want to dial in a perfect tone with extreme precision, it’s hard to find anything else with the level of control you get with BIAS AMP 2.
In the below screenshot, you can see that you can easily switch out different tubes and learn how each type of tube changes your tone. I found this a great way to learn about the characteristics of different types of tubes and how to think about the preamp and power amp stages.
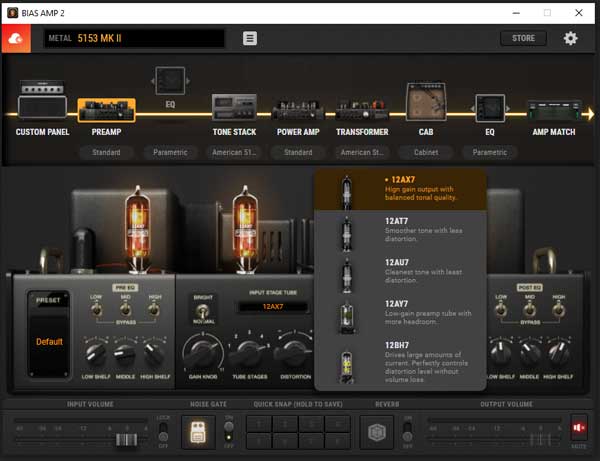
If you ever decide to buy a tube amp in the future, I would suggest using this plugin to learn as much as you can about how tube amps work. This plugin can build up your understanding of tube amps so when you go to buy one, you’ll know exactly what to look for, right down to the type of tubes that are right for you.
My favorite feature of BIAS AMP 2 is Amp Matching. Amp matching is when you let BIAS AMP listen to a recording of a guitar tone, then it listens to your guitar tone. After it samples your guitar tone and the other guitar tone, the plugin will figure out how to replicate the amp tone as closely as possible.
In other words, you can feed BIAS AMP 2 a recording of a guitar tone you want to copy and the plugin will figure out on its own how to replicate that tone.
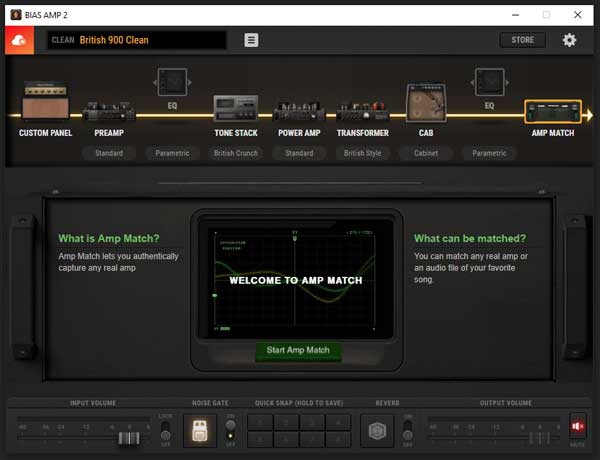
There are a lot of videos on YouTube of people using BIAS AMP to replicate some famous guitar tones with impressive accuracy.
Amp matching isn’t 100% perfect, but when I tested it and used it to replicate tones by Metallica, Dream Theater, and others, it was far better than any presets I’ve ever loaded in any plugin. If you’ve been trying to replicate somebody else’s guitar tone, read this guide on guitar amp settings and read the section on presets.
This means you can create custom amps based on different songs or albums and use them in your recordings at any time.
BIAS AMP 2 can be used on its own or you can connect it to BIAS FX 2. This means you can set up an amp and pedals rig using BIAS FX 2, then edit the amp using BIAS AMP 2. Or you can load one of your custom amps (created with amp matching) into BIAS FX 2.
Recommendation: I only recommend BIAS AMP 2 for guitarists who are really serious about amp simulation. For most guitarists, BIAS FX 2 will give you plenty of amp models and you’ll likely find one or more to suit you. But if you want to dig deeper into creating custom amps, BIAS AMP 2 is the best plugin.
Check out the pricing for the different versions of BIAS AMP 2 here.
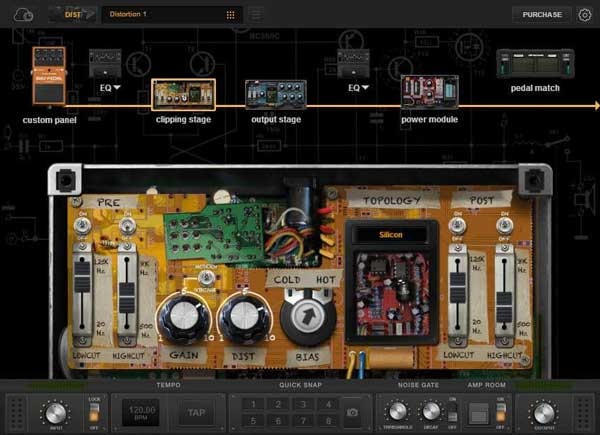
BIAS PEDAL by Positive Grid
BIAS PEDAL is similar to BIAS AMP 2, but for distortion and effect pedals. You’re able to create your own customizable pedals all the way down to the circuit level.
Again, this is overkill for most guitarists, but if you’re interested in experimenting with custom effects, the level of control BIAS PEDAL gives you is ridiculous.
For example, in my guide on Fuzz distortion, I talk about Germanium vs Silicon fuzz pedals. Unless you play around with a lot of fuzz pedals, it can be hard to understand the difference in how the two types of transistors sound.
In BIAS PEDAL, you’re able to instantly swap out a germanium transistor with a silicon transistor and instantly hear how it changes your tone.
If you’re taking my Guitar Effects Course and you really want to dig deeper into effects, you may want to get BIAS PEDAL. It gives you a fantastic way to dig deeper into effects and customizing them.
BIAS PEDAL also includes a matching feature (similar to the amp matching in BIAS AMP 2) where the plugin will listen to one of your drive pedals and effectively replicate the effect to be used in your recordings or to be added to any rig in BIAS FX 2.
For example, if you have a vintage fuzz pedal that you love the tone of, you’re able to use the pedal matching to create a virtual version of the pedal for future recordings. Again, it won’t be 100%, but you might be surprised by how close these matched pedals can sound against the real versions.
BIAS FX 2 comes in a standalone version as well as AU, VST, and AAX formats.
Recommendation: for most guitarists, BIAS FX 2 will cover every effect you might want. I recommend starting with BIAS FX 2 and if you ever feel the urge to dig deeper into tweaking the amps or pedals, you can consider extending it with BIAS PEDAL.
Check out the pricing for BIAS PEDAL here.
If you’re unsure whether you want to spend money on any of the BIAS plugins, they do have a free demo for FX 2, AMP2, and PEDAL on their website.
If you do decide that you want all three of the above plugins, you can get a serious discount by buying them in a bundle like this one.
Helix Native by Line 6
Helix Native by Line 6 takes the brains out of their popular Helix pedals and puts it into a plugin. Think of it as a software version of the Helix pedalboard.
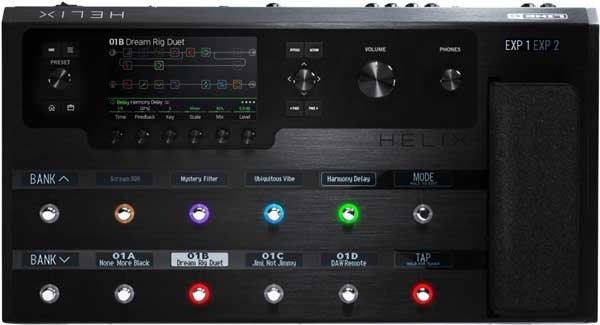
This means the plugin gives you access to the same amp and effects models used in the above pedalboard for a small fraction of the price.
If you have a Helix pedal or have seen videos of people using one, you will recognize the plugin’s interface as shown below:
The plugin uses the same interface, logos, and color coding as the physical Helix interface. This is great for Helix pedal owners, as you’ll be able to instantly dive in and know how to use the plugin.
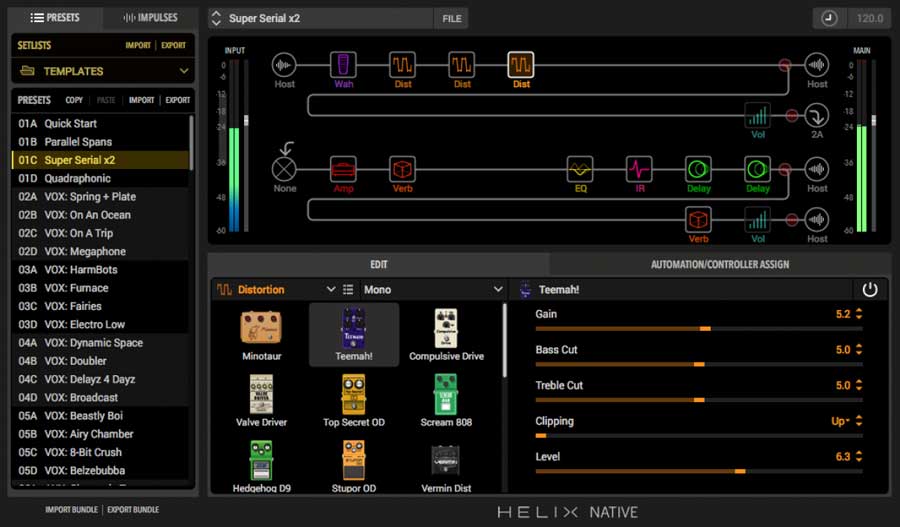
If you’ve never used a Helix pedal before, the interface isn’t as easy to use as BIAS FX 2 or AmpliTube.
It’s perfectly fine after you get used to it, but it works a little differently. Instead of turning knobs and dials on images of real-looking pedals and amps, you’re using sliders.
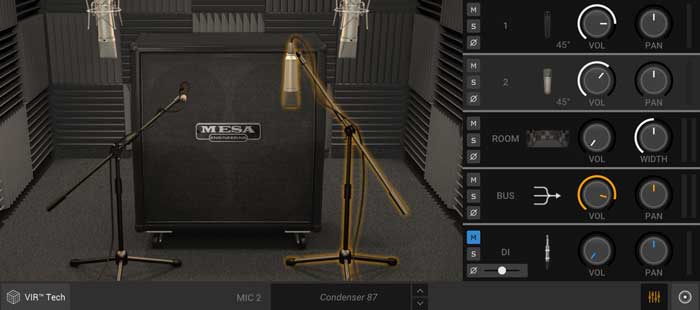
For example, the below screenshot contains all the sliders (in red) to tweak and change the settings of an amp and cabinet:
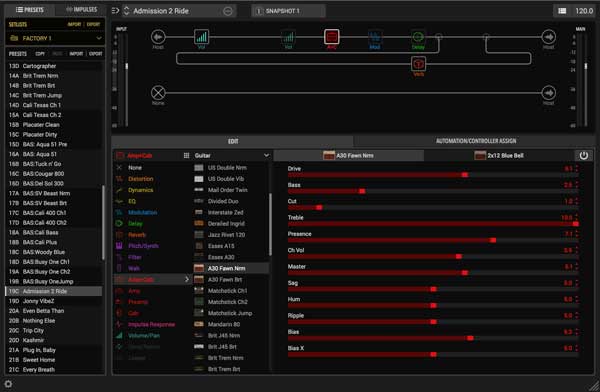
Compare that screenshot to the earlier screenshots of BIAS FX or AmpliTube where you turn knobs on a real-looking amp. Once you get used to the sliders it’s fine, but it feels disconnected from what we’re used to as guitarists.
A guitarist can glance at an amp and get an idea of what it should sound like based on the position of all the knobs. You don’t get the same feeling by glancing at a screen of sliders.
Apart from the interface (which it should be clear I’m not a fan of), the plugin is fantastic.
The sound quality of the amps and effects are as amazing as you would expect from a Helix plugin. You get access to a massive range of effects and amps, and you’re able to create full rigs easily.
Helix Native also includes the ability to use impulse responses, which is a fantastic way to extend the range of tones you can create with the plugin. Read my guide on Impulse Responses to learn why they’re so powerful.
The downside for some guitarists is that Helix Native doesn’t have a standalone version. This means you need to run it as a plugin in a DAW to use. It’s disappointing that Line 6 didn’t feel the need to create a standalone version like all of its competitors.
If you want to run Helix Native as a standalone plugin, I explain exactly how to do it step-by-step in this tutorial.
Recommendation: Helix Native is jam-packed with a fantastic range of high-quality amp and effects models. Unlike AmpliTube 5 or BIAS FX 2, there is only one version of Helix Native, so you get everything in one price. I recommend Helix Native for guitarists wanting an all-in-one plugin that has everything ready to go.
Note: If you own any other Helix hardware such as the Helix floorboard, Helix LT, HX Stomp, or HX Effects, you get a massive discount on Helix Native. Check out the discounted versions at Sweetwater here.
Impulse Response Loader (Free)
If you’ve never used impulse responses before, you will be shocked with how impressive they sound when used properly.
The short explanation is that an impulse response is a way to capture the characteristics of a guitar amp cabinet, mic, and room environment to almost perfectly recreate it digitally in your DAW.
Impulse responses are different than amp models you get in plugins like BIAS FX or AmpliTube, but they produce similar results.
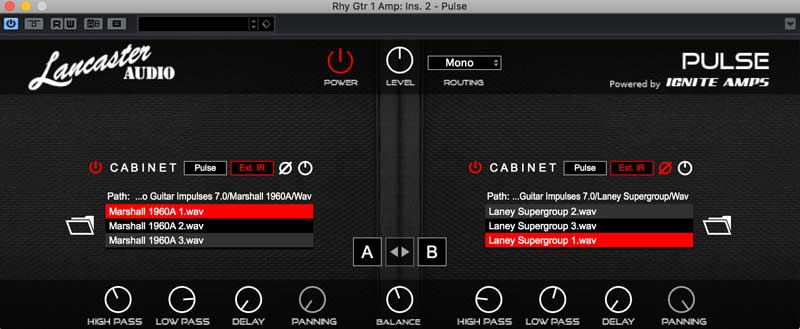
A great thing about impulse responses is that there are countless available online you can download for free and load into a DAW using a free plugin such as Pulse by Lancaster Audio.
Why use impulse responses? The big benefit is that you can download impulse responses for a massive range of amps from big brand names to use in your recordings. This means you can create recordings that sound like they were recorded in an expensive studio with a perfectly mic’d cabinet.
To use an impulse response, you simply need an impulse response loader plugin.
I highly recommend getting an impulse response loader and trying out some impulse responses if you’ve never used them before.
Read my Guide on Impulse Responses here for links to a free loader, free impulse response libraries, and more details on how impulse responses work.
Guitar Rig 6 by Native Instruments
If you’ve been reading up on guitar plugins, you have probably heard about Guitar Rig 5.
For many years, Guitar Rig 5 was the best plugin for guitar effects and modeling. I used it for years and preferred it over AmpliTube 3 for a very long time. Of course, technology has improved a lot since 2004, so Guitar Rig 5 fell to the side as other plugins continued to evolve and update.
After so many years of waiting for Guitar Rig 6 to come out, it has finally happened.
Check out my full review and tutorial of Guitar Rig 6 to learn all about it.
As you can see in the below screenshot, you build rigs in Guitar Rig 6 by dragging amps and effects from the left panel into your stack on the right.
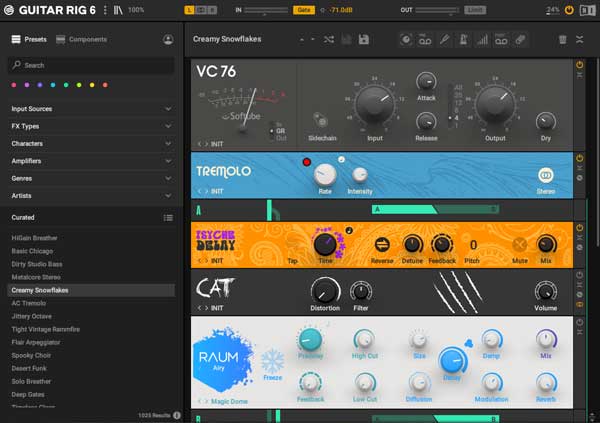
This takes a different approach than the other guitar plugins covered above and I prefer it in many ways.
In many ways, Guitar Rig 6 has the best range of effects. I spent a lot of time over the years creating psychedelic and trippy sounding guitar tones in Guitar Rig 5 that I still can’t replicate with any other plugin. The way you’re able to split a signal and feed in different effects would open up so many possibilities.
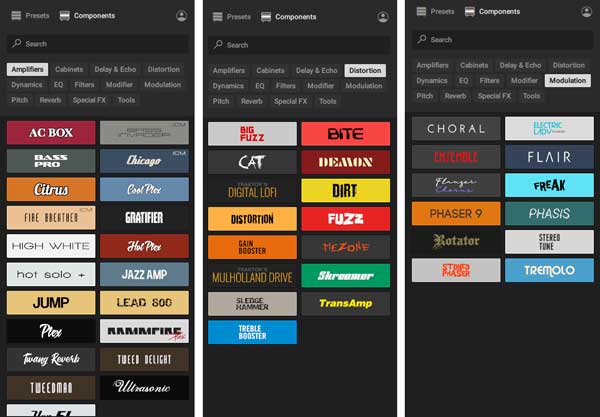
As an example of the variety of models and effects available, here are some screenshots of the different amp, distortion, and modulation models you can choose from:
When Guitar Rig 6 came out, I was thrilled to find that I could still experiment with psychedelic, ambient, or experimental tones that made me so fond of Guitar Rig 5.
You can definitely use Guitar Rig 6 to emulate authentic guitar tones, but in my opinion, Guitar Rig 6 surpasses all of the other guitar amp and effects plugins in the variety of tones and effects you can use.
Find out more about Guitar Rig 6 in my review here.
Recommendation: If you have used Guitar Rig 5 in the past, Guitar Rig 6 takes it and gives it a much-needed polish. While other plugins such as AmpliTube or BIAS FX are fantastic at creating authentic guitar tones, Guitar Rig 6 is still at the top when it comes to creating effects and soundscapes to inspire your playing.
Ignite Amps (Free)
If you like the idea of playing around with amp simulations, but can’t afford the price of some of the above plugins, there are plenty of high-quality free plugins to get you started.
Ignite Amps have one of the most impressive free amp simulation plugins I’ve tested so far.
The Emissary amp plugin is a fantastic metal amp that does a great job at something a lot of other amp modeling plugins struggle with – high gain.
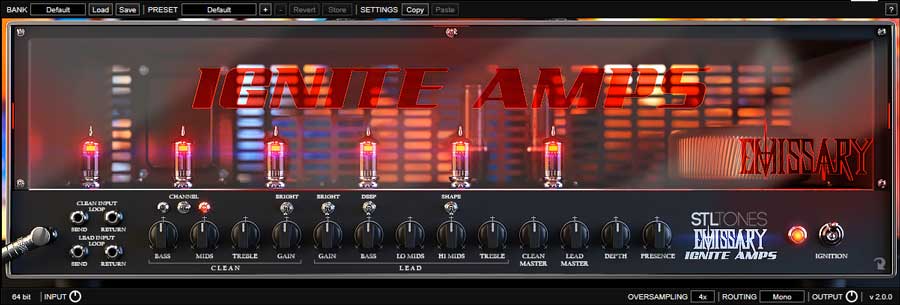
As you can see from the above screenshot, the amp does include a clean channel and you have plenty of knobs to tweak to dial in different tones.
Ignite Amps have a nice range of other free plugins you might want to play with, including impulse response plugins, tube preamp plugins, and gain pedal plugins.
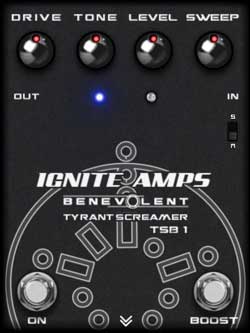
If you like high gain tones, try combining the Emissary amp plugin with one of their drive pedal plugins and blend the two gains together (something I cover in the Guitar Effects Course).
Check out their website to download Emissary or any of their other free plugins.
LePou Amp Simulations (Free)
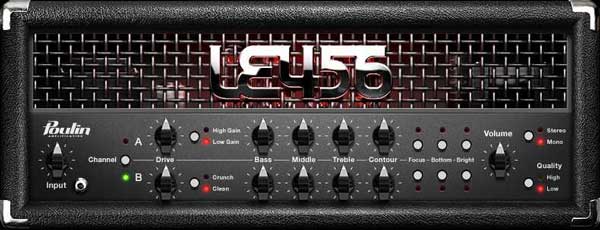
Another great alternative for free amp plugins is the LePou collection.
What I like about the free LePou amps is that you have a nice range to play with. Separate plugins are available for each amp and there is a cabinet simulation plugin available to use with any of the amp plugins.
This is a great way to experiment with different combinations of amps and plugins. You can run one of the LePou amp plugins, then either use the LeCab plugin to simulate the cabinet, or you can use any other plugin for cabinet simulation.
I suggest using one of the LePou amp plugins and use it with an impulse response plugin to simulate the cabinet.
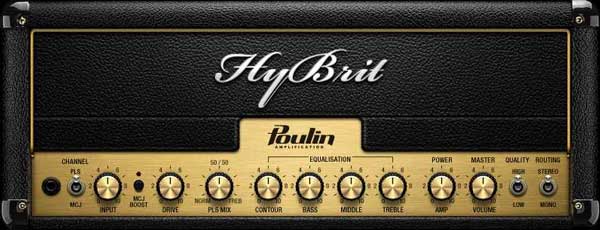
Some of the amp plugins are based on real amps (the above screenshot is clearly based on a Marshall), while others aren’t based on real-life amps.
Check out the LePou range of free amp plugins here.
Neural DSP Archetype Plugins
Neural DSP creates impressive plugins and they have five ‘Archetype’ plugins as of January 2021.
The Archetype plugins are very different than the plugins covered above. Instead of providing you with a wide range of amp and effects models, each plugin provides a curated set of models based on a specific artist.
As of April 2022, these are the Archetype plugins available: Petrucci, Tim Henson, Gojira, Cory Wong, Abasi, Nolly, Plini.
You may recognize some or all of those names and if you do, you’ll have a rough idea of the type of models and tones to expect in each plugin.
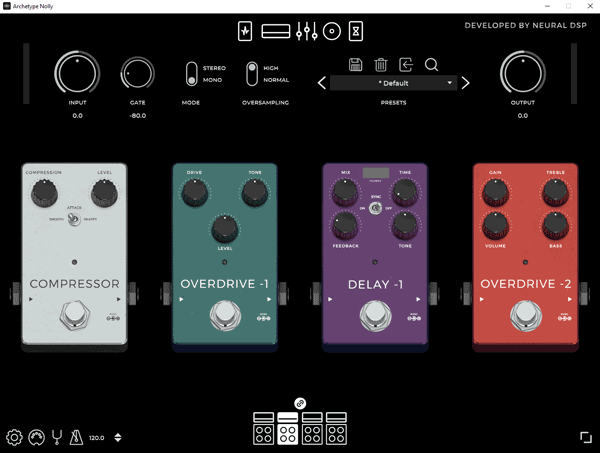
I tested out the Archetype: Nolly plugin, which gives you four of Adam “Nolly” Getgood’s custom amps with matched cabs, and six pedals.
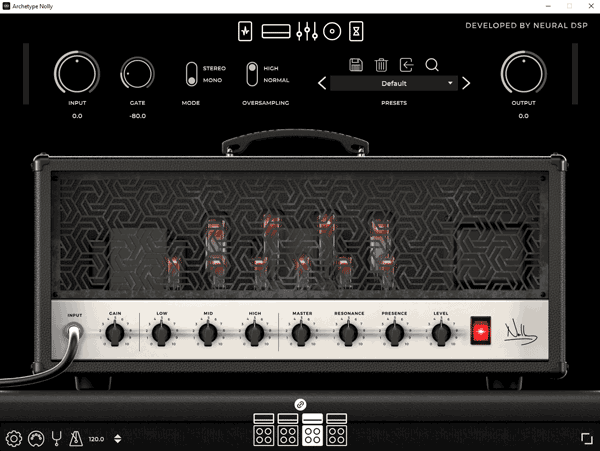
All of the Neural DSP plugins have a sleek and modern interface. You toggle between the different parts of the rig (pedals, amp, EQ, cab, pedals) using the top icons.
This is a minimalistic interface and takes some time to get used to. Controlling the settings on the amps or pedals is simple thanks to the clear amp and pedal graphics.
The plugin comes with a surprising number of presets to showcase the type of tones you can use.
This is where the Nolly plugin surprised me. You wouldn’t expect to get much variety out of only four amps and a few pedals, but the presets show that you can get a massive variety of tones.
The Neural DSP plugins seem to focus more on high-gain and modern guitar tones – which is something most plugins have struggled to achieve in the past.
If you’re a high-gain player, you should check out what Neural DSP offers. I was impressed with the crystal clear and realistic tone this plugin creates.
Here are some features you may find useful with the Neural DSP plugins:
- Standalone as well as plugins
- MIDI compatible
- Able to unlink amp and matched cabinet to mix rigs
- Tuner and metronome
When you compare one of the Neural DSP plugins to something like AmpliTube or BIAS FX, Neural DSP offers a tiny amount of gear. You only get four amp models and a few basic pedals while other plugins offer hundreds of models. It’s clear that Neural DSP is focusing on quality rather than quantity. That doesn’t mean the other plugins don’t have high-quality models, it just shows how different Neural DSP is.
Neural DSP stands out as a strange offering compared to other plugins in this guide. Should you get the Plini plugin or the Nolly plugin (the two most popular plugins from what I’ve seen)? Unless you try both of them, it’s really hard to figure out which one may suit you best.
Recommendation: it’s hard to recommend the Neural DSP plugins because you need to be a specific type of guitarist after a specific type of guitar tone. If you play in a similar style as any of the artists involved with Neural DSP, you should check the plugins out. While you don’t get many amp and pedal models compared to other plugins, the quality of the models you do get is incredible.
These plugins will suit very specific types of guitarists and if you’re one of those guitarists, you’ll be impressed with the tones available. If you’re after a wide variety of amps and pedals, there are other plugins better suited to your needs.
Check out the range of Neural DSP plugins here.
Plugins Included in DAWs
Before you start spending money or searching for free plugins, it’s worth looking through any plugins that are included in the DAW you use.
While there will always be better quality plugins out there than the included plugins included in a DAW, many of them are fantastic.
As an example, here are some of the plugins that are included in Ableton Live:
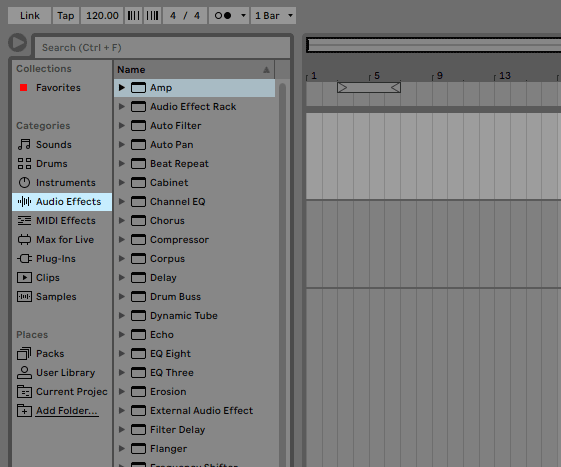
You can see there is an amp simulation plugin, cabinet simulation, EQ, chorus, compressor, a tuner, and a lot of other effects to play around with.
You may find that some of the plugins included in your DAW already cover what you need. Simple plugins such as delay, chorus, or a tuner may be perfectly fine and you don’t need to look for something better.
Other plugins such as the included amp simulation plugins in most DAWs tend to fall short when compared to other options. But they’re a great starting point to play around with.
Find out how to use the plugins in your DAW in my DAW tutorials.
VST Plugins for Other Instruments
While it’s a lot of fun to play around with amp and effects plugins, there are so many more things you can do with plugins.
Plugins can be used to help you mix and master your tracks, or you can use plugins to simulate other instruments. I’ll finish this guide by explaining how you can use plugins to become ‘virtual’ session musicians you can use at any time.
Why Use Plugins For Other Instruments?
Plugins quickly become crucial parts of your recording process when you want to start including other instruments into your tracks.
A perfect example is drums.
Let’s say you write a song and want to record it. You can easily record your guitar parts and use one of the above plugins to perfectly dial in a great guitar tone.
But what about drums? Creating a high-quality recording of a drum track is hard. You need multiple mics and an appropriate room to record them in. For most people, this means going to a recording studio.
Alternatively, you can get a drums plugin and easily program your drum tracks on your own. You’ll end up with studio-quality drums for your track and you can easily change the drum parts at any time.
While it might take some time to learn how to create tracks for other instruments, you might be surprised by how realistic they can sound. I’ve used plugins to create full-band backing tracks for my guitar tracks as well as full symphony tracks. It’s mindblowing what is possible with plugins today.
Drum Plugins
Outside of a guitar amp and effects plugin, a drums plugin is my next recommendation on what to get. Being able to easily create drum tracks in your DAW for anything and for those drum tracks to sound completely realistic is amazing.
There are a lot of great drum library plugins available. The two I use are Addictive Drums 2 and Toontrack Superior Drummer 2 (version 3 is now available).
The basic idea with these drum libraries is that you create a MIDI track in your DAW, then apply the plugin to the track. You can then go into the MIDI track and create drum beats as you like.
You can see an example of how to use MIDI to create drum tracks in this tutorial. I use Toontrack Superior Drummer 2 to create virtual drums that sound realistic.

Plugins like these include full mixers and plenty of ways you can tweak every piece of gear. You can adjust the levels for individual toms or cymbals, switch out different types of snares, or apply reverb to the kit.
If you play along with drums, I highly recommend getting a drum library plugin. They’re handy to have when coming up with song ideas, creating backing tracks for your guitar parts, or to write drum ideas to send to the drummer in your band.
Check out this Guide to the Best Drum Plugins for free and paid options. The guide covers everything you need to know about drum plugins and features you might want to look out for.
Other Instrument VST Libraries
There are VST libraries (similar to how the drum libraries work) on pretty much any instrument you want. There are even guitar VST libraries that other musicians use when they want to create virtual guitar tracks.
Many of these virtual instrument plugins were created by recording extremely expensive equipment in expensive studios. So if you want a piano in your song, you can buy a plugin and end up with a fantastic quality grand piano you can effortlessly add to any of your recordings.
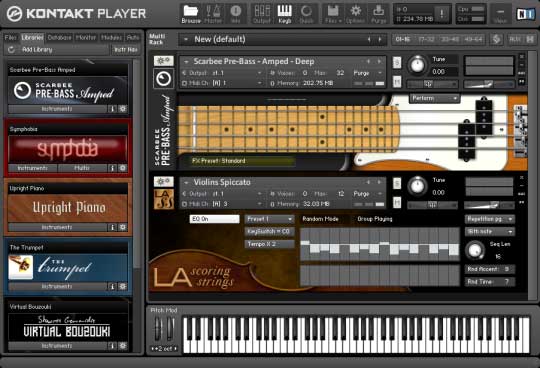
If you’re interested in getting started with other instrument plugins, I recommend checking out Kontakt 6 by Native Instruments (or get the free Kontakt player and download any Kontakt compatible libraries).
Kontakt is a sample engine that allows you to install different virtual instruments.
In the below screenshot, you can see that an electric bass has been loaded as well as violins. On the left side of the player you can see the different instruments ready to be added to tracks in the DAW.
If you’ve never used a sample library before, it’s hard to explain how impressive these instruments can sound. If you wanted to quickly lay down a bass track for your song, it’s a simple job when you have a bass installed in Kontakt.
As you can see in the screenshots below, you can find Kontakt compatible libraries for a wide range of instruments.
From accurately recorded samples of real-life instruments, to a big range of synthesizers and virtual instruments, it’s mind-boggling what is possible when you get started with virtual instruments.
I have only scratched the surface on what is possible with Kontakt and I highly recommend it for anybody who writes music.
Being able to add real-sounding symphony instruments, stars, synths, percussions, or any other instrument into your projects is something that just wasn’t possible for a musician at home in the past.
I’ll keep updating this guide when new plugins are worth highlighting, so subscribe to my email list here for future updates.
To learn more about using plugins and recording guitar in general, check out these other helpful guides: