Update: IK Multimedia has released a physical pedal version of TONEX. Check out my full review of TONEX Pedal here.
TONEX by IK Multimedia is an AI-based modeling plugin and app that lets you capture and model your own guitar pedals, amps, and cabinets as well as download models other users have created.
While there are plenty of great guitar modeling apps available today, TONEX is different in that it gives you the tools you need to create your own high-quality amp and pedal models.
This review will give you a detailed look at how you can use TONEX and what to expect from it.
Check out some of the best guitar plugins in this guide here.
3 Ways to Use TONEX
There are three ways you can use TONEX: a standalone app, as a plugin, or as an amp or stomp model within AmpliTube 5 (check out the review to learn more).
A fourth way that will be available soon is with an iOS app currently in development. This review will focus on the three ways you can use TONEX on PC/Mac.
Let’s go through the three different ways you can use TONEX on PC or Mac.
Learn more about TONEX on the IK Multimedia website here.
TONEX Standalone App
The TONEX standalone app is an easy option if you just want to jam with your models. There’s no need to first open a DAW and set up a project – just plug in and play.
The player screen of the TONEX app is split into three main sections:
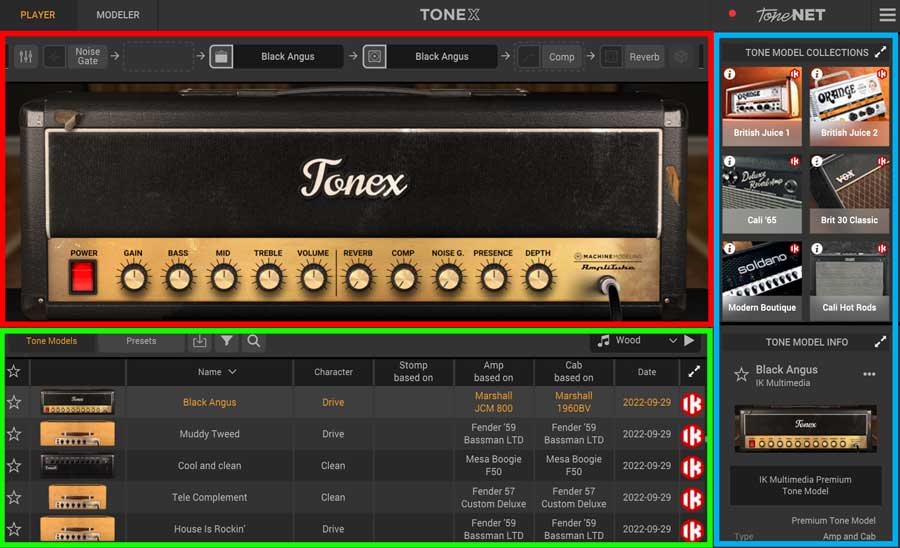
The red highlighted section is where you can edit your virtual rig, choose different amp and cabinet models, and toggle different components such as a noise gate, compressor, and reverb.
The green highlighted section is the model library where you can search for free, premium, and user-shared models (explained in detail later).
The blue highlighted section is where you can try out or purchase model collections (top) and see detailed information about the currently selected model (bottom).
It doesn’t take long to get used to this layout and while there are a few odd quirks (eg: the tone library is a bit slow and buggy on release), it’s an easy-to-use interface.
Clicking the three lines icon on the top right will bring up the audio settings (standalone app).
TONEX Plugin in a DAW
TONEX can be installed as VST, VST3, AU, or AAX plugins (learn about different plugin formats in this guide).
This is a great option when you want to work on recordings, jam along with backing tracks or combine TONEX with other plugins.
When you open TONEX as a plugin in a DAW, you only have access to the player and not the modeler. So if you want to create some models, open the standalone version instead.
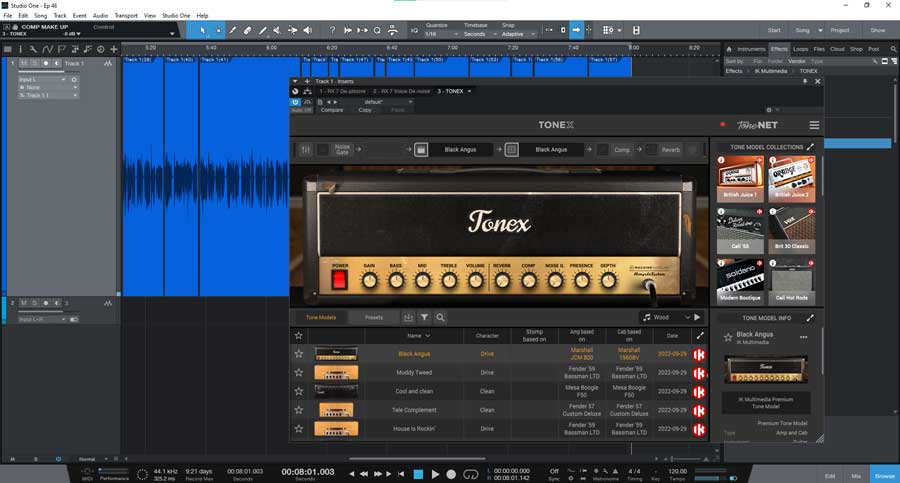
As you would expect, you can simply add TONEX to any audio track and select the model you want to use. You can turn different components such as the cabinet model on or off, which is great if you want to use other plugins.

In the above screenshot, you can see that I have everything disabled except for the amp model (all other icons are greyed out to show that they’re disabled).
While you can load impulse responses in TONEX, you can easily turn the cabinet models off and use a separate IR loader plugin for your cabinet tone.
The TONEX app is easy to combine with other plugins as long as you keep the order of plugins in mind (eg: use your IR plugin after TONEX in the signal chain).
TONEX in AmpliTube 5
If you update AmpliTube 5 to the latest version, you will see that there is a new amp model you can select called ‘TONEX’.
Update: AmpliTube has been updated again and you can now add a TONEX stomp model to your AmpliTube rigs.
Selecting the TONEX amp model gives you a way of loading TONEX into an AmpliTube 5 rig.
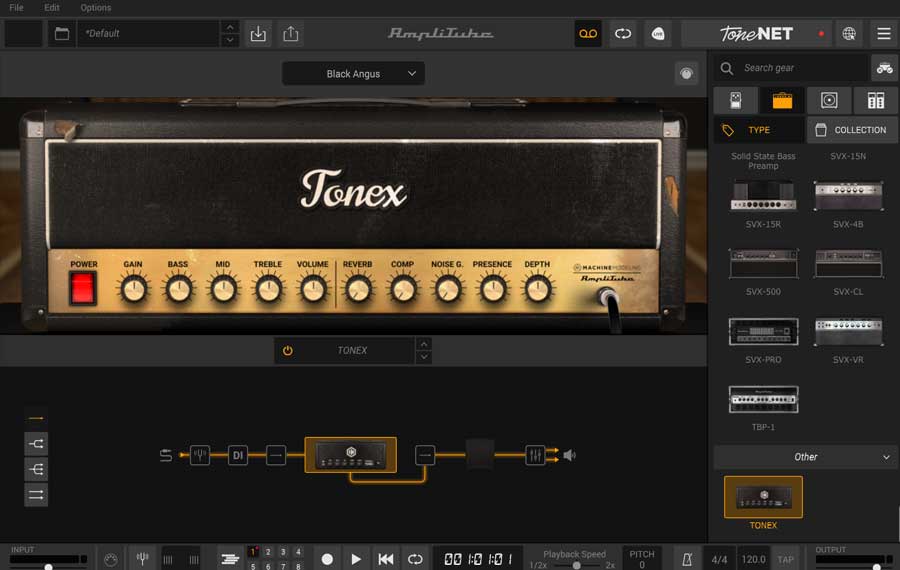

This is a great way to combine the pedal and rack effects included with AmpliTube 5 with your TONEX models.
You can choose your TONEX model by selecting the dropdown menu above the amp image:
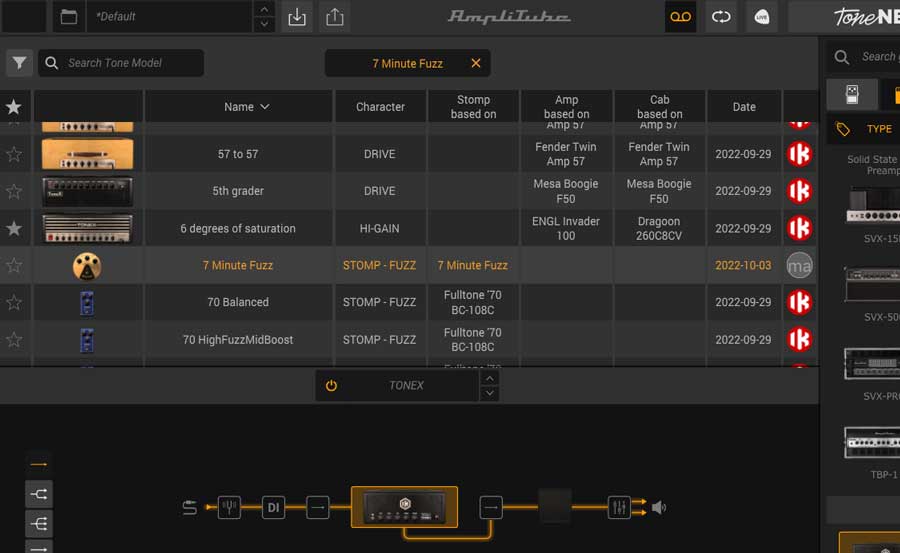

You can see the list includes premium models as well as any user-created models such as the ‘7 minute fuzz’ pedal model I created (explained later).
The TONEX toneNET library isn’t available when in AmpliTube, so you only access the toneNET models you downloaded to your library before opening AmpliTube 5.
As of December 2022, you can add TONEX stomp models and use them in combination with the rest of your AmpliTube amp models.
Simply search for ‘TONEX’ in the gear panel on the right and drag the TONEX Stomp icon into your rig.
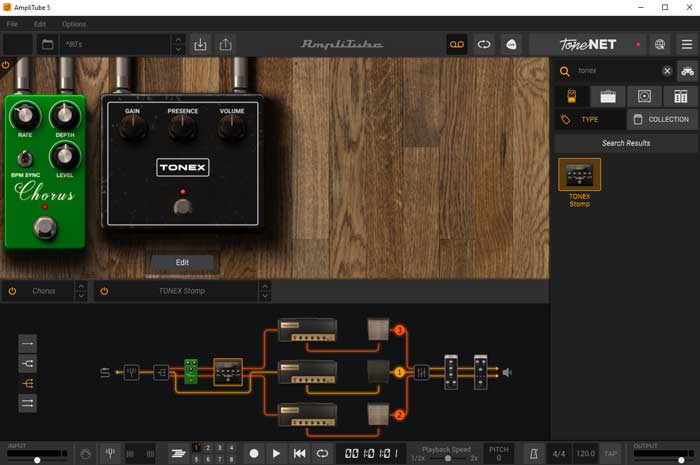

Click ‘Edit’ under the pedal to select your TONEX model.
This is a great improvement to AmpliTube and makes it easier to use your TONEX models based on pedals.
4th Way With TONEX Pedal (NEW)
In February 2023, IK Multimedia released a physical pedal version of TONEX. TONEX Pedal integrates with the TONEX software and gives you a way of accessing any model from your pedalboard.
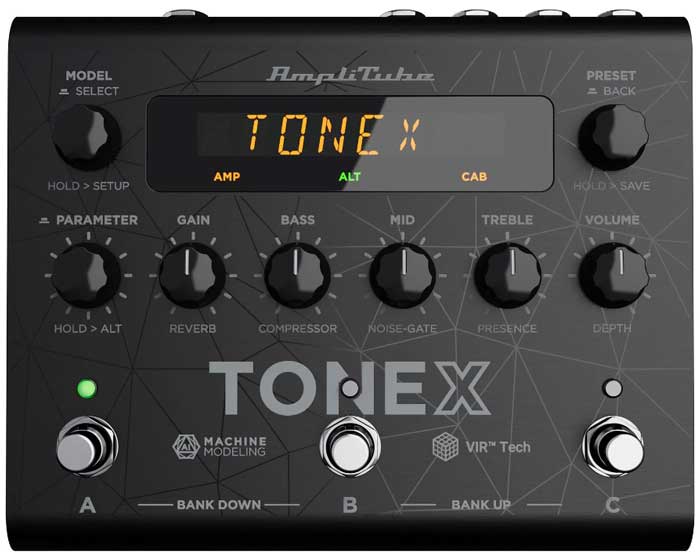

If you’re interested in TONEX software, you may want to consider buying the pedal version. The pedal includes the full version of TONEX MAX, so you get the best of both worlds with software and physical hardware.
Learn all about TONEX Pedal in my review here.
Finding TONEX Models
There are three sources of models in TONEX:
- Models that come with your version of TONEX
- Models you create from your own physical gear
- Models other people have shared on ‘toneNET”
I’ll explain each model source because they’re important to understand to make sure you buy the right version of TONEX.
Some people may find that they can buy a cheaper version of TONEX and get all the tones they will ever need without spending anything extra. So have a read through the below section to understand the difference between the model sources.
Paid TONEX Models
When you open TONEX for the first time, the models you see listed in the tone library depend on the version of TONEX you bought.
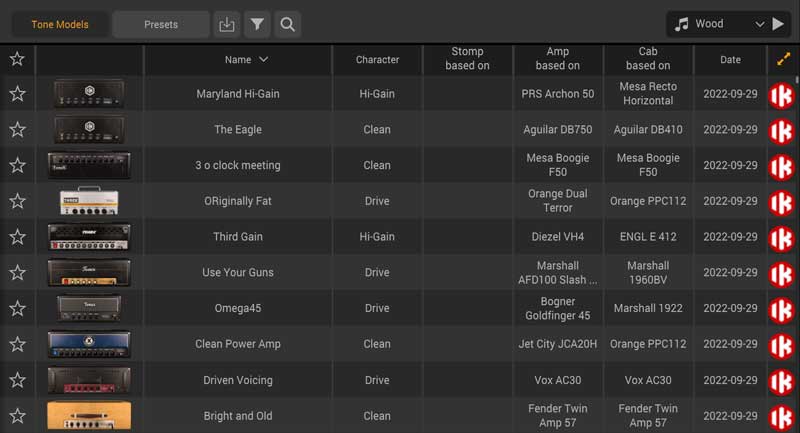

For example, the free version of TONEX (called TONEX CS) includes 20 models, while the most expensive version (called TONEX MAX) includes 1000 models.
You can identify these models by the red ‘IK’ symbol shown next to each model in the library.
If you use the free version or one of the cheaper versions, you can try out and purchase models in collections (top right of the screen):
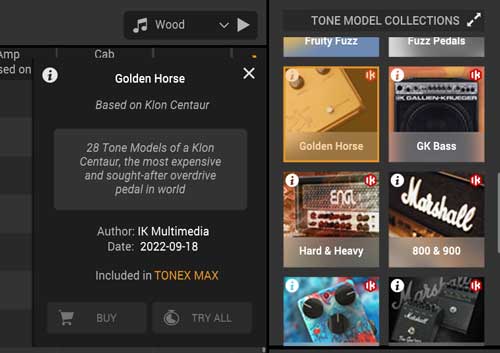

For example, the ‘Golden Horse’ collection shown above only comes with TONEX MAX, but you can try out the tones with any other version and choose to buy them if you like them.
You can also select different models by clicking the amp or cabinet sections across the top bar:


If I click the ‘Bright and Old’ text (the current amp and cabinet model), a new screen appears showing the list of models:
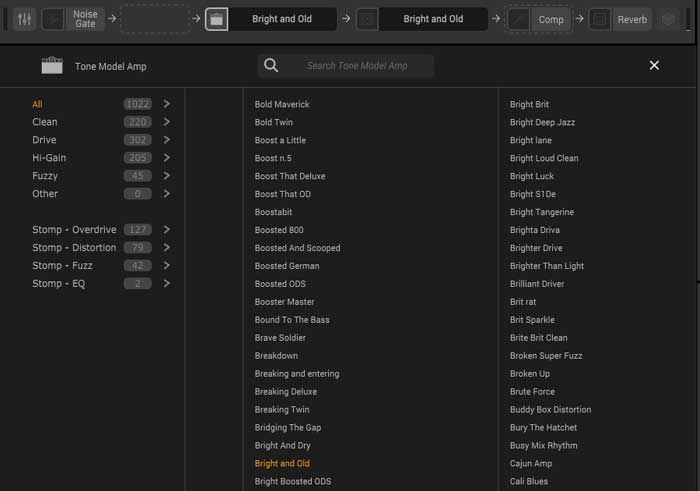

The categories on the left side give you a quick way to narrow down the list based on what type of tone you want.
But the problem with this view is that it only lists the name of the model – not what gear the model is based on. If you want to find a specific amp model, this view isn’t going to help you and you need to use the library view instead.
So if you plan on making a lot of your own models, try to name them so you can easily understand what they represent on your list.
Models You Create
If you create your own models (covered later), they will be listed in the library along with all of the premium IK Multimedia models.


In the above screenshot, you can see the ‘7 minute fuzz’ model I created shows below all the premium models.
The easiest way I found to sort out your own models from the rest is by clicking the filter icon (funnel) and selecting ‘Free Tone Models’. This will hide all of the premium IK models.
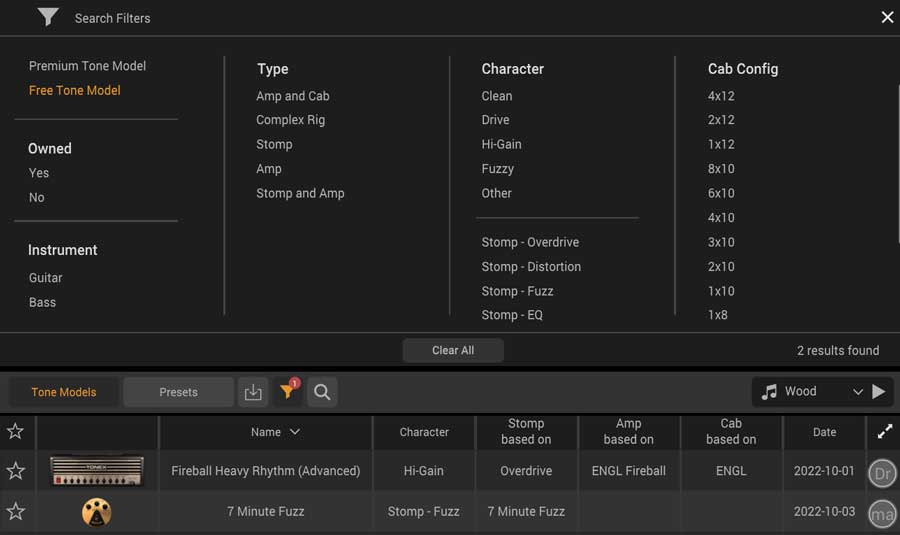

When the free filter is selected, you can see the fuzz pedal model I created as well as any toneNET models that have been downloaded (the Fireball model).
Models from toneNET
The third way to access models in TONEX is by downloading models other people have created and shared through ‘toneNET’.
ToneNET is the sharing platform used by users of both TONEX and AmpliTube 5.
To access toneNET, first click the big toneNET text on the top right:
![]()
![]()
The red status dot will turn to green when a connection is made and the library will update to show toneNET models.
If you share your created models to toneNET, they will also show up here (you can see the 7 minute fuzz pedal I created in the below screenshot):
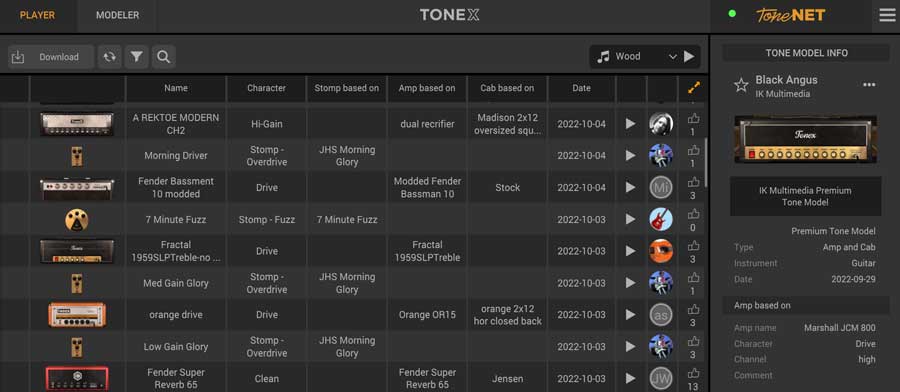

You can try out any of the models at any time by clicking on them.
If you like a model, click the ‘Download’ button on the left side of the screen to save it to your personal library.
You can save an unlimited number of models unless you have TONEX CS, which limits you to 20 downloads.
At the moment, the models load gradually as you scroll down. This makes the toneNET library slow and clunky to use. Hopefully this will be improved in future updates as it can be frustrating spending half of your time waiting for the list to update.
A far better way to find models is to use the filter to narrow down the type of rigs you want or use the search option to try and find specific models.
For example, here are some of the results when I search for ‘Fender’:
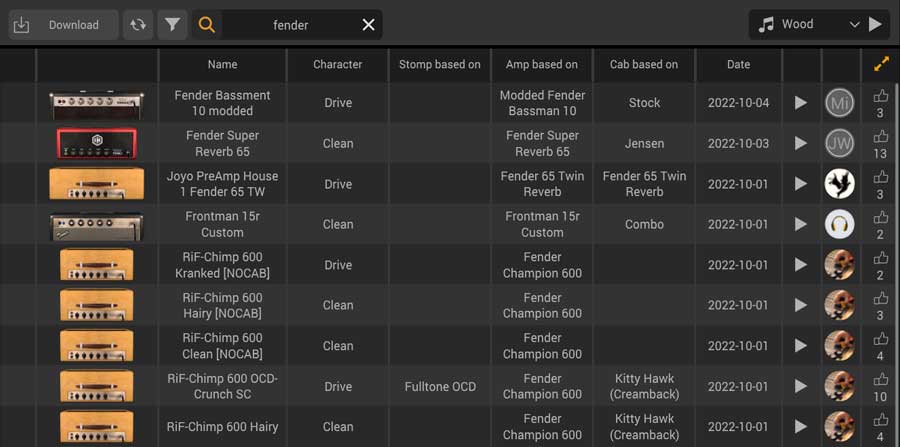

Considering this screenshot is from a few days after the public launch of TONEX, it’s a great sign to see so many user-created models.
In my opinion, the toneNET library is what makes TONEX valuable. You don’t need to pay for any of these models. As long as you buy any version of TONEX (the free CS version limits your downloads to 20), you can access all of these user-created models for no extra charge.
In the above screenshot, you can see that there are already models based on the Fender Champion 600, Super Reverb ’65, Bassman 10, etc.
I searched for a few of my favorite amp and drive pedals and almost every single search found at least a few user-created models.
The value of toneNET will start to become obvious when more guitarists start modeling and sharing their gear. I’m already seeing rare and vintage models show up, so it’s only going to get better as more people try out TONEX.
How to Create Models in TONEX
Playing with the premium and user-shared models is only half of the picture of what TONEX is about. The other half is creating your own models.
You can create models in every version of TONEX except the free TONEX CS version.
I’ll go through each screen in the capture process so you can see how simple it is to create your own TONEX models.
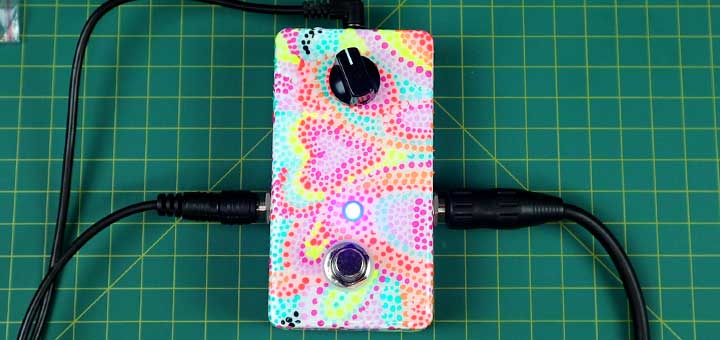
In this example, I’ll create a model of the ‘7 Minute Fuzz’ pedal I built in this guide.

I’m using an AXE I/O Solo audio interface, which removes the need to use a re-amplification box due to the ‘Amp Out’ jack you can see below.


Note: if you buy an AXE I/O or AXE I/O Solo, you also get a free download of TONEX SE.
Many audio interfaces are supported to create models in TONEX as explained later in these steps.
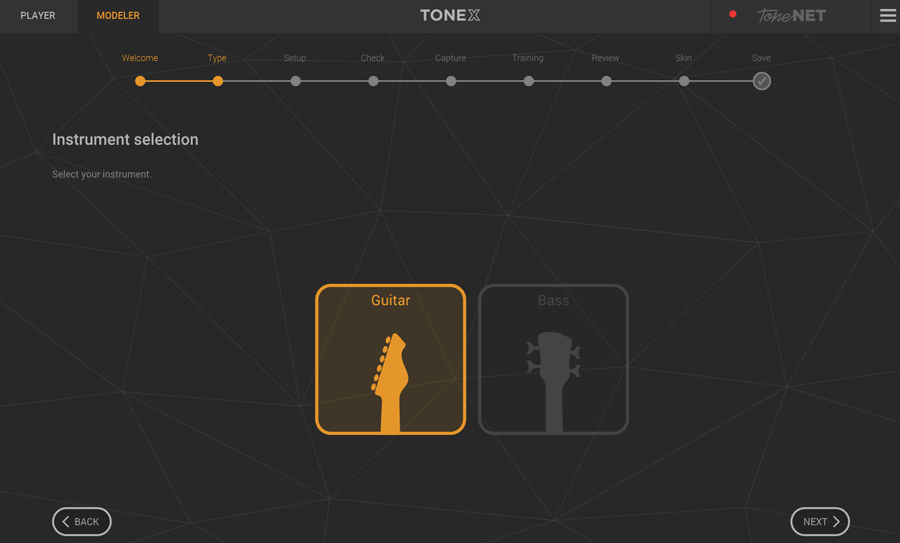
Start by clicking the ‘Modeler’ tab at the top left of the screen. After the welcome screen, the first screen asks you to select your instrument type between guitar and bass:

Step 2 is to select the type of rig you want to model:
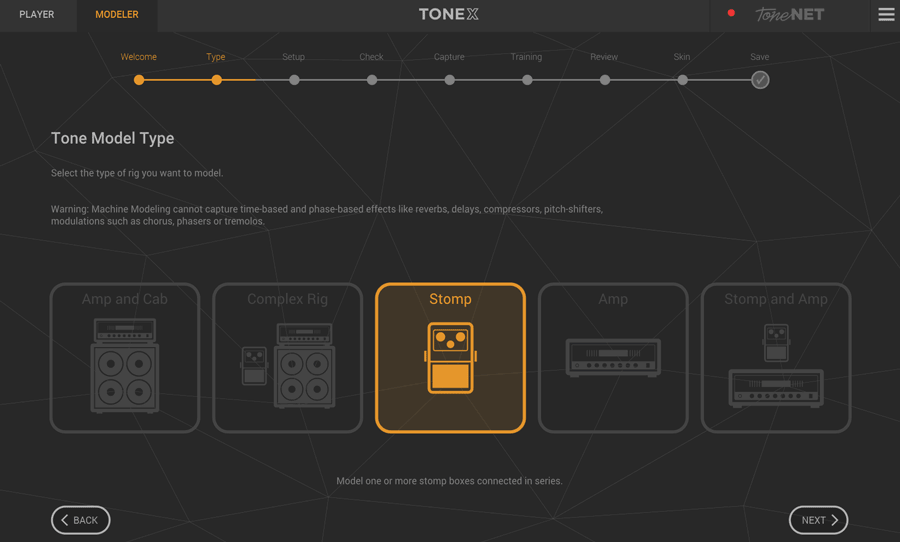

The physical connections you make and the instructions in later steps depend on what type of rig you’re modeling.
I suggest starting simple the first few times by modeling a pedal. Modeling a single stompbox is far easier than modeling complex rigs as you don’t need to worry about microphones.
Only certain types of pedals are able to be modeled in TONEX.
At the moment, you can only model distortion, overdrive, fuzz, EQ, or boost pedals.
Modulation (eg: phaser) pedals, filters (eg: auto-wah), and time-based pedals (eg: delay, reverb) won’t work with TONEX because of the way the effect changes over time. The AI used in TONEX isn’t able to model other types of effects.
Hopefully it will be possible to model other types of effects in the future, but at the moment, only basic drive pedals will work.
The next screen will advise you how you need to set up your rig to capture the gear you have selected:
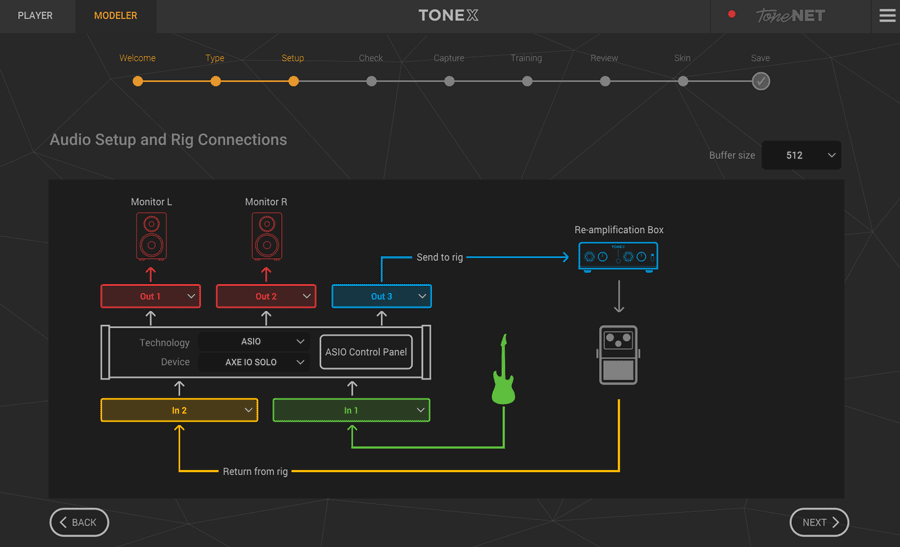

To capture a model, you will need an audio interface with at least 2 inputs.
Unless you use the AXE I/O (or AXE I/O Solo) as your audio interface, you’ll also need to use a re-amplification box to properly capture your rig.
IK Multimedia created the TONEX Capture as a simple re-amplification box you can use with TONEX:
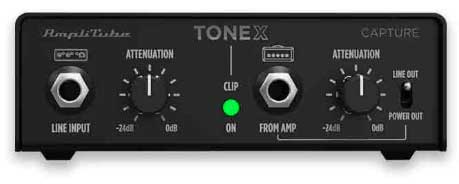

The AXE I/O Solo audio interface that I use has an ‘amp out’ jack, which can be used in TONEX.
Once you make the physical connections by following the instructions and select the inputs and outputs that match your audio interface, you can continue to the next step.
If you’re going to capture your guitar amp and cabinet, the instructions will show you how to connect your microphone(s) on this screen.
Step 4 checks your audio input level to make sure your guitar is set properly:
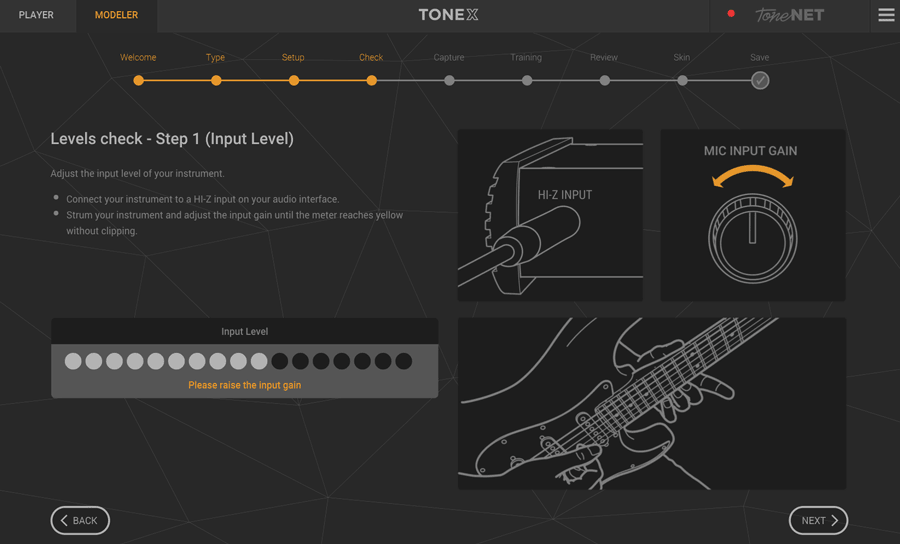

Follow the instructions until you’re happy with the input level before continuing.
The next screen checks the send level to make sure TONEX can clearly hear it.
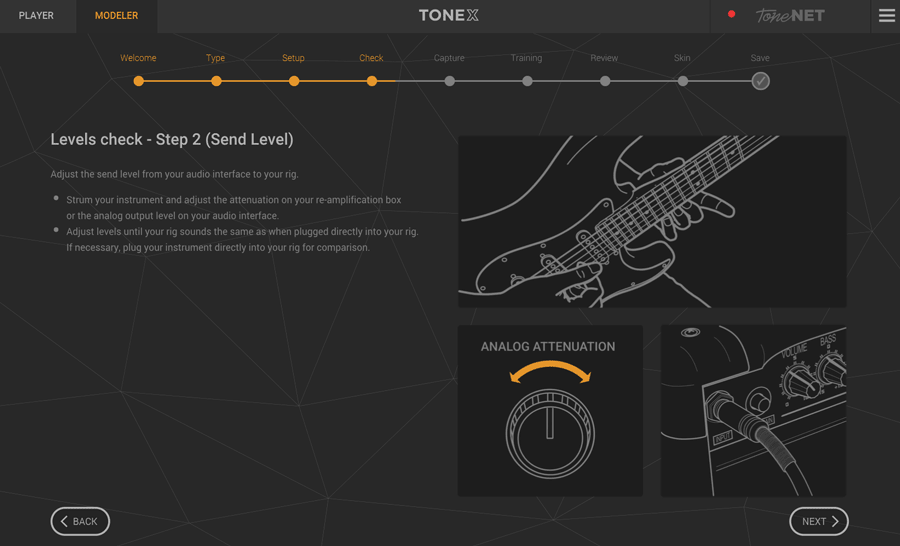

This may take some adjusting depending on your rig, but it’s crucial to creating a good quality model.
The last adjustment you need to make is to the return level.
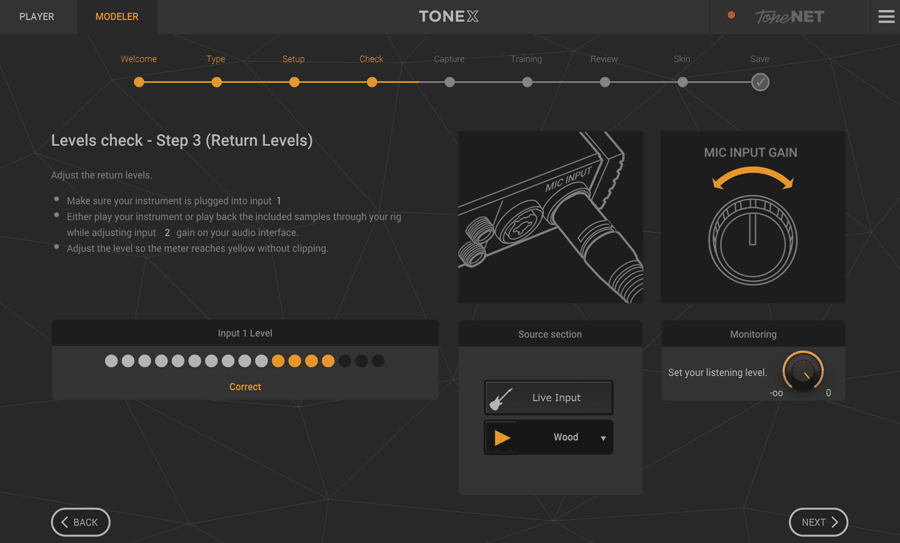

You can either use your guitar or pre-recorded clips to help you set an appropriate volume level.
This might seem like a lot of work to setup, but setting up the right levels for input and output will give you the best results, so don’t rush through these screens.
The next screen is where the magic starts:
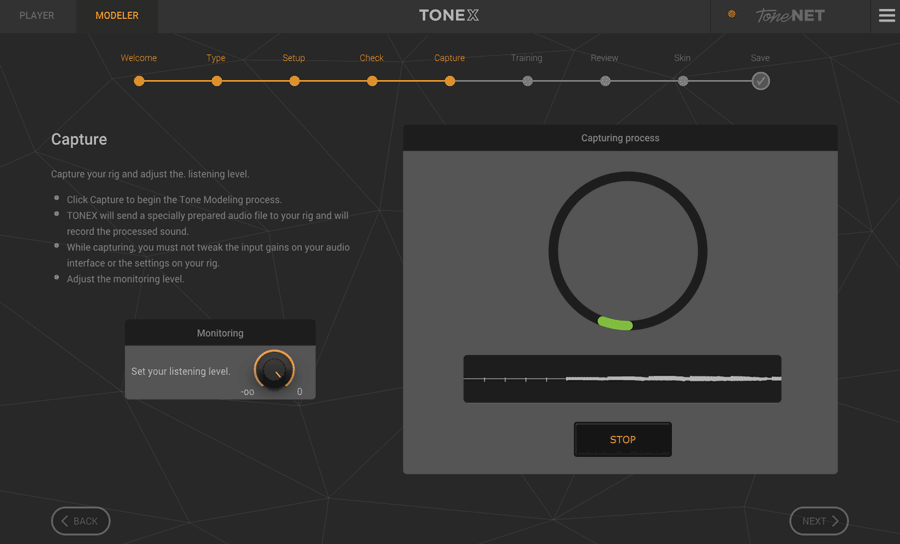

Click the big Capture button and sit back for 2-minutes while TONEX plays an audio file through your rig.
Don’t adjust any levels or settings on your audio interface or on your rig or it will ruin the capture process.
If you’re capturing your cabinet with a microphone, be aware of any room noise that may interfere with the capture process.
Once the capture process is complete, you will be asked how accurate you want your model to be:
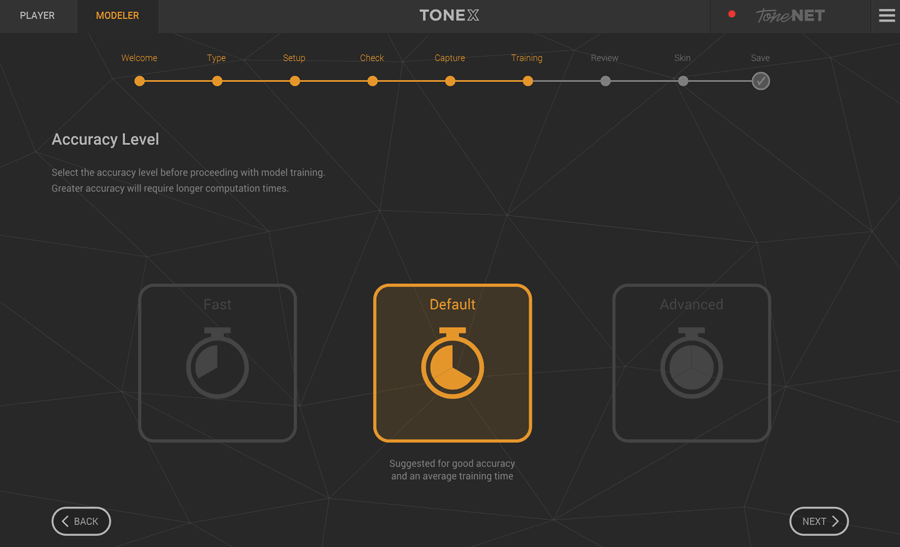

At first, I was surprised by this choice as I would expect everyone would want the best quality models possible.
But depending on your computer, this can be a very long wait for the program to process your model.
The GPU (graphics card) and CPU you have will make a big difference in how long this step takes. A computer with a high-end Nvidia GPU will experience shorter processing times as newer Nvidia graphics cards are designed with AI processing in mind.
The Advanced option takes significantly longer to process but should process a better quality model.
Unless you have a really slow computer or you’re just doing a practice run of modeling your gear, I suggest always choosing Default or Advanced so you always know you have saved the best quality models of your gear.
The good news is that while you wait for your model to process, you can switch back to the Player tab and continue jamming without affecting the modeling process.
I went with the Default option just to see how long it would take and it finished in roughly 10 minutes. I’m using a gaming computer with an Nvidia RTX 2070S graphics card and a high-end i7 CPU, so I don’t expect lower-end PCs or Macs will process the models as fast as this.
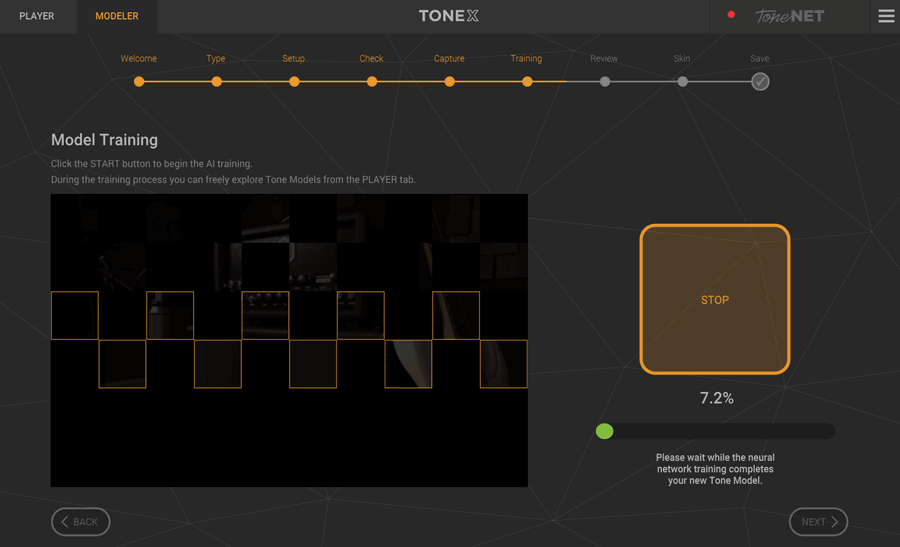

Now the AI will train using the data it collected during the capture stage.
This step might seem painfully slow, but if you have set everything up properly, you should only need to run it once per rig you want to capture. So take the time to set it up right before you start training.
Now comes the fun part – you can directly compare the model with the real rig:
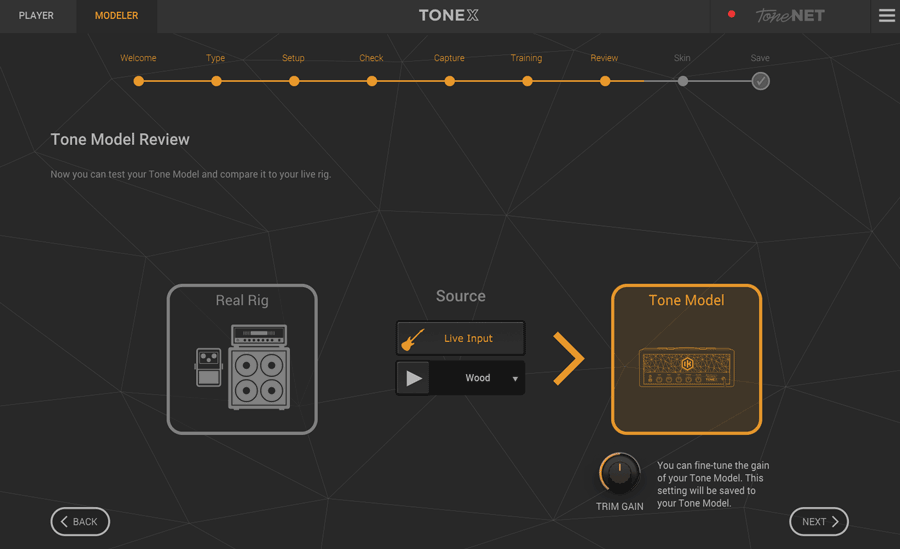

You can either play pre-recorded audio clips or use your guitar to compare the model against your rig.
Flipping back and forth between the two options felt very similar to all the A/B comparison videos you see on YouTube.
In some of the models I created, there was a minor difference between the two sounds. In other models, I was genuinely surprised by how close the model sounded to the real rig.
I hesitate to use the word ‘identical’, but some of them honestly felt that way.
I created a few models using the Default and Advanced model quality with identical rigs and in most of them, I couldn’t notice any differences. There was only one test where I noticed the Advanced model had slightly more gain than the Default model.
So if you’re running TONEX on a slower computer, you won’t be missing out by going with the Default quality level.
The next screen asks you to select an icon to use for your model before saving the name and details:
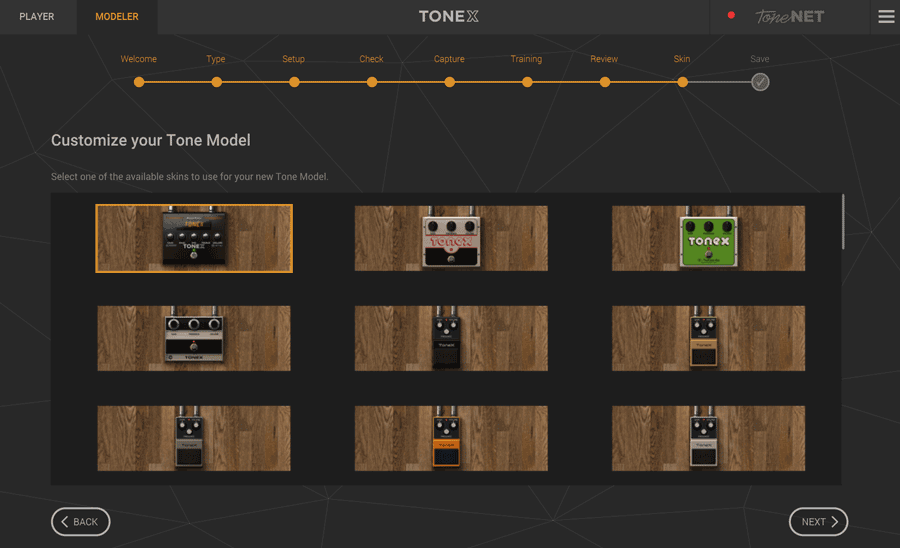

I wish there were more customization options (eg: changing the name on the pedal to something other than TONEX), but you are given a good range of options.
The chances are you will see one of these icons match the gear you’re modeling. You probably recognize the styling of some of the pedals in the above screenshot.
Once you save the name and details of your model, it will appear in your library list.
Sharing Your Models to toneNET
If you’re happy with the quality of your model, you can share it with toneNET. I highly recommend sharing your models so everybody can access a wider range of free gear.
To share your models on toneNET, first select your model. On the right side of the screen under the ‘Tone Model Info’ section, click the three dots and select ‘Upload’.
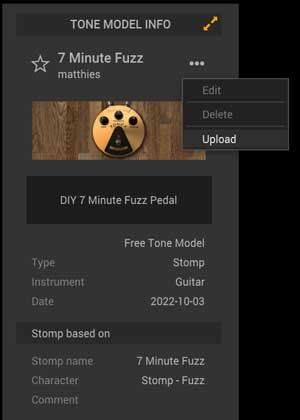

You’ll now see the model when you load up the toneNET library.
Being able to share models on toneNET is what takes TONEX from good to great. You can literally search for ‘7 minute fuzz’ in the toneNET library now and jam with my model.
Note: the ‘7 minute fuzz’ pedal I modeled is a very basic fuzz pedal. If you want to get into building pedals, see how you can build one in this tutorial.
TONEX Sound Quality
TONEX is different than other guitar amp and pedal modeling plugins because you can create your own models.
The sound quality you end up with depends on a few things I’ll explain below.
Preparation Matters
The key point to remember with TONEX models is that the sound quality of the models you end up with depends on how well you set up your hardware before capturing.
If you don’t set the audio levels right or you’re using a microphone in a noisy environment, don’t expect your models to sound like the real hardware.
Once you learn how to properly set the audio levels, the quality of the models can be incredibly impressive.
Even the simple fuzz pedal model I created was impressively close in sound compared to the real pedal. There was a tiny difference in the saturation level, but there’s no way I could have picked which one was the real hardware in a proper blind test.
When you get to the comparison screen (shown earlier), if you hear a noticeable difference between the model and the real rig as you switch back and forth, that’s a sign the hardware wasn’t set up correctly to begin with.
Keep this in mind when checking out user-created models. Not all of the models people create will properly match the real hardware due to poor setup.
While many of the ones I tried out sounded fantastic and instantly reminded me of the real hardware they were based on, a few models missed the mark.
TONEX Models are Snapshots
It’s important to think of the TONEX models as ‘snapshots’ of the captured gear and not complete replicas of the gear.
For example, if you capture an amp with the gain cranked up all the way, the model you create in TONEX is based on the gain cranked. If you then turn the gain knob down in TONEX, it’s not going to give you a realistic change in tone.
This is why you will see doubled-up models in the library – each model will be based on different rig settings.
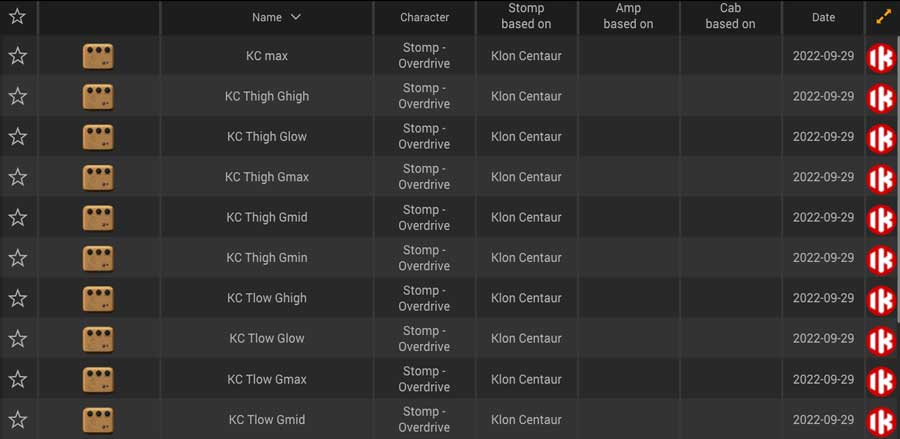

In the above screenshot, you can see that you can choose between 28 models of the Klon Centaur (learn all about the Klon Centaur here). Each model was created with different pedal settings (eg: KC Thigh Ghigh = Klon Centaur Tone high Gain high).
You can still use the Gain and EQ knobs in TONEX to make changes to the tone you hear, but those knobs won’t change your tone in the same way as the real physical knobs change the tone.
TONEX vs AmpliTube 5
With all of the above in mind, it should be clear how TONEX models differ from typical guitar amp and pedal models (eg: AmpliTube, BIAS FX, Neural DSP).
Think of AmpliTube 5 models as giving you flexibility, while TONEX models can give you accuracy at a specific amp/pedal setting (aka a snapshot).
While I’ve been impressed with most TONEX models, they feel and sound very different than AmpliTube 5 amp models.
When you adjust the controls on an AmpliTube 5 amp model, you can expect the same level of quality across different settings.
When you adjust the controls on a TONEX amp model, you know that the further away you adjust the controls from the original setting, the further you’re drifting away from the true model.
If you keep this in mind and use TONEX properly, the results can be fantastic. If you treat TONEX just like another modeling plugin, you may not get the best results.
My Thoughts on TONEX
When TONEX was first announced, I didn’t see why I would want to use it when there’s already a massive range of great-sounding amp and pedal plugins.
But TONEX is a very different type of app, so here are my overall thoughts on TONEX:
Using Models
When I first loaded TONEX and looked at the long list of models and presets, it felt like TONEX was just an extension of AmpliTube.
I’d spend a few minutes jamming on each model, trying to find the models that suit my style and tone preferences. Most of the models didn’t suit me and I saved my favorites for quick access (click the star icon to save models as favorites).
Sure, there were some great-sounding models, but how is this any different than what I already had with AmpliTube 5?
It was only when I switched to the toneNET library that I realized I was thinking about TONEX in the wrong way.
While the premium models created by IK Multimedia are great, the true value of TONEX is in the user-created models you can freely access in toneNET.
For example, let’s say you were thinking about buying a Wampler Tumnus pedal. A quick search in toneNET shows that there are already quite a few Tumnus models you can try out:
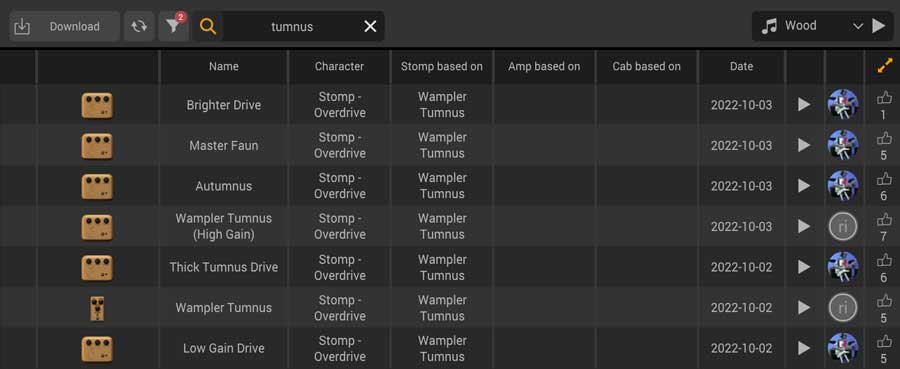

After spending some time with these models, you may find that they help you decide whether you should buy the real pedal or not.
You may find that the models give you the tone you want, or you may find that this style of drive pedal isn’t for you and you don’t need to buy the real thing.
The point is that these user-created models are an incredible way to access a massive range of gear you normally wouldn’t have access to.
Plus, they’re all free to access.
After you buy TONEX, you don’t have to spend anything and you can benefit from all of the user-created models people share over the next few years.
If the guitar community continues to add high-quality models to toneNET, it’s going to be a massive benefit to all users.
In the last 24 hours (as of writing), there have been 71 new models shared on toneNET.
Every day since launch, I’ve been enjoying going through all the new user-created models and saving my favorites. Every day has included interesting models of gear I’ve never been able to try out.
As TONEX becomes more popular, it’ll become more valuable in the range of models you can access.
Creating Models
If you have a lot of drive pedals or amps sitting around, TONEX is a great way to capture them into easily accessible models you can use at any time.
For example, if you’re working on a demo of a song, you can quickly go through your pedal or amp collection to find the most suitable gear for that song. Then you can continue to record your song using your real gear or just use the model.
There are a lot of pedals that I rarely use and I can already see myself using TONEX to access those tones instead of going through the hassle of re-configuring my pedalboard.
I’m already planning on going through all of my old gear and sharing models with toneNET.
For example, I have an old Zoom 606 multi-effects pedal from when I was a beginner. It has a bad jack connection and the PCB is damaged. Capturing my drive tones in TONEX is a no-brainer. If the pedal dies, I’ll still be able to enjoy those tones with TONEX.
Overall Impression of TONEX
Overall, I’m very impressed with how good the TONEX models sound.
Some of the models I prefer over the AmpliTube equivalent models and other models I prefer the AmpliTube models.
The great aspect of TONEX is that you can now add your own models to the list instead of relying on what comes with the software.
If you set up your hardware levels perfectly before capture, you can expect some great quality models with only 10-15 minutes of processing.
TONEX is great for capturing your own gear, but the real value is in sharing models with other users.
As someone who enjoys jamming with different drive and amp models, it’s been great fun to open TONEX every day and find new and interesting models created by other users.
The TONEX models may only be ‘snapshots’ of specific amp/pedal settings and not a complete model replica, but that’s more than enough for many situations.
It’s a shame that TONEX isn’t able to model other types of effects pedals (hopefully that will change in the future), but even when limited to drive/EQ/boost/amps, it’s still very worthwhile.
Learn more about TONEX on the IK Multimedia website here.
TONEX Pros
- Can run standalone, as a plugin, and as an amp or stomp model in AmpliTube 5
- Rapidly growing range of user-shared models
- Models on ToneNET library are all free
- Capturing models is quick and easy (with appropriate hardware setup)
TONEX Cons
- Unable to model pedals other that drive/fuzz/EQ/boost
- Navigating the presets menu is clunky
- ToneNET library is slow to load
Overall, it really does feel like TONEX is the future for guitar amp and pedal modeling. I know that sounds cliché, but when you start playing around with the models on toneNET and realize that other guitarists created and shared them, it does feel like the right way forward.
Who is TONEX for?
There are two main reasons why you might want to get TONEX:
You want to model your own gear
If you have a lot of drive pedals or amps, you may enjoy using TONEX to model your gear so you always have a virtual copy of those pedals and amps ready to use at any time.
For example, let’s say you have a drawer full of pedals that you barely use. You’re working on a demo for a new song and want to try a few different drive pedals out.
Instead of going through your pedals one by one, you could simply use the TONEX models. You can switch between all of your TONEX models to find the right pedal that suits your song.
As an extra tip: if you’re thinking about cutting down on your drive pedal collection, create a model of the pedals before you sell them so you can still access those tones.
You want to access a lot of drive/fuzz/amp models
Some guitarists like to stick with one amp and maybe one drive pedal tone. TONEX isn’t for those guitarists.
If you like to play around with different tones and try out different gear, TONEX is worth considering.
As I mentioned earlier, I’ve been enjoying jumping on TONEX every day and trying out all the new user-created models on toneNET.
I’ve never really enjoyed using other people’s shared presets for AmpliTube, but the shared TONEX models are different because they create new sounds that weren’t previously available.
As more and more users create and share models, there’s more gear you can freely access.
How to Get the Most Out of TONEX
Here are some tips to help you get the most out of TONEX if you choose to buy it:
Check Out TONEX Pedal
In February 2023, IK Multimedia released a physical pedal version of TONEX. TONEX Pedal integrates with the TONEX software and gives you a way of accessing any model from your pedalboard.
The full version of TONEX MAX comes with the pedal, so you may want to consider buying the pedal instead of only purchasing the software.
Check out my full review of TONEX Pedal here.
Use an AXE I/O Audio Interface
The AXE I/O range of audio interfaces come with TONEX SE as bundled software. They also have an ‘Amp Out’ feature that works perfectly with TONEX to capture your hardware as well as use the TONEX models on your own physical amps.
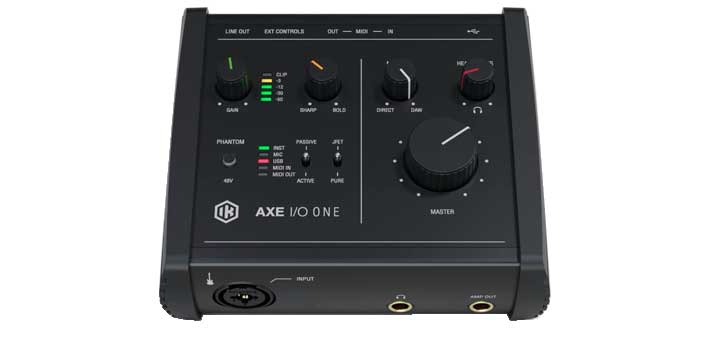

Learn about these features in my review of the AXE I/O ONE audio interface here.
Buy the Right Version
If you’re unsure about TONEX, try the free CS version.
Keep in mind that the CS version doesn’t let you create models and limits you to only downloading 20 models from toneNET. So you’re only getting half of the benefits on the free version.
If you want the proper TONEX experience and want to create your own models, get the SE version or above.
The only real difference between the paid versions of TONEX is the number of premium models that are included.
But as I explained in my review, I believe the real value of TONEX is from the toneNET models, which are all free.
So while it might be tempting to buy a version that comes with more models, you may find that you don’t use them.
For example, I have TONEX MAX, which comes with 1000 models. While I do see myself using a lot of them in the future, most of my time so far has been spent jamming with the free toneNET models other people have created.
If you want to save money, you may prefer to buy the cheapest SE version.
The SE version still gives you unlimited toneNET downloads and model creation. You can always buy a premium model collection if you try them out and like them.
But you may find that as the toneNET library grows, you don’t have a need for any of the premium models.
Capture Your Gear
Once you get used to properly setting your hardware up for creating models, it’s a lot of fun and useful.
Even if you don’t end up with a perfect replica of your gear, it’s still incredibly useful to have digital models of your gear ready to use at any time in your recordings or jamming.
Spend some time learning how to properly create models and don’t expect your first few attempts to be perfect.
The AXE I/O and AXE I/O Solo audio interfaces work perfectly with TONEX thanks to the ‘Amp out’ jacks. If you want a simple way that is guaranteed to work well with TONEX, it’s worth checking out these interfaces.
Note: I’m currently working on a full review of the AXE I/O Solo audio interface.
Use a Good Re-Amplification Box
The IK Multimedia TONEX Capture box was designed specifically to allow you to capture your guitar amp and full rigs in TONEX.
If you’re serious about creating models, it makes sense to buy one. I’ll update this review if I get a chance to try one out.
Useful Guides and Tutorials
TONEX works best when you use it along with other guitar plugins and in recordings.
Check out these tutorials to learn more:
Related Guides and Lessons:


