
After so many years of waiting, Guitar Rig 6 by Native Instruments has finally released.
Even if you haven’t used Guitar Rig 5 before, you’ve probably heard about it. GR5 was one of the best guitar effects plugins for years. As a big fan of Guitar Rig 5, I was thrilled to finally get to try out Guitar Rig 6.
In this review, I will explain the basics of Guitar Rig 6 and give you a good idea of whether it will suit you or not.
After you read this review, check out my Ultimate Guide to Guitar Plugins for some recommendations on some of the best guitar plugins available.
If you want to get the most out of Guitar Rig 6 or any other guitar amp and effects plugins, check out my Guitar Effects Course.
The course covers all the types of effects you may use as a guitarist, including how the order you chain your effects together impacts your tone.
Learn how to set up different types of tones and how each type of effect works. While the course isn’t a tutorial on how to use Guitar Rig 6, it teaches you principles you can use with any real or virtual effects.
Guitar Rig 6 Features
The best way to understand what Guitar Rig 6 is all about is to walk through how to use it. Guitar Rig 6 shines when you see how good the interface and routing options are to use.
Before I walk through how to use Guitar Rig 6, here is a snapshot of some of Guitar Rig 6’s main features:
- Drag and drop interface with a vertically stacked rig
- 21 amp models with matching cabinets
- 68 effects models, tools, and modifiers
- Standalone version and 64-bit VST, AU, AAX plugins
If you have used Guitar Rig 5, the first thing you’ll notice when you load version 6 is the updated interface:
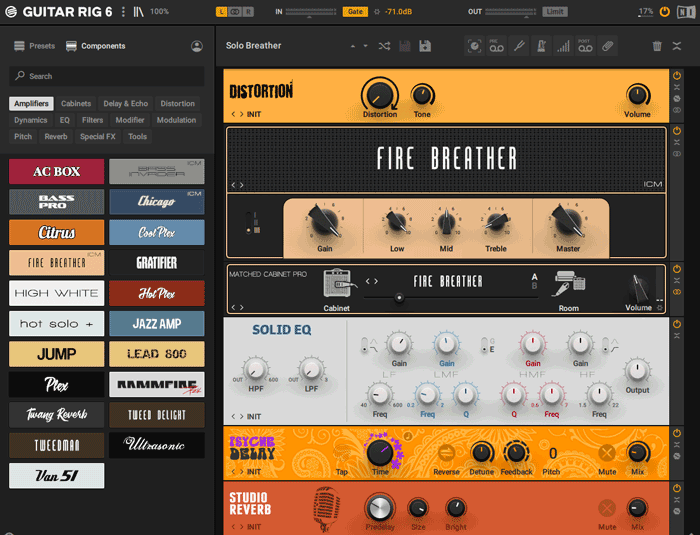
Guitar Rig 6 keeps the main layout and ideas from previous versions but gives it a modern look. The right panel displays your rig and the left panel displays presets and components.
Guitar Rig has always been different than other guitar amp and effects plugins in that you build your rig by stacking components vertically as shown above. Guitar Rig 6 keeps this interface and I’m glad to see it has remained unchanged.
There’s a lot of features I could talk about, but instead of talking about the number of amps and models like you can easily check on the Guitar Rig website, I’ll walk through how you use the plugin.
How to Use Guitar Rig 6
To give you an idea of whether Guitar Rig 6 is for you or not, I’ll walk through the main features and how to use it.
Plugin or Standalone
Guitar Rig 6 can be installed as a VST plugin, AAX plugin, and as a standalone application.
If you install it as a plugin, you can open it in any DAW to use for your recordings (learn about the Best DAWs for Guitar here).
If you run Guitar Rig as a standalone application, you can set up your audio interface under the preferences section by clicking the upper left logo, then File > Preferences > Audio (Ctrl + ‘,’ shortcut).
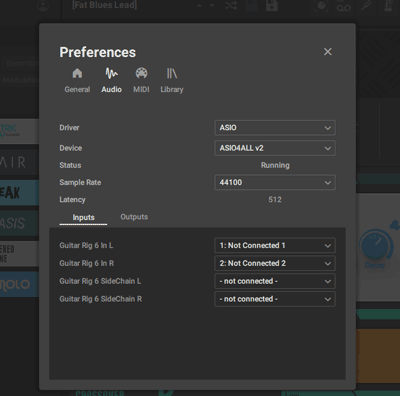
Here you can select your interface, set up the sample rate, fix latency issues, and set up your inputs and outputs.
Learn about all of these settings and how to connect your guitar to a PC in this guide.
Presets View
The presets view on the left panel is a great way to learn what Guitar Rig 6 has to offer.
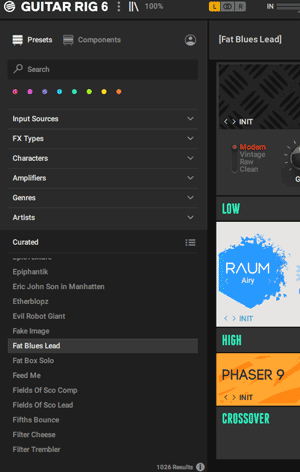
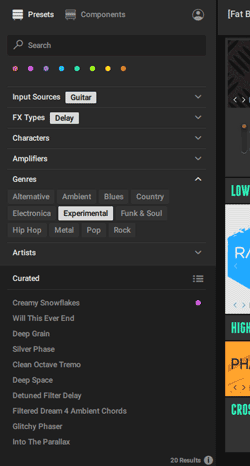
There are a ridiculous number of presets, but you can easily narrow your search down with the handy filters.
For example, you can start by selecting Guitar as your Input source (Guitar Rig has been popular over the years with non-guitarists), then narrow the presets down further by selecting the type of effect you want, genre, or overall type of tone.
I always used Guitar Rig 5 for wild effects, so when I first installed Guitar Rig 6, I immediately searched for presets under the ‘Experimental’ genre.
If you’re new to Guitar Rig, I recommend starting here to hear the wide range of tones and effects Guitar Rig 6 can produce outside of typical guitar amp tones.
If you find a preset you like, right-click it in the list and you can save it to one of the color-codes:
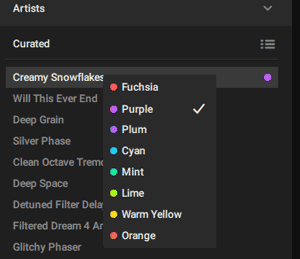
You can add presets to more than one color favorite and easily bring up those favorites by clicking the color dots on the top of the panel.
It’s a bit strange saving favorites to colors, but it works well enough as an easy sorting system. It would have been nice to be able to rename the colors to something else.
Components View
If you want to build your own presets, start with the components view on the left panel.
Go File > New (Ctrl + N) to set up a blank rig.
You can drag any component in any order you want from the left panel to the right to start building your rig.
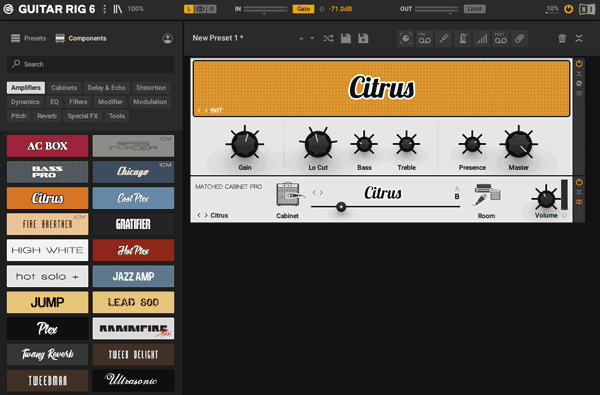
For example, you could start by selecting the Amplifiers and dragging one to the right panel along with a matched cabinet.
The design and names of each of the components are clearly based on real-world hardware. For example, the ‘Citrus’ is clearly based on Orange, Lead 800 based on Marshall, etc.
I like this approach of building up your rig because it makes it easier to combine this plugin with other plugins.
For example, if you already use a plugin such as BIAS AMP for your amp tones, you can build up rigs in Guitar Rig 6 purely for extra effects.
Alternatively, you can build complete rigs with amp and cabinet simulation directly in Guitar Rig 6.
Of course, you can do this with other plugins by disabling the amps or cabinets, but Guitar Rig 6 makes it easier to set up custom rigs.
Here are some screenshots of the various types of amps and effects models:
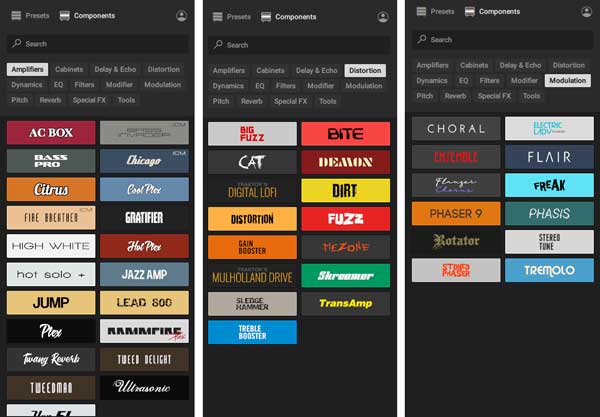
If you’re familiar with real guitar gear, you might recognize what some of these components are based on the icons and names.
Rack Tools
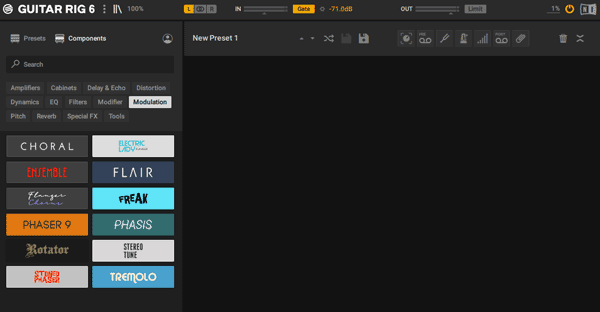
The toolbar above the components on the right panel includes handy tools such as a tuner, metronome, macros, master volume control, global effects, and ‘tape’ recorders.
You can enable or disable any of these tools by clicking the icons highlighted in green below:
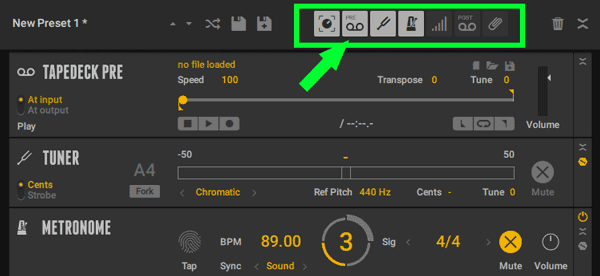
My favorite tools are the pre and post tape recorders. These can be handy tools for songwriting, tweaking presets, practicing riffs or licks, or as a way to jam with a loop.
The ‘pre’ tapedeck allows you to record audio from Guitar Rig 6’s input and the post tapedeck records from the end of your signal chain (all of this can be customized).
Here are some things you can do with these tools:
- Create a loop and trim it for a perfect loop start and end
- Tweak your presets while listening to playback of a recording
- Speed up or slow down a recording without changing the pitch
- Save recordings as audio with or without your effects applied
- Transpose your audio recordings
- Import audio clips to apply effects (handy when you’re using the standalone version of Guitar Rig 6)
I regularly used this feature in Guitar Rig 5 to quickly save any song ideas I came up with as well as create some atmospheric loops to jam over.
This was a big feature I was missing in other plugins such as Line 6 Helix, so I’m glad to have it back.
Rig View
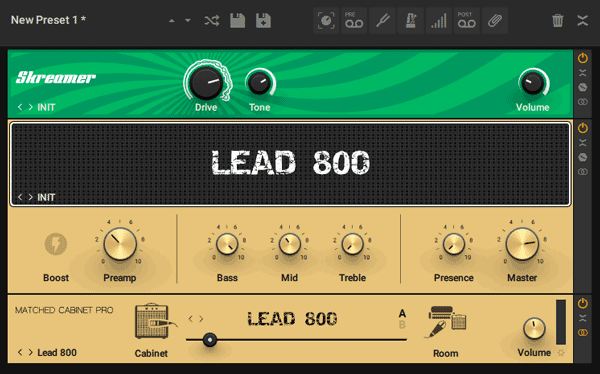
The right panel is where you build up your rigs.
I suggest starting out in Guitar Rig 6 by building basic rigs such as placing a Tubescreamer (the ‘Skreamer’ component) in front of an amp. This will get you used to the interface before you dive into more advanced routing options.
Click the icon highlighted in the below screenshot to bring up extra parameters for any component you may want to tweak.
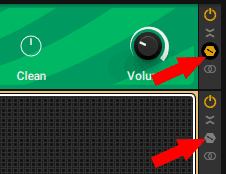
These extra options are great when you want to tweak an effect or amp far more than what the default options show.
For example, here’s the difference between the basic ‘Phaser 9’ component and the parameters you can control with the extra settings:
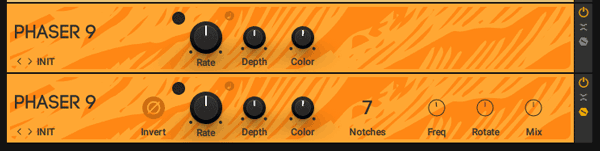
Being able to control the number of notches, or dial in a specific frequency or mix gives you so much more control over your tones.
Experiment with these options for individual components to get used to the various sounds each component can produce.
Presets for each component can be found on the bottom right (usually shows ‘INIT’ as the default).
Handy Tools
What separates Guitar Rig 6 from other similar guitar plugins is the advanced routing options and how useful they can be in tweaking your tone.
You’re able to easily create guitar tones that would be difficult to achieve in other plugins.
In the Tools section of the components view, you’ll see these options:
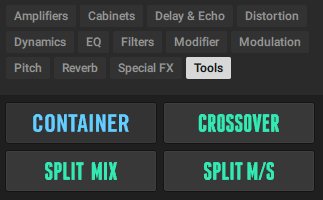
Dragging one of these tools into your rig allows you to easily route your amp and effects components in impressive ways.
For example, the ‘Crossover’ tool allows you to split your audio signal and route different effects or amps to either the lower frequencies or the higher frequencies.
So you could add an effect pedal such as a phaser to the higher frequencies, then add a reverb to the lower frequencies. That way you get a crispy phaser effect combined with a soft reverb that leaves plenty of room in the mix.
If you haven’t tried something like this before, it’s amazing.
Here’s what that would look like in Guitar Rig 6:
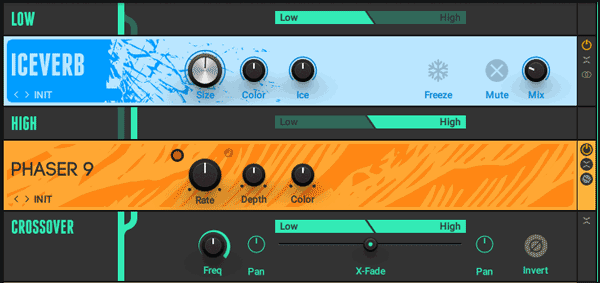
You can see from the above screenshot that you can drag any components you want into either the ‘Low’ or ‘High’ sections and those components will only apply to the low or higher frequencies of your signal.
Then at the bottom section, you can combine the two at any frequency you want. You can even adjust the mix between the two and dial in the perfect tone.
This really is a great tool to play with. There are so many different ways you can use this tool to create unique sounding tones.
For example, you could add a long delay to the lower frequencies while adding a fast delay to the higher frequencies.
Or you could run one amp on the lower frequencies to create a tight and punchy bass tone, then another amp on the higher frequencies for a heavily saturated drive tone as shown below:
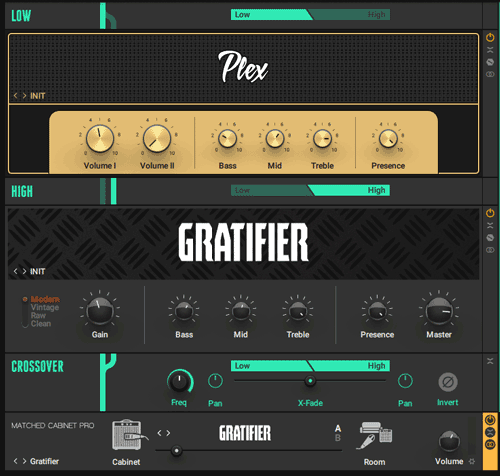
If you play in low tunings or extended-range guitars, something like this can give you so much more control over your tone and tighten up your lower end.
These tools are handy when you want to create extreme experimental effects, but they’re also ridiculously handy for shaping a normal guitar tone.
Once you start learning to use tools like the Split Mix, Container, or Crossover, you may find it hard to go back to other plugins that lack these routing options.
Modifiers
In addition to the above routing tools, you have a few different modifiers which can be used to give you interesting control over your effects and tones.
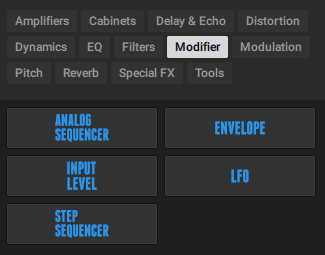
These modifiers can seem confusing if you haven’t used anything like this before. Sequencers, LFOs, and envelopes are common in synthesizer plugins, but not in guitar plugins.
This is partly why Guitar Rig 5 has been so popular with non-guitarists over the years. If you’re interested in taking your guitar tones to new places, you’ll want to experiment with these modifiers.
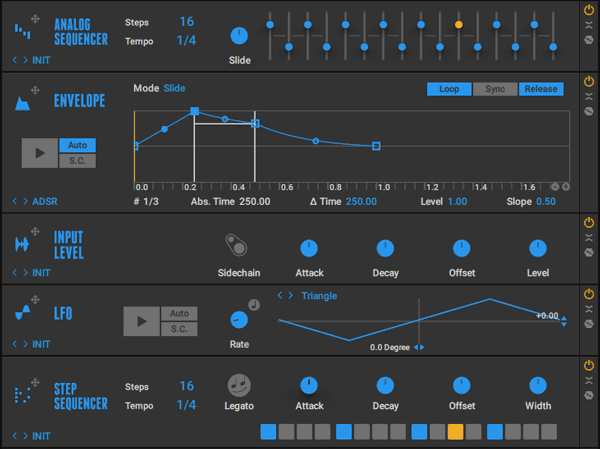
The way these modifiers work is that you can use them to control any parameter you want in any effect or amp in your rig.
As a simple example, let’s say you want to experiment with changing the amount of gain a distortion effect creates.
You add your distortion effect, then add one of these modifiers. In this example, I’ll show how you can use an analog sequencer to control the distortion’s gain level.
Simply drag the icon on the left of the modifier over the top of the parameter you want to control:
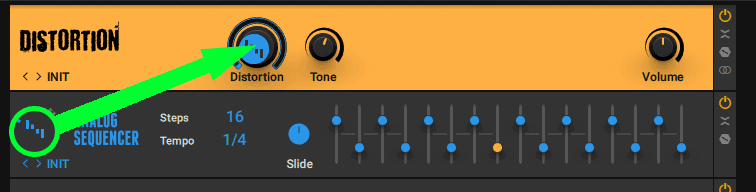
What this means is that the distortion level will be controlled by this analog sequencer. As you can see in the above screenshot, there are a series of sliders that will change the controlled parameter over time. You can control the tempo and how many steps as you like.
If you tried to do this, you would hear the distortion turn up and down in time with the sequencer. Here are a few screenshots of this in action:
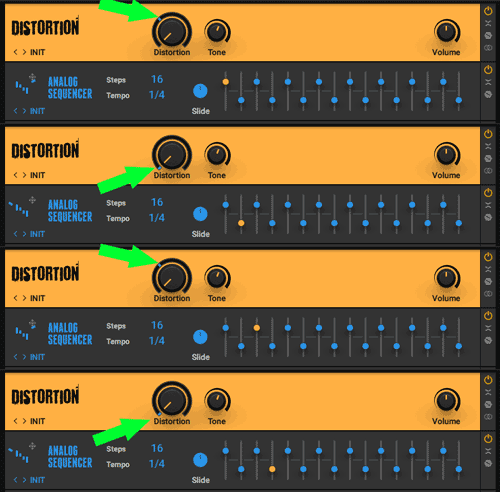
Notice that the distortion knob now has a blue marker to show that the sequencer is controlling it. You can see that the sliders control what the knob is set to over time.
Controlling a distortion’s gain using a sequencer may not seem useful, but once you get used to using modifiers, you’ll see how they open up new doors to creating tone.
Here are some examples of things you can do with these sequencers:
- Slowly sweep the depth of a phaser or reverb to create lush swells
- Create delays that rise and fall to the beat of a song
- Change the amount of fuzz based on your guitar’s volume
- Create an auto-wah to rock back and forth set to a set rhythm
- Add a pitch-shifted harmony that cuts in and out to the beat
Modifiers are another feature that once you start using them, you’ll find it hard to go back to other plugins that don’t have them (although you can use a DAW’s automation tools to create these effects).
Playing around with presets that use modifiers is a great way to learn how you can use them to get interesting sounds out of different amp or effects components.
Guitar Rig 6 Sound Quality
In the early days of guitar plugins, there would always be an obvious increase in quality as you would upgrade from Guitar Rig 2 to Guitar Rig 3 or from AmpliTube 2 to AmpliTube 3.
Modeling technology has come so far that we’ve reached the point where the quality increases in newer versions are far less obvious.
At this point, judging the quality of an amp and effects modeling plugin is less about the actual quality improvements and more about perceived quality. It’s more about what feels real.
I spent some time comparing Guitar Rig 6 to other guitar plugins to build up a general sense of which ones I preferred.
Here’s my quick summary of my perceived sound quality of each plugin:
- Guitar Rig 6: the amps felt natural and there were only a couple I didn’t enjoy jamming with. It didn’t take me long to tweak any amp to get to the point where I was happy with the tone. The effects were flawless and many of them had a spark that was lacking in some other plugins
- AmpliTube 4: it took me longer to dial in amp tones that I was happy with and there were fewer amp models that I enjoyed using. The range of effects felt more limited but I was happy with most of the effects
- BIAS FX 2: I really enjoyed jamming with the amp models and getting each one to a tone I was happy with was easy. The effects all sounded great and felt natural
- Line 6 Helix Native: most of the amps felt fine, but I just didn’t have the same enthusiasm about them while jamming. The effects were fine and natural sounding
I know this is all very vague, but that’s kind of my point. It’s really hard to nail down the differences in quality between these plugins. When comparing Guitar Rig 6 and AmpliTube 4, I did feel that AmpliTube 4 was starting to feel a bit aged (AmpliTube 5 is coming out in late 2020).
What surprised me is when I compared Guitar Rig 6 and Line 6 Helix Native. There’s no doubt that Line 6 uses excellent modeling technology in its Helix range. They probably have the largest R&D budget and have invested the most in their modeling technology. But it didn’t feel as good compared to Guitar Rig 6.
The bottom line is I had more fun jamming in Guitar Rig 6 than any other plugin. BIAS FX 2 would be a close second, followed by AmpliTube 4.
Now it’s highly likely another guitarist would test all four plugins and come up with the opposite conclusion. Tone and perceived quality are subjective, so don’t rely on anybody else’s judgment of which plugin sounds best.
If you don’t have any guitar modeling plugins at the moment and are trying to decide which to invest in, try out the demos and free versions and see what feels best. You may agree with me or you may feel completely different. That’s the point I’m trying to make – the technology has reached the point where it’s no longer about quality and all about what feels right.
Guitar Rig 6 Review Summary
The above information should give you a good idea of what it’s like to use Guitar Rig 6.
Overall, I’m thrilled that Native Instruments finally updated Guitar Rig after so many years of neglect.
For some guitarists, it’s too little, too late.
But for me, it’s a welcome upgrade. It keeps all of the features I loved in Guitar Rig 5 and gave everything a nice polish.
I would have hated Guitar Rig 6 if they moved away from the interface used in previous versions. That’s a big part of what makes Guitar Rig stand out compared to other plugins.
The sound quality of the amps and effects are great. Some guitarists may prefer other plugins, but I have been having a lot of fun jamming with all of the different amps and effects.
Should You Upgrade from Guitar Rig 5?
If you have Guitar Rig 5, the big question is whether you should upgrade or not. Guitar Rig 6 adds a lot of polish to Guitar Rig 5, but it may not be a big enough upgrade for you. GR6 only adds in a small number of new amps and effects, so if you’re happy with your current range of amps and effects, you may not see a need to upgrade.
For me, I was more than happy to upgrade to get a cleaner interface and a bit more polish on what was an old and neglected plugin.
Who is Guitar Rig 6 for?
Recording guitarists: even if you currently use another plugin such as AmpliTube or BIAS FX, you may find that Guitar Rig 6 fills in a lot of gaps. The wide range of effects Guitar Rig 6 can produce is incredible. You’re able to easily add in effects to your recordings that aren’t available in other plugins. You can continue to use your preferred amp models in other plugins and add in effects as you like.
Wanting extreme effects: Guitar Rig 6 really shines when you want to try something a bit different than traditional guitar tones. You can create lush reverb washes, psychedelic delays, or extreme atmospheric pads controlled with your guitar.
For years I used Guitar Rig 5 for inspiration when coming up with songs. If you want to get creative with guitar effects, Guitar Rig 6 is the perfect playground for experimenting.
Who isn’t Guitar Rig 6 for?
Other plugin users: If you already have a guitar amp and effects plugin you’re happy with, you may not find enough reasons to buy Guitar Rig 6. If you’re happy with the tones you’ve built up in AmpliTube, Helix Native, or BIAS FX, you may or may not prefer Guitar Rig 6.
Helix owners: if you own a Helix pedal, you may prefer buying Helix Native instead and save yourself money. While I prefer Guitar Rig 6 over Helix Native, there’s a lot of benefits in having both the plugin and the physical pedal.
Guitar Rig 6 vs Other Plugins
As I explained above, it’s hard to compare the sound quality of these plugins and give you a hard answer on which one is best. But it is easy to compare the interface, range of effects and amps, and how easy the plugins are to use.
So here’s a quick comparison of the different plugins to give you an idea of how I felt while using them.
Guitar Rig 6 vs Guitar Rig 5
I have used Guitar Rig 5 for years because it has a great interface, an excellent range of effects, and amazing routing options. But in terms of audio quality, Guitar Rig 5 uses dark ages technology.
I was thrilled to see that Guitar Rig 6 takes all of what I loved about Guitar Rig 5 and gives it a good polish.
You can see in the below screenshots how Guitar Rig 6 uses the same overall interface with a cleaner look.
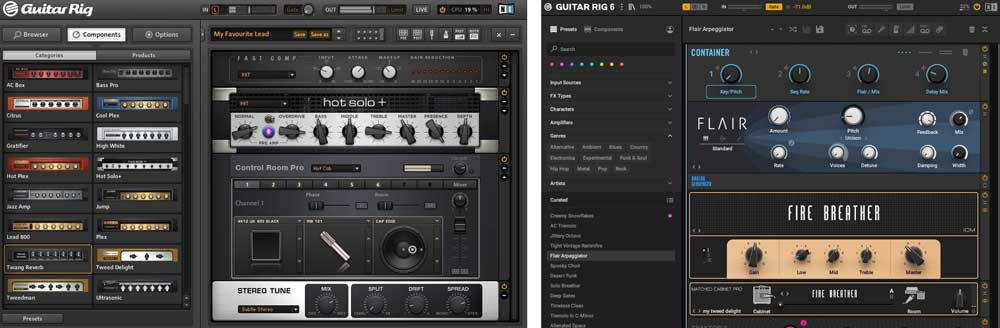
If you know how to use Guitar Rig 5, you’ll slip effortlessly into using Guitar Rig 6.
I really liked the interface in Guitar Rig 5, but the clean and flat style in 6 is a definite improvement.
There will be some guitarists who don’t see a need to upgrade to version 6. I can understand that. But for me, as much as I loved using Guitar Rig 5, the quality difference between it and newer alternatives made it hard to stick to.
Winner: Guitar Rig 6. It keeps the core of what I loved with Guitar Rig 5 and gave it a good polish.
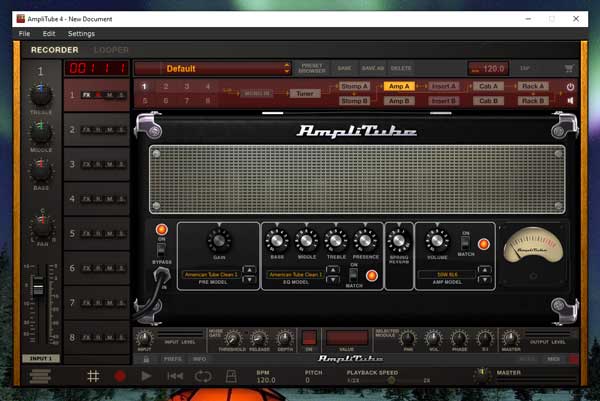
Guitar Rig 6 vs AmpliTube 4
I eventually used Guitar Rig 5 less and less when AmpliTube 4 came out. It provided an obvious jump in audio quality that made it hard to go back to Guitar Rig 5.
Now I get the feeling the same thing is happening with Guitar Rig 6 vs AmpliTube 4. AmpliTube 4 is fantastic, but for me, it can’t compete with the great interface and routing options available in Guitar Rig 6.
With AmpliTube, you need to jump back and forth between different screens to see your pedals, amp, cabinet, or rack effects:
With Guitar Rig 6, your signal chain is lined up in one view. While Guitar Rig has been using this interface for a very long time, it feels modern in today’s smartphone scrolling world.
The big aspect I’m not a fan of with AmpliTube 4 as I covered in my review is the different versions. It’s not fun to see greyed out effects or amps you can’t use without buying them separately. This will benefit some guitarists, but I like buying a plugin once and having everything available.
With Guitar Rig 6, when you buy the full version, you get everything. With AmpliTube 4, you don’t.
AmpliTube 5 is coming out by the end of 2020, so I’ll update this section when I get to compare Guitar Rig 6 to AmpliTube 5.
Winner: Guitar Rig 6. I like that you get everything under one price, the better interface, and the routing options.
Guitar Rig 6 vs Line 6 Helix Native
I don’t like the Helix Native interface.
It works as an interface when built into a pedal, but it just doesn’t work well on a large computer screen. Sliders and minimalistic icons don’t work as well as virtual representations of actual amps and pedals.
Take a look at the below screenshot and try to decipher what is in the rig and what the amp settings are:
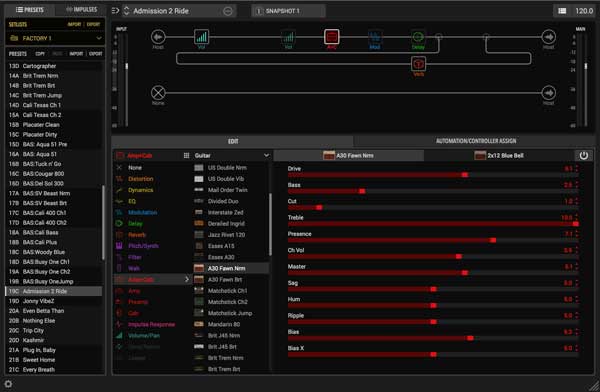
If you have a Helix pedal, you’ll learn this interface in a snap and feel at home. But using rows of sliders to set your guitar amp tone isn’t intuitive.
Helix Native can produce some amazing tones, but I found myself having way more fun with Guitar Rig 6. I fully expected to prefer Helix Native, but I didn’t.
I highly recommend comparing the demo of Helix Native and the demo of Guitar Rig 6, because you may disagree with me and have more fun with Helix Native. I expect most people will prefer Helix Native, but I didn’t.
The other aspect worth mentioning is the cost.
If you own a Helix pedal, you can buy Helix Native for $99. In that case, I would definitely recommend Helix Native as that is a bargain.
For everybody else, keep in mind that Helix Native is double the price of Guitar Rig 6.
Winner: Guitar Rig 6. Despite not liking Helix Native’s interface, I fully expected to prefer it over Guitar Rig 6. I didn’t. I had way more fun jamming with Guitar Rig 6.
Guitar Rig 6 vs BIAS FX 2
All of the BIAS plugins are impressive in their quality as well as how easy they are to use.
As I mentioned before, I don’t like the Helix Native interface as it isn’t as intuitive as tweaking knobs on virtual amps and pedals.
That’s exactly what I like about BIAS FX 2’s interface. One look at the below screenshot and you know exactly what amps and effects are in your rig:
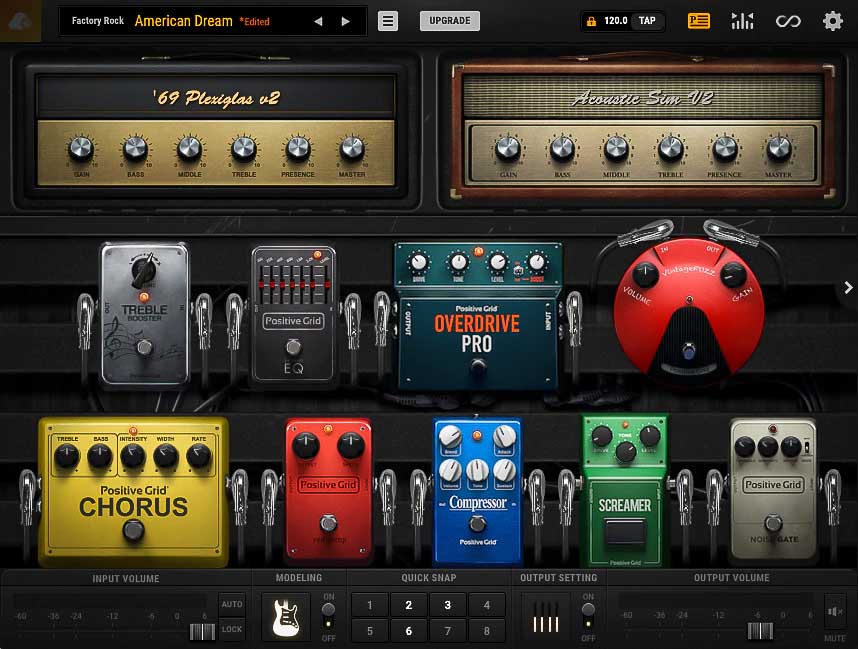
As a guitarist, if you look at that green ‘Screamer’ pedal, you know what it’s based on. You know what the pedal’s settings are and how to tweak them.
BIAS FX 2’s interface is clearly different than Guitar Rig 6’s interface. I really like that you can use BIAS FX 2 in different ways to set up your rig.
The other view also makes it crystal clear how your rig is set up:
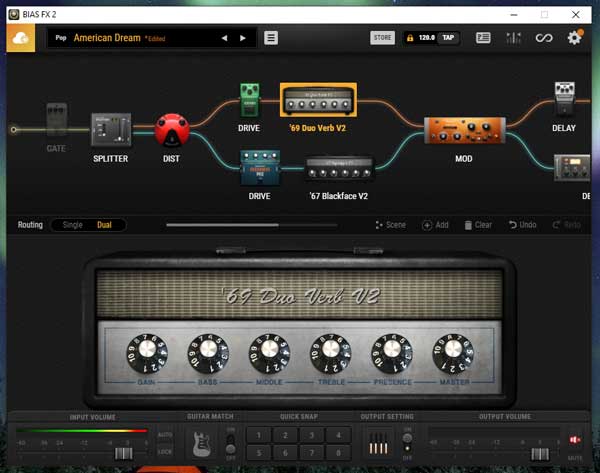
You can see you’re able to split your signal in a similar way as I explained earlier in Guitar Rig 6. Out of all of the guitar plugins, I feel BIAS FX 2 does it the best with Guitar Rig 6 a close second.
BIAS FX 2 focuses more on authentic guitar tones compared to Guitar Rig 6. Guitar Rig 6 can still create great sounding guitar tones, but it also branches out into experimental and extreme non-guitar tones.
BIAS FX 2 also does a better job at managing presets. You can easily create your own user banks, which is far more flexible than saving presets to colors as you do in Guitar Rig 6.
At the moment, I see myself using a combination of BIAS FX 2 and Guitar Rig 6 as my main guitar plugins. This may change when I get to try out AmpliTube 5, but BIAS FX 2 is a fantastic plugin.
Winner: BIAS FX 2. The interface and feel of the tones are fantastic. BIAS FX 2 is recommended for guitarists who just want authentic guitar tones. Guitar Rig 6 is recommended for guitarists who want to experiment with a wider range of effects and tones.
If you want to get the most out of Guitar Rig 6 or any other guitar amp and effects plugins, check out my Guitar Effects Course.
The course covers all the types of effects you may use as a guitarist, including how the order you chain your effects together impacts your tone.
Learn how to set up different types of tones and how each type of effect works. While the course isn’t a tutorial on how to use Guitar Rig 6, it teaches you principles you can use with any real or virtual effects.
If you want to learn more about other guitar plugins, check out my Ultimate Guide to Guitar VST Plugins. I cover all of the above plugins as well as other options and free plugins you might want to check out.
Here are some other related guides you might want to check out:
- How to Connect a Guitar to a PC
- Best DAWs for Guitar (includes tutorials for popular DAWs)
- Recording Guitar at Home
- AmpliTube 4 Review

