In this guide, you will learn how to record guitar in Studio One by Presonus with step-by-step instructions.
Studio One by Presonus is a powerful DAW (Digital Audio Workstation) and works great with guitar.
Recording guitar with Studio One is easy once you have your audio interface or USB microphone set up. Follow the below steps to get started recording your guitar in Studio One.
After you read this guide, check out this Ultimate Guide to Recording Guitar at Home for an in-depth look at recording.
Note: this tutorial uses Studio One version 4 and the latest version of Studio One is currently version 5. The same steps can be used in version 4 or 5 to record guitar. The video tutorial later in this guide shows how to use Studio One 5.
Step 1: Connect Audio Interface or Microphone
You have two ways to record a guitar in Studio One. You can use an audio interface or a microphone.
If you don’t have a microphone or audio interface, learn about the different recording options in this guide.
In this example, I’m using an iRig HD 2 (check out my review to see why I highly recommend it for electric guitar) and plugging it into my PC’s USB port.
One of the most popular audio interfaces I recommend if you want to record acoustic or electric guitar (or vocals and other instruments) is the Focusrite Scarlett range (link to Amazon for details and different options).
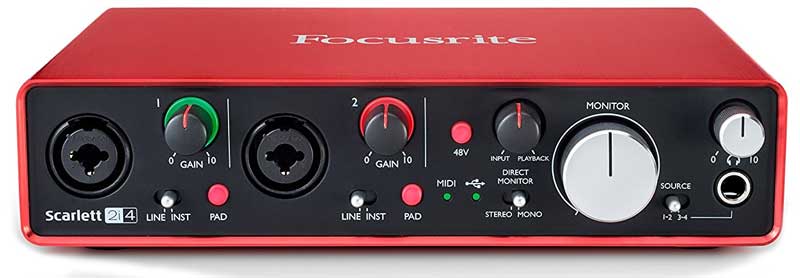
To record guitar using a Focusrite audio interface, simply plug it into your USB port before you open Studio One.
An audio interface like the Focusrite Scarlett is the ideal option if you want to record an acoustic guitar using a microphone.
Alternatively, if you want to record your guitar (or guitar amp) with a microphone, you can buy a USB microphone like this one.
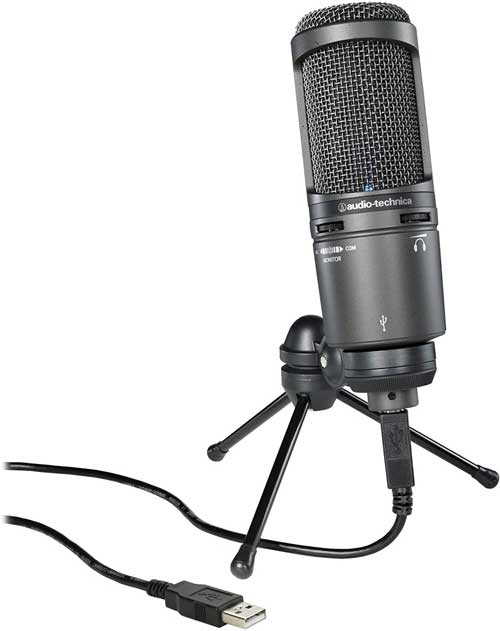
When I’m recording vocals, instead of using an audio interface, I simply plug in my iRig Mic Studio (link to review). A USB microphone like this provides a simple setup.
But for most people, I highly recommend using an audio interface as it gives you far more flexibility. You can plug any microphone or multiple microphones into an audio interface.
Step 2: Set Up Studio One
Once you have your microphone or audio interface connected to your computer, open Studio One.
Any version of Studio One will be able to record guitar, so it doesn’t matter if you have the Prime, Artist, or Professional versions.
If you don’t have Studio One, check out the different versions here.
Set Up Audio Interface or Microphone
On the main screen (may look different depending on your version), you will see a ‘Setup’ area as shown below.

This is where you can configure your audio interface or microphone.
Click on the icon or text to bring up the Audio Device settings. You can access this menu at any time by going to the Studio One > Options menu or pressing Ctrl+, (comma) on your keyboard.
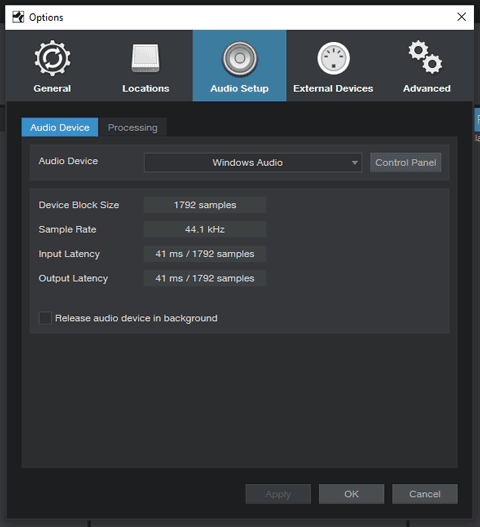
This screen shows you the audio device controlling everything. Mine is currently set to ‘Windows Audio’ but yours will display differently if you’re not using Windows.
Click the drop-down menu for the Audio Device to see what your options are. If you have an option that matches your audio interface, choose it.
For example, if you have a Focusrite audio interface, you should see an option called ‘Focusrite USB’. Choose that option and Studio One will recognize your interface.
Using Windows Audio
Some audio interfaces won’t have a separate option in this menu, but that doesn’t mean it won’t work with Studio One.
You have two options if your audio interface doesn’t appear in the drop-down menu. You can either use ‘Windows Audio’ (or whatever default your computer offers) or ASIO4ALL.
Let’s look at Windows Audio and cover ASIO4ALL later.
Click the Control Panel button to bring up the settings for your interface. Here are the settings for ‘Windows Audio’:

You can see that you can change between different playback and recording options. I’ve selected my iRig HD 2 as both the playback and recording options.
This means Studio One will record from my iRig as well as playback on the iRig.
These settings are important because you won’t hear any audio playback unless you choose the right playback option.
If you can select your audio interface and not get an error message when you press close, you will be right to move to the next step.
In my case, I received this error message:

This error appears when your audio interface uses a different sample rate than the one Windows Audio uses.
If you get an error like this when you try to select your audio interface, there is a handy workaround I highly recommend using.
Using ASIO4ALL
ASIO4ALL is a free audio driver that gives you far greater control over your interface compared to standard audio drivers.
If your audio interface doesn’t appear in the drop-down menu in Studio One, I recommend using ASIO4ALL.
First, download and install ASIO4ALL from this website.
Once ASIO4ALL is installed, re-open Studio One and go to the audio devices settings.
If you select the drop-down menu, you will now see a new device called ASIO4ALL:

As soon as you select it, you will see an icon appear in your Windows taskbar:
![]()
This is a handy shortcut you can use at any time to access the settings for your audio interface.
Click the icon or click the ‘Control Panel’ button in Studio One to bring up ASIO4ALL’s settings:
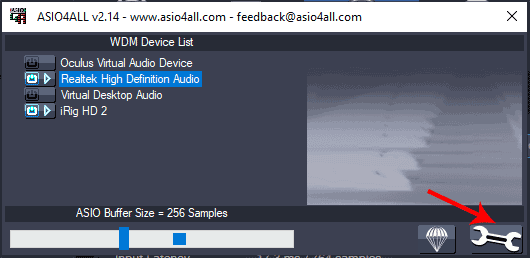
You can see which audio devices are enabled in this view, but I recommend clicking the spanner icon on the far right to access the advanced options view:
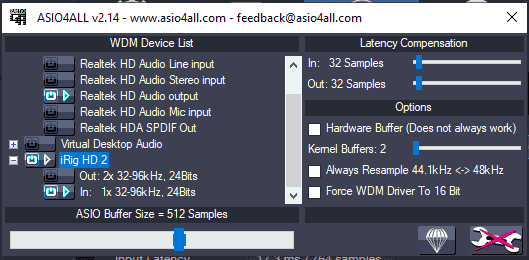
From this view you can enable and disable any device you like.
Simply click the blue power icons next to any device to enable or disable them.
In the above screenshot, you can see that I’ve enabled my iRig’s input and my computer speaker’s output.
This means I can record with my iRig and listen to the playback through my normal computer speakers.
This makes ASIO4ALL a powerful way to control multiple inputs and outputs. You can route your signals in any way you want.
Once you have set up your audio interface, you can move on to the next step.
Step 3: Create a New Song
Now that your audio interface is set up in Studio One, you can click the ‘Create a new Song’ option on the main screen or go File > New Song.
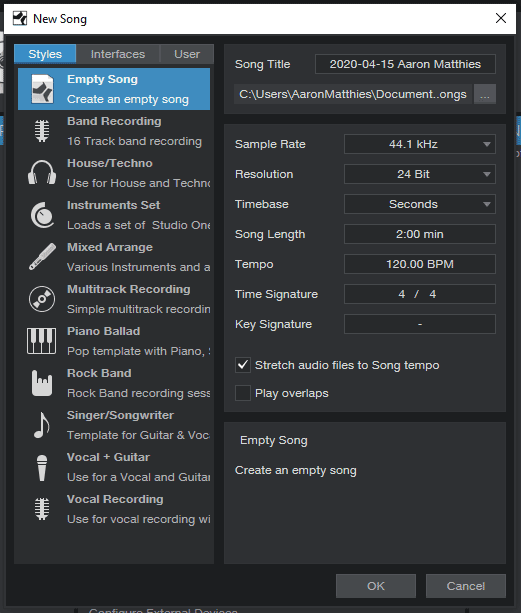
There are a lot of options, but when you’re getting started I recommend learning from the ‘Empty Song’ preset.
Choose the directory where you will save your project and give it a name.
The important thing to set up correctly here is the Sample Rate and Resolution.
If you choose a sample rate that isn’t compatible with your audio interface, you will get errors.
44.1kHz and 48kHz are compatible with most devices and newer devices will also work with higher rates such as 96kHz.
48kHz should be perfectly fine for most uses.
24-bit should work for most devices. While some devices support 32-bit, there is a lot of debate over whether there’s any extra benefit from using a higher bitrate.
Click OK once you have chosen your settings and you will see a blank screen similar to this:

Opening any DAW for the first time can be incredibly daunting, but fortunately Studio One isn’t as cluttered or confusing as others.
Create an Audio Track
Before we can start recording, we need to set up an audio track.
Go Track > Add Audio Track (mono) to set up a basic audio track.

As you can see from the above screenshot, there are a lot of different types of tracks you can set up in Studio One.
You will learn about some of these other types of tracks in the future. For now, a simple mono audio track is enough to get you started recording guitar.
You will see your new audio track similar to the below screenshot:

You can rename the track by double-clicking the ‘Track 1’ text.
Before you start recording, let’s look at how to choose the correct input to record.
Click the drop-down menu where mine shows ‘Input L’ to bring up the input options:

As the iRig HD 2 has a stereo input jack, I’ve selected the left input to record my guitar.
Depending on your audio interface, you may have a lot more options to choose from.
You can click the ‘Audio I/O Setup’ for a more detailed view of your audio interface connections.
If Studio One doesn’t pick up your guitar when you record, check the input selected matches the connection on your audio interface.
Now that you have created a new song and added an audio track in Studio One, you can move to the next step to get ready to record.
Step 4: Check Audio Levels
Before you start recording, you need to make sure the audio levels are set properly.
Having poorly set up audio levels can ruin a recording.
Start by clicking the circle icon on the track panel (next to M and S) to ‘arm’ the track for recording.
The circle icon (recording) will turn red and the icon on the right will turn blue as shown below:
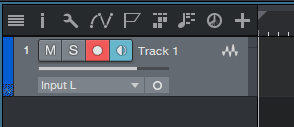
The blue icon is for monitoring your audio. This means you will be able to hear your guitar (or any connected instrument) before and after you hit record.
If your guitar is connected, you should start to hear it over your speakers selected in the previous step.
You should also see the audio meter on the track panel light up as shown below. If you don’t see a green bar, it means either the input level on your audio interface is set too low, or your guitar/microphone is connected to the wrong input channel.
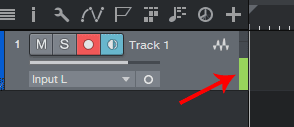
The green bar indicates the signal strength. You want to adjust the level on your audio interface so the green bar almost completely fills up without maxing out.
If you see a red square appear above the bar, it means the signal strength has maxed out.
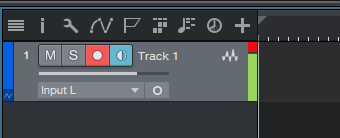
This is bad as it introduces ‘clipping’ to your recordings, which is unwanted distortion.
Click the red square to remove the indicator and lower your input level on your audio interface so the red indicator doesn’t reappear again when you play.
You want a strong, but not clipping audio level before you start recording.
Now that you have a good input level, you can move to the next step and start recording.
Step 5: Record Your Guitar
Now that you have an audio track set up in Studio One and have your audio interface set to a good level, you can start recording.
Recording guitar in Studio One is as easy as clicking the recording button on the bottom panel or pressing * on the numpad on your keyboard.

As soon as you hit record, you will see the track start to fill up as shown below:
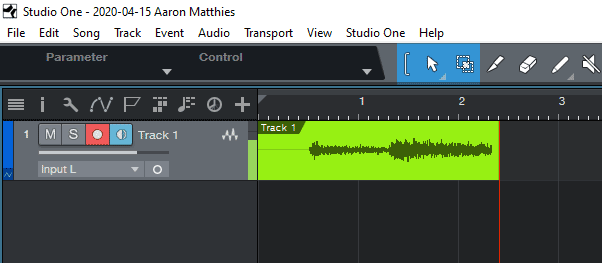
If your audio level is set right, you should see a waveform appear on the track as you play your guitar.
Press the stop button or space bar to stop recording.
You can then play back your recording with the play icon or pressing space bar.
Press 0 on your numpad to go back to the start of the recording, or click above the track on the timeline to jump around.
If you want to keep recording on the same track, simply click to an area after the previous recording and hit record.

You can delete, trim, or move around any of these clips. Experiment with them and right-click them to bring up different options.
Let’s say you want to record another track on top of the first recording.
To do this, you simply need to create a new audio track and set the new track to record.
Add a new track with the Track menu, or press the + icon above the first track.
Studio One will create a new track under the first one.
Click the first track’s record icon to disarm it and click the record icon on the new track to arm it.
Your tracks should look like this:
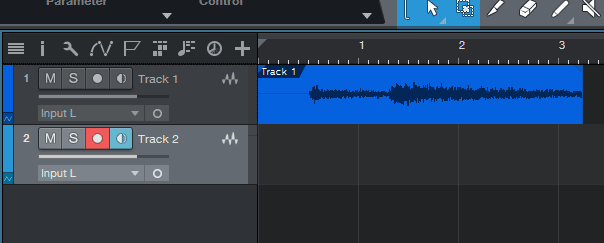
This means the second track is ready to record, but the first track is only in playback mode.
Make sure your new track uses the correct input, then set the time tool to the start of the track by pressing the ‘Return to Zero’ icon on the bottom bar or by pressing 0 on your numpad until the vertical line returns to the start of the track.
Now hit record and you will see the new track start recording. You will also hear the first track over your speakers as you record.
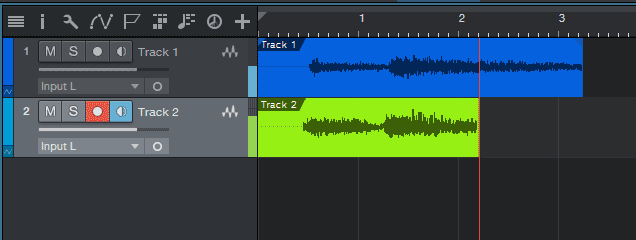
Play around with this to get the hang of recording guitar in Studio One.
Studio One Guitar Effects and Plugins
One of the great things about DAWs is the way you can use plugins to access a massive range of sounds and effects.
Find out everything you need to know about plugins including the best options in my Ultimate Guide to Guitar Plugins here.
Studio One Professional is the only version that supports third-party plugins.
If you are using Studio One Prime or Studio One Artist, you can only use the plugins that are included. You cannot install any extra plugins.
This means if you want to use guitar plugins such as AmpliTube or BIAS FX, you can only do so with Studio One Professional.
Fortunately, Studio One Artist comes with a lot of plugins and Studio One Prime has a few you can use.
Let’s look at how to use an amp modeling plugin that comes with all versions of Studio One.
To bring up the effects and instruments library, press the ‘Effects’ button on the bottom right of the screen or press F5 on your keyboard.

Instruments give you different synthesizers and samplers to add virtual drums, keyboards, and other instruments to your projects.
Effects gives you access to any plugins you have installed.
Click on Effects to see the list of plugins installed with your version of Studio One.
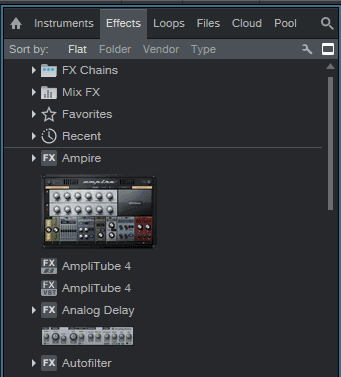
Your list may look very different depending on your version and if you have third-party plugins already installed (eg: you can see AmpliTube 4 in my list).
To apply a plugin to a track, simply drag it over the track.
Let’s drag the ‘Ampire’ plugin to a guitar track. You will see a popup as you drag the plugin over a track as shown below:
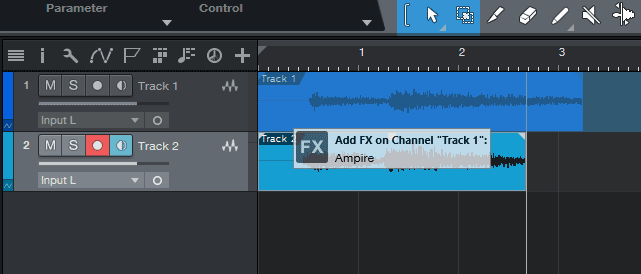
Ampire is a guitar amp modeling plugin that comes installed with every version of Studio One. If you have the Artist or Prime versions, you will have less options, but it is still available to use.
When you apply any plugin to a track, a window will appear for that plugin.
Here is the window that appears when I add Ampire to a track:

You can now tweak and play around with the plugin and hear it applied to the track during playback.
If you have audio monitoring turned on (the blue icon on the track), you will also get to hear the plugin applied to your guitar.
To remove a plugin from a track or to see what plugins are applied, press F3 on your keyboard or press the ‘Mix’ button on the bottom right of the screen.
This brings up the mixer:
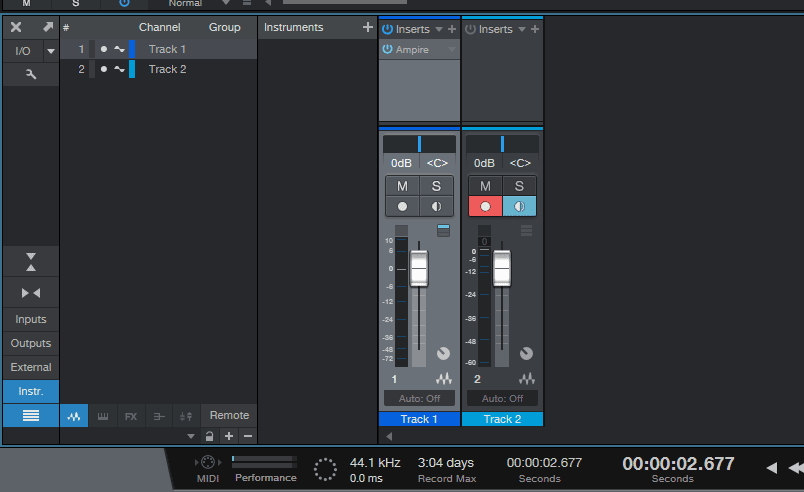
This mixer allows you to control the levels for each track as well as lists the plugins in use.
You can see from the above screenshot that I have the Ampire plugin applied to Track 1.
You can easily remove plugins from a track by right-clicking and removing them, or you can bypass them by clicking the power icon.
Play around with the plugins included in your version of Studio One and if you have the Professional version, you can start using third-party plugins.
To set up third-party plugins, go to Studio One > Options or press Ctrl , (comma) on your keyboard.
Click on the Locations option, then click the VST Plug-ins tab to see where to install your plugins.

You can add other folders to this list if you already have VST plugins installed on your computer.
Studio One will scan for changes in your plugins folder each time you open it, so if you make any changes, simply close and open Studio One to see the changes.
Check out the best plugins worth getting in this guide.
How to Record Multiple Instruments at Once
Recording multiple instruments at once is easy in Studio One.
All you need is an audio interface with multiple inputs. You can record as many inputs at once as your audio interface allows.
This means if you have an audio interface with 2, 4, 6, 8, or more inputs, you can set Studio One to record all of them at once if you want.
This is handy if you want to record multiple microphones at once (eg: a full drum kit), record guitar or vocals, or multiple guitars at once.
Create a new track for each instrument you will be recording.
My iRig only has two input channels, so I’ve created two audio tracks in Studio One as shown below:
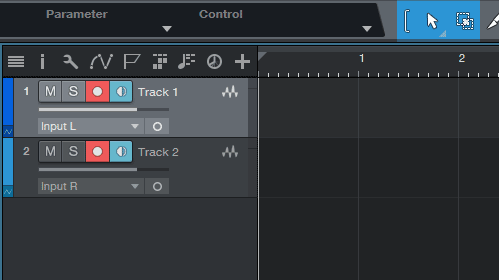
Select the correct input channel for each track and use the audio monitoring button to check if you can hear the correct instrument for each track.
I recommend renaming each track to make it easier to tell the tracks apart.
Once you have all tracks set up, arm each track.
Hit record and you will see all tracks record at the same time as shown below:
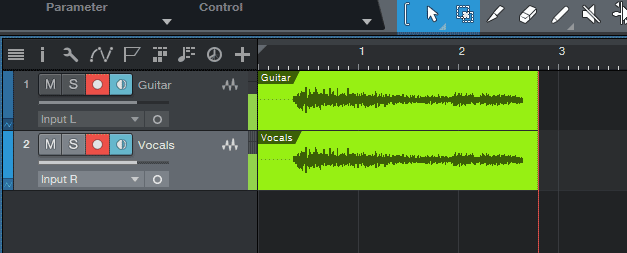
You can then edit and mix each track as you like.
If you don’t already have an audio interface, I highly recommend buying one that offers multiple input channels.
Here are some examples of what you can do when you can record multiple channels at once:
- Use multiple microphones on an acoustic guitar
- Combine an acoustic guitar’s internal pickup with an external microphone
- Record guitar and vocals at the same time
- Mic up a full drum kit with individual microphones on each piece
- Record a full band at once with separate instrument tracks
Check out my Ultimate Guide on Recording Guitar at Home to learn more about audio interfaces.
How to Record Guitar in Studio One Summary
Recording guitar in Studio One is easy once you have your audio interface set up properly and linked up each track to the proper channels.
Here is a summary of how to record guitar in Studio One:
- Plug in your audio interface or USB microphone
- Choose your audio interface in Studio One’s settings
- Create a new song and new audio track
- Set the track to the proper input channel
- Arm the track for recording and hit record
While Studio One (or any other DAW) might seem intimidating at first, it is really easy to use once you get past the initial setup.
If you want to take your learning further, check out my tutorial on recording your first full song in Studio One.
The tutorial covers everything you need to know to record a full band song using real and virtual instruments.
Extra Studio One Tips
The above tips and advice will give you a good starting point for recording guitar in Studio One. Here are two ways you can get the most out of Studio One and make it easier to learn and use:
Use a DAW Controller
You can use a keyboard and mouse for shortcuts and commands in Studio One.
You can definitely memorize the most common shortcuts and key combinations, but there is an alternative worth considering.
A DAW Controller is a piece of hardware you can plug into your computer and control any DAW including Studio One. The basic idea with these controllers is that instead of only using your keyboard and mouse, you can also use buttons, knobs, sliders, pads, keys, and wheels to change settings, tweak your effects, record virtual instrument parts, and more.
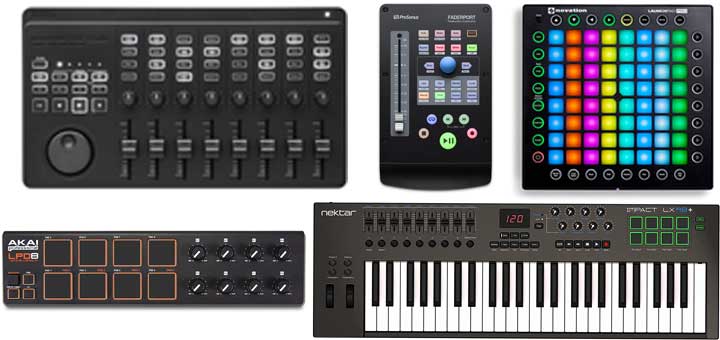
The above controllers give you an idea of the wide range of controllers out there. The right type of controller for you depends on how you want to use your DAW.
PreSonus makes a great range of DAW controllers that perfectly integrate with Studio One (covered in the below guide). But even other brands work extremely well with Studio One, so don’t feel that you need to buy one by PreSonus.
If you haven’t used a DAW controller before, it makes a massive difference in how quickly you learn to use the software and how natural it feels to use. You can set up the knobs on a controller to control a plugin settings (eg: amp or effects parameters), tap out rhythm parts for a virtual drum kit, or start recording from the other side of the room (using a wireless controller).
Try Some Plugins
Third-party plugins allow you to extend Studio One in impressive ways. The number of amazing plugins available today is staggering and once you find the right plugins for you, you’ll wonder how you lived without them.
Keep in mind that third-party plugins are only available in certain editions of Studio One. If you have version 5, anything above the Prime version allows you to use third-party plugins. If you’re using version 4, the Artist version also doesn’t let you use third-party plugins.
As a guitarist, you will likely want to try out a guitar amp and effects plugin such as AmpliTube, BIAS FX, or Guitar Rig.
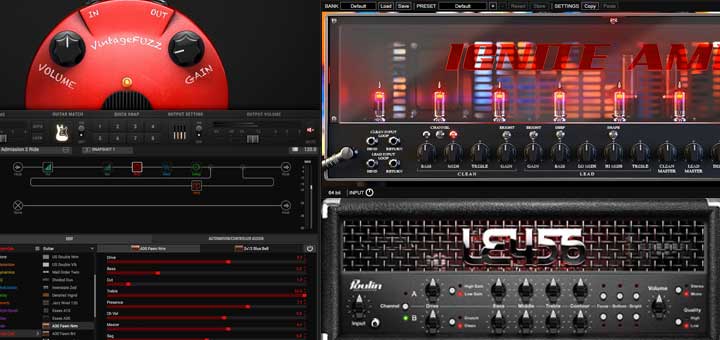
Check out some popular Guitar Plugins in this detailed guide.
Guitar amp and effects plugins are useful, but they’re only a starting point.
The next type of plugins I suggest trying out are virtual instrument plugins that allow you to create realistic-sounding instruments for your recordings or backing tracks.
You could use a drum plugin to create drum tracks, a piano plugin for piano parts, or even a plugin that gives you an entire orchestra at your fingertips.
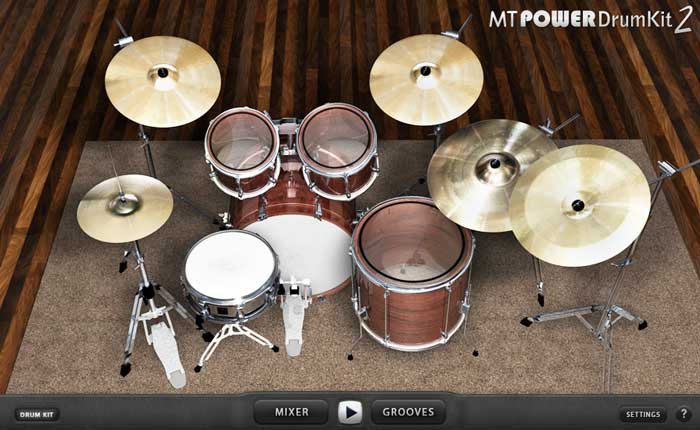
A good way to get started with virtual instrument plugins is with drum plugins. Learn how easy it is to create drum tracks for your recordings in this tutorial.
While nothing may beat a real drummer in a professional recording studio, drum plugins can get you surprisingly close.
Check out some free and paid drum plugins in this guide.
Once you learn how to create drum tracks using plugins, you can get some plugins for any other instrument you want. The range of realistic-sounding virtual instrument plugins available today is incredible and worth looking into.
Studio One 5 Video Tutorial
Here’s a walkthrough of how to follow the advice in this guide in Studio One 5. You can follow this video whether you’re using Studio One 5 or older versions.
Subscribe to my YouTube channel here for useful tutorials, lessons, and guides like this one.
Recording Guitar in Studio One FAQ
Here are some common questions you may have about recording guitar in Studio One.
Is Studio One Good for Recording Guitar?
Studio One is a great option for recording guitar and a better option than many other DAWs. Studio One makes it simple to set up audio tracks and record instruments like guitar. If you have the Professional version, you can also make use of third-party guitar plugins and effects.
I personally use Studio One as my main DAW when working on guitar-based music. I have been using it for years and even after trying out different DAWs I always come back to Studio One (I’m not affiliated with Studio One in any way).
How Do I Connect My Guitar to Studio One?
You can connect your guitar to Studio One using an audio interface. Audio interfaces like iRig or Focusrite Scarlett allow you to connect either microphones or guitar cables to your computer to record in Studio One.
Find out all the ways you can connect your guitar to a PC in this guide.
What is the Difference Between Studio One Artist and Professional?
Studio One Artist is a lighter version with less features than Studio One Professional. The biggest difference worth considering is that the Professional version is the only one that allows you to use third-party plugins.
As a guitarist, I highly recommend the Professional version so you can use plugins such as AmpliTube, Line 6 Helix Native or BIAS FX.
Why is Studio One Not Recognizing My Audio Interface?
All audio interfaces are compatible with Studio One, but some may not be recognized. If your audio interface is not recognized by Studio One, install the ASIO4ALL audio driver to use your interface.
Check the earlier instructions on how to do this.
Now that you know how to record guitar in Studio One, check out these guides to continue your learning:
- How to Record a Full Band Song in Studio One
- Ultimate Guide to Recording Guitar at Home
- How to Record Guitar Videos for YouTube
- How to Connect Your Guitar to a PC/Laptop
- Ultimate Guide to Guitar Plugins
