
Recording guitar in FL Studio is different compared to other DAWs. FL Studio is very popular with electronic music creators, but it can be used to record guitar, vocals, and other instruments.
If you follow the steps in this guide, you will be able to record acoustic or electric guitar into FL Studio.
After you read this guide, check out this Ultimate Guide to Recording Guitar at Home for an in-depth look at recording and other DAWs you may want to consider using.
This tutorial explains how to record guitar in FL Studio 20. If you are using an earlier version, you should still be able to follow the steps.
Step 1: Connect Audio Interface or Microphone
You have two ways to record a guitar in FL Studio 20. You can use an audio interface or a microphone.
If you don’t have a microphone or audio interface, learn about the different recording options in this guide.
In this example, I’m using an iRig HD 2 (check out my review to see why I highly recommend it for electric guitar) and plugging it into my PC’s USB port.
One of the most popular audio interfaces I recommend if you want to record acoustic or electric guitar (or vocals and other instruments) is the Focusrite Scarlett range (link to Amazon for details and different options).
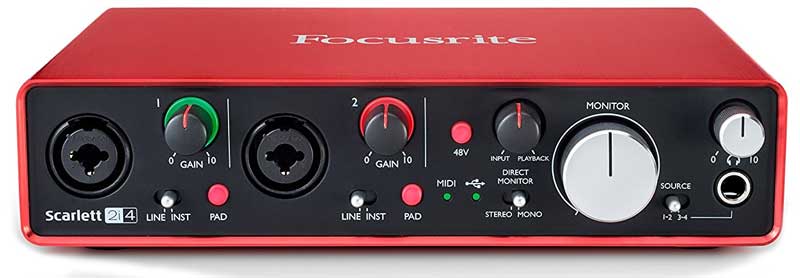
To record guitar using a Focusrite audio interface, simply plug it into your USB port before you open FL Studio.
An audio interface like the Focusrite Scarlett is the ideal option if you want to record an acoustic guitar using a microphone.
Alternatively, if you want to record your guitar (or guitar amp) with a microphone, you can buy a USB microphone like this one.

When I’m recording vocals, instead of using an audio interface, I simply plug in my iRig Mic Studio (link to review). A USB microphone like this gives you a simple way to record vocals or acoustic guitar.
For most people, I highly recommend using an audio interface as it gives you far more flexibility. You can plug any microphone or multiple microphones into an audio interface.
Once you have connected your audio interface or USB microphone to your computer, you can open FL Studio and move on to the next step.
Step 2: Set Up FL Studio
Open FL Studio and go to the Options > Audio Settings menu.
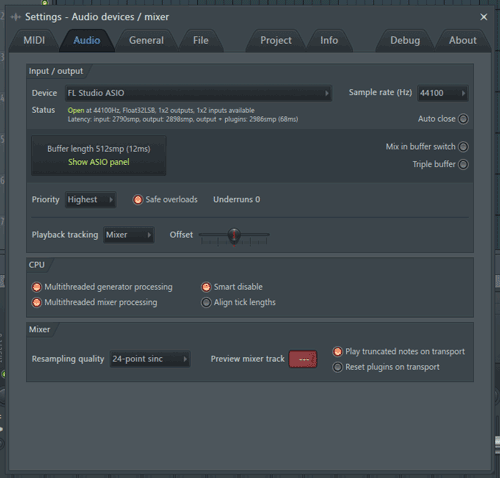
This is where you let FL Studio know what audio devices to use.
Click the drop-down menu for Device and you will see a list of possible audio devices:
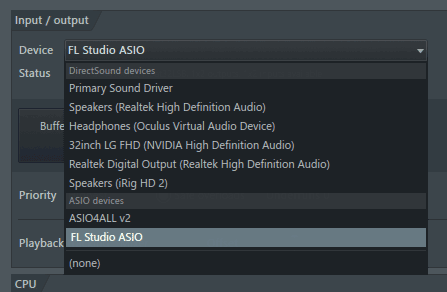
The devices you see listed here depends on what hardware you have connected to your computer.
Choosing an Audio Driver
You will likely have a few different options when choosing an audio driver.
The best choice is when an audio driver appears that matches the audio interface you have plugged into your computer.
For example, if you have a Focusrite audio interface plugged in, you should see ‘Focusrite USB ASIO’ as one of the options. That option should give you the best results.
If you don’t see your device, it doesn’t mean your audio interface won’t work with FL Studio.
You can see from my list that my iRig HD 2 does not show on the list.
You have two options if you don’t see your device on this list. You can either use FL Studio’s own audio driver, or use ASIO4ALL.
Let’s look at these two options.
Using the FL Studio ASIO Driver
‘FL Studio ASIO’ is FL Studio’s default audio driver and should work with most audio interfaces or USB microphones.
Select it then press the ‘Show ASIO panel’ button to bring up the settings for the driver:
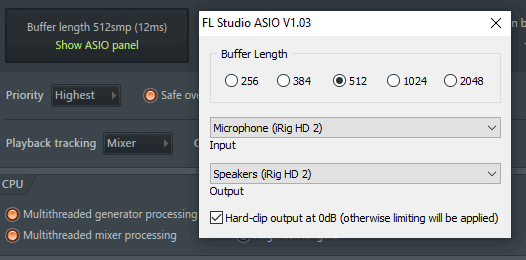
Select your audio interface in the Input section and choose whether you want the audio to playback through your audio interface or computer speakers.
In the above screenshot, you can see that I’ve selected my iRig HD 2 for both the input and output.
This driver should work for most devices. If you do have trouble with it, you may want to use ASIO4ALL instead.
Using ASIO4ALL
ASIO4ALL is a free audio driver that gives you far greater control over your interface compared to some standard audio drivers.
If your audio interface doesn’t appear in the drop-down menu in FL Studio, I recommend using ASIO4ALL as it gives you more flexibility than the FL Studio driver.
First, download and install ASIO4ALL from this website.
Once ASIO4ALL is installed, re-open FL Studio and go back into the audio devices settings.
If you select the drop-down menu, you will now see a new device called ASIO4ALL:
As soon as you select it, you will see an icon appear in your Windows taskbar:
![]()
This is a handy shortcut you can use at any time to access the settings for your audio interface.
Click the icon or click the ‘Show ASIO Panel’ button in FL Studio to bring up ASIO4ALL’s settings:
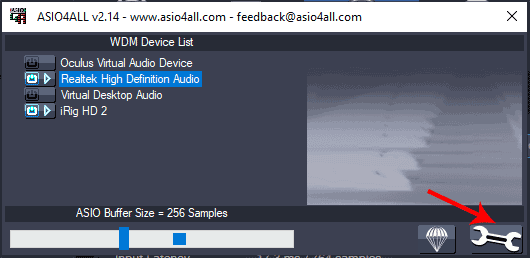
You can see which audio devices are enabled in this view, but I recommend clicking the spanner icon on the far right to access the advanced options view:
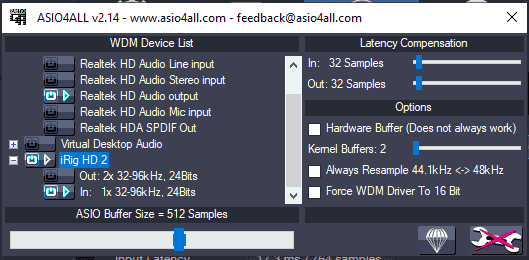
From this view you can enable and disable any device you like.
Simply click the blue power icons next to any device to enable or disable them.
In the above screenshot, you can see that I’ve enabled my iRig’s input and my computer speaker’s output.
This means I can record with my iRig and listen to the playback through my normal computer speakers.
This makes ASIO4ALL a powerful way to control multiple inputs and outputs. You can route your signals in any way you want.
Buffer and Sample Rate Settings
Once you have selected an audio driver in FL Studio, the last thing to check is the buffer settings and sample rate.
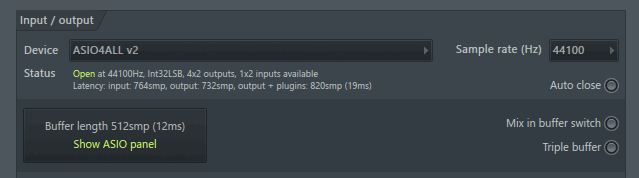
In the below screenshot, you can see that the buffer is currently set to 512smp (12ms):
The buffer length will control how much latency (delay) you hear during recording. The larger the buffer, the higher the latency.
Trying to record guitar with high latency is awkward, so your goal is to have the lowest latency possible.
You control the latency by adjusting the buffer length. If the buffer is too low, you may hear glitches, so aim to set your buffer as low as possible without causing problems.
The sample rate is also important to set right. You can see the above screenshot shows a sample rate of 44100 Hz (44.1kHz).
Most audio interfaces and USB microphones are compatible with either 44.1kHz or 48kHz and either one will be fine. Newer audio interfaces may support higher sample rates such as 96kHz.
For most guitarists, 48kHz is perfectly fine to use and higher sample rates don’t necessarily give you better quality recordings.
Once you have everything set up, you can move to the next step.
Step 3: Set Up a Track to Record
Now that you have configured your audio device, you can set up a track to record your guitar.
Open the playlist window by pressing F5 on your keyboard or press the button as shown below:
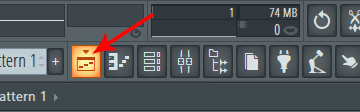
Note that the buttons only glow orange when you hover your mouse over them.
This will bring up a playlist view with a lot of tracks.
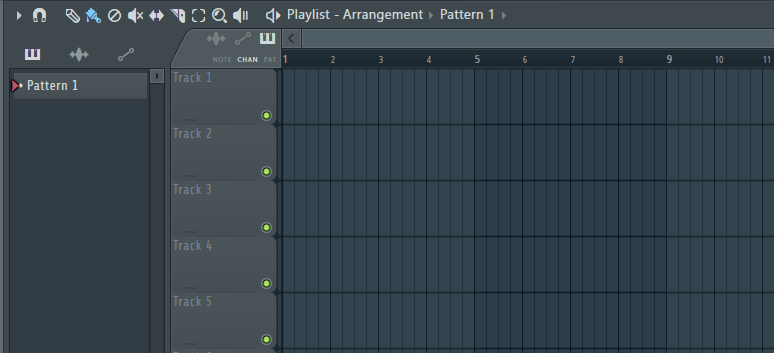
This view will be useful when you start recording as you will be able to see the recordings appear on each track.
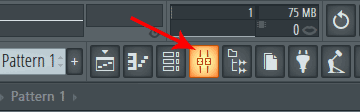
Open up the mixer by pressing F9 on your keyboard or pressing this button:
Tip: I recommend toggling on and off each of these buttons to learn what they do.
You can also hover over anything in FL Studio and see a tip on what it does and what the keyboard shortcut is for it under the main menu:

These tips will make learning FL Studio much easier, so keep your eye on this area.
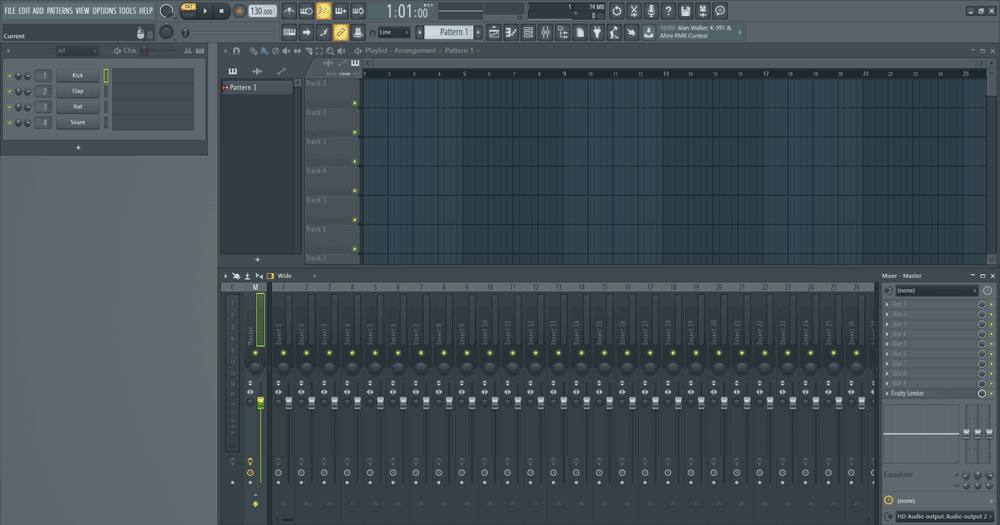
The mixer is where we will arm tracks for recording and select the input devices.
Tip: you can resize and move any of these windows around as you like. Everybody seems to set FL Studio up in different ways, so play around and find a layout that works for you.
In the mixer, you need to choose an insert channel for recording.
Let’s use ‘Insert 1’.
Click on the dot icon on the track as shown in the below screenshot to arm it for recording:
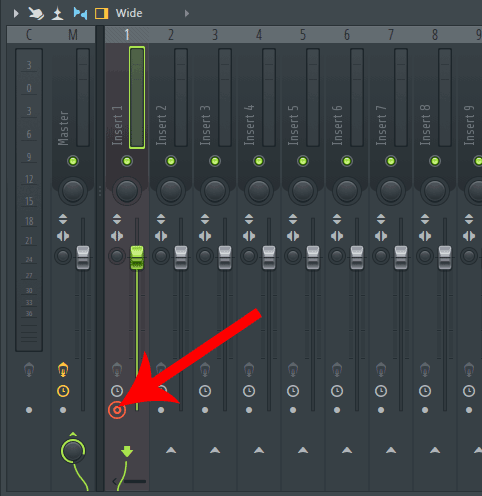
The track will turn red to indicate that it is armed for recording.
Before you can record, you need to let FL Studio what input devices to use for recording.
On the far right (or left depending on your layout) of the mixer, you will see a dropdown box where you can select the input channel:
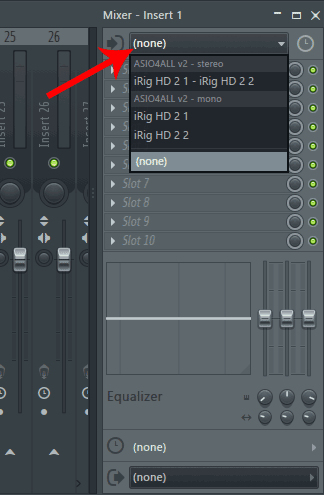
You need to select the correct input for FL Studio to record your guitar.
In this example, I’m recording guitar using an iRig HD 2. So I need to select ‘iRig HD 2 1’ to select the left channel of the iRig.
You may need to play around before you get used to how the input channels for your audio interface are displayed in FL Studio.
Step 4: Check Audio Levels
Before you start recording, you need to make sure the audio levels are set properly.
Having poorly set up audio levels can ruin a recording.
As soon as you select the input channel from the previous step, you should be able to hear your guitar through FL Studio.
You will also see the level monitor light up to show the signal strength.
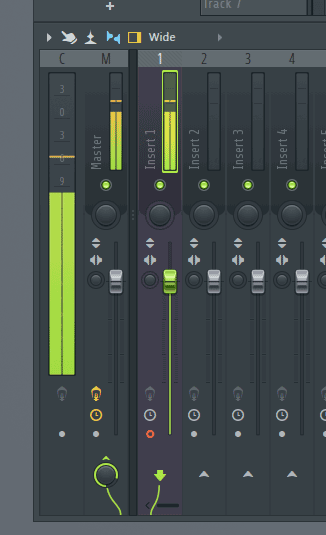
In the above screenshot, you can see that the master level indicator (on the left) and the level monitor for ‘Insert 1’ both light up and I can hear my guitar through my speakers.
It is crucial that the input level isn’t so high that it maxes out this monitor.
If your audio interface level is turned up too high, you may hear clipping (unwanted distortion) in your recordings.
Adjust the input level on your audio interface (not the level in FL Studio) until you can hear it clearly but it doesn’t max out to 0 dB. Your audio interface may also have an indicator to let you know if the signal is too hot (too loud).
Once you are happy with your audio levels, you can move to the next step and start recording.
Step 5: Record Your Guitar
Once you have properly set up your audio devices and armed a track, you can record your guitar.
To record guitar in FL Studio, click the record button on the top of the screen:
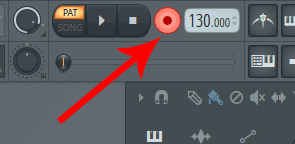
It will turn red after you click it and a window will pop up asking what you will like to record:
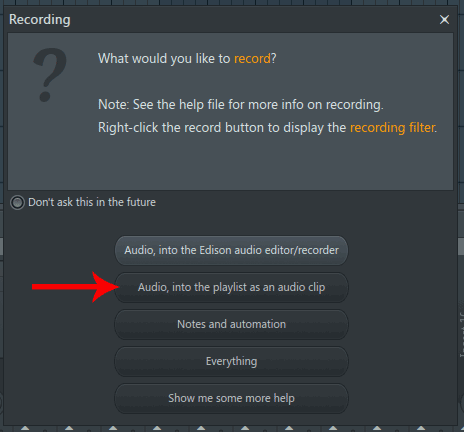
While you may have a use for some of these other options in the future, I recommend starting with the basic ‘Audio, into the playlist as an audio clip’ option.
This option will record audio clips in a simple way and display the clips in the playlist view.
Once you choose this option, you will hear FL Studio give you a four-count before it starts recording.
You can turn this on/off or change the number of bars it counts you in by right-clicking this icon at the top of the screen:
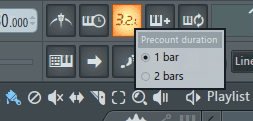
Adjust the tempo to slow down or speed up the countdown.
Once the countdown has finished, you will see the audio recording start to appear on the playlist as shown below:
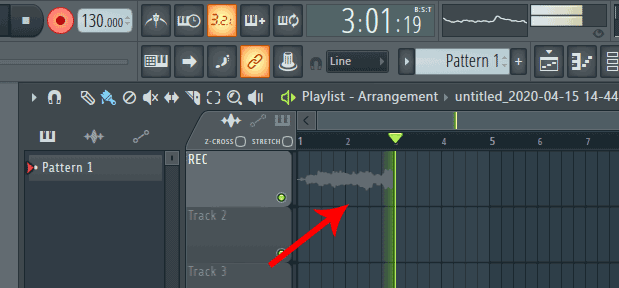
To stop recording, press the space bar or the stop button.
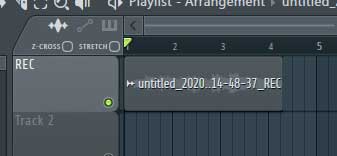
You will see FL Studio name the audio clip on the playlist view:
Here are some handy tips for any recorded clips:
- Delete the clip by right-clicking it
- Click anywhere on the playlist view to paste a copy of the clip (handy for loops)
- Double-click the clip to bring up the clip details where you can rename the file, edit it in various way, or assign it to a track
If you’ve used other DAWs before, it might feel jarring how different FL Studio handles audio clips. But with some practice, you’ll get the hang of it.
Recording Guitar in FL Studio Summary
FL Studio was designed for electronic music creators in mind. It works really well when you’re creating beat or sample-based music. It wasn’t designed with audio recording in mind. This makes FL Studio a strange DAW to use when recording guitar. It’s still possible to record guitar or other instruments in FL Studio, but it isn’t as straight-forward as other DAWs.
Here are the basic steps on how to record guitar in FL Studio:
- Connect your audio interface or USB microphone
- Open FL Studio and configure your audio device
- Open the Mixer and arm a track for recording
- Choose the correct input device on the mixer panel
- Check your audio levels with the meter on the mixer
- Press record. Your recorded clips will appear on the playlist view
If you create electronic music and want to add real guitar recordings to your music, you may find FL Studio works well for you. But if you’re recording mainly guitar-based music, I highly recommend looking at other DAWs for a better approach to recording guitar-based music.
Once you get past the basics in FL Studio, read this guide on guitar plugins to get started with amp and pedal plugins.
Extra FL Studio Tips
The above advice only gets you started recording guitar in FL Studio. FL Studio is an impressive DAW capable of far more than basic recording and mixing.
Here are two ways you can get more out of FL Studio:
Use a DAW Controller
You can control a lot of FL Studio using your keyboard and mouse. But memorizing the shortcuts and commands does take some time (the on-screen tool tips help).
A far easier way to use FL Studio and control it is with a DAW Controller.
A DAW Controller is a piece of hardware you can plug into your computer and control any DAW including FL Studio. The basic idea with these controllers is that instead of only using your keyboard and mouse, you can also use buttons, knobs, sliders, pads, keys, and wheels to change settings, tweak your effects, record virtual instrument parts, and more.

The above controllers give you an idea of the wide range of controllers out there. The right type of controller for you depends on how you want to use your DAW.
If you haven’t used a DAW controller before, it makes a massive difference in how quickly you learn to use the software and how natural it feels to use. You can set up the knobs on a controller to control a plugin settings (eg: amp or effects parameters), tap out rhythm parts for a virtual drum kit, or start recording from the other side of the room (using a wireless controller).
FL Studio is a joy to use with a controller, so I highly recommend getting one to get a better recording, editing, and mixing experience.
Try Some Plugins
Third-party plugins allow you to extend FL Studio in so many different ways. There are countless plugins available today that can give you professional studio-grade sounds, virtual instruments, and mixing/mastering tools.
Find out how to install plugins in FL Studio in this tutorial.
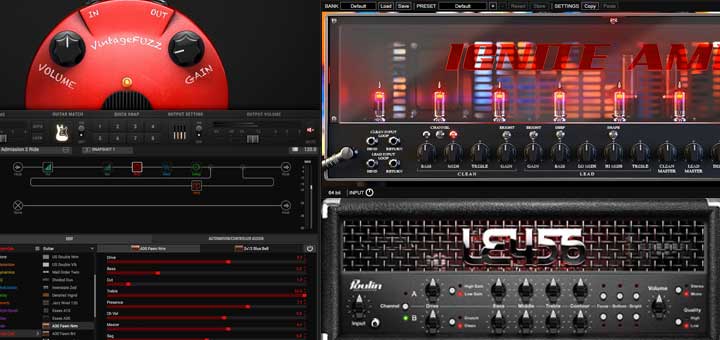
As a guitarist, you will likely want to try out a guitar amp and effects plugin such as AmpliTube, BIAS FX, or Guitar Rig.
Check out some popular Guitar Plugins in this detailed guide.
Guitar amp and effects plugins are useful, but they’re only a starting point.
The next type of plugins I suggest trying out are virtual instrument plugins that allow you to create realistic-sounding instruments for your recordings or backing tracks.
You could use a drum plugin to create drum tracks, a piano plugin for piano parts, or even a plugin that gives you an entire orchestra at your fingertips.
A good way to get started with virtual instrument plugins is with drum plugins. Learn how easy it is to create drum tracks for your recordings in this tutorial.
FL Studio is a fantastic DAW for creating virtual instrument parts, so I recommend starting out by learning how to program some drum tracks (covered in the above tutorial).
While nothing may beat a real drummer in a professional recording studio, drum plugins can get you surprisingly close.
Check out some free and paid drum plugins in this guide.
Once you learn how to create drum tracks using plugins, you can get some plugins for any other instrument you want. The range of realistic-sounding virtual instrument plugins available today is incredible and worth looking into.
Recording Guitar in FL Studio Video Tutorial
Here is a step-by-step video tutorial on how to record guitar in FL Studio that walks you through the steps covered in this guide.
The video also shows how to add effects to your recordings using plugins along with some other handy tips.
If you can’t see the above video, watch it on YouTube here. Subscribe to my YouTube channel for more helpful tutorials and lessons like this one.Recording Guitar in FL Studio FAQs
Here are some common questions you may have about recording guitar in FL Studio.
Is FL Studio Good for Recording Guitar?
Recording guitar in FL Studio isn’t as easy or straightforward as other DAWs. FL Studio was designed for electronic music in mind, so the audio recording aspects aren’t as clear as other DAWs. Audio recording wasn’t even available in early versions of FL Studio and it isn’t a major focus now.
While you can definitely use FL Studio to record guitar, you may find you prefer other options that are better suited for audio.
Can You Record Instruments in FL Studio?
You can record any instrument you like in FL Studio if you have a suitable audio interface or microphone. FL Studio can record audio just like any other DAW. FL Studio can also record multiple instruments at once as long as you have a suitable audio interface.
Follow the earlier steps to set up an audio interface to record your instruments in FL Studio.
Check out these guides to continue learning about recording guitar at home:
- How to Install Plugins in FL Studio
- Ultimate Guide to Recording Guitar at Home
- How to Record Guitar Videos for YouTube
- How to Connect Your Guitar to a PC/Laptop
- How to Record Guitar in Studio One (I recommend reading this to see how other DAWs compare to FL Studio)
- Ultimate Guide to Guitar Plugins