
Audio interfaces are a great way to record great quality guitar (and other instruments) from home at a low cost.
They can also be used with a wide range of free and paid guitar plugins to jam with thousands of different amp and effects models.
This guide will go through the best audio interfaces for different budgets and categories and help you decide which one suits you.
Useful step-by-step tutorials to get you started recording are included at the end of this guide.
If you want to learn more about recording guitar at home, check out this Ultimate Guide to Recording Guitar at Home.
Audio Interface Features to Consider
There are a lot of different audio interfaces available and it can quickly become overwhelming when you start comparing them.
Every guitarist has different recording needs and you don’t need to pay money for features you’re not going to use. The right audio interface for you may be completely different than what is the popular go-to option.
Here are some of the main features found on audio interfaces. Have a think about each one and whether it’s important to you or not.
Audio Quality
The good news is that technology has improved to the point where almost any modern audio interface is going to give you high-quality audio.
Most modern audio interfaces can record up to 24-bit and 96kHz resolution (some up to 192kHz), which surpasses what a lot of digital recording studios were capable of in the past.
All the audio interfaces in this guide meet high audio quality standards, so the main areas you need to think about are the other features covered below.
Number of Inputs and Outputs
Do you only need to record one guitar at a time or do you want to record multiple instruments at the same time?
Maybe you want to record a drum kit or acoustic guitar using multiple microphones. In that case, you’ll want to use an audio interface that provides you with enough inputs.
Some of the audio interfaces in this guide give you a simple and compact way to record your electric guitar. Other interfaces can record multiple microphones, guitars, or other instruments at the same time.
For example, here’s a comparison of the Focusrite Scarlett Solo and the Focusrite Scarlett 18i8:
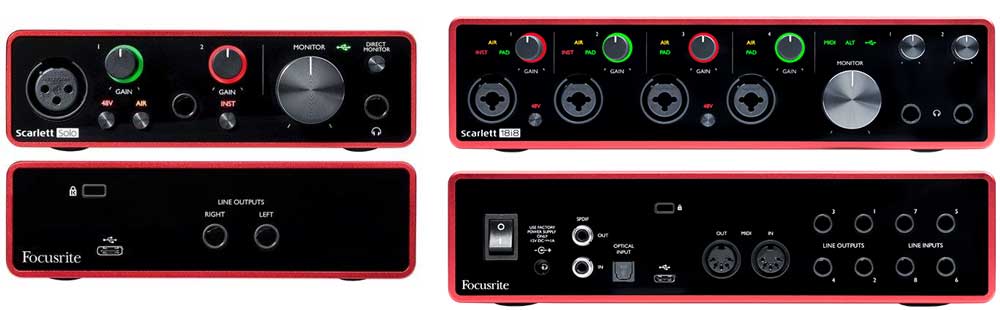
The audio interface on the left has two inputs and two outputs, while the one on the right has 18 inputs and 8 outputs.
When deciding how many inputs and outputs you need, don’t just think about what you might record today, have a think about what you may want to do in the future.
Type of Inputs and Outputs
There’s a big difference between plugging an electric guitar into an audio interface and plugging in a microphone.
Different types of signals need to be handled differently, so have a think about what type of instruments you plan on recording.
The two main input types to consider are instrument inputs (via typical guitar cables) and microphone inputs (usually via XLR cables).
Some interfaces have ‘combo’ inputs that can plug different types of instruments into one input jack.
MIDI is also another type of input that only some audio interfaces support.
Here are the three most common types of audio inputs you will see on audio interfaces:

Learn everything you would want to know about audio and data cables you may use as a guitarist in this guide.
Controls and Monitoring
Dialing in the right audio levels is crucial for producing a good quality recording.
If your audio level is too low or too high, you’ll end up with poor results.
All audio interfaces will give you a way to adjust the input gain and output levels. Basic interfaces give you a simple gain knob and volume knob for headphones/speakers.
Some interfaces take this much further and allow you to dial in the perfect gain along with different presets and modes for different instruments.
Most audio interfaces will also give you a way of visualizing the audio level so you can dial it in to proper levels. Some will have an LED to indicate clipping (when the audio signal is too high), while others have meters to give you a more precise reading.
Here are some different examples of indicator lights found on audio interfaces:

When comparing the audio interfaces in this guide, have a look at how many controls each one gives you and what level of control you want to have over your audio.
Device Compatibility
Do you plan on plugging an audio interface into a PC/Mac or iOS device?
Some audio interfaces work on almost any device, while others are specifically built for one or two devices.
Most devices will work on both PC and Mac, while only some will work on mobile devices.
In terms of software, any audio interface that is compatible with your device should work fine with any of the popular DAWs. Some audio interfaces have better integration than others, but all of them should work perfectly fine with your DAW of choice.
If you’re hoping to record guitar using an Android device, there sadly aren’t many options that work well. Android has fallen far behind iOS in recording capability and I haven’t found anything yet that I would recommend.
Power Requirements
Some audio interfaces are powered via USB, while others require you to plug them into the wall.
If you plan on having a permanent audio interface on your desk as part of your home studio, this probably won’t be much of an issue.
But if you want a portable audio interface you can take with you, you might prefer one that only needs one USB cable.
Phantom Power
Phantom power is when an audio interface can provide power to an input device. Condenser microphones require phantom power, so you’ll need to find an audio interface that offers it if you want to use condenser mics.
The below sE Z3300A is a popular example of what condenser microphones look like:
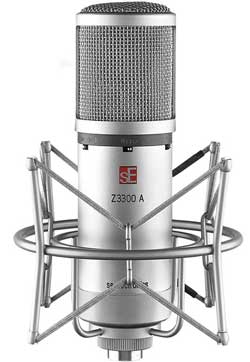
If you plan on recording using microphones, check what type of microphones you plan on using before you buy an audio interface.
There are a lot of other features you can find in different audio interfaces, but the above features are the most important to consider.
Latency
Latency is the delay between when you play a note on your guitar and when you hear it in your DAW/plugin.
Having high latency (a big delay) is frustrating to deal with and can make recording accurately impossible.
I cover latency in detail in my tutorials on recording guitar (see the end of this guide for a list), so check out those guides to learn how to deal with latency.
There are two sides to latency – the hardware side and the software side.
Most of the latency problems people have aren’t due to the type of audio interface used. The DAW you run, the plugins you use, and the computer you use play a massive role in latency. For example, an old and slow computer is likely to experience high latency.
Some audio interfaces promote having ‘zero latency’, but this is misleading. The zero-latency often promoted is a mode you can enable which gives you a way of directly monitoring your input signals. It isn’t what you should expect when running through plugins on your computer.
Don’t buy an audio interface just because it says ‘zero latency’, because zero latency when running through a DAW and plugins is impossible.
The direct monitoring feature may be useful in some scenarios, but most guitarists won’t use it. If you’re having latency problems, it’s usually due to your computer system, audio settings, and drivers rather than the audio interface.
Best Budget Audio Interfaces
There are a lot of cheap audio interfaces you can buy for under $100 and many of them will work perfectly fine. Many dirt-cheap interfaces are plagued with compatibility issues and low audio quality, so be careful of anything too cheap.
Here are two of the best audio interfaces if you’re looking for a budget option.
M-Audio M-Track Solo
If you want the cheapest audio interface possible, get this one instead of buying a cheap Behringer or no-name-brand interface.
The bit depth and sample rate (16-bit / 48kHz) aren’t quite at the same level as the other audio interfaces in this guide, but it’s perfectly fine for at-home recordings if you’re on a tight budget.

Here are the main features of the M-Audio M-Track Solo:
- 16-bit / 48kHz
- 2 Input Channels: 1 instrument input (TRS) & 1 XLR combo input
- Preamp and phantom power
- Powered via USB
- RCA & headphone outputs
When you consider the price of the M-Track Solo, it packs in a good range of features. You can use this audio interface to record any instrument you want as well as use a wide range of microphones thanks to the phantom power.
The combo input channel allows you to connect either an XLR cable or an instrument cable, so even if you don’t plan on recording any microphones, you can still use that channel for guitar/bass/keyboards.
Each of the two input channels includes a gain knob and an LED to indicate the signal strength or clipping.
Here’s the front and back view:
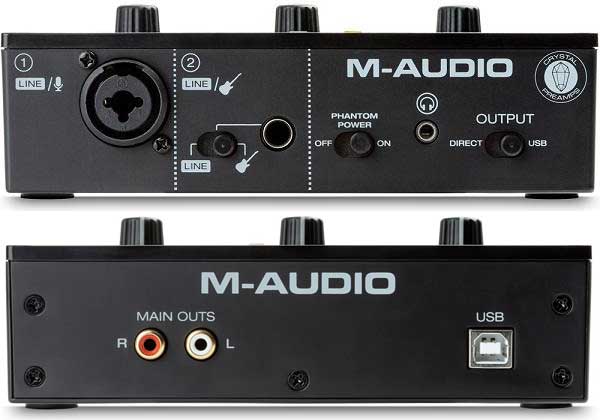
Take note that the output jacks use RCA cables, so you may need to buy an adapter if you use different connectors for your speakers.
Check out the price and details of the M-Audio M-Track Solo here (link to Amazon).
Focusrite Scarlett (3rd Gen)
If you have read anything on audio interfaces before, you’ve probably heard of the Focusrite Scarlett range.
The Focusrite Scarlett is the most popular range of audio interfaces and has been popular for a very long time. The 2i2 model is the best-selling audio interface, but the right model for you depends on your recording needs.
These interfaces pack in all the essential features while keeping the price at reasonable levels (can be bought dirt cheap second-hand thanks to how popular they are).
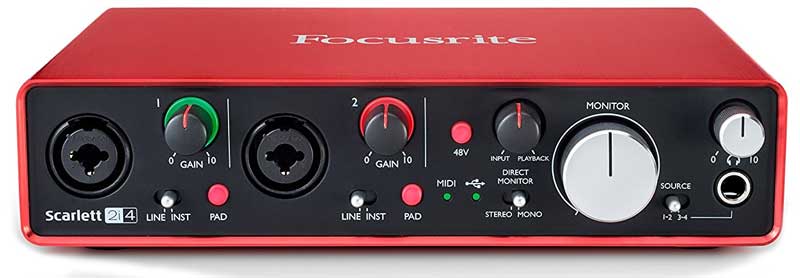
There are a few different models in the Scarlett range depending on how many inputs and outputs you want. The first number in the model states the number of inputs and the second number the number of outputs. So 2i4 has two inputs and four outputs. 18i20 has 18 inputs and 20 outputs.
Here are the different Focusrite Scarlett models to choose from comparing the types of inputs each one includes:
- Solo: 1 instrument/line input & 1 XLR mic input
- 2i2 & 2i4: 2 combo XLR/instrument/line inputs
- 4i4: 2 combo XLR/instrument/line inputs, 2 balanced fixed line inputs, stereo loopback input, 5-pin MIDI input
- 8i6: 2 combo XLR/instrument/line inputs, 4 balanced fixed line inputs, stereo loopback input, 5-pin MIDI input, 1 S/PDIF input
- 18i8: 2 combo XLR/instrument/line inputs, 2 combo XLR/line inputs, 4 balanced fixed line inputs, stereo loopback input, 5-pin MIDI input, 1 S/PDIF input, 1 optical ADAT input
- 18i20: 2 combo XLR/instrument/line inputs, 6 combo XLR/line inputs, stereo loopback input, 5-pin MIDI input, 1 S/PDIF input, 1 optical ADAT input
As you can see, the right model for you depends on what type of recording you plan to do and how many inputs you need.
Most guitarists don’t need 18 inputs, which is why the 2i2 and 4i4 are so popular. You can achieve a lot with only two inputs.
Check out the price of the Focusrite Scarlett models here.
3rd Generation Models
There have been three generations of these interfaces. There have been improvements and changes with each generation, although they all look very similar.
Here’s a comparison of a 1st Generation 2i2 model and the latest 3rd Gen model:

While the inputs and outputs are the same on both models, you can see some subtle changes in features.
The USB connection on the back has changed from a Type A connection to a Type C. The Gen 3 models also include the ‘Air’ feature, which is an emulation of a ISA 110 mic preamp.
If you want to buy a Focusrite Scarlett audio interface, make sure you buy a 3rd Generation model and not one of the older models.
Buying Second-hand
The price of these audio interfaces may not seem budget-friendly at first. The reason I list this audio interface as a budget option is that there are so many available for incredibly low prices when buying second-hand.
Because the Focusrite Scarlett range has been so popular for such a long time, there are always second-hand units in great condition available.
I just had a quick search in my local listings and found 6 units selling for under half the retail price and 3 units selling for under a quarter the retail price. If you’re on a budget and want a good quality audio interface, have a look around for a second-hand unit in good condition.
If you do buy a second-hand unit, get a 3rd generation unit for the best quality and improvements compared to older models.
Best Compact Audio Interfaces
While most of the audio interfaces in this guide are portable and can be easily taken with you (along with a laptop), there are times when you may prefer and simple and compact audio interface.
Some compact audio interfaces also work with phones and tablets, which is great when you want to record anywhere you want.
Here are two of the best compact audio interfaces for guitarists.
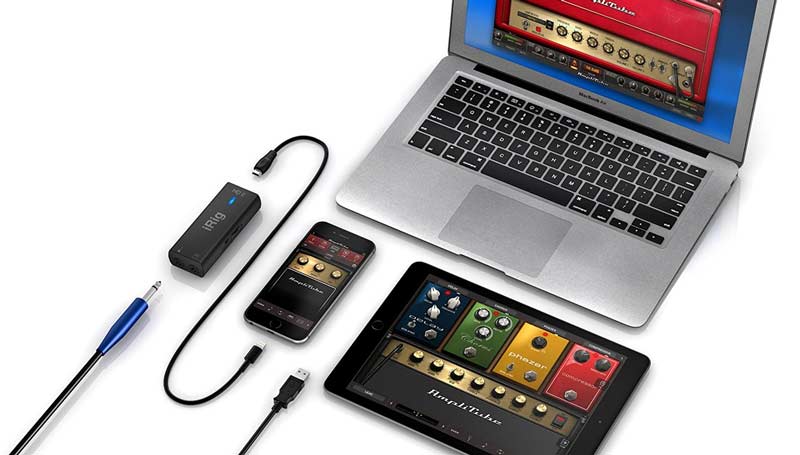
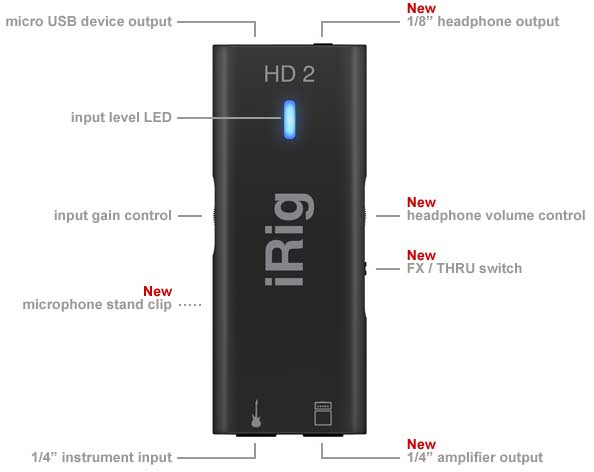
IK Multimedia iRig HD 2
The iRig HD 2 (read my full review here) was a massive improvement in quality over the original iRig devices. The iRig HD 2 provides studio-quality processing while being compatible with iOS devices (as well as PC/Mac).
Here are the main features of the IK Multimedia iRig HD 2:
- 24-bit / 96kHz
- 1 instrument input
- 1/4″ amp and 1/8″ headphone outputs
- Powered via USB
- Compatible with PC/Mac and iOS devices
As the iRig HD 2 only has one instrument input, it isn’t suitable for recording using a microphone or multiple instruments at the same time.
But if you only want to record electric guitar directly into your computer or iOS device, it works perfectly well.
The iRig HD 2 comes bundled with the popular software AmpliTube and iOS users can redeem the full version of the AmpliTube for iOS for free.
Find out more about the iRig HD 2 in my comprehensive review here.
Positive Grid RIFF
Released in early 2022, Positive Grid’s RIFF is a direct competitor to the iRig HD 2 covered above.
Positive Grid sells the popular BIAS FX software range, so it makes sense for them to have a competing compact device.
Here are the main features of the Positive Grid RIFF:
- 24-bit / 96kHz
- 1 instrument input
- 1/4″ stereo and 1/8″ headphone outputs
- Powered via USB
- Compatible with PC/Mac and iOS devices
- Comes in four colors (Black, Blue, Green, Red)
Just like the iRig HD 2, the main point to consider with the RIFF is that it only has one instrument input. So you can’t use this audio interface to record using microphones or record multiple instruments at once.
But if you want a simple way to connect your electric guitar to your computer or iOS device, it might be right for you.

The large LCD display and knob give you a simple interface to adjust settings, which is something lacking on the iRig HD 2. There are three built-in preamp settings, but you’ll probably prefer using a plugin to access drive tones rather than these three presets.
RIFF is bundled with BIAS FX 2, but as some users have noted in reviews, it’s not the full version of BIAS FX 2. Many audio interfaces come bundled with a ‘lite’ or ‘LE’ version of a DAW (the RIFF also comes with Studio One Prime), so it’s no surprise that the BIAS FX 2 you get with the RIFF isn’t the full version.
The lite version of BIAS FX 2 is still a great way to access a wide range of tones for your recordings or jamming.
A nice advantage of using the RIFF with BIAS FX 2 is the way the device integrates with it as shown below:

You can see that you can easily change the input/output levels directly in BIAS FX 2 as well as change presets using the knob on RIFF.
You can even assign different functions in BIAS FX 2 to be controlled by the knob on RIFF. For example, you can assign the knob to control the virtual amp/pedal’s gain, a pedal’s delay settings, or even assign it to an expressive effect such as wah or whammy.
If you like the idea of controlling plugins or your DAW with hardware, you might want to consider a proper DAW Controller like the ones covered in this guide.
Overall, the Positive Grid RIFF is a good option if you use BIAS FX 2 as your go-to guitar plugin. The integration it offers is a nice feature not found on any other popular audio interface.
Check out the price and details of Positive Grid RIFF here.
Best Guitar-Focused Audio Interfaces
While the two audio interfaces covered above were created specifically with guitarists in mind, you may want something that offers more than a single input.
The AXE I/O range of audio interfaces by IK Multimedia were designed with guitarists and bassists in mind. The three audio interfaces in this range include guitar-focused features that aren’t found in other audio interfaces.
Check out the three models below to see if one may suit your needs.
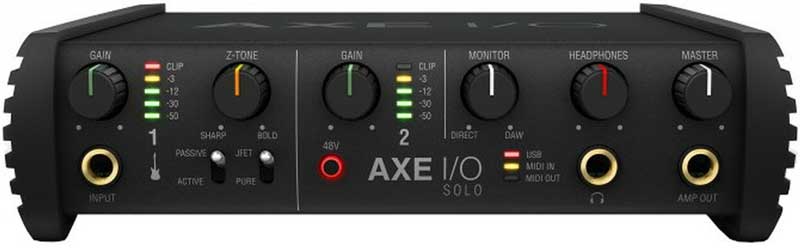
IK Multimedia AXE I/O
The AXE I/O is a feature-packed audio interface ideal for guitarists who plan on recording multiple instruments at once or a mix of microphones and direct instruments.
While you can use it to record any other instrument, it has clearly been designed with a focus on guitarists.
Here are the main features of the IK Multimedia AXE I/O:
- 24-bit / 192kHz
- 2 instrument inputs & 2 combo inputs
- 1/4″ amp output, 1/4″ headphone output & 4 line outputs
- ‘Z-TONE’ circuit control for variable impedance
- Requires external power
- MIDI input/output
- 2 external expression pedal/footswitch inputs
- Compatible with PC/Mac
- AmpliTube integration
As you can see, there are quite a few interesting features, so I’ll focus on the main features you’re likely to be interested in as a guitarist.
The first feature is the ‘Z-TONE’ circuit. In the below photo, you can see that for Channel 1, you have a Z-TONE knob as well as two switches to choose between a few different settings based on your guitar pickups.

The basic idea with these options is that you can set up the audio interface to perfectly match the type of pickups you use. If you use passive pickups, the output will be treated differently compared to active pickups.
Being able to switch between the Active/Passive/JFET/Pure instrument preamps gives you flexibility with the types of guitars you use. Your guitar may sound perfectly fine without using these options, but you may find that some guitars get a better tone when you tweak these options.
The Preset knob in the middle of the interface can change between presets or be assigned in AmpliTube to control any parameter you want.

Another interesting feature is the ‘Amp Out’ jack in the front of the interface. This allows you to send a signal out to your amp for jamming, or you can use it for recording your physical guitar amp.
For example, you can record your electric guitar direct into the audio interface, then use the Amp Out to send that signal to your guitar amp or pedals, then either record your amp with a microphone or send that signal back into the interface.
This means you can easily change the physical amp or pedals used on your tracks without having to re-record your performance.
You can connect external expression pedals or single/double footswitches directly to the AXE I/O.
The control software for AXE I/O allows you to assign different MIDI CC functions to any external control you connect:

If you already own an expression pedal or external footswitches, it’s a nice way to control your DAW or plugins. Otherwise, you might want to consider using a dedicated DAW Controller.
I highly recommend the AXE I/O as the best overall audio interface for guitarists. Every guitarist has different needs, so why I personally feel this is the best option overall, you may find one of the other interfaces better suits your needs. Have a think about what features are important to you.
Check out the price and details of the AXE I/O here.
IK Multimedia AXE I/O Solo
As you might expect, the AXE I/O Solo is a smaller and simpler audio interface based on the larger AXE I/O.
It still includes most of the features found on the AXE I/O and still uses the same 24-bit / 192kHz maximum resolution.
The number of inputs reduces to one instrument input on the front and one combo input on the back.
Many of the same features such as the Z-TONE controls, the Amp Out, expression pedal support, and MIDI are still included in this smaller unit.
Unfortunately, the Preset knob has been removed on the Solo, so you miss out on the integration with AmpliTube. Although, I generally recommend using a dedicated DAW Controller if you really want to control your plugins/DAW using hardware controls.

A nice advantage of the AXE I/O Solo is that it removes the external power supply requirement. Power is instead supplied via USB.
If you liked the range of features in the AXE I/O but it exceeds your budget or you don’t have a need for the extra inputs, the Solo is worth considering and comparing against similar smaller units like the Focusrite Scarlett.
Check out the price and details of the AXE I/O Solo here.
IK Multimedia AXE I/O ONE
The AXE I/O ONE is the smallest model in the AXE I/O range. But it still packs in almost all of the same features as the larger units.
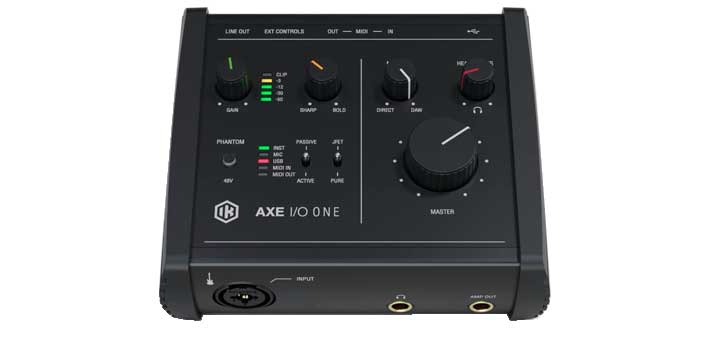
The main difference between the AXE I/O ONE and the SOLO is the number of input channels. While the SOLO has two input channels, the ONE only has one input channel.
One input channel is perfectly fine for most recording needs, so if you want a compact unit that still gives you plenty of options for shaping your tone, you may want to consider the AXE I/O ONE.
Learn more about the AXE I/O ONE in my review here.
Best Multiple Instrument Audio Interface
Most guitarists will only need to record one or two inputs at the same time. But if you want to record acoustic guitar, drums, or a band performance, you get the best quality when you use multiple microphones and inputs.
For example, being able to capture an acoustic guitar performance with 3+ different microphones at different locations gives you flexibility with mixing and tweaking your tone. You can mix and blend between different mics to find the right tone and room quality for your tracks.
Some of the audio interfaces covered above allow you to record quite a few instruments at once (especially the higher end of the Focusrite Scarlett range).
Here’s an option to consider if high-quality recordings and multiple inputs are your priority.
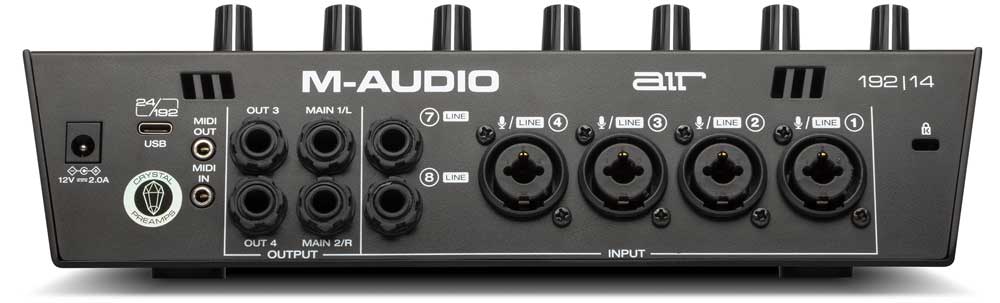
M-Audio Air 192|14
The M-Audio AIR 192|14 gives you eight inputs and four outputs as well as MIDI connectivity.
Four mic preamps are included, which makes this audio interface the best option covered in this guide if you plan on recording multiple instruments or using multiple microphones.
Here are the main features of the M-Audio Air 192|14:
- 24-bit / 192kHz
- 4 combo inputs, 2 instrument inputs & 2 line-level inputs
- Two separate 1/4″ headphone outputs & 4 line outputs
- Requires external power
- MIDI input/output
- Compatible with PC/Mac
A quick look of the photo below and it should be clear that this audio interface was designed for recording multiple instruments/mics at once:

Being able to see the input signals and switch between different outputs for headphones makes this an ideal audio interface for recording live performances or full bands.
The monitor mix knob and button on the top right allow you to choose whether the outputs use a direct signal (aka ‘Zero latency’) or USB signal.
Recording up to four microphones at once and having control over phantom power makes this a great option for acoustic guitarists or musicians who also play other instruments that are best captured with mics.
The M-Audio Air range does have smaller units with fewer inputs and outputs, so if you like this type of interface but don’t need as many inputs, you might want to check out the Air 192|6 or the Air 192|4.
Check out the price and details of the M-Audio AIR 192|14 here. Also includes the other models in the AIR range.
Recording Guitar Tutorials
There are plenty of other audio interfaces other than what has been covered in this guide. But the above options showcase some of the best audio interfaces guitarists can buy.
Here are some useful tutorials to help get you started recording and using any audio interface you buy:
Set Up Your Home Recording Studio
While an audio interface is an important part of any home recording studio, there are other things worth thinking about.
Check out this guide to learn the basics of recording guitar at home.
The above guide covers all the hardware and software basics you should consider before you get started.
If you have questions about recording guitar, check out this FAQ to recording guitar at home for answers.
If you plan on recording your guitar for YouTube, TikTok, Instagram or any other social media, check out this comprehensive guide to Recording Guitar Videos for YouTube.
Learn About DAWs
A DAW (Digital Audio Workstation) is the software platform used for your recordings. There are a few different popular DAWs and each one feels very different to use.
Learn the basics about DAWs in this guide with an overview of the most popular options.
I recommend trying out a few different DAWs covered in the above guide before you settle on one. All popular DAWs have free trial versions, so give a few a try to see what they’re like to use.
Follow this step-by-step tutorial to record your first song to learn the basics of recording.
If you’re on a budget and aren’t ready to dive into DAWs but you want to use some guitar plugins, there is a way you can run almost any guitar plugin as a standalone application to jam with.
Find out how to use any plugin as standalone in this guide.
Use Some Plugins
Plugins allow you to access thousands of different tones and effects as well as produce impressive quality recordings.
Learn everything you would want to know about guitar plugins in this guide. The guide includes some of the best free and paid plugins to get you started.
You can even use plugins to create virtual backing instruments to jam along with or for your recordings.
For example, check out these free and paid drum plugins to find out how good virtual drums can sound.
Find out how you can create realistic-sounding drum tracks using a plugin here.
More recording tutorials and guides are always being worked on, so subscribe to notifications or email updates here.