
There are a lot of different ways you can record full songs at home with excellent quality. In this tutorial I will walk through the process I use step-by-step for an incredibly easy way to produce a full band recording. You can use this method to record covers of songs or for your own original songs.
Before continuing I highly recommend reading through my Beginner’s Guide to Recording Guitar at Home for a full overview of what equipment and software you will need to get started recording. The DAW I will use in this guide is Studio One, but the same process should work with any popular DAW.
If you are interested in creating guitar videos for YouTube, read through this guide for full details on how to make a professional video. This tutorial is an important part in creating videos, so the advice you learn here also applies if you ever want to create videos.
If this is your first time using a DAW, check out my step-by-step tutorial on how to record guitar in Studio One.
Setting Up A Song in Guitar Pro 8 or 7
While a lot of guitarists will jump right into their DAW to start recording, in this tutorial we will start off by setting up the tracks in Guitar Pro 8 (or 7).
If you don’t have Guitar Pro (read my review on Guitar Pro 8 here), it’s a program where you can transcribe full songs using TAB or standard notation for any instruments.
It’s a great way to work on writing your own songs and a very easy way to learn other people’s songs from freely available transcriptions online.
There are three reasons why you might want to use a Guitar Pro file to start off your recordings:
First, it sets up a very handy template for your song. As you will see in the next step, once we import the Guitar Pro file into the DAW, we can instantly see the outline of the song and all instruments. This makes it much easier to jump in and start recording rather than starting with a blank DAW.
Second, it makes it much easier to record your parts. Instead of recording along with a click track, you can hear any tracks from the song you want. So you can record your guitar parts while hearing the drum tracks or the guitar tracks or both. You can even record the parts in any order you want because you already have a full template of the song to work with.
Third, it fills in the blanks for instruments you can’t physically record. For example if you don’t have access to a drum kit to record, you can use the drum track from the Guitar Pro file as part of your recording.
As you will see later, that’s exactly what I do to produce the drums and bass for this recording. Rather than have to manually create the drum tracks in the DAW, it’s ready to go after importing it from Guitar Pro.
In this tutorial we will work through recording a cover of Metallica’s Enter Sandman but you can use any song or write your own. Here’s the link to the Guitar Pro file I’ll use in this tutorial.
You can find Guitar Pro files for almost any song by following this guide on Best Websites for Guitar TABs.
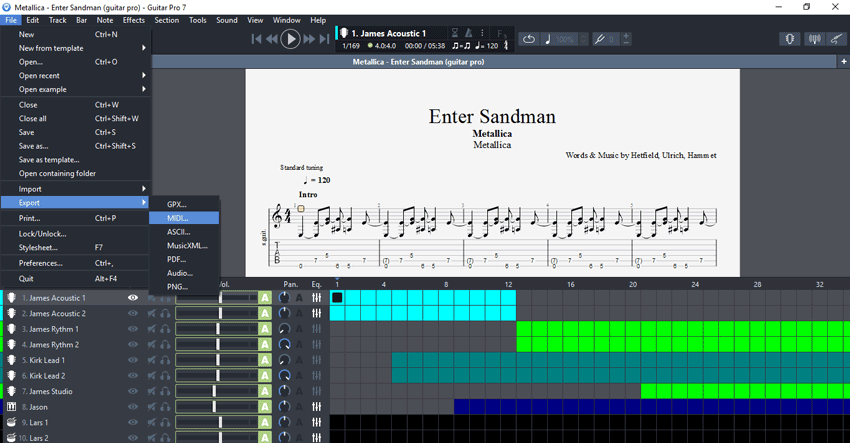
When you’re happy with your tracks you need to export it to MIDI format (File > Export > MIDI).
Importing MIDI To Your DAW
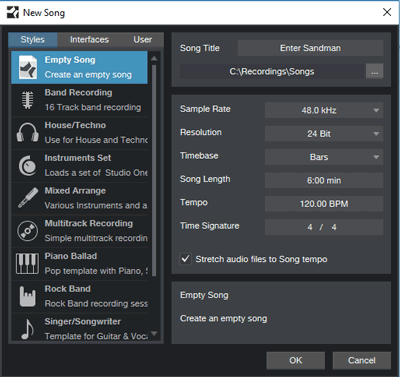
Now you can open your DAW (I’m using Studio One) and set up a new project. Here are my settings:
Now you can import the MIDI from the previous step and set up all the instrument tracks. For most DAWs the easiest way to do this is to simply drag the MIDI file into the middle of the screen. It will import the file and set up the tracks as shown below:
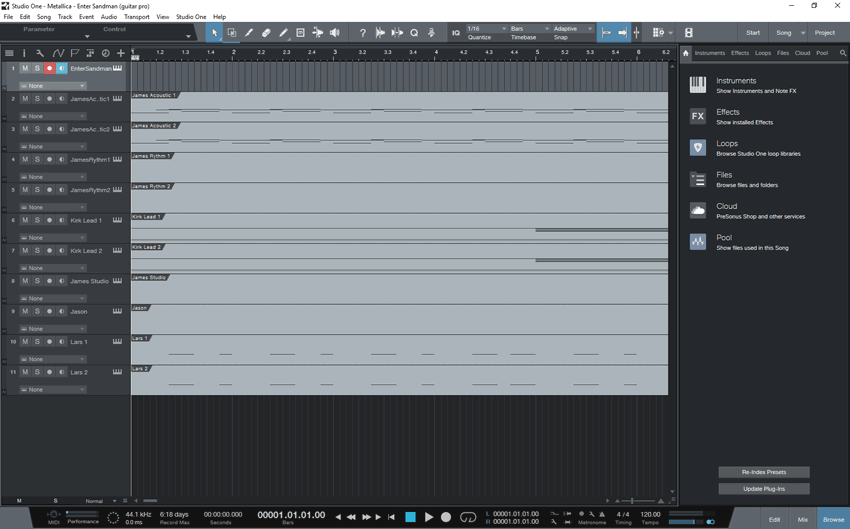
Note: this Guitar Pro file has duplicate tracks for each instrument so I simply delete the tracks I don’t need. If at any time you want to mute a track without deleting it, just hit the M on the track. Many Guitar Pro files found online include vocal tracks which can be very distracting while recording so it’s a good idea to mute any tracks you don’t need right now. You may find them useful later on so mute them rather than delete them.
If you hit play you should hear all the tracks play at the correct tempo. Now you’re ready to start recording!
Setting Up Audio Interface with ASIO4ALL
There are many different ways you can record your guitar as explained in the Recording at Home Guide. Whether you choose to record a mic’d amp, through a multi-effects pedalboard or directly is up to you. In this guide I’ll be recording direct from the guitar using an audio interface. I’ll be using an iRig HD 2 but any audio interface will work fine.
The reason I’ll be recording a direct signal is so I can use modelling software such as AmpliTube, Guitar Rig or BIAS FX to set up my tone. Recording this way gives you a lot of flexibility. If in the future I want to change the effects or amp used for the guitar tracks, I can easily jump in and change them rather than need to completely re-record the tracks.
Connect your audio interface (you will need to restart your DAW) and check that the DAW is using it. In Studio One you can check this by going Studio One > Options > Audio Setup. Make sure your audio interface is the audio device in use.
Check out the Best Audio Interfaces for Guitar in this guide.
When using iRig HD 2, it won’t show up in the list of devices as it doesn’t support ASIO. But as I explained in my review, you can use it perfectly fine after installing ASIO4ALL (freely available here and highly recommended). After installing (and restarting your DAW), select ASIO4ALL from the dropdown and click the Control Panel:
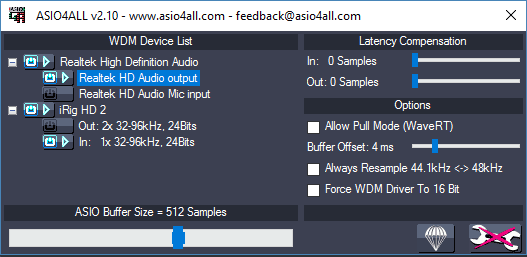
Click the wrench icon to bring up advanced options. This allows you to choose how you want to work with your computer and audio device. If you want to connect monitors or headphones to your audio interface, make sure the ‘Out’ option for the interface is enabled.
My studio monitors are connected to my computer’s audio card so ASIO4ALL allows me to use them without having to connect them to the iRig. To do this I simply enable the soundcard’s output and disable the iRig’s output. In the above screenshot you can see that the input comes from the iRig and output to the computer’s soundcard. Choose whichever setup works best for you.
Now that the audio interface is set up and ready to go, we can start recording.
Recording Guitar
Start by creating your first audio track. In Studio One you simply right click the left panel or click the Track menu:
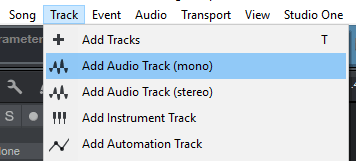
To keep this tutorial simple I’ll be using mono tracks but there may be times when setting up stereo tracks makes more sense (eg: you want to use stereo effects on your tracks).
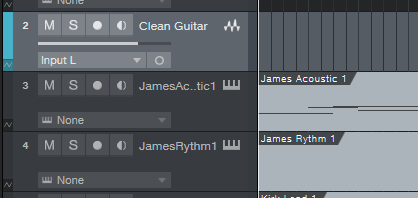
Rename your track to make it easier later on. I’ll start by recording the clean guitar parts so I’ve named the track ‘Clean Guitar’:
While you could record right now, you would hear the direct tone which may not feel very inspiring if you’re recording parts that use any gain or effects. So let’s set up the tone before we record. I’ll be using AmpliTube 4 to set up my guitar tones in this tutorial.
To apply a plugin to a track, drag it from the Effects panel (press F5 to bring up in Studio One) to the track you want to apply it to:
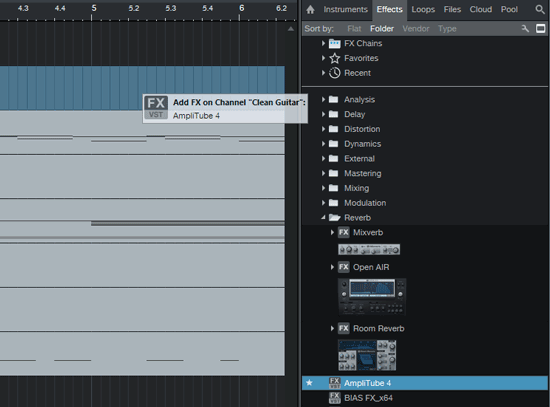
AmpliTube will now load for the new track and I can set up the tone as I want:
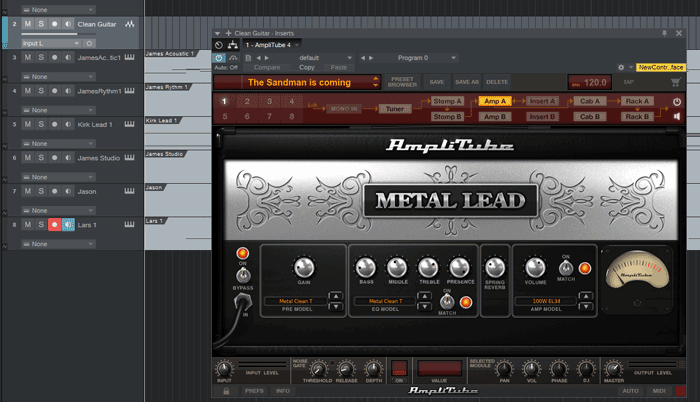
As this first track is for the clean tones in the song, I’ll set up a clean amp and add in some reverb and a subtle chorus to try and match the tone in the song. Setting up tone is outside of the scope of this tutorial and is covered in the Guitar Effects Course.
Tip: Clicking the ‘Monitor’ icon on the track bar allows you to hear your guitar signal. This is a great way to set up your tone before you start recording. Remember when you are recording direct you can easily change the tone after recording, so don’t spent too much time dialing in the perfect tone now.
Once you have a decent tone set up, you can start recording.
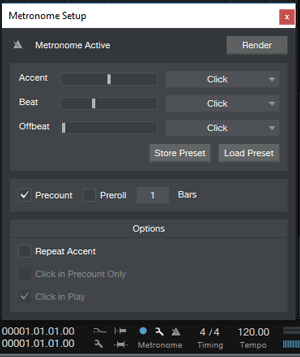
Using a precount or preroll
All DAWs allow you to set up a precount which makes it much easier to start your recording properly. A precount will give you a chance to prepare for your recording. This is crucial for this song which starts off with guitar. When using a precount, when you hit record the DAW will give you a countdown using the metronome before it starts recording. So if you set the precount for one bar, it will count 4 beats (if you’re in 4/4) and start the recording after the count is complete.
A preroll is useful when you need to record sections in a song that has already begun. Instead of having a metronome count you in, you can play a bar or two of the song before it starts recording. This makes it easy to fix mistakes as you can re-record small sections.
Here is the settings available in Studio One to give you an idea how much control you have over the settings:
After recording, you will see your audio clip like shown below:
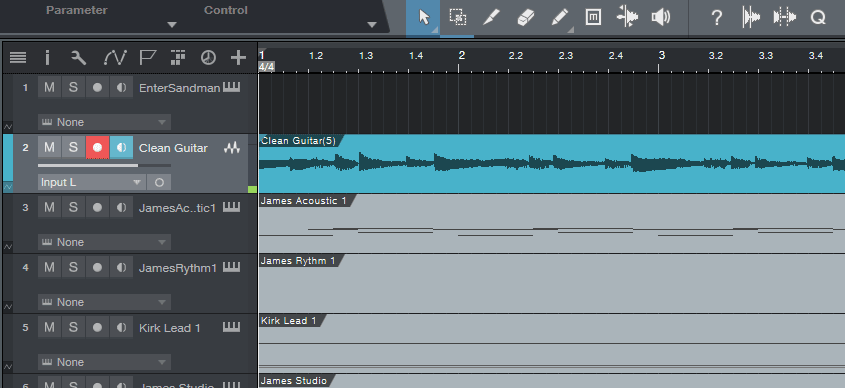
If you make any mistakes during recording or your timing is off, just hit delete and record a new take. In the above screenshot the clip is titled ‘Clean Guitar(5)’. This is because the first few takes were to try out different pickups and get a feel for what I liked. The fifth take was the one I was happy with.
While you can easily change your amp and effects settings later on following this process, it’s important you start off with a good quality guitar tone. You can’t fix it if your guitar is out of tune during recording or you used the wrong pickup. So make sure you’re happy with your tone before you hit record.
After I finish recording the clean guitar parts, I simply created more tracks for the rhythm and lead guitars following the same steps above.
Tips for Recording Guitar
There’s a lot you’ll learn as you record your first few tracks. It’s a skill like any other and can take a long time to master. Here are some basic tips to make the process a bit easier:
- Start with the right audio level. If your input level is too high, it will clip and sound horrible. If your input level is too low you’ll get a lot of background noise as you try to compensate for the low level by cranking the track up. Good quality audio interfaces should tell you when your audio level is too low or too high (eg: iRig HD 2’s blue, green, red indicator).
- Know when your audio is clipping. All DAWs will show you a red light somewhere when a track is clipping. If you see this after recording, find out where the clip occurred and rerecord the part with a lower input level.
- Record as many takes as you need. Don’t put pressure on yourself to try and get the perfect take straight away. If you try to avoid mistakes you’ll likely sound robotic when you perform. Practice recording different parts until you feel comfortable and don’t stress about mistakes. You can always record another take.
- Use fresh strings. A new set of strings will give you crystal clear recordings while older strings will produce dull recordings.
- While you can use EQ to try and improve your tone afterwards, don’t rely on it. Try to get the best possible tone straight away and only use EQ and plugins to slightly adjust or enhance your tone.
- When recording acoustic guitar, try to record multiple microphones at the same time if possible. Being able to hear your guitar from different positions and distances gives you more flexibility with your tone (eg: you can blend between different recordings).
- Try to eliminate any background noise or hum when recording acoustic guitar. The lower background noise level you can get, the more your guitar will stand out. Even the fan noise from a laptop or computer can be enough to lower the quality of your recordings.
Creating Drum Tracks
Recording drums can be significantly harder than recording guitar. If you don’t have access to an appropriate recording space, have good enough equipment or have access to a good drummer, you’re unlikely to be happy with the results of your drum tracks.
An alternative is to create drum tracks using one of the below methods.
Guitar Pro Drum Export
This is the easiest option if you need a drum track but don’t care about sound quality. If you’re recording a backing track for you to jam over, this is a quick an easy option.
Virtual instruments
If you want to create a high-quality drum track that can sound as good as a professionally recorded track, then this is an option to consider. There are ‘virtual instrument’ plugins available that take a MIDI track and create a drum track using high quality samples.
Check out some popular free and paid drum plugins in this guide. The guide explains everything you need to know about drum plugins and why they’re so useful.
To create a drum track is simple once you have the plugin installed. In Studio One I simply drag the virtual instrument onto the track (just like applying AmpliTube to the guitar track) and it loads up the plugin:

Now you can tweak the sound and mix of each piece of the kit. If I don’t like the sound of a cymbal I can instantly swap it out for different options. Then I can adjust the volume levels for each piece and can even adjust the stereo balance of the entire kit.
While the drum track for this recording project was already created for us from the Guitar Pro file, we can easily go in and edit the drums at any time. If you want to change any parts such as adding in some fills not in the original track, you can easily do so. In most DAWs you simply double click the drum track and it will bring the track up in an editor similar to the one below:
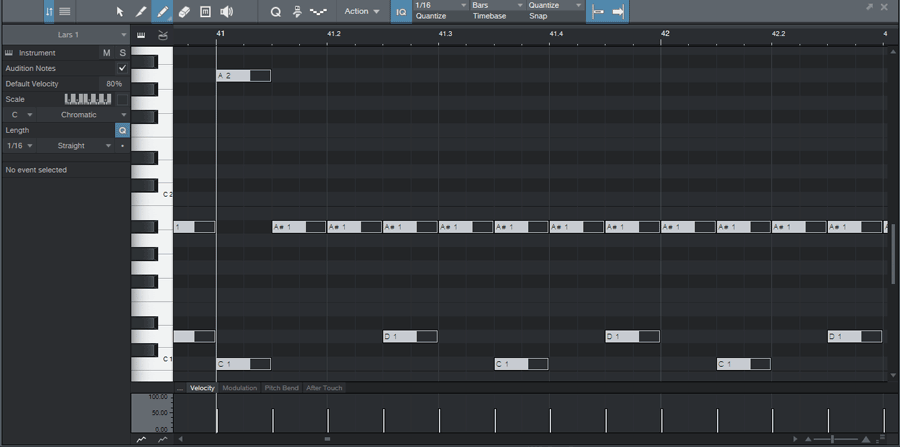
Remember that the drum track is from a MIDI file exported from Guitar Pro. The way drums work in MIDI is that every piece of the drum kit is assigned a different note which is why you see a piano layout on the left. It takes a while to get used to, but you can figure out which notes match different pieces of the drum kit. Above you can see that the kick drum is assigned to the note C1, the snare to D1, the open hihat to A#1 and a crash cymbal to A2.
Most DAWs should let you click the notes on the piano to hear what piece of the kit that note matches.
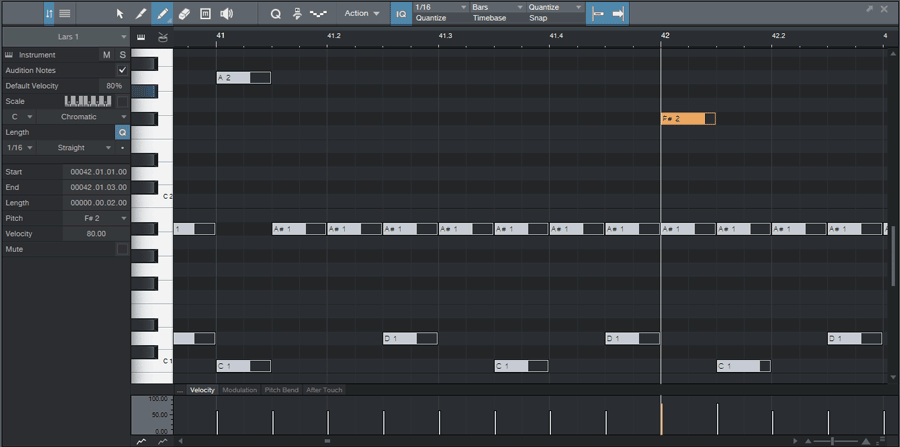
To change the drum parts, you simply draw in when you want to hear a piece of the kit. So in the below example I’ve added a different crash cymbal hit on bar 42:
If you want to learn how to write your own drum parts for your own songs, it’s a good idea to play around with a drum track like the one above in a DAW. Get used to changing the beat around and writing fills.
Find out how to write your own drum tracks in this tutorial.
Adding Other Virtual Instruments
If you can play other instruments or can get other musicians in to record different parts, great! All you need to do is follow the steps earlier to create new audio tracks and record those parts. But if you can’t record other instruments you need, you can still produce good-sounding tracks using virtual instruments just like the drums for this track.
For any instrument, you have two basic options:
- Export the audio from Guitar Pro
- Download a virtual instrument plugin for your DAW and use the MIDI file
The audio export from Guitar Pro will give you decent results for most instruments and is a free way of filling in instruments you can’t record. But if you want higher quality, you’ll need to look at investing in some virtual instrument plugins.
Two options worth checking out are SampleTank by IK Multimedia and Kontakt by Native Instruments. These plugins contain libraries of different instruments and can be expanded with a lot more instruments as you need. If you’ve never heard of either of these before, download the demo or free version to get a feel for what sample based libraries are all about.
There are countless virtual instrument plugins available and it can be overwhelming trying to figure out what suits you best. Start out simple by using free plugins until your recording skills develop. Then you can turn more attention to adding high quality instruments to your recordings. Starting off with low quality plugins or Guitar Pro audio exports is fine because you can always replace those instruments with something better in the future.
Mixing and Mastering
Once you have all your tracks recorded, you can look at mixing and mastering. Long tutorials could be written on these topics so I’ll simply provide you with a quick summary of what is involved. Then you can decide how much time and effort you want to put into learning these skills.
Mixing your tracks involves adjusting the levels of each track so the overall song sounds right. When you listen to a professionally produced song, the drums, guitar, vocals and other instruments all fit nicely together. Listen to your favorite songs and you’ll be able to hear all instruments without any one overpowering the others.
If you listen to your song now, the chances are some instruments will overpower others. Trying to get an overall balance across all your tracks can be tricky. Using EQ to carve some space for each type of instrument plays a big role in mixing but it’s outside of the scope of this tutorial. For now we’ll just look at how to adjust the levels of each track so they all fit together.
All DAWs will have a mixing screen similar to the one shown below (press F3 in Studio One):
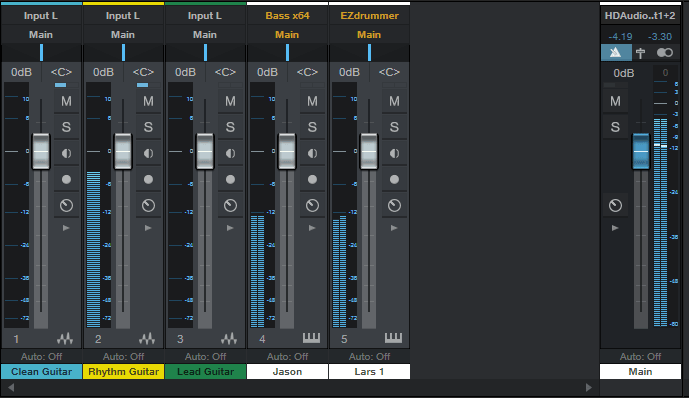
You can see all the tracks with individual volume sliders just like a physical mixing desk you would see in a recording studio. Here you can start making adjustments to each track to try and balance out all tracks.
On each volume slider you’ll notice that there is a zero level where the slider starts by default. You can move the slider above this level to raise the volume and move the slider lower to lower the volume. If you have a few tracks that are too quiet, rather than crank those tracks’ sliders, I highly recommend lowering the louder tracks instead. There are times when it makes sense to boost a track above the zero point, but it’s a better practice to get used to lowering loud tracks.
Here are some basic tips to help you with your mixing:
- Avoid clipping at all costs – if you see any track with a red indicator, lower the volume to stop it clipping. If all your tracks are too loud, the main track (shown on the right) will clip so watch that as well.
- If you have multiple guitars playing at the same time, think about how each guitar sits in the stereo mix. For example if you have two identical rhythm guitars playing at the same time, try panning one to the left and one to the right.
- If a track’s volume is way too low or really inconsistent, instead of cranking the track apply a compressor to it. The compressor can be used to raise the volume of that track and give it a more consistent level.
- Alternate between listening to your song on speakers as well as headphones to check that it works on different devices. For example you might notice that your speakers add a lot of bass to your sound so when you listen to your song on headphones it sounds thin and weak. This is why a good set of studio monitors are really useful.
After you have adjusted each track and are happy with the overall mix, you can turn your attention to mastering.
Mastering is a complex task that can cost a lot of time and money for professionals. The main idea behind mastering is to take your mixed song and apply different compressors and adjustments to give it a consistent volume level and quality. Mastering is a tough skill to learn so we’ll keep things simple by just applying some basic compression to the song so you can get a rough idea of what mastering is about.
Applying effects to the entire song is just like applying plugins to individual tracks. This time you apply the plugins to the main track. In the screenshot earlier on the right you can see a main track with it’s own slider. Any plugins you apply to that track will apply to the entire song.
To apply a compressor to the entire song, drag a plugin to the main track as shown below:
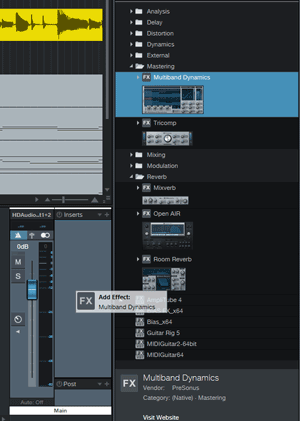
Most DAWs will come with compressor plugins otherwise you can download one online. In Studio One there is a ‘Mastering’ category and I’ve applied the ‘Multiband Dynamics’ plugin to the main track. As you learn about compressors (here’s a Guide on Compressors to get you started) you’ll get better results out of them.
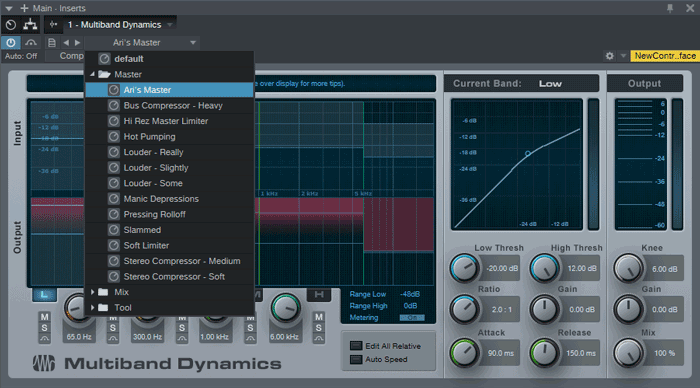
If this is the first time you’ve used a compressor when mastering a track, try out the plugin’s presets to get a feel for how a compressor can enhance your song. In the below screenshot you can see that there are a few different presets for mastering as well as a different set of presets for mixing individual instruments. Some presets may work well with your song while others won’t. Get a feel for how they work and you’ll end up with a better sounding song.
You may need to adjust the overall volume level after applying a compressor. Make sure the main track never clips but try to keep it as high as possible.
Exporting Your Song
After you’re happy with the overall mix and levels, you can mixdown your song into an MP3 file (or other formats). In Studio One you simply select Song > Export Mixdown. Other DAWs will have similar options. You should see something similar to the screenshot shown below:
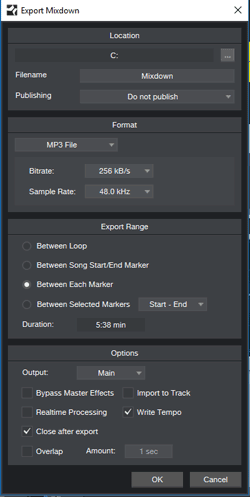
When mixing your song down you’ll be able to choose your file format, bitrate, sample rate and other important details. In Studio One you need to select what part of the song to export so make sure you get the entire song. This can be done using markers or creating a loop.
Once you export your song to a file, listen to it on as many different devices and speaker systems as you can. Think about what you like about it and what you might want to improve. Recording your music is a deep skill that can take sound engineers a long time to master so don’t stress if you’re not happy with your first attempts.
Producing Better Quality Tracks
The more you practice recording, mixing and mastering your songs, the better they will sound. There are plenty of tutorials on YouTube that can take you further than this basic overview, so keep practicing.
If you found this tutorial helpful, please subscribe for email updates and I’ll send you more useful guides, lessons and reviews in the future.
To learn more about how to use effects to help you get a better guitar tone in your recordings, check out the Guitar Effects Course here. For more information on recording equipment, check out this guide.