
In this guide, you will learn how to record guitar in Reaper with step-by-step instructions.
Reaper is a popular DAW (Digital Audio Workstation) with guitarists due to a great layout that works well with guitar and low cost.
Recording guitar with Reaper is simple once you have your audio interface or USB microphone set up. Follow the below steps to get started recording your guitar in Reaper.
After you read this guide, check out this Ultimate Guide to Recording Guitar at Home for an in-depth look at recording.
If you’re trying to decide which DAW to use, check out a comparison of the best DAWs for Guitar in this guide.
Step 1: Connect Audio Interface or Microphone
You can use an audio interface or a microphone to record your guitar or other instruments in Reaper.
If you don’t have a microphone or audio interface, learn about the different recording options in this guide.
In this tutorial, I’m using an iRig HD 2 (check out my review to see why I highly recommend it for electric guitar) and plugging it into my PC’s USB port.
One of the most popular audio interfaces I recommend if you want to record acoustic or electric guitar (or vocals and other instruments) is the Focusrite Scarlett range (link to Amazon for details and different options).
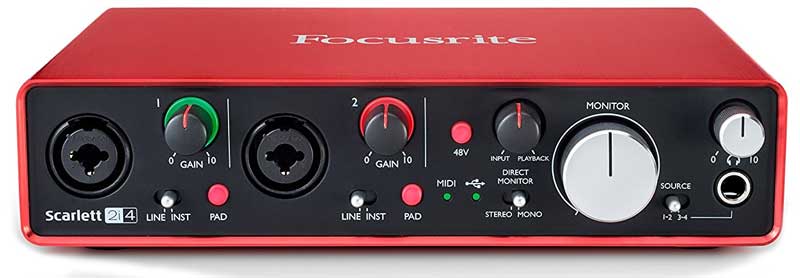
To record guitar using a Focusrite audio interface, simply plug it into your USB port before you open Reaper.
Alternatively, if you want to record your guitar (or guitar amp) with a microphone, you can buy a USB microphone like this one.

When I’m recording vocals, instead of using an audio interface, I simply plug in my iRig Mic Studio (link to review). A USB microphone like this provides a simple setup.
For most guitarists, I highly recommend using an audio interface like the Focusrite as it gives you far more flexibility.
Being able to plug in multiple instruments or microphones and record them all at the same time is incredibly handy.
Once you have connected your audio interface or USB microphone to your computer, you can move on to the next step.
Step 2: Add Audio Interface to Reaper
Open Reaper or download and install it from here if you don’t already have it.
Before you start recording, you need to tell Reaper what inputs and outputs to use.
To add your audio interface to Reaper, go to Options > Preferences or press Ctrl P.
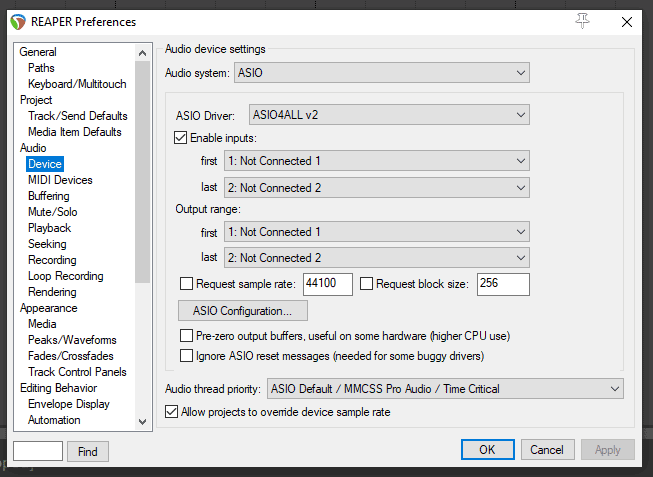
In the Audio > Devices option on the left, you can set up your audio interface in Reaper.
If you’re on a PC, select ASIO as the audio system. The options will look different for Mac users and you simply select your audio device.
Click the drop-down menu for the ASIO Driver to see what your options are. If you have an option that matches your audio interface, choose it.
For example, if you have a Focusrite audio interface, you should see an option called ‘Focusrite USB’. Choose that option and Reaper will recognize your interface.
Click the ASIO Configuration button and select the inputs and outputs you want to use.
Audio Interface Not Recognized in Reaper
Some audio interfaces won’t be recognized in Reaper and you won’t see an option in the ASIO Driver dropdown menu.
This doesn’t mean that your audio interface doesn’t work with Reaper, all it means is that there isn’t a dedicated ASIO driver for your interface.
The good news is you can easily fix this by installing ASIO4ALL.
As my iRig doesn’t have a dedicated ASIO driver, I installed ASIO4ALL to use it with Reaper.
Using ASIO4ALL in Reaper
ASIO4ALL is a free audio driver that gives you far greater control over your interface compared to standard audio drivers.
If your audio interface doesn’t appear in the drop-down menu in Reaper, I recommend using ASIO4ALL.
First, download and install ASIO4ALL from this website.
Once ASIO4ALL is installed, close and re-open Reaper, then go to the audio devices settings.
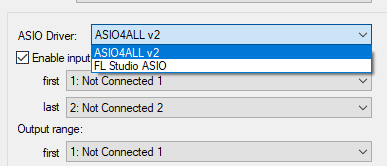
If you select the ASIO Driver drop-down menu, you will now see a new device called ASIO4ALL:
After you select ASIO4ALL, click the ASIO Configuration button to bring up the settings:
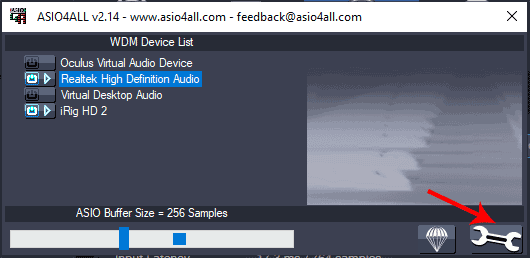
You can see which audio devices are enabled in this view, but I recommend clicking the spanner icon on the far right to access the advanced options view:
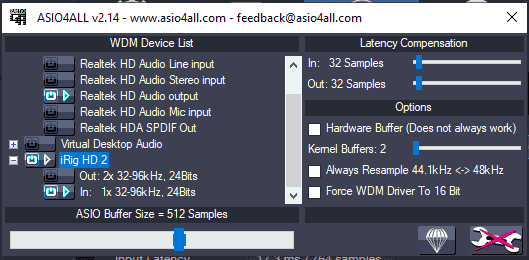
From this view, you can enable and disable any device you like.
Simply click the blue power icons next to any device to enable or disable them.
In the above screenshot, you can see that I’ve enabled my iRig’s input and my computer speaker’s output.
This means I can record with my iRig and listen to the playback through my normal computer speakers.
This makes ASIO4ALL a powerful way to control multiple inputs and outputs. You can route your signals in any way you want.
Once you have set up your audio interface’s inputs and outputs in Reaper, you can move on to the next step.
Step 3: Set Up a Track in Reaper
One of the reasons why Reaper is so popular is because it is so easy to use compared to other DAWs (find out about other DAWs here).
While other DAWs have separate options for audio or MIDI tracks, Reaper does everything all in one option.
Create a Track
To create a track in Reaper, simply double click anywhere on the left panel:
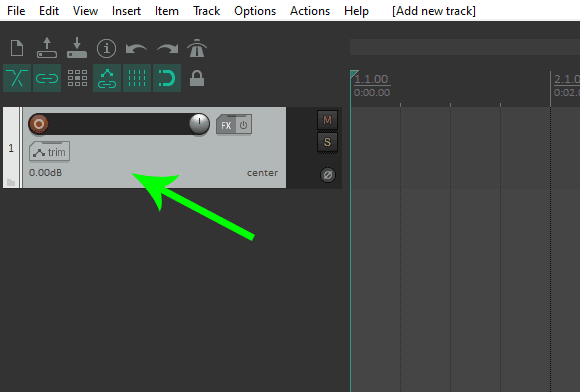
As you can see from the above screenshot, Reaper will create a new track.
At any time you can add new tracks by double-clicking in the blank space below the other tracks.
Arm Track for Recording
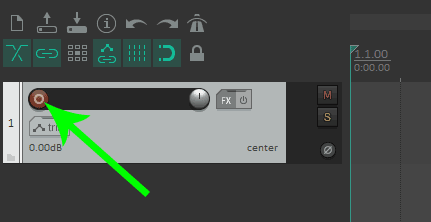
Once you have a track set up in Reaper, you need to ‘arm’ it for recording.
Click the red button on the track to arm it for recording:
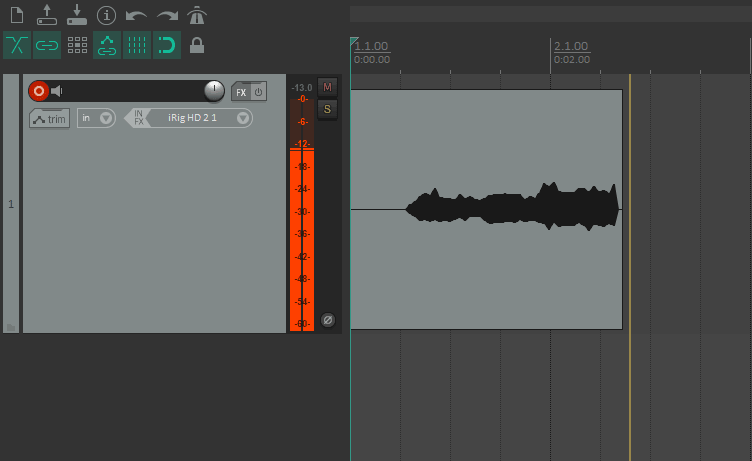
You will see the button glow red and an audio meter appear on the track as shown below as well as on the mixer at the bottom of your screen.
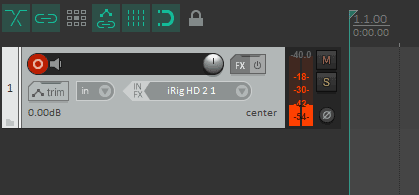
You may also notice the track display your audio interface input. In the above screenshot, you can see that Reaper automatically selected my iRig’s stereo input for recording.
Your audio interface may have multiple inputs, so if you want to change the input the track uses, click the dropdown arrow as shown below:
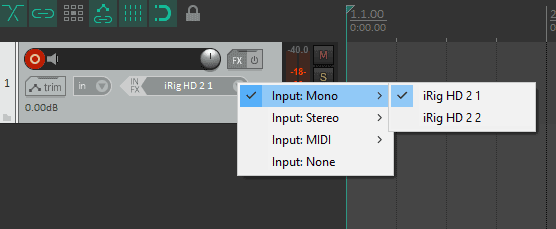
You will see all the options available from your audio interface as well as an option to take MIDI input for keyboards or virtual instruments.
In this example, I’m recording a guitar, so I’ve selected the first mono input on my iRig.
Audio Monitoring
As soon as you arm a track for recording in Reaper, you should start to hear whatever is connected to the input channel.
This means if your guitar is plugged in and you have selected the correct input channel, you should hear your guitar through your speakers.
This is handy, but sometimes you may want to turn this off.
You can toggle between three different audio monitoring settings by clicking the speaker icon next to the red recording icon:
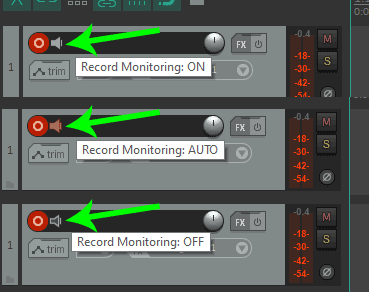
When you click the speaker icon, it toggles between three modes:
- ON (grey): you will hear the input device over your speakers
- AUTO (red): monitoring will mute when you hit play, then unmute when playback has stopped
- OFF (black): monitoring will be muted
If you can’t hear your guitar in Reaper, check that you have the correct input channel selected, make sure the track is armed, and make sure audio monitoring is on.
Step 4: Check Audio Levels
Before you start recording, you need to make sure the audio levels are set properly.
Having poorly set up audio levels can ruin a recording.
The audio meter on the track is handy to see the current audio level for your guitar.
To make it easier to see the monitor, drag the bottom of the track down to stretch it out:
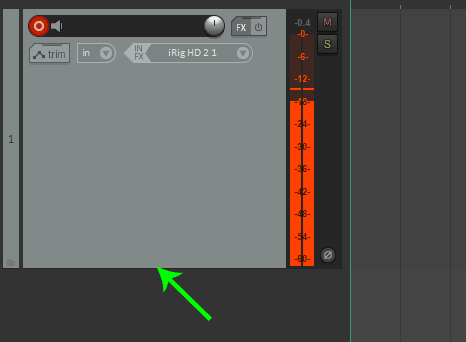
This makes it easier to check your audio level and make sure there aren’t any problems.
If your audio level is set too low on your audio interface, you’ll end up with a quiet recording.
Turning up the volume in Reaper’s DAW won’t solve the problem of having a quiet recording.
You need to turn the level up on your audio interface so you have a strong, but not maxed out recording.
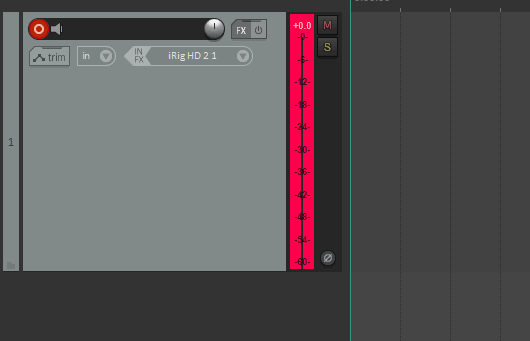
If your input level is too high, the audio monitor will max out and turn pink as shown above.
Even if the meter only briefly maxes out, you’ll end up with unwanted distortion in your recording.
The meter will stay pink to let you know if it has maxed out at any point. Click the pink square at the top of the meter to reset it.
If your meter maxes out when you play your guitar hard, turn the level down on your audio interface.
You want a strong, but not clipping audio level before you start recording.
Aim for the meter to fill up around 75% most of the time while you are playing (around -12 to -18 dB). It’s okay if the peaks are higher as long as they never hit the top (0dB).
Once you have a good input level, you can move to the next step and start recording.
Step 5: Record Your Guitar
Now that you have a track set up in Reaper and have your audio interface set to a good level, you can start recording.
Recording guitar in Reaper is as easy as clicking the recording button on the bottom panel or pressing Ctrl R.

As soon as you hit record, you’ll see Reaper display the recording on the track’s timeline as shown below:
Once you have finished recording, press the stop button.
Depending on your settings, Reaper will display a window asking if you want to save the recording file:
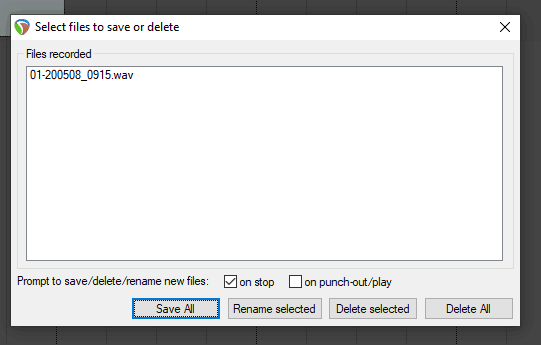
I recommend unchecking the ‘on stop’ option to stop Reaper asking this all the time.
You can easily delete recordings you don’t want to keep, so having this popup is overkill.
Now that you know how to record guitar in Reaper, let’s look at how to use effects and plugins on your recordings.
Adding Effects and Plugins in Reaper
Reaper is compatible with VST plugins, which means you can access a wide range of effects and amp modeling plugins such as AmpliTube, BIAS FX, or Line 6 Helix Native.
Reaper auto-detects plugin folders when you first load it, so if you already have plugins installed on your computer, Reaper should find them.
Find out everything you need to know about plugins including the best options in my Ultimate Guide to Guitar Plugins here.
To add an effect or plugin to a track, click the FX button as shown below:
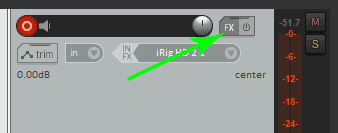
Reaper will open the effects for the track as well as a window asking you to choose a plugin to add to the track.
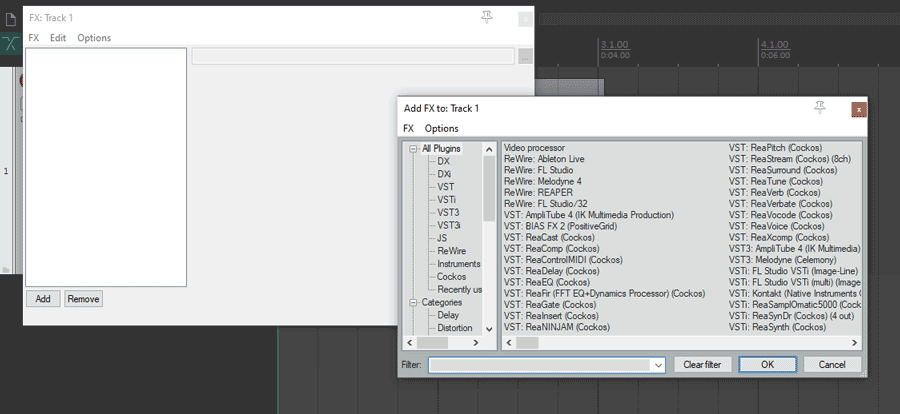
You can see that Reaper has automatically found other plugins I had installed before Reaper as well as plugins that come with Reaper.
To add a plugin, select it and press OK.
In the below screenshot, you can see that after I selected AmpliTube, it adds it to the track and loads the AmpliTube screen.
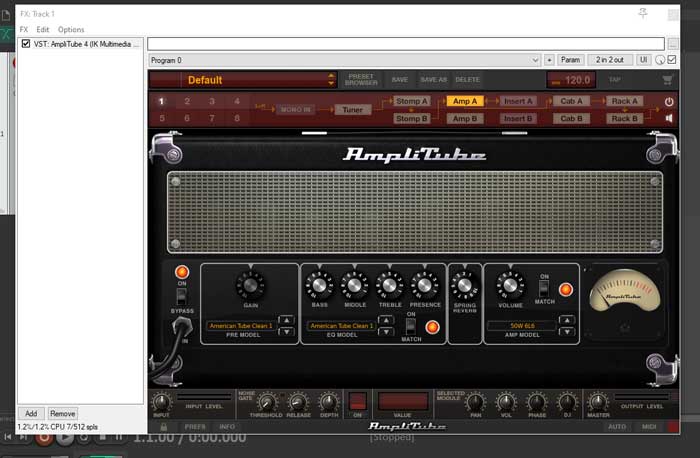
In this view, you can:
- Enable or bypass plugins by clicking the checkbox for each one
- Add or remove plugins from a track with the buttons on the bottom left
- Load or save presets for any effects
- Change the order of plugins by dragging them around on the left panel
- Edit each plugin’s settings
If you close this window, simply press the FX button to bring it back up again.
Check out some of the best guitar plugins in this guide.
Extra Reaper Tips
The above tips and advice will give you a good starting point for recording guitar in Reaper. Here are two ways you can get the most out of Reaper:
Use a DAW Controller
You can use a keyboard and mouse to access all of Reaper’s shortcuts and commands. But it does take some time to get used to what all the shortcuts are.
You can definitely memorize the most common shortcuts and key combinations, but there is an alternative worth considering.
A DAW Controller is a piece of hardware you can plug into your computer and control any DAW including Reaper. The basic idea with these controllers is that instead of only using your keyboard and mouse, you can also use buttons, knobs, sliders, pads, keys, and wheels to change settings, tweak your effects, record virtual instrument parts, and more.

The above controllers give you an idea of the wide range of controllers out there. The right type of controller for you depends on how you want to use your DAW.
If you haven’t used a DAW controller before, it makes a massive difference in how quickly you learn to use the software and how natural it feels to use. You can set up the knobs on a controller to control a plugin settings (eg: amp or effects parameters), tap out rhythm parts for a virtual drum kit, or start recording from the other side of the room (using a wireless controller).
Try Some Plugins
Third-party plugins allow you to extend Reaper in impressive ways. The number of amazing plugins available today is staggering and once you find the right plugins for you, you’ll wonder how you lived without them.
As a guitarist, you will likely want to try out a guitar amp and effects plugin such as AmpliTube, BIAS FX, or Guitar Rig.
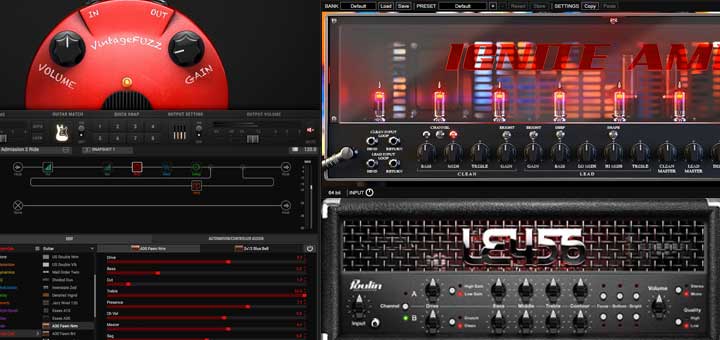
Check out some popular Guitar Plugins in this detailed guide.
Guitar amp and effects plugins are useful, but they’re only a starting point.
The next type of plugins I suggest trying out are virtual instrument plugins that allow you to create realistic-sounding instruments for your recordings or backing tracks.
You could use a drum plugin to create drum tracks, a piano plugin for piano parts, or even a plugin that gives you an entire orchestra at your fingertips.
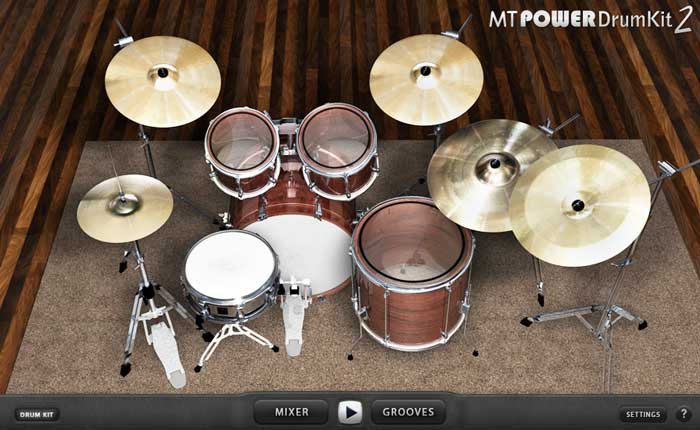
A good way to get started with virtual instrument plugins is with drum plugins. Learn how easy it is to create drum tracks for your recordings in this tutorial.
While nothing may beat a real drummer in a professional recording studio, drum plugins can get you surprisingly close.
Check out some free and paid drum plugins in this guide.
Once you learn how to create drum tracks using plugins, you can get some plugins for any other instrument you want. The range of realistic-sounding virtual instrument plugins available today is incredible and worth looking into.
Recording Guitar in Reaper FAQs
Now that you know the basics of recording guitar in Reaper, here are some common questions you might have or problems you might encounter.
How to Reduce Latency in Reaper
You can reduce latency in Reaper by decreasing the buffer length or increasing the sample rate. These settings can be changed in the ASIO configuration screen and the audio settings menu.
Decreasing buffer length from 512 to 256 can make a big difference in latency. If your audio interface supports higher sample rates, you may also want to try increasing sample rate.
Be aware that lower buffer length or higher sample rates increase the amount of work on your CPU. So if you start hearing glitches or stuttering in audio, you will need to back off the changes.
Reaper Not Recognizing Audio Interface
If Reaper does not recognize your audio interface, it does not mean your audio interface isn’t supported. All it means is there isn’t a dedicated driver for the interface. Installing ASIO4ALL will allow Reaper to use your interface.
Follow the earlier instructions in this guide to download and install ASIO4ALL.
Reaper Not Picking Up Guitar
If Reaper is not picking up your guitar, first check your ASIO Configuration settings and make sure the correct input is made available to Reaper. Then check the track input and make sure it matches your guitar. Finally, check the levels on your audio interface as well as in Reaper.
Also, make sure a track is armed for recording and audio monitoring is on.
How Do I Monitor My Guitar in Reaper?
To monitor your guitar in Reaper, arm a track for recording. You will instantly hear your guitar if the correct input is selected. Click the speaker icon on the track to switch between monitoring modes.
Read Step 3 in the above advice to learn about audio monitoring.
Does Reaper Have a Guitar Tuner?
Yes, Reaper comes with a guitar tuner as a VST plugin. To use the guitar tuner in Reaper, open the effects panel for a track and search for ReaTune. If audio monitoring is turned on, you will be able to use the tuner on your guitar.
The below screenshot shows what the guitar tuner in Reaper looks like.
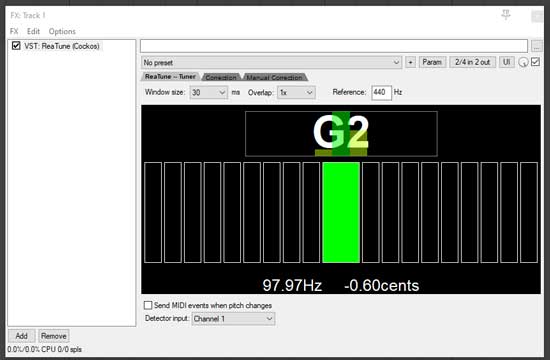
There are other guitar tuner plugins you can use, but Reaper does come with one.
Is Reaper Good for Recording Guitar?
Reaper is a great DAW for recording guitar because of the simple interface, low price, and portability. Guitar tracks are easy to set up and record in Reaper and you can take Reaper with you on a USB stick to use anywhere.
See how Reaper compares to other DAWs in this guide.
Learn more about recording guitar at home in this guide.