
If you want to record and create your own tracks, you may need to create drum tracks as well.
While you get the best results when recording an actual drummer in a studio, not everybody has that option.
In this guide, I’ll explain three different ways you can create your own drum tracks in any DAW for your recordings.
I suggest trying all three methods so you can figure out which method suits you best.
Check out this Guide to Drum Plugins to find a plugin that suits your needs.
What You Need to Create Drum Tracks
You need a few things to create realistic-sounding drum tracks for your recordings. There are both free and paid options that vary in quality.
The first thing you need is a DAW (Digital Audio Workstation).
A DAW is what you will be recording your guitar parts in and what you will set up your drum tracks in.
If you don’t already have a DAW, check out this guide on the Best DAWs for Guitar to find one that suits you.
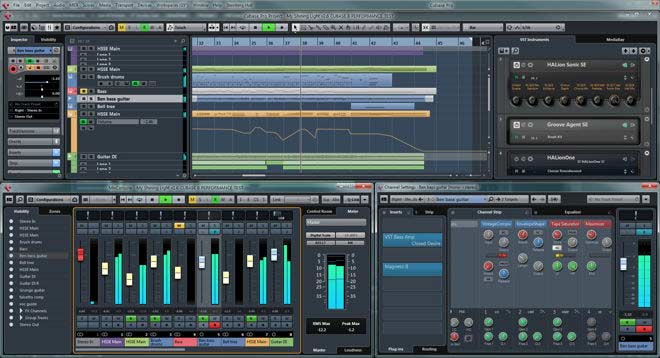
If you haven’t used a DAW before, the above screenshot may look intimidating. But I have tutorials that explain the basics of recording guitar in the most popular DAWs, so you’ll be fine.
The next thing you need is a Drum Virtual Instrument Plugin.
Virtual instrument plugins allow you to create tracks for instruments you’re unable to record yourself. You can find virtual instrument plugins for piano, bass, drums, keyboards, violin, cello, saxophone, or almost any other instrument you can think of.
Virtual instrument plugins have come a long way and when used properly, they can sound incredibly realistic. While nothing may ever be able to completely compete against an actual musician performing on real instruments, virtual instrument plugins can get surprisingly close.
There are quite a few free and paid virtual instrument plugins for drums available.

The above screenshot shows what a typical virtual instrument plugin looks like for drums. You’re able to load in different sounds for cymbals, snares, kick, and toms to suit different styles of music.
The basic idea with a virtual instrument plugin is that you set up a drum track in your DAW, then the plugin will play the appropriate samples to match the parts you create.
Check out this guide to the Best Free and Paid Drum Plugins to find one that suits you.
If you’ve never used a drum plugin before, grab one of the free plugins covered in the guide to follow along with this tutorial. I’ll be using a free drum plugin called MT Power DrumKit 2 in this tutorial, but you can use any plugin you want.
Method 1: MIDI Piano Roll
The most common way of creating drum tracks in a DAW is to use the DAW’s piano roll.
Most DAWs will have a piano roll where you can draw notes on the screen to play on a virtual instrument. With this method, you draw the drum parts into the piano roll, then the drum plugin will play the parts you write.
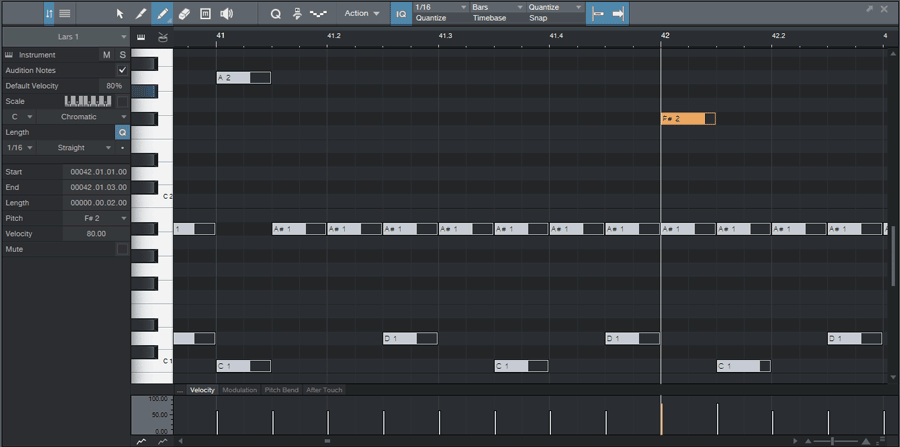
The above screenshot shows what a typical piano roll looks like with drum parts.
It might look confusing at first, but it doesn’t take long to feel comfortable with writing drum parts in this way.
The basic idea is that each note position matches a piece of the drum kit. So in the above example, you can see that the note C1 is used in the drum plugin for the bass drum, D1 for the snare, A#1 for the hi-hat, and A2 & F#2 for different crash cymbals.
I know that looks confusing, but I’ll go through ways of making this easier to use.
Here are some advantages to writing drum parts in the piano roll:
- Easy to change parts at any time
- Easy to copy/paste parts to fill an entire song
- Handy tools to adjust hit velocity or ‘humanize’ timing
The main disadvantage of this method is the learning curve. You need to learn where each part of the drum kit lines up in the piano roll and learn to write drum parts by drawing each note.
Some DAWs are able to display the drum kit parts instead of piano keys, which makes it much easier to write parts.
Setting Up an Instrument Track
The first step is to install a virtual instrument plugin and set up a track for your drums.
In this example, I’ll be using Studio One as my DAW. The steps may look different for each DAW, but the same basic steps will apply.
In your DAW, set up an instrument or MIDI track (not an audio track). Instrument tracks use MIDI to talk to the drum plugin.

Now you can add the drum plugin to the track so any drum parts you create in the piano roll will control the drum plugin.
You will find your drum plugin either in your plugins view or in a separate virtual instruments view (depending on the DAW).
In Studio One, you simply go to the Instruments library and drag the plugin onto the track as shown below.

Once you add the plugin to a track, you will see the plugin open. Depending on your plugin, you can select different types of drum kits or adjust the sound for each part of the kit.

While each DAW looks different, the main steps should be the same for each one. Set up an instrument or MIDI track, then add your drum plugin to the track.
Creating Drum Parts
Once you have an instrument track set up and linked to a drum plugin, you can start creating drum parts.
Open the piano roll for your track. Some DAWs will have a button to open the piano roll.
In Studio One, you double-click a blank area of the track to create a part. If your DAW doesn’t have a button to access the piano roll, try double-clicking the track to create a part.

Once you have created a blank track, double-click it to open that track in the piano roll.

In the above screenshot, you can see that Studio One opens the piano roll in the bottom half of the screen. The piano roll is incredibly useful when writing parts for other instruments.
For example, most DAWs will give you a few different ways to edit tracks.
Studio One has three options: Piano View, Drum View, and Score View as shown below:
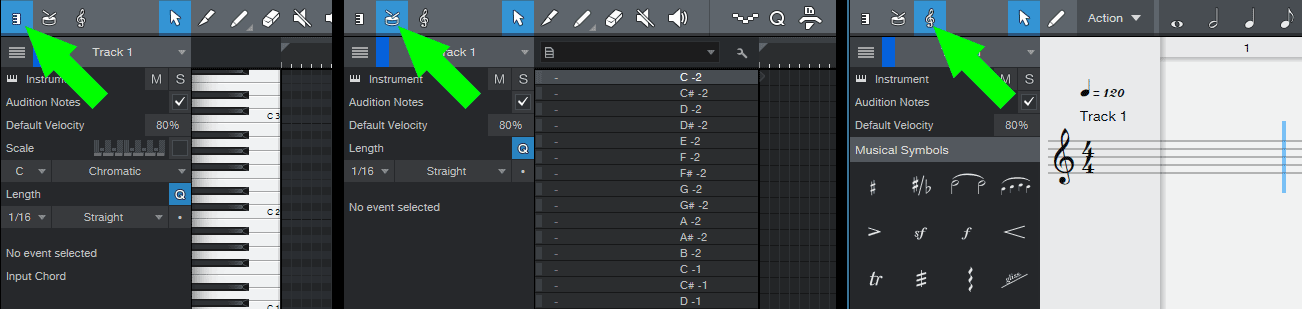
As we’ll be creating drum tracks, it makes sense to use the Drum View.
The basic idea with the Drum View is that you can label each note position to match the piece of the drum kit. So instead of having to memorize the notes and which note lines up to each piece of the drum kit, you can easily see where the bass drum, snare, and other pieces are.
Some plugins will automatically label the positions, while others you might need to manually label.
With the MT Power DrumKit 2 plugin, it comes with preset files for different DAWs to automatically label the drum view.
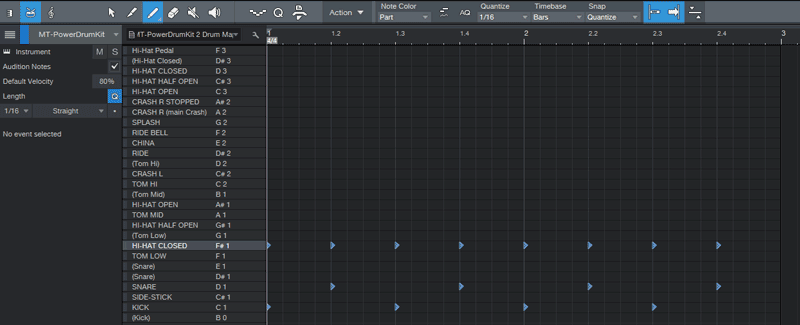
Here’s what a labeled drum map looks like in a DAW:

As you can see, this makes it far easier to write drum parts compared to using the piano view. If you want to add a kick drum, ride cymbal, or any other piece, you can easily find them on the list.
Once you have this all set up, you can start writing parts.
With the piano roll, writing parts for drums is as simple as drawing on the grid where you want each hit to go.
The grid splits up the timeline into beats and bars. If the display is showing the timebase as ‘seconds’, change it to ‘bars’. The default will be 4/4 time, but you can easily change this at any point along with changing the tempo.
Here’s what a standard rock beat looks like for two bars:
Studio One shows each hit as a triangle. Other DAWs may show these as blocks, but they all work in similar ways.
If you hit play in your DAW, you should be able to hear any beat or part you create. If you close the piano roll, you should see the part show up in your track similar to the screenshot below:
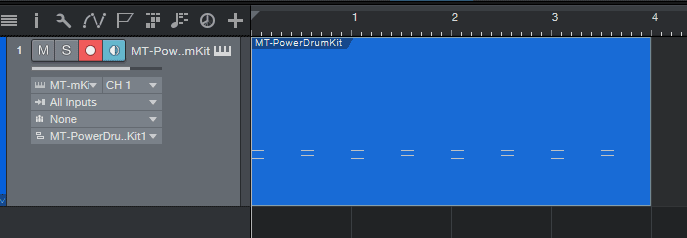
The above screenshot shows the time in seconds, but you can easily switch it to show bars to see how many bars you have written for your drums.
From here, you can easily copy and paste parts you create, you can move them around, or go back into the piano roll to edit and add new parts.
I know this probably seems complicated at first, but after you do this once, you’ll see that it’s quite easy to set up and write drum tracks using a piano roll in your DAW. Even if you prefer to use one of the other methods covered below, it’s handy to know how to create and edit drums in the piano roll.
For example, I prefer to create drum parts in Guitar Pro (covered in Method 3), but it’s handy to be able to instantly go into the drum track in the DAW and change parts using the piano roll.
Method 2: DAW Pattern Sequencer
While the piano roll is extremely flexible for creating entire drum tracks, there may be times when you prefer using a pattern sequencer.
Pattern sequencers are how electronic musicians have been creating virtual drum parts for decades. They’re simple to use and allow you to quickly create patterns to copy/paste throughout your song.
Most DAWs will have a pattern sequencer and some DAWs such as FL Studio use pattern sequencers as the main focus.
The big advantage of using a pattern sequencer is that it can be much faster to create drum parts. There are usually many tools built into sequencers to make repeating things such as hi-hat patterns a breeze. You can literally create a full drum pattern in as few as four clicks.
Setting Up an Instrument Track
Before you start creating parts in the pattern sequencer, you first need to set up a track for your drums.
You follow the same steps to do this whether you want to use the piano roll or pattern sequencer.
In your DAW, set up an instrument or MIDI track (not an audio track). Instrument tracks use MIDI to talk to the drum plugin.
Now you can add the drum plugin to the track so any drum parts you create in the piano roll will control the drum plugin.
You will find your drum plugin either in your plugins view or in a separate virtual instruments view (depending on the DAW).
In Studio One, you simply go to the Instruments library and drag the plugin onto the track as shown below.
Once you add the plugin to a track, you will see the plugin open. Depending on your plugin, you can select different types of drum kits or adjust the sound for each part of the kit.
While each DAW looks different, the main steps should be the same for each one. Set up an instrument or MIDI track, then add your drum plugin to the track.
Open Pattern Sequencer
With your instrument track set up, you can now open your pattern sequencer and start writing drum parts.
In Studio One, press Ctrl+Shift+P to insert a blank pattern part. Alternatively, you can create a normal instrument part, then right-click it and convert it to a pattern part by going to the Instrument Parts > Convert Part to Pattern menu.
Double-click the pattern to open the pattern sequencer:

At first, this may not look that different from the other view. But pattern sequencers can be extremely powerful.
Here’s what a typical rock drum beat looks like in this pattern sequencer:

The above screenshot should start to make it clear how easy sequencers are to use and how clear they can sometimes look compared to using a piano roll.
There’s a lot of features I could talk about, but features vary depending on your DAW, so play around with the sequencer and try writing different types of patterns and beats.
Method 3: Guitar Pro
With the first two methods, you write your drum parts in your DAW. Writing drum parts in a DAW is a great way to come up with parts as you record your guitar track. You can experiment with coming up with drum parts that match what you have just recorded.
But what if you want to write your song outside of a DAW? There are a few ways you can do this and I’ll share the method I use.
I compose my music using Guitar Pro 8 (link to my review). In Guitar Pro, you can write guitar, bass, keyboard, drum, or any other instrument tracks using Guitar TAB or Standard Notation (or both).
The basic idea of this method is to write your drum parts in Guitar Pro (or any other similar program), export the MIDI file for that track, then import the MIDI file into your DAW.
The advantage of this method is that you can write your drum parts alongside your guitar parts without needing to record anything first. The way I write my music is to come up with a part on guitar, enter that part into Guitar Pro, then come up with drum parts in Guitar Pro that match the guitar parts.
Everybody is different and you may prefer writing drum parts in your DAW, but some guitarists may prefer this method – especially if you already use Guitar Pro.
The other big advantage of using Guitar Pro to write your drum tracks is that you can study other drum tracks in any Guitar Pro file you download.
I learned to write drum parts by studying the Guitar Pro transcriptions of drum tracks in music I liked. If you hear a drum fill or a pattern you like the sound of, you can download the Guitar Pro file for that song and study the drums.
Writing Drums in Guitar Pro
Start by creating a drum track in Guitar Pro. Go Track > Add and select drums from the top icons.

When you set up a percussion track in Guitar Pro, you can choose to write the parts on the staff or in Guitar TAB format. Select both Tablature and Standard Notation so you can get an idea of what each is like to use.
On the top right of the screen, click the drum icon to bring up the virtual drum kit options (or press Ctrl+F6).
![]()
This brings up a reference to all the percussion items you can add to your track. If you want to write in Standard Notation or TAB, it will list the TAB number or staff position for each kit piece.
 Click on any item in this view and it will add it to the track. Once you get used to the main pieces of the kit (eg: snare, bass drum, hi-hit, cymbals), you’ll be able to easily write drum parts.
Here’s a basic rock beat and how it displays in both Standard Notation and TAB:

Some guitarists may prefer writing drum tracks using Standard Notation, while others may prefer writing using Guitar TAB format. I personally prefer writing in TAB format because I’ve already memorized the main numbers needed for most kit pieces.
So I know that 36 is the bass drum, 38 is the snare, 42 is a closed hi-hat, 46 is an open hi-hat, 49 is a cymbal, etc.
It might sound like a lot of work, but once you feel comfortable with this system, it’s a breeze to write full drum tracks. A nice advantage of writing drum tracks in Guitar Pro is that you can easily print off the Standard Notation for your tracks and give it to a drummer to play. Even if you write the tracks using TAB numbers, you can hide the TAB and print off the Standard Notation.
Importing Drums to a DAW
Once you have written your drum track in Guitar Pro, you need to export it in MIDI format to be able to use it in your DAW.
Go File > Export > MIDI and save the file.
This will export all of your tracks into a MIDI file. So if you have any guitar or bass tracks, it will export those as well. When you import your MIDI file in your DAW, you can simply delete any tracks you don’t need.
Open your DAW, set up a new project, then import your MIDI file.
In Studio One, you simply drag the MIDI file into the project and it will automatically create instrument tracks for each instrument.
Here’s what my basic two-bar drum track looks like after dragging the MIDI file into Studio One:

Your DAW should also recognize the tempo and time signature changes and automatically set up your project to match what you created in Guitar Pro.
Once your MIDI track has been imported, you simply add your virtual drum plugin to the track to link it up.
In Studio One, you drag your plugin from the Instrument library on to the drum track.

Configure your plugin using the sounds you want and you should be able to hear your drums when you hit play.
At any time you can go into the piano roll and edit your drum track. You can chop and change parts as you like without needing to go back into Guitar Pro.
If you don’t hear a certain cymbal, tom, or piece of the kit, it may be because Guitar Pro maps the kit piece to a different note compared to what your plugin is expecting. You may need to highlight those parts and shift them up or down to match the correct notes for your plugin.
Tips for Better Drum Tracks
While the best drum tracks are recorded with a real drummer playing a real kit in a professional studio, you can still create some impressive-sounding drum kits using the above methods. It’s possible to create drum tracks that sound better than an amateur recording of a real drum kit.
How good your drum track sounds depends on the plugin you use and how you write and edit your drum tracks.
Here are some tips to create better-sounding drum tracks.
Write Like a Drummer
The better you understand drum parts, the better your drum parts will sound. Imagine a pianist trying to write parts for a guitar by writing them on their piano. Unless the pianist has a good understanding of guitar (eg: limitations on how guitarists can voice chords), the parts they come up with may not be playable or will feel awkward to play on guitar.
It’s the same with writing drum parts. A drummer only has two arms and two legs. If you write a part where the drummer needs to hit three cymbals at once in time with a snare, not only is that unplayable in real life, but it probably won’t sound right either.
You learn to write good sounding drum tracks by studying parts real drummers have written. Watch a few drum lesson videos on YouTube to get an idea of the basics behind drum patterns, fills, and beats.
Listen to the drum parts in songs you like and study the drum tracks in Guitar Pro files (covered earlier in Method 3).
This might seem like a lot of work, but it helps you write better quality parts. You’ll become a better musician if you take the time to understand other instruments and how to write parts for those instruments.
Adjust Velocity
Virtual drum parts can sound robotic and lifeless when done poorly. One of the reasons they can sound robotic is if every drum hit sounds the same at the same velocity.
When you create a drumbeat in the piano roll in a DAW, you may see a velocity section as shown below:
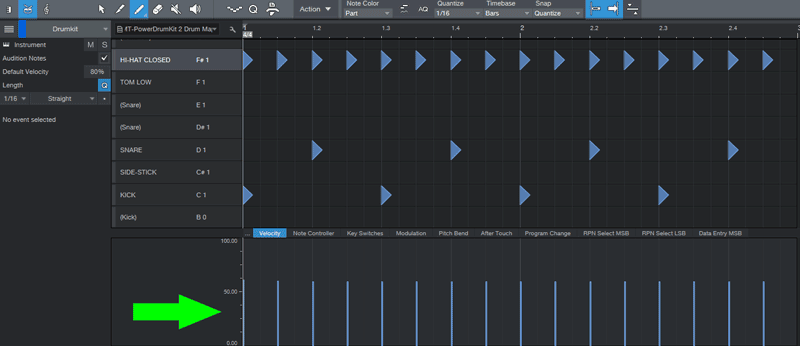
Think of the velocity as how hard the virtual drummer hits the drums. Notice how each hit has the exact same velocity? Real drummers don’t play like that. Real drummers vary how hard they hit the drums based on which beats they want to emphasize, the feel of the music, what piece of the kit they’re hitting, etc.
To make your drum parts sound more realistic, try to vary the velocity. Think like a drummer. A drummer will probably hit the first beat harder than the next beat, or they may emphasize certain hits that line up with your guitar parts.
Simply draw over the velocity chart to raise or lower the velocity as you like. Here’s a basic example of something that will sound far more realistic than the above example:

Most decent drum plugins will sound far more realistic when you take the time to vary the velocity of your drum parts. When you learn to dial in the right velocity to suit your music, it will sound incredibly realistic.
It’s also possible to automate this using a ‘Humanize’ tool as explained below. But you get the best results when you vary velocity by hand to suit your music.
Humanize Your Track
When you write a drum part in a DAW or Guitar Pro, the timing for each hit is perfectly in sync with the tempo. While this sounds like a good thing, real drummers don’t have perfect timing.
Even the best drummers in the world won’t play every single hit perfectly in time down to the millisecond. In fact, drummers will play slightly out-of-time on purpose to add to the feel of a track.
If your drum track sounds robotic or unnatural, it may be partly because of the perfect timing.
Fortunately, most DAWs will have tools to allow you to loosen up the timing of your virtual parts and give them more of a human feel.
You may see this labeled as ‘Humanize’ in your DAW. When you Humanize a track, the DAW will slightly vary the timing of each hit. You can control how much the timing varies, but even a slight variance can be enough to suddenly make a robotic drum track sound more natural.
In Studio One, right-click the track and go to Musical Functions > Humanize.
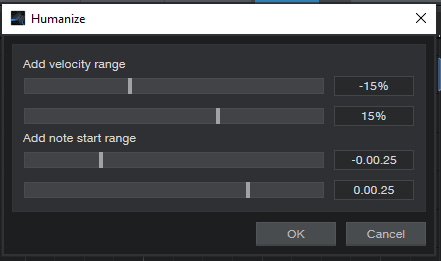
You can see that you’re able to randomly change the velocity within a range as well as the timing of each hit within a range.
When you hit OK, you’ll see that the track slightly moves around in timing and velocity:

Notice that some of the hits are now slightly before or after the beat and they don’t perfectly line up. A little variance like this makes a track sound more human. Too much variance and it will sound loose and out-of-time.
Play around with this to get a feel for what works. It’s possible to undo these changes using a Quantize tool, which will snap each hit back into perfect timing.
You can also adjust any hit that sounds off to bring it back into time without changing everything else.
Get Feedback From Real Drummers
A drummer will be able to listen to your drum tracks and immediately tell you if anything sounds off or if they have suggestions on how to improve it.
If you know any drummers, write a few tracks then send them to get feedback. You’ll learn a lot about how drummers think about parts and you might learn what mistakes to avoid or ideas to add to your tracks.
Writing parts for an instrument you don’t play is difficult at first, but not impossible. There are many composers who write parts for instruments they’ve never picked up before. If you want to write drum parts for your own music, get involved with drummers online or in-person.
If you’re ever stuck in a part of your song, getting a real drummer to have a listen might be all you need to get ideas on what to write.
USB MIDI Pads
For some guitarists, programming drums will feel awkward. Maybe you have a rhythm in your head, but you can figure out how to write it down in your DAW.
A great alternative to programming drums is to record them yourself using a MIDI Pad.
The basic idea is that you use a MIDI pad like the one shown below and you set each pad to a part of the drum kit. Then you can hit record and tap out your rhythm patterns on the pad.
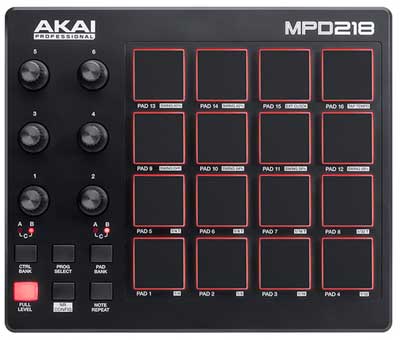
The above AKAI USB/MIDI Pad (link to Sweetwater) is an example of a MIDI pad that is perfect for working on your drum tracks.
The big advantage with creating drum tracks this way is that you will automatically add a natural feel to the rhythm parts you create. You won’t need to ‘humanize’ the tracks as you do when you program them because the tracks will already have a human feel.
When I switched from programming drum tracks in a DAW to recording the parts using a MIDI pad, I noticed the drums suddenly felt far more ‘human’.
The way you use these controllers is to assign the pads to control different pieces of the drum kit as shown below:
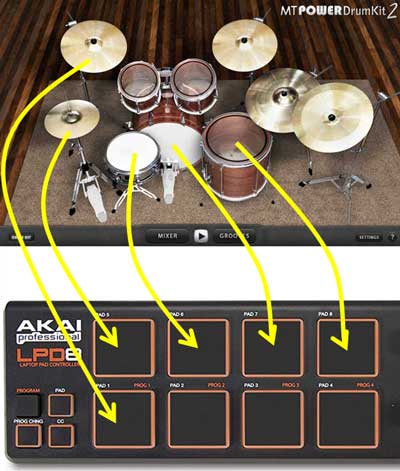
This is easy to set up in any DAW and once you have the pads set up, you simply hit record and tap the rhythm on the pads and it will record your drum parts.
A nice bonus with using a MIDI pad is that you can use it to control any aspect of your DAW. You can set the knobs, buttons, and pads to adjust the volume of different tracks, assign it to your guitar plugin to control amp settings or pedal settings, or you can create easy shortcut buttons such as record, stop, play.
There are a lot of different styles of MIDI pads and controllers with different knobs, sliders, buttons, and keys you can use to control your DAW and plugins.
Learn more about the different types of DAW controllers you can get in this detailed guide.
Useful Resources
Here are some guides and resources to help you write and record music in a DAW:
- Guide to Drum Plugins (Free and Paid) – covers the basics of drum plugins and some popular options
- Ultimate Guide to Recording Guitar at Home – covers everything including software and hardware
- Recording Your First Song Tutorial – gives a step-by-step process including virtual instruments
- Best DAWs for Guitar – compares the most popular options and includes tutorials for each one
- Best Plugins for Guitar – some of the best plugins you might want to check out
- Guide to MIDI Foot Controllers – extremely handy for recording in a DAW
- Best DAW Controllers – control your DAW with dedicated hardware