
AmpliTube 4 allows any guitarist to achieve excellent quality recordings at home with a variety of gear. But as you will see in this review, AmpliTube 4 isn’t just for recording. It’s also a great way to jam, experiment and learn about different effects and gear.
While AmpliTube 4 is still great software – AmpliTube 5 is now available.
Check out my in-depth review of AmpliTube 5 here to see why you might want to choose it over the older AmpliTube 4.
There are three versions of AmpliTube 4 discussed in this review: AmpliTube 4, AmpliTube 4 Deluxe & AmpliTube MAX. The difference between the versions is the range of gear included. AmpliTube 4 is the entry level version. The Deluxe version more than doubles the gear you get. The MAX version includes everything – including gear from earlier AmpliTube products partnered with Fender, MESA/Boogie, Orange, Jimi Hendrix, Slash and more.
If you’re thinking about getting AmpliTube 4 or already have it, you might want to check out the Guitar Effects Course here. The course uses AmpliTube 4 throughout and is a great way to find out how you can use the software to tweak and setup your own tones and effects combinations.
Note: it’s worth mentioning that you can get the full version of AmpliTube 4 when you buy an iRig HD 2. When you consider that the price for the iRig HD 2 is lower than the regular price of AmpliTube 4, it makes sense to buy an iRig if you want AmpliTube. After you read my AmpliTube 4 review, check out my review on the iRig HD 2 for more details.
AmpliTube 4 Features
The features I’ll cover here are from the standard version of AmpliTube 4. Check out the list of gear included in AmpliTube 4 Deluxe or AmpliTube MAX on the IK Multimedia website.
Included gear in AmpliTube 4:
- 10 stompbox models (eg: chorus, delay, overdrive, compressor, etc.)
- 9 amplifiers (modelled on well known models such as the Marshall JCM800)
- 10 cabinets
- 29 vintage and modern individual speaker models
- 4 microphones
- 2 rack effects units
- 2 tuners
There’s more to AmpliTube 4 than the gear. Here are AmpliTube’s main features:
- Cab Room: allows you to customize cabinet selection, individual speaker selection, mic selection and placement, room selection and mixer selection
- DAW plugin or standalone: add AmpliTube 4 to any track in your DAW or use it as a standalone program
- 8-Track Recorder: record, mix and experiment with recording up to 8 tracks all within AmpliTube
- 4-Track Looper: record and loop up to four tracks with an unlimited time limit. Also allows you to import/export your loops and use a MIDI foot controller
I’ll go over each of the above features later in this review.
Ease of use
As with any piece of software that is packed with different features, it can feel overwhelming at first. It can be hard to figure out where to start with AmpliTube 4, just like when you load up a DAW for the very first time. Here is the main screen with some of the main sections highlighted:
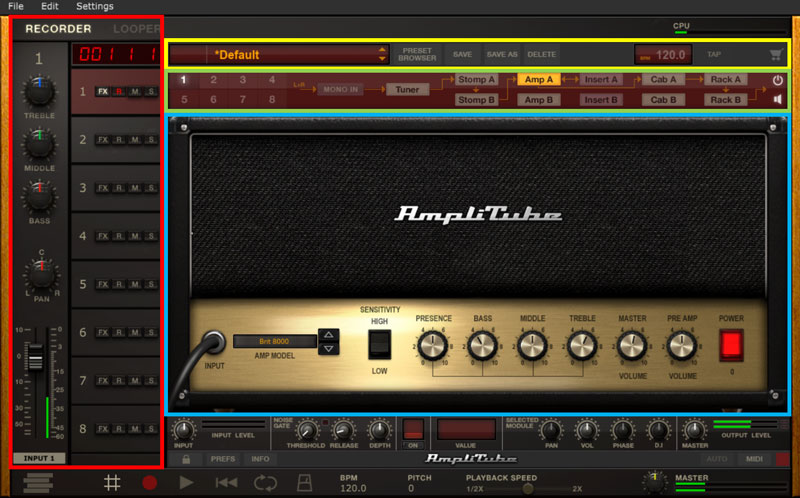
Let’s go through each of the main areas highlighted above to see how you use AmpliTube 4:
Rig Routing (green highlighted area)
Let’s start with the overall rig and how you can reconfigure and reroute it in different ways to suit your needs. In the green highlighted area above, you can see the overall signal chain. Each section (eg: Tuner, Stomp A, Amp A, etc.) allows you to go in and customize the relevant gear. So if you want to place a stompbox before the amp, simply click ‘Stomp A’. If you want to change the amp used, click ‘Amp A’. It’s pretty intuitive to set up a basic rig.
Things get interesting when you realize you can change the overall routing. The numbered squares on the left allow you to switch instantly between eight different routing options. Here are a couple of examples:
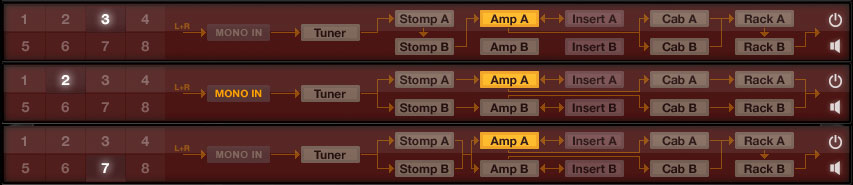
In the first example (highlighted 3), we have a standard chain leading to two cabinets. This allows you to create a nice long pedalboard into one amp before getting split into two cabinets. The main benefit here is that you can mix two different cabinets together.
The second example (highlighted 2) is a stereo rig all the way from the first stompbox. It basically allows you to mix two completely separate rigs together. You can run two different amps, cabs and effects units in any way you want. This gives you a lot of flexibility for creativity or can help you achieve a very thick tone.
Notice the yellow ‘MONO IN’. It allows us to select a stereo input if we wanted. This would be handy for acoustic guitarists recording from two different microphones or a mic and pickup combination.
The third example (highlighted 7) is an example of a different way you can run two independent amps, cabinets and stompboxes, but keep a mono signal. This is great if you want to mix two different amps together but want to avoid any stereo separation.
I feel this is a very strong feature in AmpliTube because it gives you so much flexibility. You can set up and instantly switch between different rigs and find the perfect setting for you. Running two amps together or switching between stompboxes in parallel or series is difficult to do in real life. In AmpliTube, you can easily switch and experiment with different rigs.
Gear area: Pedals (blue highlighted area)
The main area highlighted in blue is where you spend your time tweaking your gear and setting up your effects. All the gear are displayed to look like actual physical gear. So as a guitarist it’s incredibly easy to use. Just adjust the knobs on the amp or pedal just like you would in real life. Let’s start with the pedalboard.
In the below screenshot, I’ve crammed a few pedals together you may recognize:
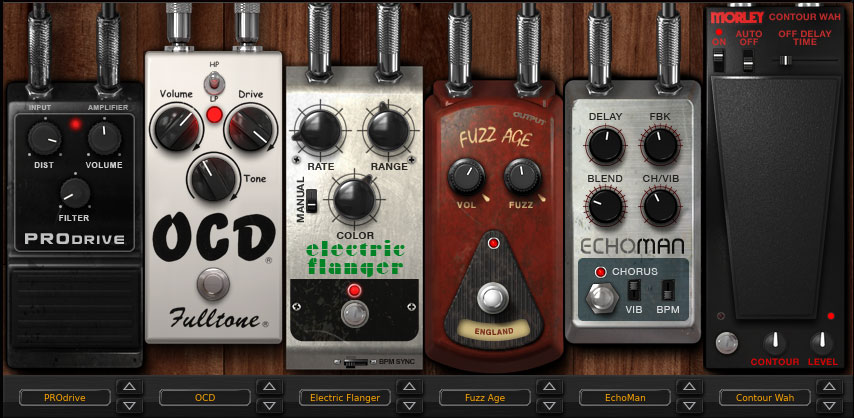
You will notice that some pedals have the proper name and branding (eg: the Morley wah and the Fulltone OCD). Other pedals look like well known pedals but with a slightly changed name (eg: ‘Fuzz Age’ is clearly based on a Fuzz Face pedal). It depends on whether AmpliTube has an agreement with the company the gear is modeled on or not.
Note: some of the above pedals aren’t included in the regular version of AmpliTube 4. They can be purchased separately (covered later) or with AmpliTube Deluxe or MAX (I have AmpliTube MAX).
Setting up a pedalboard is a matter of selecting the pedals you want and dragging them into position. If you want to switch two pedals, simply drag and drop to change the order. This is a great way to learn how pedal position affects your tone.
The screen layout makes a lot of sense from a guitarist’s point of view. It looks like a pedalboard and works just like you would expect a real pedalboard to work.
It’s useful to know that every single knob and footswitch can be controlled by MIDI. This means if you’re recording in a DAW, you can automate different effects parameters all within the DAW. If you have a MIDI footcontroller you can control any aspect of the pedals.
Some pedals also include different presets and you can save presets and even your entire pedalboard. Very handy once you come up with a pedalboard you like.
Gear area: Amps (blue highlighted area)
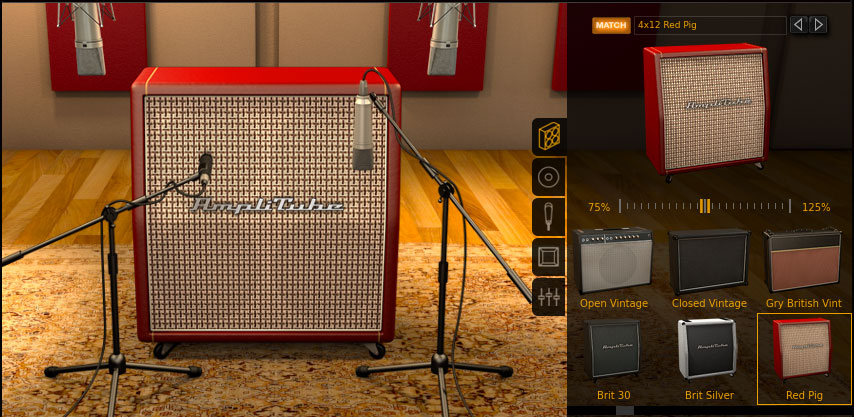
The amp section is just as easy to use as the pedalboard because it looks like a real amp. The amp below is based on a Marshall Major 200 “Pig” and is one of the new amps to AmpliTube 4:
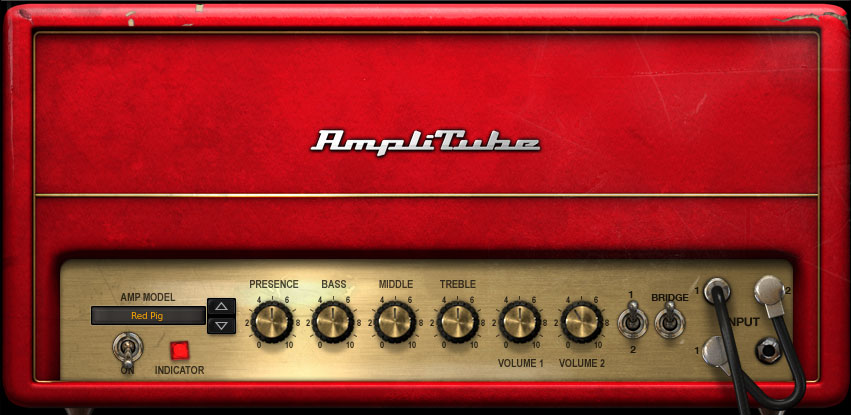
Being able to use gear like the above amp is one of the big advantages software like AmpliTube give guitarists. I’ve never even seen a Marshall Major 200 in person, but can jam and use it on my recordings as much as I want. Of course people will always say “it’s not as good as the real thing” with modeled gear, but for most guitarists it is. I definitely don’t need or want a 200-watt monster like the above amp at home.
There’s not much more to explain here as you control the amp settings exactly how you would expect. Simply select the amp you want and tweak the knobs to get the tone you’re after. Simple.
You can save presets with your amp just like in the pedalboard area. So once you dial in a great tone with a specific amp model, you can save the settings to use in other presets.
Gear area: Cab Room (blue highlighted area)
In my opinion this is the most interesting section of AmpliTube 4. The Cab Room essentially gives you access to all the gear and flexibility available in a real recording studio. This is where you set up your mics, cabinets, speaker selection and even the type of room.
In the below screenshot, you can see that AmpliTube has automatically selected a cabinet that suits the amp I selected earlier:
It’s an easy way to start off with an appropriate setup. But you can easily switch in and out different cabinets. The above screenshot shows six different cabinets that are suitable for the selected amp. Those cabs will suit, but you can definitely choose any available cabinet from the drop down menu. You can choose any cabinet from the range and connect it to any amp. I spent quite some time experimenting with mixing modern and vintage gear together to some interesting results. If you’re not very familiar with how different types of cabinets sound (eg: 2×12 open back vs closed back), this is the ideal place to learn.
You have a lot of flexibility when it comes to microphones. Want to reposition the mic? Just drag it to the position you want on the cabinet. Want to mix between a dynamic and condenser mic? Just position them and adjust the mix. It really is easy to use because of the 3D rendering of the gear. Just by looking at the screenshot below you know exactly how the mics are positioned:
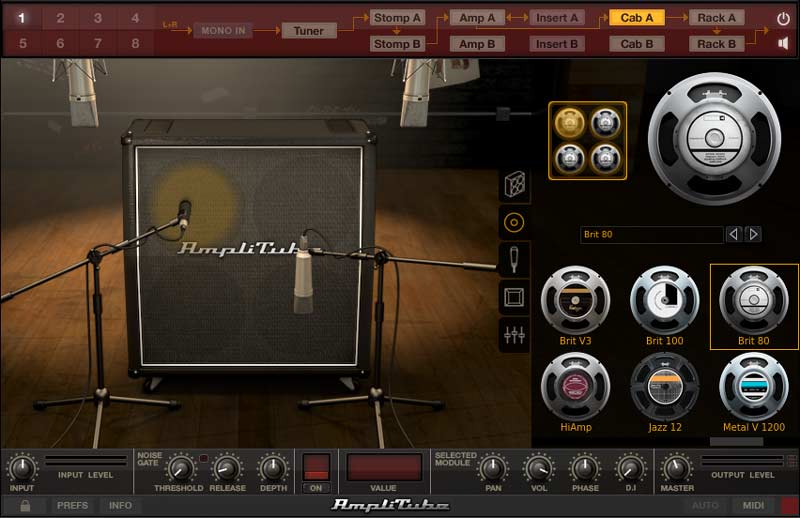
Speaker selection is another interesting area. You can swap in and out different speakers in the same cabinet. For most guitarists this is probably a bit too extreme, but I know there will be some gearheads out there who want to go into that detail. It’s great to see this in AmpliTube for those who want it.
Finally, let’s look at the room settings. As you can see below, you can switch between six different types of rooms:
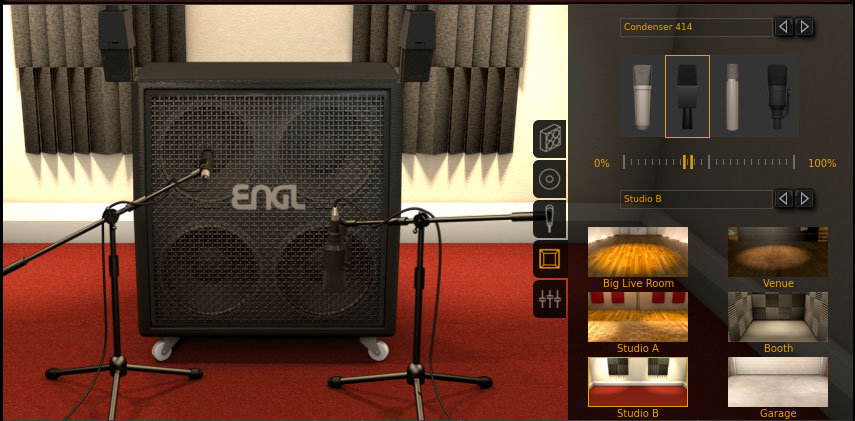
This plays a massive role on your tone so it’s great to see so much flexibility. Picking the ideal room for the type of tone you want is so crucial. You can also set up room mics and mix between them and any other mics you set up.
Overall, the cab room gives you plenty of control over your tone while keeping it easy to use.
Gear area: Rack (blue highlighted area)
The rack area allows you to set up any rack effects in your signal. It also allows you to set up an effects loop for stompboxes. There are quite a few rack units available to purchase, but AmpliTube 4 only comes with two to start you off (digital delay & parametric EQ). The rack effects are pretty simple to use as shown below:
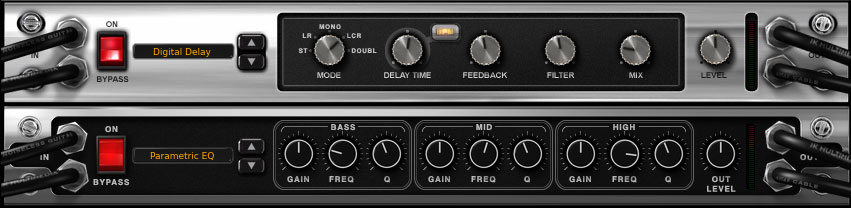
Adding pedals in an effects loop (under the ‘Insert A’) section is a matter of selecting the pedal you want. It first appears as a rack unit. To adjust settings, you click ‘Edit’ to bring up an image of the pedal. If you haven’t experimented with effects loops and the 4 cable method before, this is an easy way to learn why it’s so useful.
Preset Selection (yellow highlighted area)
As with any software like this, AmpliTube 4 comes with a preset library. It includes a range of presets and you can use it to save your own. You can choose presets from the dropdown menu, or go into the ‘Preset Browser’ as shown below:
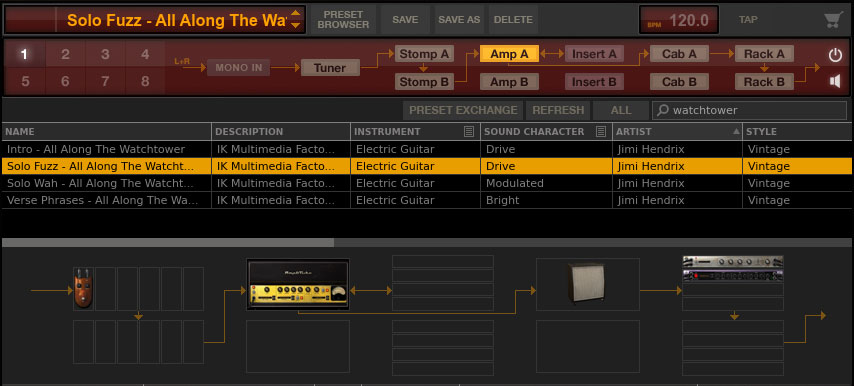
You can sort the different presets or search for specific ones. In the above screenshot I’ve searched for presets relevant for a specific Hendrix song (I have a guide on All Along the Watchtower’s effects here). When you select a preset, you are shown a diagram of the entire rig. It’s a great way to instantly see what gear each preset uses.
This was the only real frustrating aspect of AmpliTube for me. Because the standard version of AmpliTube 4 gives you a selection of gear, you won’t have everything required for many presets. For example you may be missing the amp used or simply one of the pedals. This is usually fine, but every time you select a preset when you have missing gear, you get an annoying warning message. This warning will show up every single time. There’s no way to stop it and there’s no way to hide presets that uses gear you don’t have. When you consider that majority of presets use gear you don’t initially get, it’s really frustrating.
Looper/Recorder (red highlighted area)
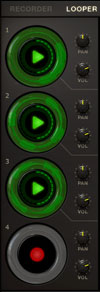
The last main section is the recorder and looper. While I highly recommend every guitarist buy a looper pedal (ready my Guide on Best Looper Pedals here), it’s handy to have one built in to AmpliTube 4. It’s a quick and easy way to jam and come up with new ideas.
The looper gives you up to four loops which is more than enough for most situations. You can export the loops or the entire loop mix if you want which is a quick and easy way to save any ideas you come up with.
The 8 track recorder is also handy for anybody who doesn’t have a DAW (read about DAWs in my Beginner’s Guide to Recording Guitar at Home). While it’s nowhere near as powerful as a DAW, it’s handy for basic recording. If you’re jamming and you come up with a great riff or lick, hit record and save your idea.
Custom Shop
As explained earlier, AmpliTube 4 is really the entry level version of AmpliTube. It’s a bit confusing the way IK Multimedia package AmpliTube 4. Basically, AmpliTube 4 is the shell. You get some gear with it, but a lot of the gear is available for individual purchase or in bundles. So you can either upgrade to Deluxe or MAX (which includes everything), or you can buy individual gear from the Custom Shop:
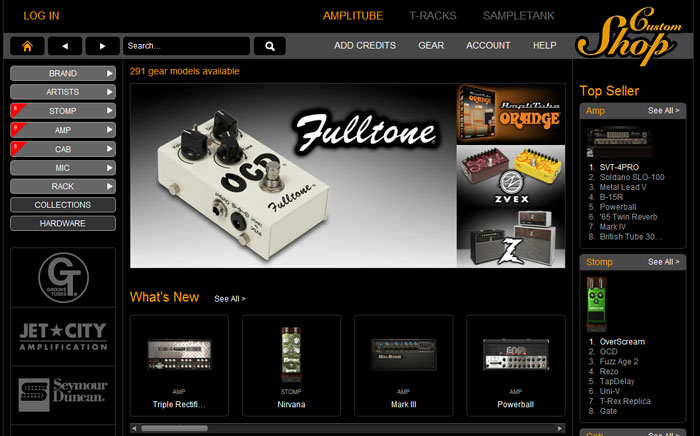
The good thing about the Custom Shop is you can trial any piece of gear for free before you decide to buy it. This is handy because a lot of gear you may find just doesn’t suit your specific tastes. With the try feature, you can make sure you only buy gear that you’re going to use regularly.
In some ways having to buy extra gear is a bit disappointing. It would be nice if AmpliTube 4 came with everything like it did in the past. But in other ways, it’s a good way to keep the cost down. You’re not paying for 300+ pieces of gear. You only pay for what you want.
Sound Quality
I’ve used AmpliTube since it’s first version in the early 2000s (I forget the year). Each version has seen massive increases in quality and features. The jump from AmpliTube 2 to AmpliTube 3 was so significant in terms of quality. Modelling software started to feel real enough that you could come up with excellent quality recordings all using software. The jump from AmpliTube 3 to AmpliTube 4 may not be as big a jump, but you can definitely hear an improvement.
There will always be people who say that software can never be as good as the real thing. BIAS FX and Axe-FX II are excellent examples of super high quality modelling technology that shows how real software can get. I feel that for most guitarists, AmpliTube 4 can produce tone superior than what you would get by recording your actual amp at home. Unless you’re a sound engineer, it’s hard to imagine getting the same quality recording at home.
The fact that any guitarist can plug their guitar into their PC/Mac and access a range of high quality amp models is amazing. Being able to set up a virtual 4×12 200watt stack in a simulated studio environment with multiple microphones and for it to sound as good as the real thing is groundbreaking. Any guitarist can now produce incredibly high quality recordings without having to shell out thousands at a local studio.
In short, the sound quality in AmpliTube 4 is amazing and perfect for most guitarist’s needs.
The only shortcoming I want to point out is some of the pedals you get in the standard version. Many of the effect pedals feel quite generic and a bit bland. As I have AmpliTube MAX, I know that there are plenty of amazing quality pedals available. But in the standard version, you unfortunately miss out on most of them.
Overall impression of AmpliTube 4
It’s hard to imagine that a future version of AmpliTube will be able to raise the bar much higher. The sound quality of AmpliTube 4 is spot on. While I’m sure they will make improvements in the future, the sound quality today is incredibly realistic.
From a features point of view, the software is really easy to use. It’s a much better layout than Guitar Rig 5 as you interact with real looking amps and pedals rather than weird rack-like units. You have plenty of flexibility to set up a rig and pedalboard exactly how you want without restriction.
At first it was disappointing to see how many pieces of gear you miss out on in the standard version. But just like with multi-effects units, most guitarists tend to stick to specific effects and pedals. So you probably don’t need 300+ pieces of gear. You can simply buy the gear you will use and you’ll be set.
Alternatively, you can look into the Deluxe or MAX versions. I have the MAX version and the range of gear it’s overwhelming. While the standard gear tends to focus on vintage tone, with the expanded range you get access to a lot more modern gear. Some of the modern gear produces fantastic sounding high gain tone suitable for metal.
For years I felt that Guitar Rig 5 was the best available (before BIAS FX came along). To me it felt ahead of AmpliTube 3. It’s clear now that AmpliTube 4 has leapfrogged Guitar Rig. Whether it’s on the same level as BIAS FX I’m not sure yet. I’ve barely spent any time with BIAS FX so I’ll write a comparison of the two in the future. In short, AmpliTube 4 is exactly what a lot of guitarists will want.
Pros
- Excellent quality tone
- Complete flexibility with routing and pedal placement
- Standalone and DAW plugin gives you plenty of flexibility
- Well designed interface is incredibly easy to use
- Custom Shop allows you to pay for only the effects you want
Cons
- The standard version only comes with a selection of gear
- Most included presets are useless due to missing gear
- Annoying warning messages when selecting presets with missing gear
Who is AmpliTube 4 for?
Guitarists wanting to record music: if you want to record music at home, AmpliTube 4 is a great option. The sound quality is fantastic and you have plenty of options and flexibility with gear and features. When you consider you can get it for free when you buy an iRig HD 2, it turns into a really good deal.
Guitarists wanting to learn sound engineering or learn about recording: I remember going through a year of classes in the studio and trying to learn how to get the most out of each piece of gear. It takes a long time to get the feel for mic placement or how to choose the right cab for different tones. Tediously moving mics, re-recording, then comparing the output is a slow way to learn.
I wish I had AmpliTube 4 during that period. With a single click you can test out different mic placements or switch out gear. You can learn so much at such a rapid rate in AmpliTube. If you want to learn more about getting the most out of guitar gear, this is a great place to start.
Who isn’t AmpliTube 4 for?
Live performers: while you could use AmpliTube in a live situation, I don’t recommend it. You could use a MIDI foot controller and bring a laptop to run the software, but there’s a lot of risk in that situation. The last thing you would want is audio drop outs or an issue with your PC to leave you standing there in silence. For live performers, I would recommend some of the more recent hardware by Line 6 to get a similar range of modeled gear.
How to get the most out of AmpliTube 4
If you want to get the most out of AmpliTube 4, I recommend enrolling in the Guitar Effects Course here. The course uses AmpliTube 4 to demonstrate different effects and setups. While the course will cover far more than just AmpliTube, it will give you a thorough look at crafting and tweaking your tone using the software.
Alternatives to AmpliTube 4
BIAS FX: for many guitarists, BIAS FX is the gold standard in modeling software. It also uses a fantastic interface that feels far more intuitive than AmpliTube 4.
Guitar Rig 6: Guitar Rig 6 is my go-to plugin when I want to explore non-traditional guitar tones. If you want to experiment with lush soundscapes, unusual delays, or other weird sounds, Guitar Rig 6 is packed with interesting effects. Check out my full review of Guitar Rig 6 here.
For other alternatives, check out my Best Guitar VST Plugins guide here.
To see how AmpliTube 4 would fit as part of your own home studio, check out my Beginner’s Guide to Recording Guitar at Home.

