
What is the 4 Cable Method?
The 4 cable method is a way to hook up a pedalboard to an amp in a way that allows you to control which pedals or effects are placed before the pre-amp and which pedals or effects are placed after the pre-amp in the amp’s effects loop.
This is achieved using four cables hence the name. In this guide, I will explain the pros and cons of this method and share diagrams for different pedals. By the end of this guide, you will know how to set up the 4 cable method on your rig.
If you want a short overview of the 4 cable method, the below video will explain everything you need to know. Then continue through the guide for more diagrams and details.
If you found the above video useful, subscribe to my YouTube channel here.
Why is the 4 Cable Method Popular?
Some effects generally sound best when placed before the amp. Pedals such as distortions, overdrives, wahs, and compressors usually sound best plugged into the front of your amp. Those pedals usually sound best before the pre-amp because they drive the pre-amp.
Other effects such as reverb, delay, and modulations generally sound best after the pre-amp in your amp’s effects loop. This is because those effects tend to sound better when applied after all the gain and drive. Placing a reverb or delay before the pre-amp will tend to result in a very muddy tone – especially if you mainly use your amp for your drive.
The 4 cable method allows you to get the most out of all your pedals or effects by placing each one in the best position. You can place your drive and wah before the pre-amp and your delay and reverb after the pre-amp and achieve a far better tone.
Pros to the 4 Cable Method
- Better control of your tone and better quality
- Get the most out of every effect or pedal you own
- Able to easily switch between your amp’s preamp and your pedal’s preamps (eg: if you use a Line 6’s modeled preamps)
- More flexibility
Cons to the 4 Cable Method
- Messy setup
- More cables
- More complicated
Equipment Required for the 4 Cable Method
Amp with an effects loop
The first thing you need is an amp that has an effects loop. If your amp doesn’t have an effects loop, then you cannot use the 4 cable method. Small practice amps generally don’t have effects loop while almost all larger amps will.
If you’re unsure if your amp is the right type to use the 4 cable method, read through my Guide on Types of Guitar Amps. It will explain the different types of amps out there and give you a better understanding of your type of amp vs others.
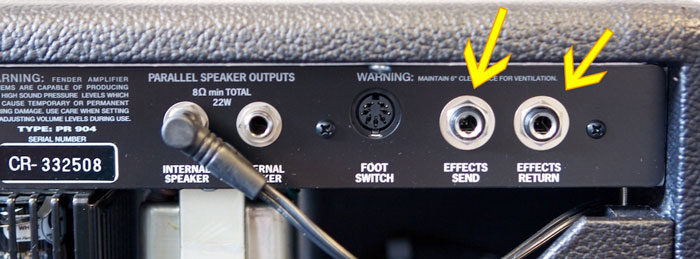
At the back of your amp you will see the jacks for your effects loop as shown below:
4 Cables
You will need four cables to run back and forth between your pedalboard and your amp – although you probably guessed that by now! 🙂
A multi-effects pedal with FX SEND/RETURN (for multi-effects pedal users)
Not all multi-effects units will work with the 4 cable method. If your pedal has FX SEND and RETURN jacks, then you should be able to use it with the 4 cable method.
More Cables (for single-effects pedal users)
If you want to use the 4 cable method with individual pedals, you will basically be setting up two separate pedal chains. You should already have enough cables but just keep in mind that it can get a bit messy when using the 4 cable method on a non-multi-effects pedalboard.
4 Cable Method for Individual Pedals
Let’s start by looking at how you would set up a 4 cable method with individual pedals, then look at specific multi-effects pedals.
First, split your pedals into two groups. Group 1 contains pedals to go before your preamp and Group 2 contains pedals to go after your preamp.
Here is an example of pedals to go before your preamp (Group 1):
- Tuner
- Distortion/Overdrive
- Wah
- Compressor
- Booster
Here is an example of pedals to go after your preamp (Group 2):
- Delay
- Reverb
- Chorus (some also sound good before the preamp)
The basic 4 Cable Method involves:
Cable 1 (RED) connects your guitar to the pedals before your amp (Group 1)
Cable 2 (GREEN) connects your Group 1 pedals to the amp input
Cable 3 (BLUE) connects the SEND from your amp’s effects loop to your Group 2 pedals
Cable 4 (PURPLE) connects your Group 2 pedals to the RETURN on your amp’s effects loop
Here is a diagram of the 4 cable method using individual pedals:

With this setup, your drive, wah and compressor are all working your preamp without the reverb, delay or chorus getting in the way and messing up the tone. The reverb, delay, and chorus all come after the preamp which means they enhance the tone after all the drive. You will end up with far more clarity in the reverb and delay.
4 Cable Method with Line 6 POD HD500X
The 4 Cable Method works extremely well with the HD500X (read my review here), the HD500, HD400, or newer models such as the Helix. The bonus advantage to using the 4 cable method with a multi-effects unit such as the HD500X is that you can also mix and match using the pedal’s amp modeling with your amp.
Here is a diagram of the 4 cable method with the HD500X:

The basic steps are (essentially the same for the HD500 as well):
- Your guitar input connects to the HD500X input as normal (red cable)
- The HD500X’s FX SEND connects to your amp’s input (green cable)
- The amp’s SEND on the EFFECTS LOOP connects to the HD500X’s FX RETURN L/MONO (blue cable)
- The HD500X’s UNBALANCED OUTPUT L/MONO connects to the amp’s RETURN (purple cable)
Because we’re now using the HD500X’s 1/4″ outputs, we need to also make sure that the 1/4″ switch next to the expression pedal is set to AMP as shown below:
This will ensure that the level is suitable for the amp. You will still have control over the levels as explained later.
Now you need to set up your patch to make use of the effects loop. Select a blank effects slot (or you might need to replace an effect if you have already maxed out your positions) and turn the 1st knob until you reach ‘FX LOOP’ as shown below:
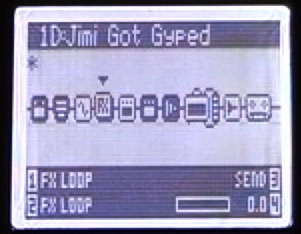
You can now move the FX LOOP to any position in the chain to change which pedals are sent to the FX LOOP and which ones are sent to the amp’s preamp. You can also adjust the levels for the SEND and RETURN to make sure the level remains consistent throughout the chain. To do this simply adjust the 3 and 4 knobs.
If you don’t have an HD500X but are considering one, read my thorough review of the Line 6 HD500X here.
4 Cable Method with Line 6 M13
The 4 Cable Method works with the Line 6 M13 but not the M9 or M5 (as they do not have separate jacks for FX SEND/RETURN). Just like with the HD500X, you can easily change which effects are sent to the front of your amp and which effects are sent to the effects loop after the preamp. This gives you plenty of flexibility and allows you to easily experiment with which effects should go where.
Here is a diagram of the 4 cable method with the M13:

The basic steps are (essentially the same for the HD500 as well):
- Your guitar input connects to the M13 input as normal (red cable)
- The M13’s FX SEND L(MONO) connects to your amp’s input (green cable)
- The amp’s SEND on the EFFECTS LOOP connects to the M13’s FX RETURN L(MONO) (blue cable)
- The M13’s OUTPUT L(MONO) connects to the amp’s RETURN (purple cable)
Once your M13 is hooked up as shown above, you can decide what effects columns you would like to send to the effects loop. The way the M13 works is that you can split up the chain of effects and send some to the effects loop. So you might send the far left column to the preamp and the next three effects columns to the effects loop, or you could make it 2 and 2 or 1 and 3.
Here are the basic steps to set up the effects loop on the M13:
- Hold down the Looper Controls footswitch to enter setup mode
- Under the FX LP heading, you will see what the current setting is
- Use the knob to change the position (eg: ‘PRE ALL’ means all are sent to the preamp, while POSTFX1 means the last three are sent to the effects loop)
It’s also important to remember that this is set up per scene so you can change how many effects in each chain for each scene you create.
If you don’t have an M13 but are considering one, read my thorough review of the Line 6 M13 here.
4 Cable Method with BOSS GT-10
The 4 Cable Method works with the Boss GT-10, GT-8, GT-6, GT-5 & GT-3. Just like with the HD500X, with the 4 Cable Method you can easily switch between your amp’s preamp and the preamps on the GT. This gives you far more flexibility than relying completely on one or the other.
Here is a diagram for the 4 Cable Method on the GT-10:
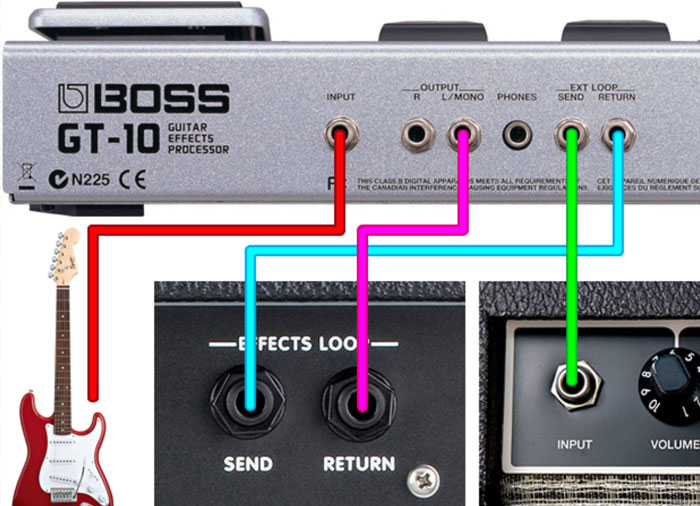
The basic steps are:
- Your guitar input connects to the GT-10 input as normal (red cable)
- The GT-10’s EXT LOOP SEND connects to your amp’s input (green cable)
- The amp’s SEND on the EFFECTS LOOP connects to the GT-10’s RETURN (blue cable)
- The GT-10’s OUTPUT L/MONO connects to the amp’s RETURN (purple cable)
It’s also worth mentioning that the GT-10 also has an amp control jack which can control your amp’s channel selection if your amp has the ability to connect an external footswitch. This means you can use your GT-10 to control the selection between the amp’s preamp or the GT-10’s preamps.
Now that you have physically set up the 4 cable method, you can now edit your patches to take advantage of this setup.
Here is how to enable the Send & Return ports on the GT-10:
- Load up your patch
- Press the Master/Pedal FX button
- Select S/R by using the cursor right button then press ENTER
- Use the Time/Value wheel to change the setting to NORMAL
- Press the Master/Pedal FX button to switch Send & Return to ON
- Press Write to save the setting
Note: this must be done on each individual patch to enable the send and return routing.
For other BOSS pedals such as the GT-6 or GT-8, you need to change the ‘Output Select’ to match your type of amp.
4 Cable Method for Other Multi-effects Pedals
If you have a different pedal than the ones listed above, one of the above three diagrams will still work for you. Read through the above explanations to understand how the 4 Cable Method works and you’ll be able to figure out how your pedal compares to the above pedals.
If you compare the three diagrams above, you’ll see that they’re essentially the same across the different pedals. The name of the input/output may be slightly different on your pedal, but everything else should be very similar.
4 Cable Method Tips
Learn ideal pedal positions for different effects
There are a lot of rules-of-thumb when it comes to pedal positions. You’ve probably heard over and over something like “always put pedal X before pedal Y”. While those rules are usually helpful, blindly following them can leave you missing out on better results.
My Guitar Effects Course gives you a thorough look at the most common types of guitar effects (including gain pedals) and how to use them. The more you understand about guitar effects, the easier it will be to control them. The course will give you the tools you need to craft a better tone.
Experiment with different settings
At the beginning of this guide, I said that some effects generally sound better before the preamp and some generally sound better in the effects loop. There are no set rules when it comes to effects. If your ears feel that your delay pedal sounds better before the preamp, then do it.
Experiment with placing pedals in different chains and listen to the results. What happens when a reverb is placed before the preamp? How does your tone change when you place the chorus before or after the preamp? The only way you will work out the best possible configuration is by experimenting with different combinations.
Make use of your multi-effects pedal’s preamps
If you own a multi-effects pedal like the Line 6 HD500X or the BOSS GT-10, you have a wide range of preamps to play with. Experiment with different preamps to learn which ones you prefer. Get a feel for when your amp’s preamp is the best choice and when your pedal’s preamps produce better results.
People tend to assume an amp’s preamp will always be better than a preamp in a multi-effects pedal. But unless you experiment, you won’t know for sure. I’ve heard quite a few guitarists use their multi-effects preamps in very creative ways. Being able to achieve a wide range of amp tones with one rig is a benefit only available to guitarists who make the most out of their pedals.
Sometimes simple is better
While the 4 cable method usually produces far better results than plugging straight into your amp, sometimes it’s not worth the hassle. Having the extra cables running back and forth from your amp can be a bit of a pain in live situations or band practice. Sometimes it’s just better to plug straight into your amp.
If you use a multi-effects pedal, I recommend creating banks and patches for your 4 cable method rig and separate banks and patches for a straight rig. That way you can have the same presets and easily change back and forth between different routing options without having to edit your patches.
Found this guide useful? Please share it on social media to help support this site (if you use Pinterest, please pin the below photo).
