
Update: The M13 is quite old at this point. It’s still a fantastic pedal, but there are better options available now. If you read through this review and like the sound of what the M13 offers, consider the HX Effects unit. It contains all the M13’s effects, as well as newer effects and better features.
Features

The Line 6 M13 (link to Amazon for price and features) is designed to imitate a stompbox pedalboard. This is a different approach to multi-effects pedals such as the Line 6 POD HD500X and I’ll compare the two later on. There are 109 effects on the M13 with the latest firmware version. Let’s start by looking at what effects are included on the M13:
19 Delays
The Line 6 DL4 Delay Modeler is one of the most popular and successful delay pedals available. All of the effects from the DL4 have been reproduced in the M13 which realistically is all the delay types you would want. From standard delays such as Analog with modulation, Tape Echo, Digital Delay or Stereo Delay, to more creative style delays such as Ping Pong, Echo Platter, Reverse, Lo Res, or Multi-Head, if you hear any type of delay in a song you’re going to find it here.
23 Modulations
These are based off of the Line 6 MM4 Modulation Modeler and include a wide range of Tremolo, Phaser, U-Vibe, Chorus, Vibrato, Flangers, etc.
17 Distortions
The distortions are based off of the Line 6 DM4 Distortion Modeler and give you a range of fuzz, boost, octave drive, tube drives etc. Many of the distortions are modeled from famous distortion stompboxes such as the Ibanez Tube Screamer, ProCo Rat, BOSS Metal Zone, Arbiter Fuzz Face, Big Muff Pi, etc.
29 Compressors and EQs
This was a surprising feature and gives you plenty of control over your tone. You will gain access to tube compressors, noise gate, graphic/studio/parametric EQ, etc.
26 Filters
The filters are based off of the Line 6 FM4 Filter Modeler and while many of them offer really out-there sounds such as the Tron Up, Growler or Synth String, many are extremely usable such as the Octisynth, Voice Box and range of wahs (requires an expression pedal).
12 Reverbs
Some of these reverbs are from the Line 6 Verbzilla and contain pretty much every main type of reverb available. As you will see later there is the option to connect the M13 to your amp’s effects loop and that’s where these reverbs really bring their best tone.
To see the full list of effects and what they’re modeled off, check out the Line 6 website here.
Now let’s look at the main features of the M13:
Up to 4 effects simultaneously
You can rig up the M13 to play four stompbox effects at the same time and have access to another 8 instantly (explained later). For comparison, the smaller M9 only allows up to 3 effects at once and the M5 only allows one effect at a time. It’s also worth mentioning that the 4 effects can be any combination of effects and in any order.
Tap Tempo, Tuner & 28 second Looper
There is a dedicated Tap Tempo footswitch that can universally control all your time based effects. Holding the Tap Tempo footswitch enables the tuner. The M13 also has an inbuilt looper with up to 28 seconds of recording time (or you can double the recording time using the half speed effect). It’s worth mentioning that the looper has dedicated footswitches for Record/Overdub, Play/Stop, Play Once, Undo/Redo, Half Speed, and Reverse so you have full control over your loop.
M13 Dimensions: 15.5″ (L) x 12″ (W) x 3.5″ (H)
To put those dimensions in perspective, it’s roughly the size of two DL4s side by side. This is a large unit, but when you consider what it can do, it’s worth the space.
Ease of use
The Line 6 M13 has one of the easiest interfaces I’ve ever used on a multi-effects pedal (the award for easiest interface would have to go to the Zoom G5).
There are a few main reasons why the M13 is so easy to use. I’ll go through each main aspect below:
Color Coding
The fact that you can save up to 48 scenes on the M13 means it can be very easy to lose track of which footswitches are dedicated to which effects. The M13 changes this by assigning a color for each main type of effect.
Green is for Delays, Blue for Modulation, Purple for Filters, Yellow for Distortions and Orange for Reverbs. The colors match the original Line 6 stompbox modelers as shown below:

This means the lights not only tell you which stompboxes are activated, but they also tell you what type of effects are activated. So when you look down, you will instantly know what type of effects are being used and which footswitch controls each effect. This really is a great feature and it’s obvious how useful color coding is every time I now look at my HD500X’s red footswitch lights. While it’s fairly easy to memorize the layouts for the presets I create on the HD500X, color coding would be far easier. It’s good to see that Line 6 are continuing this useful feature in newer pedals such as their Firehawk FX.
To show how useful this is, take a look at the below photo and think about what type of effects are currently active in each column:
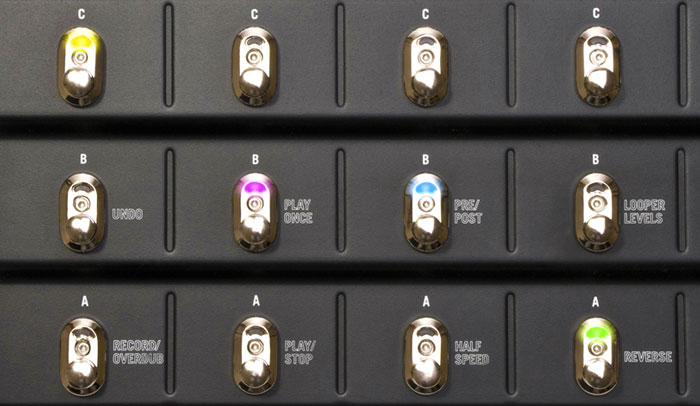
Immediately we know that there is a distortion active in the first column (yellow), a filter in the second column (purple), a modulation in the third column (blue) and a delay in the fourth column (green). So if you wanted to turn off the delay, you would simply look for the green light and hit the relevant footswitch.
Compare the above photo to four active effects on the Line 6 POD HD500X below:

There’s no way to know which footswitch controls which effect without memorizing them beforehand. So if you wanted to turn off delay on this pedal, there’s the chance you might accidentally hit your distortion pedal and blast your audience at the wrong time. Color coding is definitely the way to go!
Matrix Layout
What makes the M13 different to other multi-effects pedals is the layout. Most multi-effects units use banks and presets and to move between different combinations of effects you have to move through different banks. The M13 is designed to look and act similar to a pedalboard filled with individual stompboxes.
You are presented with a grid (or matrix) of four columns (the column on the far right controls other features) and three rows. This gives you twelve footswitches which can individually be loaded with up to 12 stompboxes. You can assign any type of effect in any position although I would recommend grouping your effects based on the columns (eg: keep all your delays on one column).
This type of layout means you have far more flexibility in switching between different effects compared to a preset & bank style layout.
Stompbox style controls

At the top of the M13 you will see four LCD screens with six dedicated controls for each screen. This layout acts exactly like a stompbox. The knobs control the assigned stompbox effect in the same way a real stompbox has knobs you control in real-time. The M13’s autosave feature means that every tweak you make to your effects are automatically saved – just like a physical pedal. This style of control is very similar to the Zoom G5 which is the easiest control layout on a multi-effects pedal I have ever used.
In the image to the right you can see that the ‘Fuzz Pi’ distortion is loaded in the first column (FX 1 UNIT). We know it is distortion because the screen lights up as yellow.
The six knobs control the six parameters you see (the first one changes the effect type). So for example, if you wanted to increase the mid-range, you would simply turn the lower left knob up and you would see the screen change in real-time. Your changes are automatically saved so you won’t need to worry about forgetting to save your changes like other pedals.
Scenes
This is a unique feature to the M13 and is a result of the matrix style layout. Because you don’t have presets and banks, Line 6 have created ‘scenes’. The basic idea is that you can load up to 12 effects on the pedalboard at one time and save that layout to a scene. Examples of practical uses of this would be to dedicate a scene for different songs in your setlist, different scenes for different styles of music, different scenes for different types of rigs.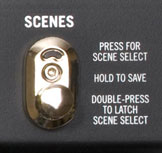
You can save 12 scenes per folder and can have up to four folders. That means you have up to 48 scenes in total you can save to the M13. In reality, 12 scenes are likely to be all you need. The dedicated Scenes footswitch (shown to the right) allows you to instantly change between different scenes.
Scenes work extremely well with the M13 and it’s a nice change compared to the standard presets and banks style layout.
Sound
The M13 has been out for a long time and there are newer units by Line 6 with better quality (eg: the POD HD range), however the quality of the M13 is top notch. I was most impressed with the delays and filters and when you use the 4 cable method to connect the M13 to your amp, those effects really shine.
I did read on other reviews people complain about the distortions. What I found was that in general the distortions had too much high end. As soon as I rolled off the high end on the distortion, the quality shot up. This is an important point to remember with multi-effects units that people often forget: the quality of the tone you end up with depends on how well you can manipulate the individual effects’ parameters. If you load up a distortion and expect it to sound perfect straight away, you’re likely to be disappointed. Tweaking the parameters is all it can take to turn a harsh sounding distortion into something great. Essentially every distortion model gives you separate controls for Bass, Mid and Treble, so it’s easy to adjust the tone to suit the style of distortion you prefer. As I mentioned, I felt most of the distortions had too much Treble, so a simple tweak of the Treble knob was all I needed to do to bring the tone to what I wanted.
Scrolling through the effects you’re going to come across a lot of wacky sounding modulations and filters. But if you give each effect a chance and play around with the parameters, you’re going to find that pretty much all of them can be used in different situations. Don’t dismiss a wacky sounding effect as soon as you hear it because all it might need is to bring the DRY/WET mix knob down and suddenly it’s a great effect.
Reliability/Quality
This is a big and solid unit that’s designed to take a beating. This is definitely an appropriate unit for live guitarists and it easily compliments an existing pedalboard if you really want to go all out with effects. You have the ability to connect up to two expression pedals which would give you wah & volume control or the ability to control any effect parameter on the fly.
The M13 really is top quality in construction and design and I expect it to last a very long time without problems.
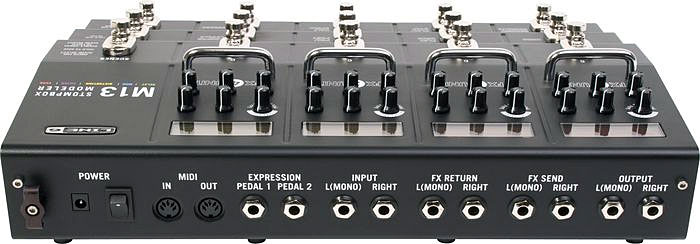
As you can see from above, you have plenty of control over how you route your effects to your amp as well as MIDI control.
Overall impression
When I first heard about the M13, I was skeptical because I didn’t see the point as the standard style multi-effects pedals do a great job. But that’s the wrong mindset with this pedal. The M13 is designed to act like a pedalboard rather than a chain of effects in a standard multi-effects unit. If you think of the M13 as an all-in-one pedalboard, then you’re going to see the potential here.
Being able to have up to 12 different effects at call and easily switch between different scenes is something not possible with other multi-effects units. I think the POD HD500X is fantastic and while it can run more effects at once compared to the M13, it doesn’t give you the same flexibility. The M13 really allows you to easily control each effect just like any other stompbox and set up your pedal chain with so much versatility. If you play live, being able to bend over and tweak your effects just like you would a normal stompbox is a great benefit thanks to the autosave.
Check out the current price and availability of the M13 here.
Pros

- Incredibly easy to use interface
- Acts extremely well as a stompbox-style pedalboard
- Ability to use expression pedals means you could use the M13 for your entire rig
- Color coding of effect types is fantastic
Cons
- It is big – so if you already have a lot of pedals on your pedalboard, it’s going to take up space
- Expression pedals need to be purchased separately
Who is it for?
Intermediate/advanced guitarists: this is a great unit for intermediate to advanced guitarists because it gives you a massive range of effects at call. If you’re a beginner you can definitely consider it as well, but there are simpler options out there for somebody just getting started (see below). Being able to chain your effects together just how you want them, tweak all the parameters and set up scenes of effects gives an intermediate or advanced guitarist so many useful ways to shape and control their tone.
Live guitarists: many guitarists use the M13 for gigging and it’s pretty clear why. The stompbox-style control works great live and thanks to the scenes you won’t be tap dancing on your pedals.
Who isn’t it for?
If you don’t use a lot of effects: if you like a straightforward tone of a guitar in an amp, then this unit probably isn’t for you. But you probably already figured that out by now right? 🙂
If you already have a big pedalboard and want to keep using those pedals: the M13 is a great way to replace a lot of gear and simplify your pedalboard. But if you like your existing gear, then I would find it hard to pick a reason why you would also want the M13. If you’re simply looking for a way to access some more effects you don’t already have, I would recommend the M5 or M9 as explained below instead of the M13. The smaller M5 or M9 will still give you the same range of effects without the large pedal size.
How to get the most out of it
Guitar Effects Course
To really get the most out of your M13, take the time to learn about the effects built into the pedal. The Guitar Effects Course available here covers all common types of guitar effects, how they work, how to control them and how to position them for the best sound. This course is ideal if you want to learn how to set up your own presets with the M13. Check out the course here for more details.
Get an external expression pedal
While the M13 works perfectly on it’s own as a stompbox modeler, simply adding an external expression pedal opens up so many features, effects and control. You suddenly have access to a wide range of wahs, pitch shifting, modulation effects or even a simple volume control. The added bonus with using an expression pedal is that you can assign different parameters from an effect to the pedal and control them in real-time. For example, you could assign the mix on a chorus to the pedal and gradually fade the effect in and out at will. Or you could set the gain from a distortion effect to the pedal to easily roll the gain in and out as needed.
The M13 can be used with one or two expression pedals so if you want you can add another pedal to control two parameters at once (eg: wah & volume control). But as a minimum I recommend getting one expression pedal – it’s hard to understand how much extra control you have until you connect one.
Check out the Line 6 EX-1 Expression Pedal here to give you more control over your M13.
Start with only one effect
The main mistake I see guitarists make (and based on reviews I’ve read online) is to start off by loading up a few effects and seeing how everything sounds. That’s the wrong approach. I recommend starting off with a single effect on a clean sound. Choose an effect and start tweaking with the parameters just like you would if you bought a stompbox. Learn how to dial in the perfect effect from that single stompbox then turn it off. Load up a different effect and repeat the process. Slowly go through all the effects one at a time and learn how to get the most out of every effect.
Once you get a feel for tweaking each individual effect, then you can start to combine effects. Start with something basic such as a chorus and a tube drive distortion or try a delay and a phaser. Figure out which effects work well together and which ones don’t.
Only after you get the feel for running two effects at once should you consider trying three or four. The reason this approach will give you better results is that it’s the same approach guitarists take when they buy stompboxes. A guitarist starts off with one pedal then learns how to get a great tone out of it. Then they buy another and learn how to get both to interact. As a guitarist buys more pedals, they learn how to combine effects properly. Do the same thing with the M13.
Use the 4 cable method
Some effects are meant to be placed before your amp and some are meant to be placed after the pre-amp in the effects loop (if your amp has one). Reverb, delay, and chorus sound best when used after the pre-amp while distortions work best before the pre-amp. While you can definitely run the M13 straight into your amp with good results, you’re going to achieve a far greater tone by splitting the signal and using the 4 cable method.
Here’s a diagram on how to connect the M13 to your amp using the 4 cable method:

Yes, it is more complicated and messy with the extra cables, but you’ll appreciate the better quality tone. If you’re unfamiliar with the 4 cable method, this guide covers it in detail along with more detailed instructions on how to set up the 4 cable method with the M13. I highly recommend using the 4 cable method with the M13.
Alternatives
Update: Line 6 HX Effects
The HX Effects pedal offers all of the effects contained in the Helix multi-effects unit but in a stompbox-style pedal. It also contains the M series of effects so contains everything covered in this review. The HX Effects is currently the best quality effects Line 6 have produced and are a big step up from the M series.
Line 6 M9 or M5
The M9 is a much smaller unit that can still use up to three effects at once. The M5 is an even smaller unit that acts as a single stompbox and only uses one effect at a time. All units have the same range of effects so the only decision is how many you want at the same time and how much flexibility you want in switching between effects. Check out the pricing and detail for the Line 6 M9 and the Line 6 M5 to compare your options.
Line 6 M13 vs HD500 or HD500X
As I’ve explained, the M13 is very different to a standard multi-effects unit such as the Line 6 POD HD500X. If you like the idea of having a stompbox-style pedalboard, then the M13 probably suits you better. If you want to have more control over your tone, layer more effects at once and prefer the bank & preset style interface, the HD500X may suit you better. While the M13 would work perfectly for live situations, I feel the HD500X gives you more control with extra features such as amp and cabinet modelling, XLR in & out, Variax input, DT Link, etc. Read my review of the HD500X to see how it differs to the M13.
Zoom G5
When I first tried out the M13, it reminded me of the Zoom G5’s interface. The G5 is also designed to act as a series of stompboxes although it achieves it in a very different way. The features between the two are very different so I recommend reading my review of the Zoom G5 to learn more.
See information on pricing, availability and other reviews of the M13 here (link to Amazon).
