If you have bought a guitar amp or are thinking about upgrading your amp, this guide is for you.
This guide will show you how to get the most out of your amp by showing you how to become an expert in your guitar amp’s settings.
This guide is so important because of something I see too often as a guitar teacher. I often see students ‘upgrading’ their amps because they’re not happy with the tone their current amp produces. It normally happens like this:
- The student buys a new amp and plays around with it for a couple of weeks. Eventually, they get frustrated because it’s not producing the tones they want so they go to the guitar shop.
- The salesperson tells them that their current amp isn’t suitable for the style they want to play and they recommend something else.
- The salesperson demos the amp and the student buys it because it matches the tone they’re after.
- After a few weeks, the student gets a bit frustrated because they’re unhappy with how it sounds….
This has happened to quite a few of my students over the years. Before we dig into guitar amp settings and how to dial in a great tone on any guitar amp, let’s look at what’s the problem is and how you can avoid it:
People have different ideas on which amps are suitable for different styles
If you want to play a certain style, people will start suggesting different guitar amps to suit that style. While those suggestions might be helpful, what normally happens is it causes you to doubt your own amp choice (if you already have one).
So if you have amp X and somebody tells you amp Y is great for the style you want to play, you will start doubting amp X even if that amp is perfect for that style.
If you’re not sure what type of guitar amp is right for you, read through my Guide on Types of Guitar Amps.
The salesperson at the guitar shop (or any other experienced guitarist) knows how to dial in good tones with almost any amp
One of my students bought an unsuitable amp (in my opinion) on the spot because the guitar salesperson dialed in a great tone at the shop. An experienced guitarist can make almost any amp sound great just like an advanced guitarist can make a cheap guitar sound far better than it is.
So if you go to the guitar shop in search of an amp, be aware that it’s very easy for the salesperson to make one amp sound better than another.
It’s also worth mentioning that there are many tricks some salespeople will use to make one amp sound superior to another. For example, having one amp slightly louder than another amp can be all it takes to make that person believe that the louder amp is superior. This is used often in the hi-fi and home theater industry – to make a more expensive unit sound better they simply raise the volume slightly.
Keep this in mind when you’re comparing guitar amps – even so-called ‘audiophiles’ can be easily tricked with the right conditions.
Blaming gear isn’t the answer
Getting frustrated at your gear because you can’t reproduce a tone you hear in a song is a common problem most beginners and intermediate guitarists experience.
I’ve heard of beginners buying $2000+ amp stacks because they thought that buying high-priced gear will give them great tone. That’s what the amp makers want you to believe! This guide will steer you away from that line of thinking.
Guitar Amp Settings Presets (and why you should ignore them)
One reason why I created this guide is that I saw how many websites list different guitar amp settings or presets. You will see a lot of websites list guitar amp presets like:
METAL: Drive 10, Bass 10, Mid 1, Treble 7, Vol 8
BLUES: Drive 3, Bass 2, Mid 5, Treble 2, Vol 6
ROCK: Drive 7, Bass 5, Mid 7, Treble 7, Vol 7
The major problem with guitar amp presets is that every guitar amp is different so the presets are useless. If you lined up 10 different guitar amps and set them all with the exact same preset, each one would still sound completely different.
Read the comments on those websites and you will see countless people complaining that they followed the advice and it didn’t give them the tone they wanted.
Even if you have the same amp as the person making the recommendations, your guitar and pedals will change your results.
The goal of this guide is to teach you to use your ears and figure out the right preset for any situation on your own. If you follow the advice in this guide you will never need to look up another guitar amp settings preset again.
The main lesson here is that guitar amp settings presets don’t teach you how to use your guitar amp or how to dial in good tones.
Guitar Amp Basics
Let’s start by getting a general feel for the typical controls on guitar amps. The three examples below are very different from each other, but you will notice some similarities in the controls.
There are countless other amps out there with different controls, so the three below will give you a good idea of what to expect.

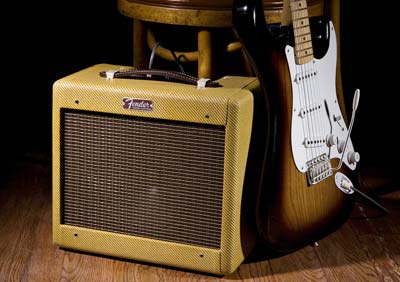
The Fender Mustang I shown above is a digital modeling amp which is why the section on the right of the above photo is so different from traditional guitar amp controls. A lot of modern combo amps have some effects built-in and many give the option to save different presets.
Older combo amps may be limited to reverb as the only onboard effect. Here are the main controls worth mentioning:
- Gain knob
- Volume knob
- Treble & Bass knobs
- Master knob
- Preset knob with LED indicators
- Modulation & Delay/Reverb knobs
This amp gives a wide range of channel options and models different types of amps which is becoming more and more common with combo amps.

The Marshall MG15DFX above is an example of a small combo amp with a few built-in effects. It’s also simpler than the Mustang I shown earlier. Here are the main controls worth mentioning:
- Volume knob under ‘Clean’ channel
- Gain & Volume knob under ‘Overdrive’ channel with an ‘OD select’ button
- Bass, Contour & Treble knobs
- Preset/Adjust & FX level knobs for digital effects
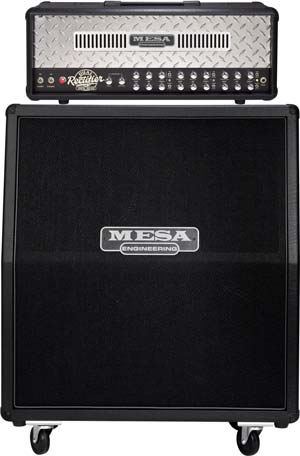
The below amp is a Peavey 6505+ head unit. While it might look daunting compared to the above examples, when you look closer it becomes clear that this amp is actually pretty basic.

The unit has two channels with independent controls. So while it looks like a lot of knobs, it’s only because each channel has dedicated controls rather than master controls. This means you can set different EQ settings for the ‘Rhythm’ or ‘Lead’ channels. Here are the main controls:
- Pre & Post gain knobs (one set for each channel)
- Low, Mid & High EQ knobs (one set for each channel)
- Resonance & Presence knobs (one set for each channel)
When we compare the three amps above, we can see that they all offer:
- Gain options (either one or two gain knobs per channel)
- EQ options (some combination of Bass, Mid, Treble)
- Channel and master volume options
That’s what this guide will focus on and by the end, you will be able to tweak these controls on any amp to produce the tone you want. Your amp may have more or fewer controls than the examples above, but the main features to pay attention to is gain, EQ, and volume.
Think of those controls as the core of your tone. Other features such as inbuilt effects are something you consider later on.
Getting a Good Clean Tone
Let’s start with the most basic thing you can do with your guitar amp: getting a clean tone. This is a good starting point as it will get you comfortable with how the gain, EQ, and volume controls all contribute to your overall tone. It will also emphasize the importance of pickup selection.
1. Select your clean channel or turn the gain down if you don’t have multiple channels
Many modern amps will have multiple channels so select a clean channel to get you started. If your amp has multiple clean channels (eg: a digital modelling amp with a few different clean options), pick any for now.
2. Turn off all amp effects and effect pedals
At this point, all you want is a very clean and dry sound without any effects. Turn off any compressors, boosters, delay, reverb or anything else that might be on. When you play your guitar it should sound dry without any hint of effects or any grit or distortion.
This is important because it gets you thinking about the underlying tone before you apply any effects. Quite often people start with effects (eg: delay) on and it distracts them from first setting up a good clean tone. So start with everything else off.
On a lot of digital amps, the clean setting may be a preset with some effects built-in. So even if you have an option for clean, double check to make sure all the effects are turned off.
3. Bring the bass, mid & treble knobs all to 12 o’clock
As explained earlier, every amp is different, but with most amps this should be a neutral setting for EQ. Using this as your starting point will give you a feel for your amp’s natural tone before you start tweaking it. Set your amp’s EQ knobs to look similar to below:
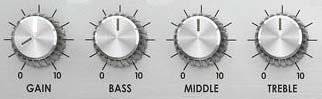
Starting with your EQ as flat as possible allows you to get a good feel for the natural sound of your amp. You can always tweak the EQ later on, so even if you don’t like what you hear now, it’s good to get a basic starting point.
4. Keep the gain fairly low and adjust the volume to a suitable level
With some amps, if you roll the gain knob to zero it cuts the signal. Keep the gain low enough that you can still hear your guitar and adjust the volume up or down to bring it to a comfortable level.
When you hit a chord hard you shouldn’t hear any type of distortion at all and it should die off naturally. If you do hear a bit of grit or breakup in your tone, back the gain off.
You probably won’t like the sound of a very dry amp, but don’t worry. This is just to give you a baseline. You will be able to roll the gain back in later to find the tone you’re after.
5. Jam for a while to get a feel for the tone
Spend at least a minute jamming then change to a different pickup. Spend at least a minute on each pickup combination to get a feel for how each pickup sounds. Don’t worry if the tone sounds bad as you will soon tweak it to your liking.
6. Think about what you like about the tone and what you don’t like about it
This is an important step so don’t skip ahead to making adjustments yet! Learning how to think critically about your tone before you make adjustments is how you will get a good tone in the end. Randomly tweaking knobs or adding in stompboxes won’t teach you to control your tone.
At first, it will be hard to describe what you like/dislike about your tone. Here are some basic examples of what you might be thinking:
- It sounds too muddy
- It sounds thin and hollow
- I’m getting a twangy sound
- I like how crystal clear it sounds
- It produces a weird boomy sound when I play chords
Over time you will be able to get more specific about what you like/dislike about your tone so spend a few minutes now trying to describe your tone.
7. Start making small adjustments to fix any problems you hear
The previous step is so important because you need to first know what you don’t like about your tone before you make any changes. Tweaking knobs without a specific goal won’t help you get a good tone.
At first, you may not know how to fix a problem such as ‘it sounds thin and hollow’, but this experimenting stage will teach you how each knob affects your tone. So while I’d like to give you a recipe for fixing any possible problems, you won’t learn much from it.
Here’s an example of the type of experimenting to go through when trying to fix a problem or make an improvement:
Let’s say you feel your tone is thin and hollow.
- Start by turning the bass knob up and jam for a bit with each pickup. Did that fix the problem? The chances are it will still sound thin but now has a more boomy sound. Turn the bass knob back.
- Turn the mid knob up. Did that fix the problem? This time it will probably sound muddy as if the amp was made out of cardboard. Turn the mid knob back.
- Turn the treble knob up. Did that fix the problem? It’s like it will sound even thinner but now have a bright or shimmering sound. Turn the treble knob back.
- Turn the gain up and adjust the volume down to compensate. Did that fix the problem? It’s likely that it fills out your tone but you still feel it’s a bit hollow. If this made an improvement, you would then continue by either trying to raise the gain some more or keep the change and go back to the EQ knobs to further improve the results.
So for this example, you might find that turning the gain up and adjusting the bass and mid knobs solves the problem.
Think of the above example as a way to figure out how to overcome any problems in your tone. Go through each setting one at a time to figure out which setting helps solve the problem. There isn’t a rulebook that gives perfect solutions to any problem so that’s why this process is important to learn.
Once you solve any issue or problem you hear in your tone, you can shift your focus to anything else that doesn’t sound quite right. The main lesson here is that the only way you will be able to end up with a great tone is if you take the time to learn how each knob impacts your overall tone.
8. Add in any effects you want after you’re happy with your tone
Only after you have tweaked your way to a tone you’re happy with should you even consider adding any other effects or pedals into the mix. The reason is that you want your other pedals to enhance your tone – not to try and fix a crappy tone. A lot of people get this the wrong way around and start buying pedals to fix a bad tone.
Don’t buy more gear because you’re unhappy with your tone. Get your clean tone into a good position then you can look at how your other pedals might enhance your tone.
When you do add any effects in, start with the mix of the effect low and slowly raise it until you find the right level. It might sound good to crank the effect up, but in most situations having the effect a bit lower in the mix ends up with better results.
If your amp doesn’t have inbuilt effects or you prefer to use pedals, here are a couple of guides to help you find suitable pedals for your clean tone:
- Best Delay Pedals – delay is a great way to give your clean tone a fuller sound
- Best Reverb Pedals – while not as popular as delay, reverb can make your clean tone feel more lively – especially at home
- Best Compressor Pedals – you’ll be surprised by how much a compressor pedal can enhance your clean tone
9. Try coming up with different types of clean tones
Listen to a few different songs or guitarists using clean tones and you will hear a wide range of different sounds. Some guitarists like a rich tone full of sustain to the point where it almost sounds like overdrive. Others like a glassy-like tone while some prefer a bit of grit in their clean tone to give it some edge.
Try to experiment with your clean tone to get a feel for the overall range your amp has to offer. The more distinct clean tones you can produce with your amp, the more options you will have later on so it’s worth the time spent experimenting.
Here are a few examples of songs with clean tones you might want to try replicating:
- Sweet Home Alabama – Lynyrd Skynyrd (a very twangy clean so make sure you consider your pickups)
- One – Metallica (listen to the difference in tone between the rhythm and lead tones in the intro and try to replicate both)
- Purple Rain – Prince (first try to replicate the silky clean tone before you add any effects)
- Little Wing – Stevie Ray Vaughan (listen to the slight grit in the tone when picked hard. Also listen to the Hendrix version for a very different tone)
The more different clean tones you can produce, the more flexibility you will have when writing your own music or trying to replicate somebody else’s tone. So listen out for any clean guitar and try to replicate it with your amp.
Using Pedals or Your Amp For Your Gain
Now that you have experimented with getting a good clean tone and you have a good feel for your amp’s controls, you can turn to a distorted/overdriven tone.
There are two main ways you can get a distortion/overdrive tone: use a pedal or use your amp. The right option for you depends on what gear you have available and what sounds you want to produce. Quite often a person gets frustrated with their amp because they’re unhappy with the distorted tone they’re trying to produce.
Experimenting with using pedals or your amp (or a combination of both) to produce your distorted/overdriven tone is a good starting point when getting the most out of your amp.
Some guitarists are adamant that your drive tone should come from your amp while other guitarists are just as insistent that the best drive tones come from pedals. I suggest that instead of limiting yourself to one way or another, keep your mind open to all options.
One day you might find a pedal or amp that delivers a great tone so don’t restrict yourself for now.
In my Guitar Effects Course, you can hear examples of different ways to create a drive tone. You’ll be able to compare an overdrive from an amp vs a pedal, and you’ll learn how to ‘stack’ your drives for some incredible tones.
Getting a Good Drive Tone
Let’s go through how to think about drive tones and how to set up a good tone on your amp.
1. Think about what you want out of your tone
The first thing to think about before you start setting up a drive tone is what you want to use the tone for. A lot of guitarists don’t think about this and end up with a sub-par tone as a result. The drive tone you create should match what you will play.
For example, if you’re playing rhythm guitar in a band with two guitarists, turning up the gain too high or adding in effects like delay can easily ruin your band’s overall sound. People will struggle to hear you in the wash of noise.
While your rhythm tone might sound great on your own, things change when you’re playing in a band. On the other hand, a high gain tone with delay can be perfectly suitable when playing solos or lead lines. So remember that the drive tone you use must match your situation.
Here are a couple basic examples of what type of drive tone works best for different things you might play:
- Metal rhythm riffs: using a fairly low gain will bring the clarity out in your riffs. Too much gain might sound good on your own in the bedroom, but live or on recordings it can turn your tone into a mess. Lower gain gives you more definition to your riffs.
- Strumming power chords: a fairly low gain gives your chords more punch. Too low gain will thin out your tone and make the chords sound less powerful.
- Rock/metal solos and lead lines: higher gain will give you more sustain and help with any pinch harmonics you want to add in. Adding in effects such as delay can give your tone a fuller sound.
- Blues lead or rhythm: your drive plays a big role in the feel and character of your playing. A warm overdrive that slightly breaks up your clean tone can give you plenty of inspiration. A highly saturated tone works when you want more sustain – simply use your volume knob to roll the drive back and clean up your tone as needed (similar to how Hendrix achieved his clean tone while playing live).
The first three examples above could all be found in the one song, so it’s important to remember that the tone you create should match what you’re playing. A song might start off with an intricate riff needing definition, then it might move into a power chord based verse needing less gain.
When it comes time for the solo you might find that some extra gain and delay allows your solo to shine.
While you could get away with having one drive tone for everything, you’re not going to be getting the best out of your gear. The best tone will change to match what you’re playing.
2. Start with an appropriate pickup
It’s hard to get a sharp and punchy rhythm tone when you’re using a single-coil neck pickup. It’s just as hard to get a smooth and thick lead tone when you’re using a high power humbucker on the bridge. So start off by choosing a pickup setting that matches the type of tone you will need. If you’re unsure which pickup should work best, let your ears decide.
If you’re an experienced player this might sound obvious, but it’s worth remembering that you should regularly switch between pickups when tweaking your amp’s settings. Have a listen to how your different pickups affect your drive tone and which pickups are the best fit for the drive you come up with.
3. Choose a suitable amp model (for modern digital modelling amps)
Many modern amps will give you a range of different amp models to choose from. This can often make finding the right tone complicated as you’re always wondering what the other amp models sound like.
If you’re not already very familiar with the different models your amp offers, take some time to get used to each one. Spend a few minutes with each model and jam with it. Get a feel for what style of music the model would suit and whether you like the tone or not.
After doing this you will probably find that you like a couple of the models and dislike the rest.
Find the model that is the closest to the tone you’re after without having to tweak anything. It’s possible to tweak other amp models to get the tone you’re after, but start off with the basic amp model and try to find the closest one.
Once you’ve found the amp model that gets you close to the tone you’re after, you can move to the next step.
4. Set the EQ flat and turn off any effects
Just like with your clean tone, the goal is to start off with a very flat EQ curve so you get a feel for the amp’s natural sound. You probably won’t like how it initially sounds, but it’s not a good idea to skip this step.
For now, leave the gain fairly low. We will adjust the gain later so don’t worry if it isn’t at the right level. As long as your EQ is flat and all your effects are turned off, move on to the next step.
5. Spend a few minutes jamming with this tone
Remember that you want to match your tone to a specific situation (eg: chord strumming, lead, riffs, etc.). So make sure you only play the type of stuff you want to use this drive setting for. That means don’t jam with both lead and rhythm parts because you will want different things from your tone for those situations.
If you want to get a good lead tone, play lead. If you want to set a good rhythm tone, play the type of rhythm you want to play.
Spend some time jamming with this setting and try to think what you like or dislike about the tone. Does it sound muddy? Is it thin? Does it have too much of a high-end bite? Think about what you would like to change about the tone for a while before you make any tweaks.
6. Start fixing any problems you hear in your tone
Just like with your clean tone, you should turn one knob at a time to learn how it affects your tone. Turning the bass knob up or down with a drive setting can sound completely different from turning it up or down with a clean setting. So even if you followed the above steps with your clean tone, you still need to go through the steps with your drive tone to learn how your EQ affects your tone.
Let’s say your tone sounds too boomy when playing palm-muted riffs. Here is an example of how you should try to fix the problem:
- Start by checking to make sure the problem isn’t with your pickups. Jam for a while with each pickup and take note whether the boomy sound changes or not. Continue through the steps with the pickup that gives you the least boomy sound.
- Turn the bass knob down and jam for a bit. Did that fix the problem? It probably did, but just for this exercise, turn the bass knob back up so you can hear how the other settings might also change your tone.
- Turn the mid knob down. Did that fix the problem? Depending on your amp you might hear slightly less boom but the tone will probably sound slightly hollow. Turn the mid knob back.
- Turn the treble knob up. Did that fix the problem? You will probably still have the exact same boomy sound, but now your riffs have a ‘sharper’ or brighter sound. Turn the treble knob back.
- Turn the gain down and adjust the volume up to compensate. Did that fix the problem? It might have partially fixed your problem depending on your amp.
- Think about how each knob affected your tone. If any of the changes you made improved your tone, make that change now. In this example, it probably means you would lower the bass knob, slightly raise the high knob and adjust the gain down slightly.
- Once you make those changes, jam with the result and think about what further tweaks you might want to make. Repeat the steps until you find the setting that doesn’t need any more tweaks.
Remember that every amp is different so if you have a problem with your tone the only way you will solve it is to go through the steps above.
7. Add in any effects you want to use
Depending on what you want to play, you might add in effects such as delay or a compressor, or you might use modulation effects such as a phaser or chorus. Adjust the effect’s settings to suit your tone. You might also need to make slight tweaks to your amp’s settings after you add in any pedals, but they should really be only minor tweaks.
8. Adjust your gain to the right level
Once you have added in any effects, you can now adjust the gain to find the ideal level. Start with the gain turned right down and slightly turn it up a little bit at a time while jamming. Every time you turn the gain up, think to yourself whether the change improved your tone or not.
You will find that at a certain point adding more gain doesn’t improve your tone. When you reach that point, start slightly rolling off the gain and ask yourself whether it improves the tone. You will probably find that you can roll a fair bit of gain off before it starts feeling like you’re taking away from your tone.
Your ideal gain level is somewhere between those two points. It’s not an exact science so leave your gain at a level where you feel happy with the result.
9. Write down the settings you used for this drive
Writing down the exact settings you use along with any notes such as what you like about the tone or what type of playing it suits is a great way to learn how to get the most out of your gear.
Every time you come up with a new drive tone, write down notes so you can reproduce it. In a year’s time, you might have 20 unique drive tones and exact settings to reproduce them as needed. Or if you record a song with a certain tone, you now have a way to reproduce that tone exactly.
Not only is this a good way of keeping a record of the tones you come up with, but it helps you learn to get the most out of your amp. I’ve seen a lot of students struggle with their tone because they don’t learn from their experiences.
Written notes help you remember how and why different settings sound good or bad.
10. Try to replicate different drive sounds from different guitarists
Go through your music collection and pick out 5 completely different drive sounds. Try to find a mix of both rhythm and lead tones and in different styles if you can. The goal here is to see how wide you can push your amp.
Can you get a solid rhythm metal tone, a warm blues tone, a high sustain lead tone or a vintage rock tone all with your amp? If you take the time to experiment with your amp, you’ll be surprised how many different tones you can achieve – especially if you have a modelling amp.
Even if you only like to play one style of music, it’s still worth trying to come up with different tones. Every time you try and emulate a different tone, you learn how your amp works. So when you go back to your original tone, you will find you can make further improvements to it. It’s worth the effort.
Get More From Your Amp
If you spend time applying the advice in this guide, you will learn how to get the most out of your amp. Don’t expect to rush through the above steps once and become an expert on your amp’s tone. It doesn’t work that way. Your ears need time to learn how your amp’s EQ knobs affect your tone or how much gain is the ideal amount.
Practice getting to know your amp just like you would practice a song. The more time you spend slowly going through the above steps, the better your tone will become.
Guitar Effects Course
If you use any guitar pedals or are thinking of adding effects to your rig, check out my Guitar Effects Course. The course gives a complete overview of the most common types of guitar effects, how they work and how to get the best sound out of them.
The more you understand guitar effects, the easier it is to use them to craft a better tone. The guitar effects course will cover everything you need to get the most out of any pedals you own.
Other Useful Guides
There’s a lot more you can do to achieve a good tone with your amp. Here are a few guides to help you get more out of your amp:
- 7 Tips for a Great Guitar Amp Tone
- Can You Use a Guitar Amp as a Speaker?
- How to Play Electric Guitar Without an Amp
- Different Types of Guitar Amps Explained
- Best Battery Powered Mini Portable Guitar Amps
- How to use the 4 Cable Method
Found this guide useful? Please share it on social media to help support this site (if you use Pinterest, please pin the below photo).