
The TONEX Pedal has just launched (16th February 2023) and is a physical pedal version of IK Multimedia’s TONEX software.
IK Multimedia provided me with a TONEX Pedal a few weeks before launch, so this review will give you a thorough look at the pedal and my impressions of it.
In this review, I’ll explain what TONEX Pedal is, the different ways you can use it, and my impressions on it.
I recommend reading my review of the TONEX software here to fully understand TONEX before reading this review. The TONEX software and pedal work together, so understanding the software is important.
A full version of the TONEX MAX software is included with TONEX Pedal (as well as a full version of AmpliTube 5), so it’s worth reading my review to see what you get with the pedal.
Note: IK Multimedia have released a low-cost audio interface that includes TONEX as bundled software. Learn about the AXE I/O ONE audio interface here.
TONEX Pedal Features
Here are the main features of the TONEX Pedal:
- Guitar and bass compatible
- 50 banks with 3 preset slots per bank
- Includes full versions of TONEX MAX and AmpliTube 5 software
- Built-in Noise gate, EQ, Compressor, and Reverb (from AmpliTube X-SPACE pedal)
- Custom IRs as well as VIR cabinet sim
- 24-bit, 192kHx processing
- 5 Hz – 24kHz response with 123 dB dynamic range
- Use as a USB audio interface
- Multiple signal output routing with or without cab sim
- Full MIDI in/out
- Selectable true bypass or soft bypass
- Built-in tuner
- Expression pedal input
- Headphone output
- Dimensions: 176 x 142 x 55mm (6.92 x 5.59 x 2.16″)
- Weight: 906 grams
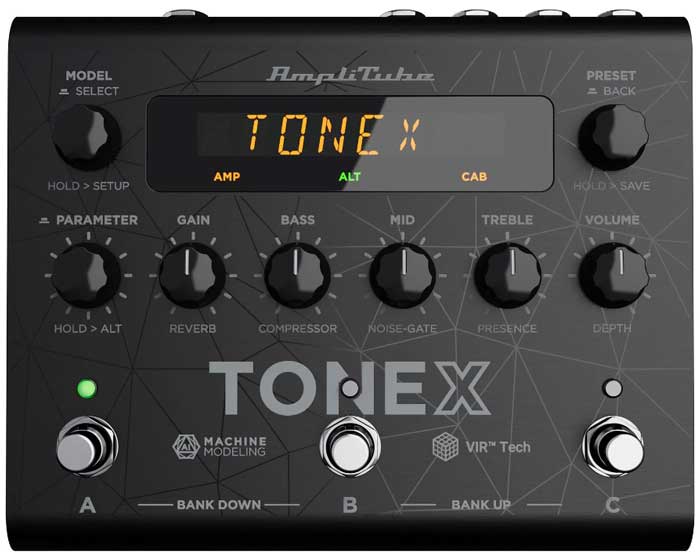
The TONEX Pedal is built out of anodized aluminum and features three footswitches to choose between presets and banks.
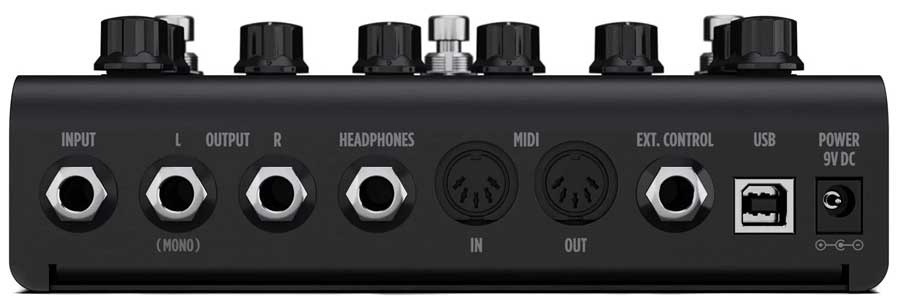
On the back of the pedal, it features a single input jack, two outputs, headphones out, MIDI in/out, external expression pedal, USB, and a power jack.
TONEX Pedal Sound Quality
The sound quality of the TONEX Pedal depends completely on the quality of the models you save to it.
As I explain in my TONEX review, there are two main types of TONEX models: models created by IK Multimedia, and models created by users and shared on toneNET.
You have 1000 models to choose from in the included TONEX MAX software, so there’s a massive range of amps, drive pedals, amp + cabs, or complete rigs. While many of these models are great quality, some are odd choices and feel underwhelming.
TONEX really shines when you dive into the toneNET models. The quality of the models shared with toneNET can vary depending on how well the person captured the hardware, but most of them are absolutely fantastic.
I’ve been very happy jamming with toneNET models since TONEX came out. Users have shared models on so many rare and collectible pedals/amps that I would never get a chance to play. Now I can easily access them on my pedalboard at any time.
Cab Sims
As you might expect, the cab sims available on TONEX Pedal are impeccable. High-quality impulse responses have been standard for quite some time now, so I expected great-quality cab sims when testing this pedal.
You’re able to swap any of the cabinet models out with third-party impulse responses and save them to your pedal. Read everything you would want to know about impulse responses here to learn more.
Alternatively, you can use the included ‘VIR’ cabinets created by IK Multimedia.
As I explained in my AmpliTube 5 review, the VIR cabinets are essentially IRs captured in a 3D space.
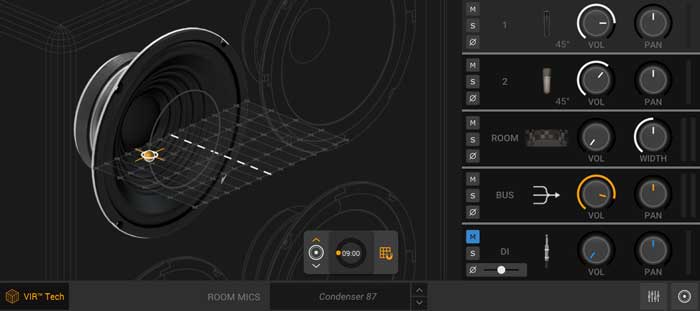
This means you’re able to tweak the microphone placement while staying true to a real IR. The VIR cabinets sound fantastic, but it’s great that you’re able to swap them out for any third-party IR you want.
Built-in effects
While the main purpose of TONEX Pedal is in amp and drive tones, there are a few built-in effects you can use to enhance your tone.
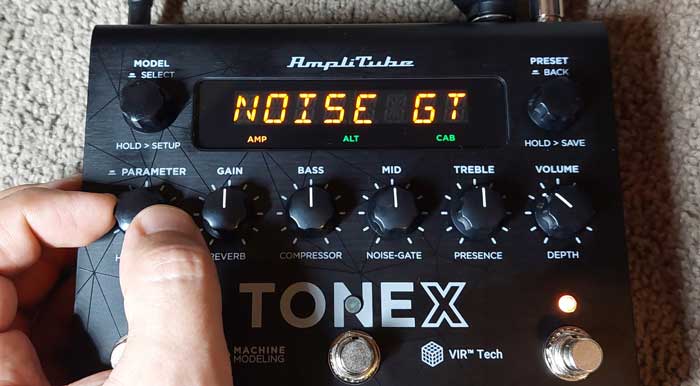
An important built-in effect is the noise gate. Many of the amp and gain models offer insane levels of gain, so being able to easily add a noise gate onto any preset is an important feature.
You’re able to control the noise gate’s release, depth, and threshold using the parameter and alt knob functions.
A compressor gives you a way of adding a different level of control to models that you feel need some extra control.
You’re able to control the compressor’s gain, attack, position (before or after the TONEX model),
EQ is available for every preset to give you a simple way to tweak the model to suit your own style and tone preferences. As explained in my TONEX review, the EQ controls on the pedal shouldn’t be thought of as the same as using the EQ controls on the physical amp the model is based on. But they can achieve a very similar result.
The EQ controls include: bass frequency, mid Q, mid frequency, treble frequency, EQ position (before or after TONEX model), mix.
Finally, five stereo reverbs are available and are based on reverb models built into IK Multimedia’s X-SPACE Reverb pedal.
You’re able to control the reverb’s time, predelay, color, mix, as well as choose from five types: spring 1, spring 2, spring 3, room, plate.
Of course, you can easily add a reverb pedal or any other effects pedals to your signal chain, but it’s nice that there are some basic effects available to help shape your tone. Adding a simple reverb can add some life to your tone, so I’m glad it’s included here.
TONEX Pedal Ease of Use
As I explain in detail later, there are a few different ways you can use TONEX Pedal. You can use it as a simple distortion/overdrive pedal on your pedalboard, or you can use it in different ways to supplement or replace your guitar amp.
In this section, I’ll explain what TONEX Pedal is like to use and how you edit the settings on your pedal without using any software.
Presets and Banks
There are 50 banks and each bank contains 3 presets (one per footswitch).
This means you can save up to 150 presets on the pedal at any one time.
Changing between the three presets in a bank is as simple as hitting the footswitches.
Alternatively, you can turn the top right Preset knob to quickly cycle between all 150 preset positions. So if you wanted to skip between bank 0 to bank 49, it only takes a few seconds by turning the Preset knob.
Three footswitches feel more than enough for the different ways you can use this pedal.
Unlike a multi-effects pedal where you may need to be able to quickly switch between many different presets during a song, you probably will only need one or two presets per song. You may even use the same preset for an entire setlist, depending on how many different drive tones you use.
The only quirk I noticed with changing between presets is that once you reach the end of the last bank (bank 49), it won’t continue to cycle back to the start. So if you want to go back to Bank 0, you need to use the preset knob and cycle all the way back.
Overall, cycling through presets and banks is easy.
Pedal Display
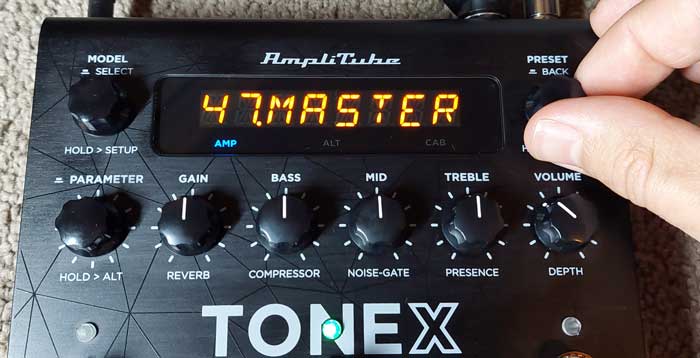
The TONEX Pedal has an 8-segment display, which does make it challenging when navigating the setup menu or reading the preset names.
By default, the presets are displayed with the bank number, followed by the preset name:
This means you only have 6 characters of your preset name visible. If you don’t feel the need to display the bank number, you can change it in the ‘Global Settings’ menu.
Simply hold down the top left knob and select Global Settings, then Naming to customize the way presets are displayed.
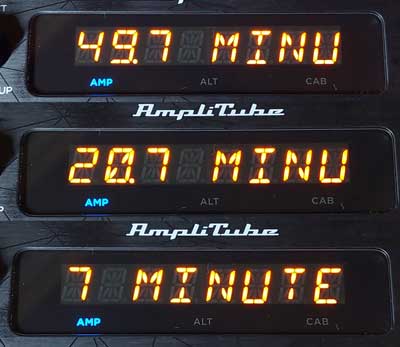
You can choose between:
- Bank + Name
- PC (Program Change) + Name (useful for MIDI users)
- Name
Here’s what the display looks like for each of the three options:
The display also uses color coding to show when different types of models are active.
The AMP and CAB labels on the display change between orange, green, blue, and white (CAB only) to represent these types of models:
- AMP (orange): Amp only model
- AMP (green): Stomp + amp model
- AMP (blue): Stomp model only
- CAB (orange): Cab tone model
- CAB (green): VIR cab model
- CAB (blue): IR cab model
- CAB (white): cabinet bypassed
Once you learn what the colors represent, it gives you an easy way to know what type of model you have selected at any time.
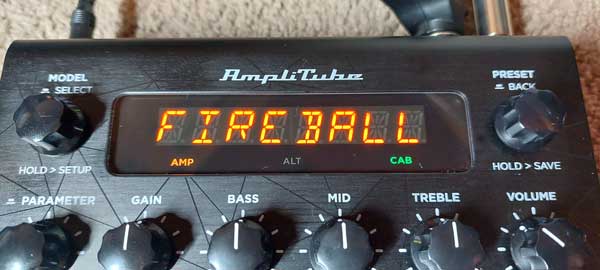
If you see a blue AMP label, you know you’re using a stompbox model. If you see an orange AMP label with a green CAB model (shown below), you know you’re using an amp model with VIR cab model.
It didn’t take me long to figure out the menu system (the manual wasn’t ready when I received the pedal), so it’s a fairly simple system to use.
Knob Functions
Here’s a quick look at the different control knobs and how they can be used:
MODEL (top left): press and rotate the knob to replace the current preset model with a different model. You’re also able to enable/disable the amp or cab model such as replace the VIR with a third-party IR.
If you hold the MODEL knob down, you can change the global and preset settings. Preset settings include expression pedal setup and enabling/disabling amp/cab models. Global settings include naming options, navigation, easy/advanced user mode, MIDI setup, USB options.
PARAMETER (bottom left): press the knob to set up everything from the noise gate, compressor, reverb, EQ, mic, volume. If you hold the knob down, the pedal switches the five main knobs function to their ‘ALT’ function (the labels below each knob). A green ‘ALT’ will show on the screen to let you know when these functions have been activated.
PRESET (top right): rotate the knob to scroll through all presets. Hold the knob down to save the current preset.
Different Ways You Can Use TONEX Pedal
TONEX Pedal is different than a typical multi-effects pedal or amp modeler. You can use it in different ways and achieve very different results depending on your type of guitar rig.
Live performances
TONEX Pedal can be used to replace your guitar amp or supplement it. It all depends on what type of tones you want and how you plan on using the pedal.
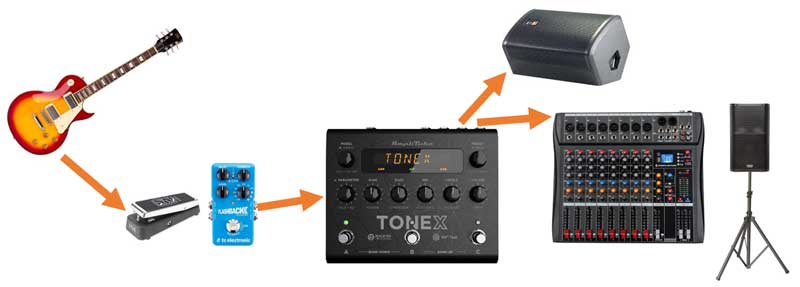
The built-in cab models mean you can ditch the guitar amp completely and run the stereo outputs to the mixer as well as any monitors on stage. Then you can use the pedal to easily switch between any amp model you want during your performance.
Here’s how your rig might look when you use TONEX Pedal this way:
Or you can use TONEX Pedal as part of your pedalboard as a quick way to access different drive tones. It can replace all of your drive pedals all in one unit. You can even create your own TONEX models of your drive pedals and load everything into TONEX Pedal.
The MIDI integration and external expression pedal control gives you plenty of ways to use the pedal for performances.
Replace Your Guitar Amp
You can easily replace your entire guitar amp and use TONEX Pedal to create any amp tone you want.
By plugging the outputs from the pedal into a FRFR (Full Range Flat Response) cabinet or PA system, you can get the most out of TONEX Pedal.
The built-in cab models sound fantastic, so you really can ditch the guitar amp if you prefer flexibility over your current amp sound.
Here’s how your rig would look when you use TONEX Pedal this way:
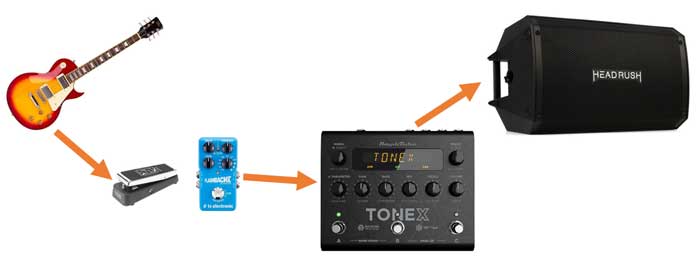
You can still use any pedals you want before or after TONEX Pedal (eg: stereo reverb pedal after TONEX Pedal).
Unlimited Gain Pedals
If you like the sound of your amp and don’t care about using different cabinet sims, you can use TONEX Pedal as a way of quickly accessing a massive range of stompbox and amp drive tones.
Think of all the popular and sought-after drive pedals and imagine loading all of them into one pedal. That’s basically how I’m using TONEX Pedal right now.
You can download all the stomp and amp models you want, turn off the cab sims, and use TONEX Pedal as the ultimate drive pedal.
Here’s how your rig would look when you use TONEX Pedal this way:
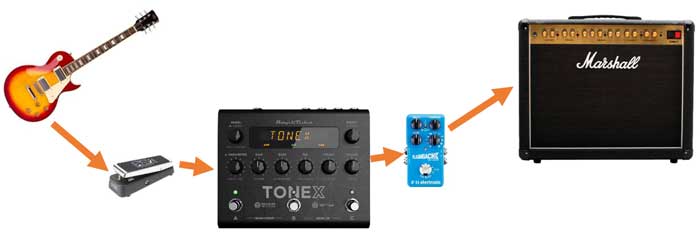
While you’re not using TONEX Pedal to its full potential in this way, it’s still a fantastic way of getting access to a massive range of tones.
As an Audio Interface
TONEX Pedal can be used as an audio interface for recording with a DAW. You’ll already be using the USB cable to interface with the TONEX software, so this feature gives you an easy way to record your ideas without using a separate interface.
Simply install the ASIO drivers for TONEX Pedal and you will see it appear as an option in your DAW of choice.
The TONEX Pedal gives you two different ways you can send audio to your DAW:
- STEREO: stereo mode will send the processed stereo signal to USB Outputs 1 & 2
- DUAL: the left processed signal is sent to USB Output 1 and the dry unprocessed signal is sent to USB Output 2
Being able to change between these two modes gives you great flexibility with using TONEX Pedal while recording.
For example, if you select DUAL mode, you’re able to record your dry guitar signal to one track as well as the TONEX processed signal to a separate track.
You can also change the pedal to INTERFACE MODE under the GLOBAL SETUP, which gives you a way to monitor the audio from your DAW using headphones connected to the pedal or the pedal’s main outputs.
While a dedicated audio interface will provide you with more control and options compared to using TONEX Pedal, it’s good enough for simple recording needs.
TONEX Pedal Software Integration
TONEX Pedal is essentially a way of taking the tones from the TONEX software and placing it on your pedalboard.
To get the most out of the pedal, you need to use the TONEX software, which is included when you purchase the pedal. You also get access to the full version of AmpliTube 5 and are able to add your TONEX models to any AmpliTube preset.
The TONEX version you get with the pedal is ‘TONEX MAX’, their top version with 1000 included models.
As I explained in my review of TONEX, you’re also able to download any user-created models, which essentially gives you an unlimited number of possible models you can save onto your pedal.
As more and more guitarists upload their models to the toneNET sharing community, you will have access to more and more options.
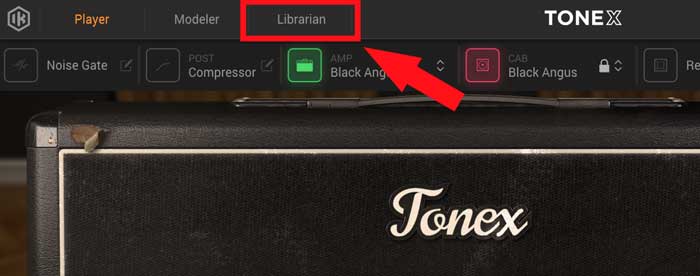
TONEX ‘Librarian’
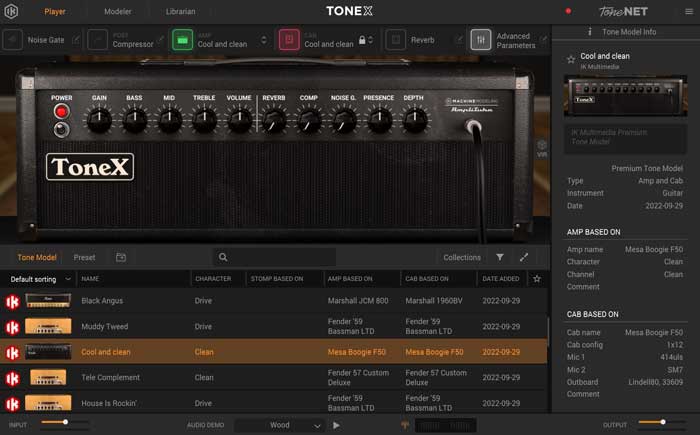
The main way the TONEX pedal integrates with the TONEX software is with the new ‘Librarian’ option at the top of the screen.
When you plug your TONEX pedal into your computer via the included USB cable, the software will sync with the pedal and display your currently loaded presets and banks.
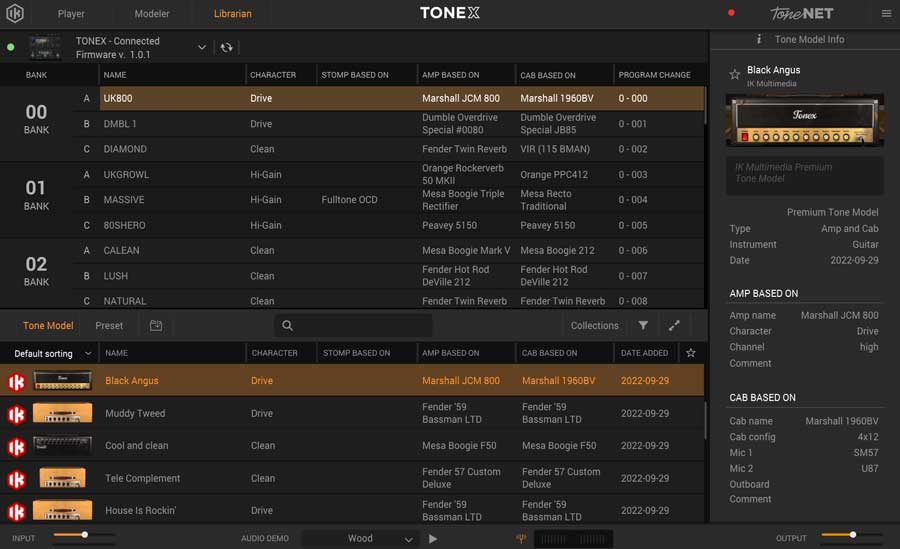
At the top left of the screen, you can see that the software has recognized my pedal and displays the current firmware version. The version you see will likely be different as I have been using a pre-release version.
From here, you can easily rename or replace the presets with any available TONEX model as well as import/export your entire library or update the pedal’s firmware.
If you click on a different preset, your pedal will instantly switch to it. Alternatively, if you hit the footswitches to move between presets or banks, the software will update to show what is currently selected.
It’s a simple integration at the moment and this will likely improve as updates are released.
Adding Presets to TONEX Pedal
Adding a tone model preset to your TONEX Pedal is as simple as dragging it from the bottom of the screen and dropping it onto the position you want to save it to.
I searched for the ‘7 Minute Fuzz’ preset I created in TONEX based on this pedal I built and shared with toneNET.
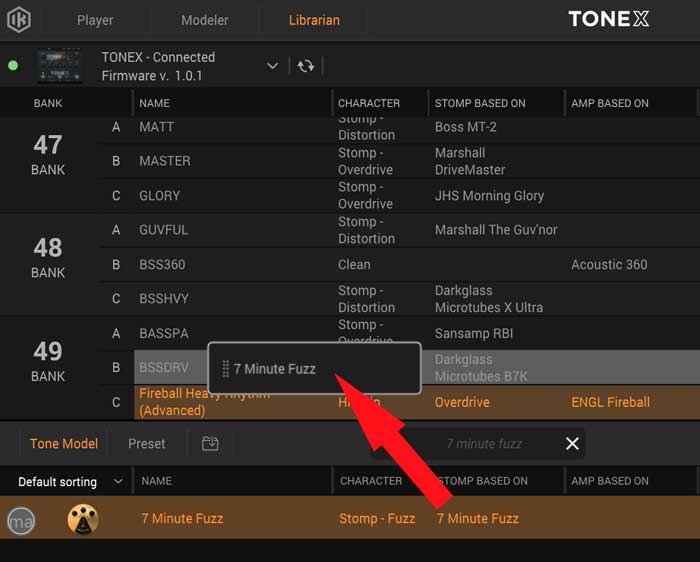
Once you drag the Tone Model into position, you’re asked to confirm that you will be overwriting the existing preset, then your preset will save in that position.
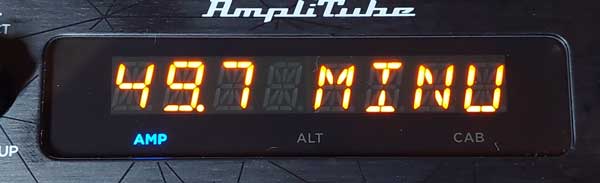
You can rename the preset to change what is displayed on the pedal. Long preset names will scroll on the pedal’s display once when you select them.
It’s an interesting feeling to have a model I created running on the TONEX pedal. It’s an even better feeling to be able to use models other people have created and save them onto my pedal.
Overall Impression of TONEX Pedal
While I was testing TONEX back in September 2022, I kept thinking that this software would be fantastic as a physical pedal. I’ve wanted an AmpliTube-based physical pedal for years, but I realize how much more difficult that would be compared to placing TONEX in a pedal.
I’m thrilled that we now have a physical way of using TONEX in our rigs so soon after TONEX was first released.
TONEX Pedal will have a permanent place on my pedalboard because I love being able to scroll through countless drive pedal and amp models at any time. I enjoy jamming with user-created TONEX models in the TONEX software, but being able to save my favorite models to my pedalboard is a big improvement.
The sound quality of TONEX Pedal is exactly what you would hope it to be. It’s perfect for live performances or recording or jamming at home.
Being able to toggle the amp/cab models gives you the flexibility to use the pedal in various ways as I explained earlier.
For some guitarists, TONEX Pedal can be the core of your drive tones. For other guitarists, it gives you a vast range of drive pedals and amp models to play around with at home or away.
TONEX Pedal is significantly cheaper than something like the Kempler Profiler or amp modeling pedals like the Helix. It’s also different in how easy it is to share models with other people.
With TONEX Pedal, you can easily download user-created models of super rare and expensive amps and rigs and build up your own collection of great models you can instantly access at any time on your pedalboard.
Needless to say, I highly recommend TONEX Pedal if any of the above sounds interesting to you.
Note: I’ll be adding to this review as the software and firmware continue to update. I’ve spent the last few weeks with early software versions and there have already been quite a few improvements, so I expect to see more improvements over the next few weeks.
How to Get the Most Out of TONEX Pedal
Here are some tips to help you get the most out of TONEX Pedal if you decide to buy one:
Get Used to the TONEX Software
While you can use the pedal without touching the software, you’ll be missing out. There are so many fantastic quality user-created models available on toneNET and the software is the best way to try out different models.
Connect your TONEX Pedal to your computer, load up the TONEX software and spend some time jamming with the different models.
Get used to the different types of models and download some user-created models. Many of the IK Multimedia-created models are great, but many of the best quality models are the ones you will find on toneNET. I spend almost all my time jamming to user-created toneNET models.
As I explain in my TONEX Software review, it can feel overwhelming at first when you see the long list of models. TONEX MAX (included with the purchase of the pedal) packs in 1000 models, so there’s far more than you probably would want to use.
Favorite the models you like the sound of and after a few days you’ll have a nice selection of models you can tweak and add to your pedal.
Decide How TONEX Pedal Will Integrate With Your Rig
How you incorporate the pedal with the rest of your rig will determine what type of tones you get out of it.
For example, if you use TONEX Pedal with a regular guitar amp and cabinet, you’re probably not going to want to use any of the cabinet models. Running a cabinet model through a regular guitar amp doesn’t sound the best. If you want to make use of the great quality cabinet models available, you’ll be best running through a FRFR cabinet or mixer into a PA.
On the other hand, if you want to use TONEX Pedal as a quick way of accessing different drive tones, you can safely disable the cab models and run the pedal just like any other distortion/overdrive pedal. This is currently how I use the pedal as I love being able to jam with expensive and rare drive models.
Have a think about what you want to get out of the pedal and how you will need to work your rig to make use of those features.
Setup and Customize Your Presets
Once you figure out how to incorporate TONEX Pedal into your rig and you have a bunch of models you like the sound of, you can add them to your pedal and customize the names and banks.
I set up my pedal so the first twenty banks are stomp-only models, then the rest of the banks are stomp + amp or amp-only models. Then each bank is dedicated to a different type of stompbox.
For example, I have a Klon Centaur bank with three different Klon presets, a Fulltone OCD bank with three different presets, a Wampler Leviathan bank, and so on.
Check out these reviews and guides to learn more about TONEX and other plugins/options:
- TONEX Software Review
- AmpliTube 5 Review
- Ultimate Guide to Guitar Plugins
- Ultimate Guide to Guitar DAWs
- Ultimate Guide to Guitar Amp Settings (a must-read for dialing in good tones)
Related Guides and Lessons:

