
After many years of AmpliTube 4 being one of the best guitar amp and effects plugins, AmpliTube 5 is finally here.
In this review, I’ll walk you through the basics of what AmpliTube 5 includes, how to use it to set up different guitar rigs, and how it compares to other guitar plugins such as BIAS FX 2, Guitar Rig 6, and Line 6 Helix Native.
If you want to get the most out of the amp and effects models used in AmpliTube 5, check out my Guitar Effects Course.
The course covers all types of effects and explains how to use them in detail. Learn how to combine different effects, change the order for better tones, and set up complete rigs from scratch.
The course will teach you principles you can use to get the most out of AmpliTube 5 or any other real or virtual guitar effects.
AmpliTube 5 Features
Here’s a quick summary of AmpliTube 5’s core features:
- 400+ amp, cabinet, stompbox, and rack effects models (depending on version purchased)
- 5 new amps, 2 new stompboxes, 2 new rooms, 19 new rack effects models
- Available in Standalone version as well as VST, AAX, AU plugins
- Looper, tuner, and practice tools
- 8-track recorder
- VIR technology (Volumetric Impulse Response)
- Custom IR loader
Check out more details on AmpliTube 5 or buy it here on the IK Multimedia website (this is an affiliate link that earns me a small commission if you buy AmpliTube 5 at no extra cost to you).
If you also want to get an audio interface, check out these AmpliTube 5 + Axe I/O bundles at Sweetwater.
AmpliTube 5 Ease of Use
The first change you will notice when you load AmpliTube 5 is the change in interface.
While I felt AmpliTube 4’s interface was fine, the interface and how you use AmpliTube 5 is a big improvement.
You can also resize the screen in AmpliTube 5, which is great to see after years of being locked into a fixed screen size.
This is a welcome change and the new graphics and layout look great maximized on a large monitor.
The aspect ratio of the window stays the same, so if you maximize the window you will end up with black bars on the side as shown above. But it’s a massive improvement to be able to change the window size.
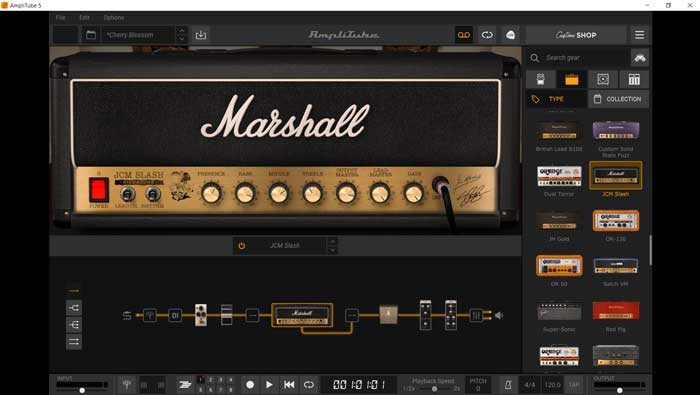
AmpliTube 5’s interface is split into three sections as highlighted below:

You’ll see this layout whether you use the standalone version or load AmpliTube 5 in a DAW as a plugin.
Let’s go through the main areas to see how you will use AmpliTube 5.
Signal Chain
The bottom left of the screen shows your current guitar rig signal chain.
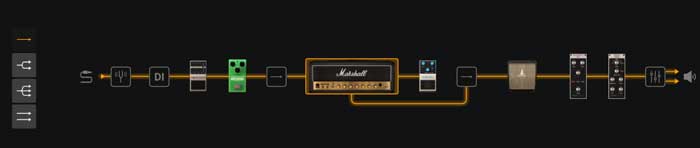
This is a welcome upgrade over AmpliTube 4’s signal view. Not only can you clearly see all of your rig’s gear in one view, but you can easily drag components around (this wasn’t possible in AmpliTube 4).
You can drag a stompbox from the front of the amp to the effects loop, split the signal into two or three paths, or enable different effects as you like. At any point, you can drag new gear into the signal chain from the right panel.
This is similar to what you see in other plugins such as BIAS FX or Helix Native.
The signal chain display uses icons of the gear used so you can easily tell what you have in your rig. In my opinion, this is far more intuitive than the abstract icons used in Helix Native.
Here’s what the signal chain looked like in AmpliTube 4 (three screenshots with different routing options):
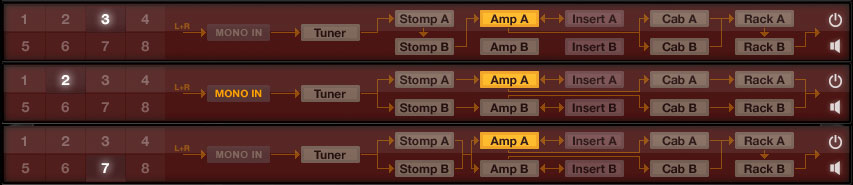
You have no idea what gear is used in the above screenshots and the routing can quickly become confusing. So hopefully, it’s clear why this is an important improvement I’m happy to see in AmpliTube 5.
On the far left in AmpliTube 5 you have four different signal path options. Here are the four options and how they change the signal routing (four separate screenshots):
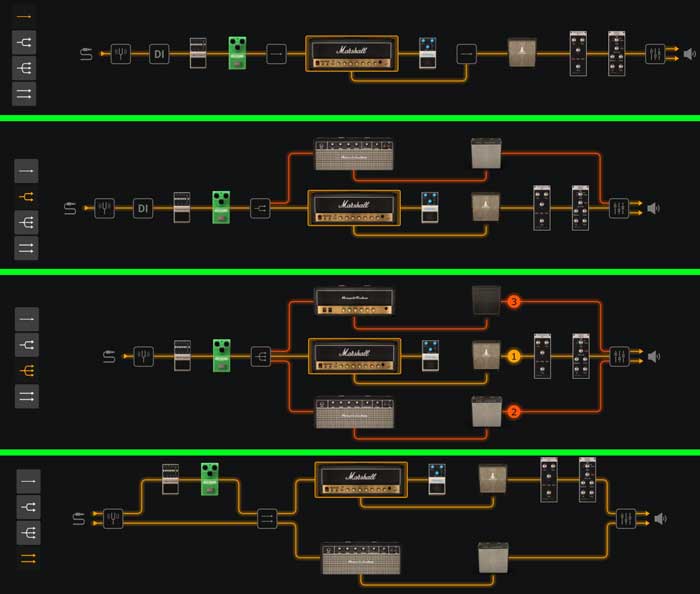
These options allow you to split your signal chain up to let you run multiple amps and mix between them.
If you’ve never tried running two amps at once before in an amp sim plugin, it’s great fun.
In AmpliTube 5 you can split the signal to run two amps or even three amps, which is a great way to blend together different amp tones for a big sound.
The different signal paths are color-coded, which makes it easier to clearly tell what components are in each signal path. Rigs can quickly become complicated, so I felt the color-coding made the signal paths much easier to understand.
Just to show how flexible the routing options are, here are three screenshots showing me moving the green Tubescreamer pedal into different positions in a stereo rig:
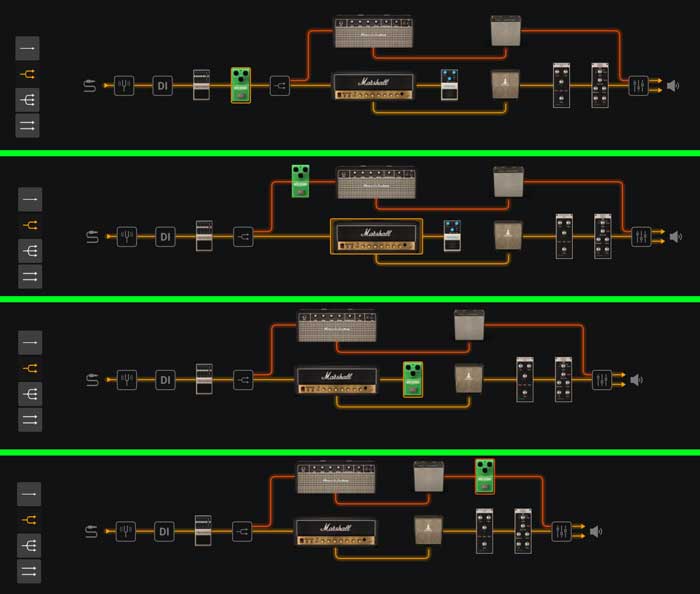
While you probably won’t want to place a drive pedal in the effects loop or after the cabinet, it shows how much freedom you have in how you set your rig up.
Key point: I can’t emphasize how useful this view is and how much of an upgrade it is over AmpliTube 4.
This is so much better than having to toggle back and forth between different views just to see what pedals, amps, and rack gear are being used.
Gear View
If you have used AmpliTube 4, the gear view will feel very familiar. When you click on any component in the signal chain view, the gear view will bring up a clear view of the gear.
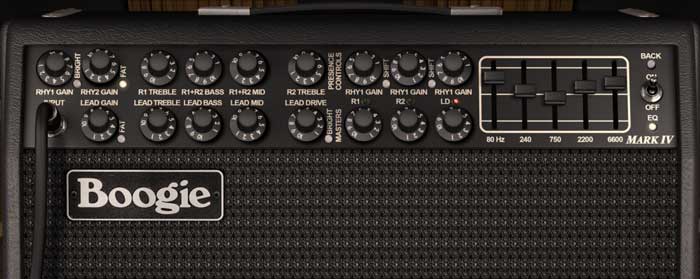
The visual representation of the hardware looks so much better than what was used in AmpliTube 4. Many of the amps look almost identical to their real versions, so this is a great way to learn how to use classic and iconic amps and get a feel for how each one sounds.
While it’s only visual and doesn’t impact your tone, it does feel nicer to use when you’re turning knobs on an amp that actually looks like the Marshall or Mesa Boogie the model is based on.
As a guitarist, you’ll likely prefer tweaking and controlling your pedals, amps, cabinets, and rack gear like this compared to something like Helix Native which uses a bunch of sliders.
You can easily drag gear around the signal chain and replace individual components as you like. As somebody who used AmpliTube 4 for a very long time, this was quick and easy to use.
You’re able to add up to 12 pedals in front of the amp as shown below:

You can see that the first six pedals are before the routing icon, then you can place another six pedals after that icon in front of the amp. If you click on any of the pedals in the signal chain, it brings up a pedalboard view where you can tweak and change the pedal settings.
Key point: the gear view gives you a nice looking virtual representation of the pedals, amps, cabinets, and rack gear. Anybody can instantly figure out how to use this interface to swap pedals around or change your rig.
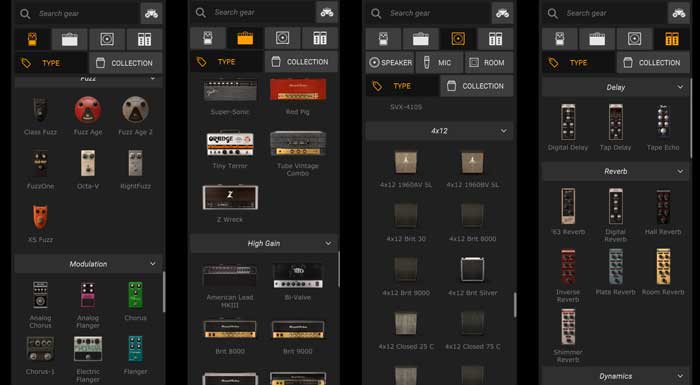
Gear Selection
The gear selection panel on the right is where you can find stompboxes, amps, cabinets, and rack gear (there’s an icon for each category at the top). Here are the four main gear views:
This is another nice upgrade over AmpliTube 4, which used a menu system to find components.
You can search for components by type and scroll through all of the different options, or you can browse components by collection. All of the gear is sorted into different types so you can easily compare the different fuzz pedal options, high gain amps, or reverb rack effects.
One of the ways this is an upgrade over AmpliTube 4 is that you can now see icons for each component to give you a better idea of what each one is.
You can also replace any gear in your rig using the selection menu on the gear view area:
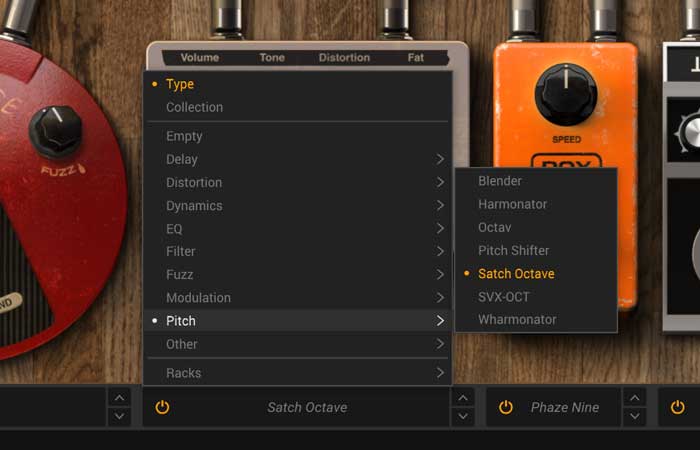
Using the down and up arrows allows you to quickly toggle between components, which can be a handy way to test different combinations of amps, cabinets, or pedals.
I definitely prefer using the right panel and dragging components into the signal path, but it’s nice that there are other ways to change your gear.
Other Features
There’s a lot of features packed into AmpliTube 5, so I’ll quickly run through some of the more interesting features you may use at some point.
You can access a multi-track looper and metronome by clicking the loop icon on the top right of the screen (highlighted below):
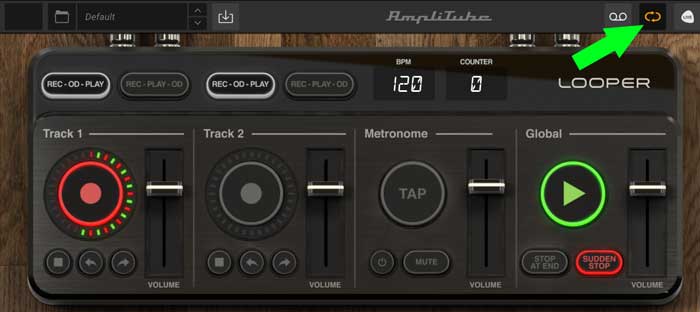
You can see how easy this is to use and how much control you have over the two loopers. If you have a MIDI foot controller (covered later), you’ll get the most out of the looper.
The tuner can be accessed by clicking the little tuner icon on the far left of the signal view:
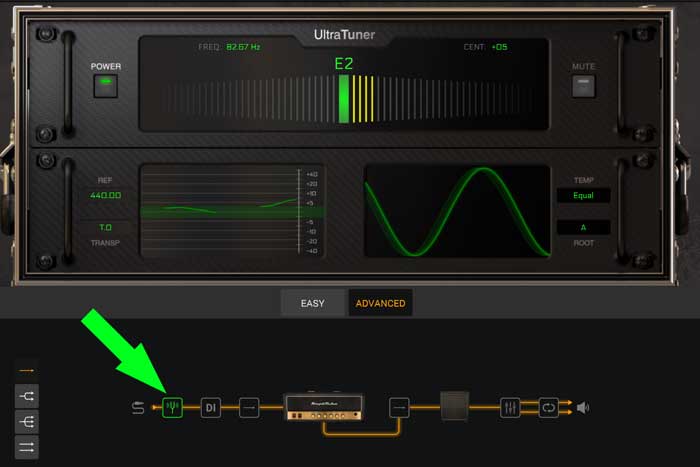
There are two options for tuners: easy or advanced. The ‘advanced’ tuner includes more information such as the strobe view and a chart showing your pitch.
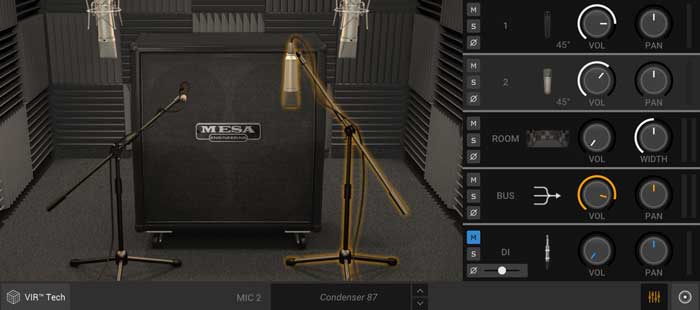
The mixer view gives you an easy way to blend between the different mics or to set up a DI signal path.
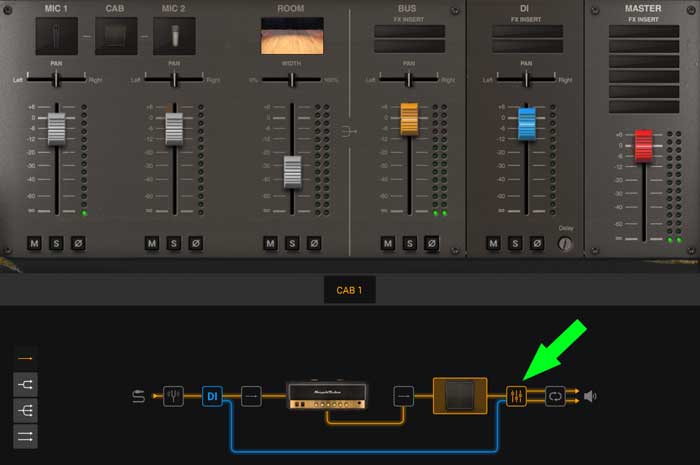
Clicking the ‘DI’ icon in the signal path activates the blue pathway and is handy if you want to bypass AmpliTube’s amp and cabinet models and use a different plugin instead.
If you use the standalone version of AmpliTube 5, it includes a multitrack recorder. Access it by clicking the highlighted icon in the below screenshot:

While this isn’t as powerful as a DAW, it’s a great feature if you just want something simple to record your ideas or mix together songs.
You can even import audio files into AmpliTube such as backing tracks or saved recordings. Simply drag your audio file into a track and it will load as shown below:
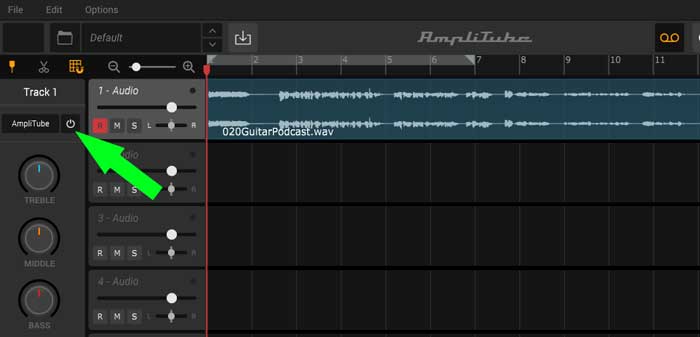
If you do load an audio file into AmpliTube, the default behavior is for that audio to pass through AmpliTube’s signal chain. If you want to set up a backing track to jam over, click the power icon to disable AmpliTube for that track (highlighted in the above screenshot). Then you can set up another track to use for your guitar tone.
Overall, the multitrack recorder is a handy feature if you don’t already have a DAW you can use. It’s also a great way to quickly capture any ideas you come up with, which is something I often talk about in the Bite-Size Guitar Podcast.
Ease of Use Summary
AmpliTube 5’s interface has had a big overhaul and improved many of the areas I felt were lacking in AmpliTube 4.
Being able to see your entire rig in one view is such an important feature and it’s great to see that AmpliTube 5 has been designed around that view.
If you have used AmpliTube 4, you’ll find it easy to learn the new interface. There are some elements that feel the same as AmpliTube 4 and the newer elements such as the gear selection panel are clear and easy to understand.
Being able to drag and drop components and shuffle your rig around is so much easier here than in previous versions.
AmpliTube 5 Sound Quality
While it’s clear that AmpliTube 5’s interface has had a big overhaul, the sound quality is what matters the most.
As soon as I finished installing AmpliTube 5, I spent a couple of hours just jamming and playing around with the different presets, setting up different tones, and experimenting with different cabinet mic positions (covered later).
While the gear that I’m used to in AmpliTube 4 is still there, the new gear surprised me.
For example, as a big Joe Satriani fan, I was excited to try the gear in the Satriani collection.
If you click the folder icon on the top left of the screen, it brings up the preset browser. Under ‘AmpliTube Collections’ you can access presets for any collections you have purchased (I have AmpliTube 5 MAX, which includes everything).
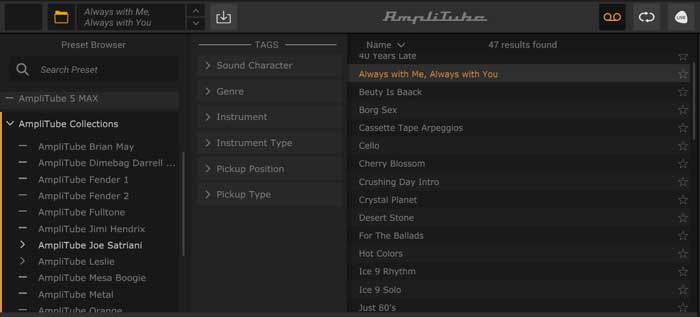
As I jammed with all of the presets based on specific songs, I was seriously impressed by how closely they matched the tones you hear in the songs.
Of course, how closely any of the presets match the song depends on the guitar you play and your playing style, but it truly surprised me.
I felt the same as I went through other collections such as the Slash, Brian May, and Jimi Hendrix collections. Everything just sounded right and at no point did I feel anything was lacking.
What Does it Feel Like?
When it comes to the sound quality of modeling technology like this, the quality has become so good that it’s all about how it feels now.
In the early days of modeling technology, you could hear that there was a digital or fizzy sound to the amps and tones. An amp model would sound sort-of-like-a-Marshall, but at no point could you trick somebody into thinking it was the real thing.
With AmpliTube 5 (and other recent modeling plugins), that’s no longer the case.
The tones sound so good that A/B comparisons between recording real-world amps and using plugins are all about splitting hairs. An experienced audio engineer will be able to tell them apart, but to everybody else, they may as well be the same thing.
The tones I can set up for my recordings in AmpliTube 5 are far better than what I’m able to capture if I mic up my amp at home. Plus I’m able to easily switch between countless amp models – something I definitely cannot do at home with real amps.
Key point: when I jam with the amps and effects in AmpliTube 5, it just feels right. The amp, cabinet, and effect models sound just as good as the real amps and pedals I play with.
VIR Technology
A big change in AmpliTube 5 is with the cabinet models. All of the cabinets have been remade using their new “Volumetric Impulse Response” technology.
Most of the time when a company boasts some new technology with a fancy name marked with a ‘TM’, it’s just marketing speak. I honestly don’t feel this way about their ‘VIR’ technology.
The difference between VIR and standard impulse responses (learn about impulse responses in this guide) is that they capture 600 impulse responses per speaker to build up a ‘volumetric’ area instead of only one single point.
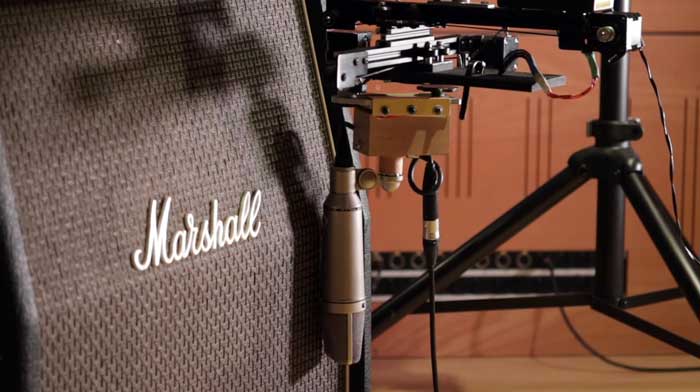
In the above photo, you can see the rig IK Multimedia used to capture their impulse responses.
The rig would position the mic, capture an impulse response, angle the mic, capture another response, move the mic slightly to the side, then repeat the process for 600 positions per speaker.
This means a 4-speaker cabinet has 2400 impulse responses per microphone you can use to find the perfect position.
They did this for every cabinet using multiple microphones.
This is a fantastic idea and allows you to position the virtual mic anywhere you want in the captured area and use the impulse response from that position.
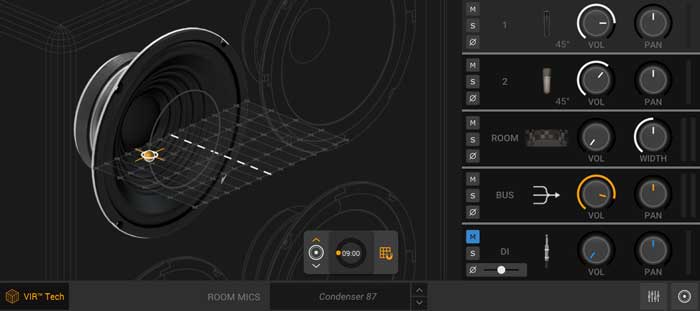
The above screenshot shows a grid of the captured IR positions you can use for your mic position.
You can snap the mic position to any of the grid points to use that Impulse Response, or you can position the mic anywhere else in this area and AmpliTube 5 will blend between multiple IRs in that position.
You can change the type of mic, switch between any speaker you want on the cabinet, or blend between multiple microphones.
I think I spent at least an hour just playing around with different mic positions, switching to different cabinets, and changing the speakers in the cabinet.
Muting every mic except one really sold me on how useful this technology is. I set the ‘Dynamic 57’ mic dead center of the speaker, then slowly moved it around the grid. While you can do this in many other plugins, the difference is that each position uses an actual IR and the plugin isn’t just using EQ tricks to simulate the different mic positions.
Impulse responses are a game-changer and it’s great to see that AmpliTube 5 not only makes use of them, but they’ve taken the technology much further.
You can even load your own custom impulse responses, but once you see how much control you have with their VIR technology, you may prefer to use theirs instead.
Key point: while impulse responses are amazing, you normally only have one or two per speaker to choose between. With AmpliTube 5, you have 600 IRs per speaker to help you dial in the perfect mic position.
How to Use AmpliTube 5
To give you a better idea of what it’s like to use AmpliTube 5 read through the below step-by-step tutorial.
This tutorial will give you an idea of whether AmpliTube 5 is for you or not before you try it out.
Installing AmpliTube 5
To install AmpliTube 5, you first need to install the IK Multimedia Product Manager. This may be an annoying step if you haven’t already purchased anything by IK Multimedia, but I now find it a handy way to update the various plugins I use from them.

Once you authorize AmpliTube 5 on your computer, it will download and install the software (it was a 2.4GB download for me)
You can choose to install VST, VST3, AAX (for Pro Tools), and Standalone versions.
Using the Standalone Version
When you first open the standalone version of AmpliTube 5, it will ask you to set up your audio hardware.
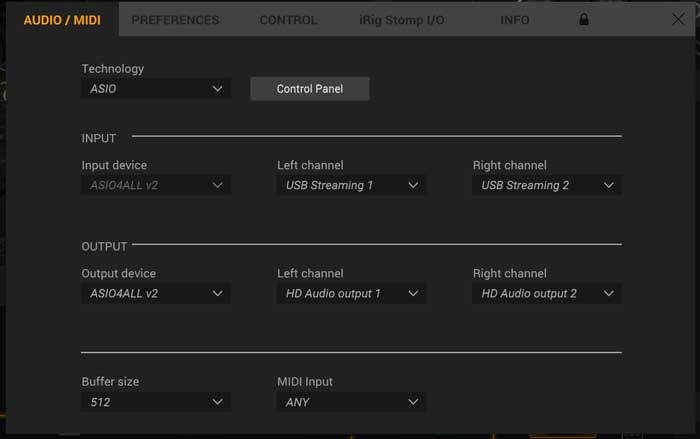
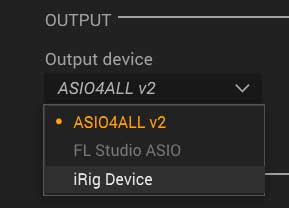
If you are using Windows, select ASIO from the Technology dropdown menu. Then you can select the audio driver that matches your audio interface under the Output section.
Find out more about connecting your guitar to your computer in this guide. The guide covers different hardware and software options.
Once you select the audio driver that suits your hardware, you can set up the input and output channels. You may want to click the Control Panel button to bring up your audio driver’s settings and make sure everything is properly set up.
Adjust the buffer size at the bottom of the screen if you have any latency issues. You can re-open the settings menu at any time by clicking the three lines icon on the top right corner of the screen.
Once you set up your audio hardware, you can close the settings screen and use Amplitube 5 as you like.
Using AmpliTube 5 in a DAW
After you install the plugins, your DAW should automatically detect AmpliTube 5 when you open it. Otherwise, you might need to scan for plugin changes.
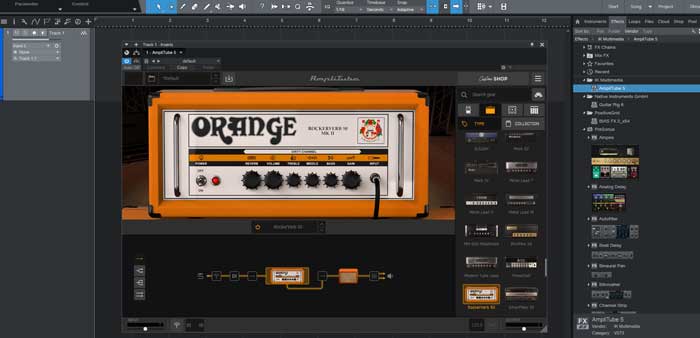
Set up a track then look through your plugins to add AmpliTube 5 to the track.
If you haven’t used a DAW before, read this guide on the best DAWs for Guitar to see what they’re like to use. The guide includes tutorials for some popular DAWs.
Once you have added AmpliTube 5 to a track, you can use it before or after recording as you like.
One of the big benefits of using a DAW is that you can set up automation to control any parameter you want on your effects or amps.
For example, let’s say you’re recording a song and you want to turn a Tubescreamer pedal on at a specific point in the song. All you need to do is right-click the pedal’s bypass switch, then assign that footswitch to a parameter.

Your DAW can now use that parameter to toggle the Tubescreamer pedal on or off whenever you want.
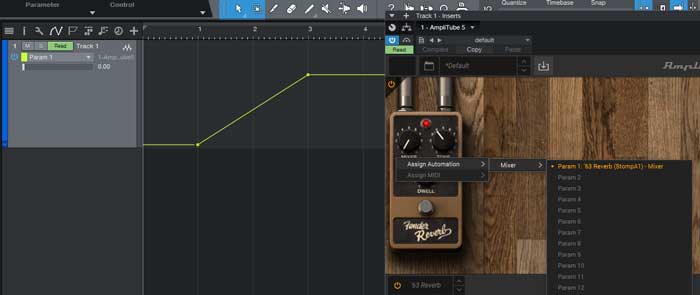
As another example, let’s say you want to slowly fade in a reverb pedal over a couple of seconds.
You simply right-click the reverb pedal’s mixer knob and assign it to a parameter. Then you can set up when you want the reverb to start fading in and how much to fade it in in your DAW as shown below:
If you haven’t experimented with automations in a DAW before, they can give you a lot of control over any track you record. You can set up your DAW to control almost any aspect of AmpliTube, which can be handy if you want to toggle between different effects or adjust parameters over time.
Using a Foot Controller
An advanced feature you might want to consider is using a MIDI foot controller to control AmpliTube 5.
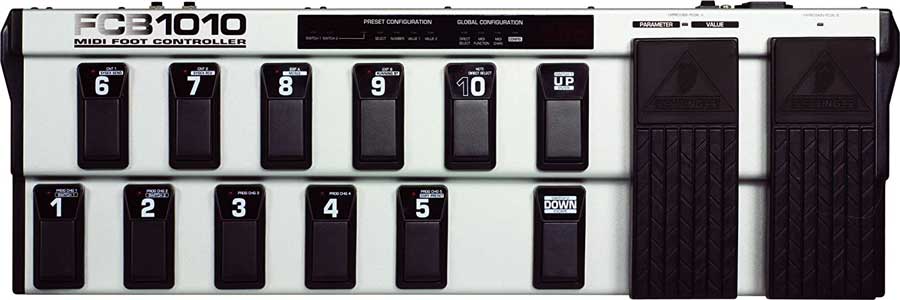
You could use a MIDI foot controller to control a wah, whammy pedal, or any other effect parameter you want in AmpliTube 5.
AmpliTube 5 includes a lot of wah pedals, pitch shifters, and other effects that only work when you have an expression pedal to control them. If you want to get the most out of AmpliTube, it’s worth spending the money to get a decent-sized foot controller.
Read my guide on MIDI foot controllers to learn more about this.
Set Up a Rig
While there are countless presets you can play around with, a good way to learn how to use AmpliTube is to start from scratch and build up your rig one piece at a time.
Go to File > New to create a blank preset. The only piece of hardware included in your rig will be the default amp model.

Start by picking an amp model from the gear selection panel on the right. Play around with the different options until you find one that suits the type of tone you want to set up.
Once you find an amp you like the sound of, I suggest deciding on whether you want to run a mono rig, stereo rig, or even three-amp rig.
Click the routing buttons on the bottom right and hear how your tone changes as you toggle through the different options. AmpliTube will add the default amp model to any new signal paths, so you’ll be hearing a mix of different amp tones.
Play around with the four different options and decide which one suits you best for this tone.
Once you decide on the basic amp setup, you can look at adding any effects as you like.
Drag any pedals in front of the amp or in the effects loop depending on what type of effect you use. Also play around with the rack effects, which you can also add to any position in the rig.

In the above example, I added a drive pedal in front of the amp, a chorus pedal to the amp’s effects loop, then a hall reverb rack effect at the very end of the signal chain.
Once you’re happy with your setup, save your preset by clicking the icon on the top left (highlighted below):
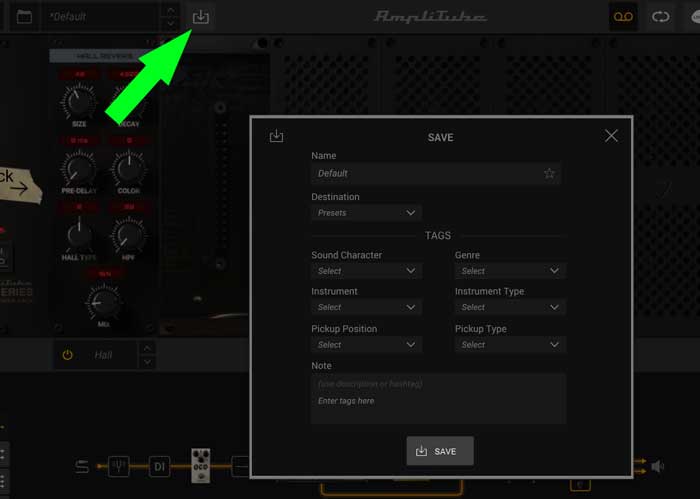
You can name your preset, choose where to save the file, add notes, or add tags to the preset to make it easier to find in the future.
AmpliTube 5 Review Summary
Compared to AmpliTube 4, AmpliTube 5 is easier to use, looks better, sounds better, and gives you far more flexibility with how you set up and control your tones.
The change to the interface makes AmpliTube 5 much easier to use. You’re able to instantly see your complete rig in one view and easily toggle between the different screens to edit and tweak your amp or effects settings.
The VIR cabinet technology gives you serious flexibility with how you set up your virtual mic positions. It’s a great idea that takes the amazing sound quality of impulse responses and gives you fine control over them.
I’m impressed with AmpliTube 5 and expect to use it as my go-to amp and effects sim from now on.
Check out more details on AmpliTube 5 or buy it here (this is an affiliate link that earns me a small commission if you buy AmpliTube 5 at no extra cost to you).
If you also want to get an audio interface to use with AmpliTube 5, check out these AmpliTube 5 + Axe I/O bundles at Sweetwater.
AmpliTube 5 vs Other Guitar Plugins
There are a few other popular amp and effects plugins that directly compete against AmpliTube 5. Here are my thoughts on how they compare.
AmpliTube 5 vs AmpliTube 4
If you already have AmpliTube 4, you may wonder whether it’s worth upgrading to version 5.
The big change with AmpliTube 5 is the visual interface. You’re able to drag components around anywhere you want in the rig and easily see everything in your rig in one view.
This is a serious improvement over AmpliTube 4 and makes it faster and easier to set up and tweak your gear.
While AmpliTube 5 does see improvements in sound quality, I personally felt the biggest improvements were in how you use the software. AmpliTube 4 feels seriously outdated now that I’m comfortable with the new interface.
If you currently use AmpliTube 4, I suggest downloading the free version of AmpliTube 5 to get a better idea of whether the upgrade is worth it to you or not. For some people, it will be an obvious improvement and worth the upgrade while other people may not see a big enough change.
AmpliTube 5 vs Guitar Rig 6
Guitar Rig 6 and AmpliTube 5 both released in 2020. Both also saw big improvements in their visual interfaces.
It’s hard to directly compare AmpliTube 5 and Guitar Rig 6 because they take very different approaches to setting up tones and the type of effects you can access.
AmpliTube 5 aims to be an authentic guitar amp and effects simulator with a focus on recreating real-life tones. If you want a simple Tubescreamer into Marshall amp tone, it’s hard to go past AmpliTube 5.
Guitar Rig 6 is at it’s best when you want to dive into experimental or atmospheric tones. Even non-guitarists love Guitar Rig 6 for the wide range of effects and tones it can produce.
I recommend AmpliTube 5 for guitarists wanting to create typical guitar tones, while I recommend Guitar Rig 6 for guitarists wanting to explore different effects and tones you normally don’t get from guitar gear.
Check out my full review of Guitar Rig 6 to learn more about it and how it differs from AmpliTube 5.
AmpliTube 5 vs BIAS FX 2
AmpliTube 5 and BIAS FX 2 are very similar in that they both produce amazing-quality tones and they’re both simple to use.
When BIAS FX 2 first came out, I immediately loved the interface. It was so good that it made it obvious how far behind AmpliTube 4’s interface was.
Now that AmpliTube has updated their interface, both of these plugins sit in a very similar place.
I’m still undecided which I like better from a sound quality point of view. Both sound amazing and both are great to use. If you already use BIAS FX 2, I suggest downloading the free version of AmpliTube 5 to see whether it suits you or not.
AmpliTube 5 vs Line 6 Helix Native
While Helix Native packs in some amazing tones and effects, the interface seriously holds it back.
If you also own a Helix pedal, then you’ll already be familiar with the interface and it won’t be a negative point for you. But if you aren’t already familiar with the Helix interface, it’s not ideal.
Take one look at the below screenshot of Helix Native and think about how natural it feels to tweak an amp’s settings using sliders.
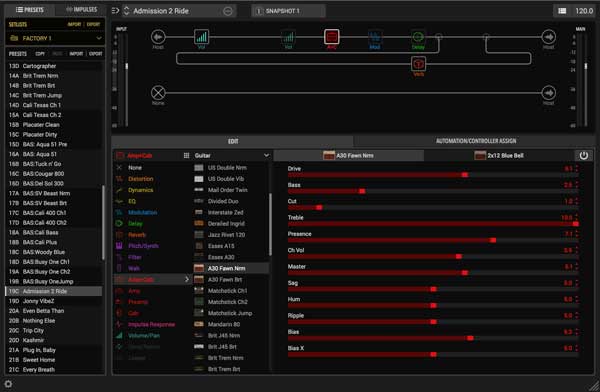
Compare the above screenshot with how you set up an amp tone in AmpliTube 5:
As a guitarist, turning knobs on a virtual amp makes far more sense than moving sliders around.
Every guitarist is different so you may not have an issue with the Helix interface, but there’s no doubt that the AmpliTube interface is clearer and easier to understand at a glance.
Unless you already own Helix hardware, you’ll probably enjoy using AmpliTube or BIAS FX more.
AmpliTube 5 FAQs
Here are some common questions you might have about AmpliTube 5:
Should I Upgrade from AmpliTube 4?
The big change to AmpliTube 5 is the visual interface. It is far easier to use and understand than the AmpliTube 4 interface. You can see your entire rig at a glance in one screen – something that isn’t possible in AmpliTube 4. For some guitarists, this is enough to consider the upgrade to version 5.
AmpliTube 5 does include some new gear, but most of the changes are with how you use the software and with the cabinet modeling technology.
You can download the free version (AmpliTube 5 CS) to try it out, but keep in mind that the CS version doesn’t include the VIR cabinet technology and some other features. It will still give you a good idea of the change in interface, but you won’t be getting the full benefit of the changes.
Do I Keep All My Gear When Upgrading to AmpliTube 5?
You keep all of the gear you purchased in AmpliTube 4 when you upgrade to AmpliTube 5. You can buy any version of AmpliTube 5 and it will include the gear you previously purchased.
This is great to see because if you bought a lot of gear in AmpliTube 4 using their Custom Shop, you could use the free AmpliTube 5 CS version and it will unlock all of your previously purchased gear. Keep in mind that the CS version doesn’t include the VIR cabinet technology, so you would need to buy the SE version or higher to get the full benefit of upgrading.
Check out the comparison table on this page under the versions section to double-check the different features and included (new) gear in each version before you decide to upgrade.
How Do I Use Custom Impulse Responses With AmpliTube 5?
To load a custom impulse response in AmpliTube 5, click on the cabinet in the signal path. Scroll up to the top of the cabinet models in the right panel until you see the ‘Custom IR’ option. Select it and it will bring up the Custom IR panel on the top left.

You can now add any impulse responses you want by clicking the + button on the left side of the screen.
If you want to get the most out of the amp and effects models used in AmpliTube 5 or any other guitar plugin, check out my Guitar Effects Course.
The course covers all types of effects and explains how to use them in detail. Learn how to combine different effects, change the order for better tones, and set up complete rigs from scratch.
The course will teach you principles you can use to get the most out of AmpliTube 5 or any other real or virtual guitar effects.
If you have any questions about AmpliTube 5, ask me here and I’ll include the answers in this FAQ.
Here are some guides to help you get started with AmpliTube 5 or recording guitar:
- Best Guitar VST Plugins
- Ultimate Guide to Recording Guitar at Home
- Best Guitar DAWs – includes tutorials to record guitar in different DAWs
