
Latency is a common problem found while recording instruments in FL Studio.
In this guide, I’ll walk you through how to reduce and solve any latency issues you experience in FL Studio. While every person’s recording hardware is different, most people should be able to solve their latency problems by following these steps.
After you read this tutorial, check out these other guides on FL Studio:
- How to Install Plugins in FL Studio
- How to Record Guitar in FL Studio
- Ultimate Guide to Guitar VST Plugins
- Best Drum VST Plugins
- Best Free Guitar Plugins and Software
Understanding Latency
Before you start changing settings in FL Studio, it’s important you understand exactly what latency is and what causes it.
I’ve noticed in a lot of YouTube videos that cover this topic that commenters get frustrated when they follow tips without first understanding why they’re being told to change each setting.
If you first understand what causes latency, it makes it easier for you to track down the issue in your setup and fix it.
What is Audio Latency
Audio latency is the delay between when you play your instrument (or vocals) and when you hear that instrument played back.
The larger the latency, the longer the delay you hear between when you play something on your instrument and when you hear it on your speakers or headphones.
Latency is measured in milliseconds (ms) or sample bits (smp) and can be anything from under 1 ms to well over 50 ms. I’ll use milliseconds in this guide when talking about latency as it’s easier to understand than sample bits.
Low latency (eg: 3 ms) is fine and you may not notice any delay in the signal. If your audio latency is below 5 ms, it should not be noticeable or shouldn’t impact your performance.
Latency starts to become noticeable at around 5 ms and sounds like a strange echo. As it increases to around 10 ms, it can start to negatively impact your performance. You may find it difficult to play in time to the other tracks or you may become distracted by the delay.
If you have high latency over 15 ms, it becomes incredibly difficult to give a solid performance that will work in your recording.
What Causes Audio Latency
There will always be some latency in a recording studio as your system needs to process the incoming audio and send it along with all the other tracks to your speakers or headphones.
Latency is added to every stage of your recording studio from when it leaves your instrument to when it leaves your speakers.
Latency is added:
- As your audio interface converts the analog audio signal to digital
- As your DAW applies any plugins or track effects to the audio
- As your DAW processes all the other plugins and effects on other audio tracks
- By your audio driver based on your audio quality settings
- As your system processes the audio to be played on your speakers or headphones
The amount of latency added at each step depends on the hardware you use and the type and amount of plugins and track processing you use.
When using FL Studio, the most common causes of latency are the audio settings you use and the amount of plugins and track effects used.
Now that you have a good understanding of what audio latency is and what causes it, let’s walk through the steps you can follow to reduce and solve any latency problems.
Fix Latency Step 1: Check Your Current Latency Stats
Before you dive into changing anything, it’s a good idea to take a look at your current latency stats and audio settings.
If you note down or screenshot your audio settings, you can easily go back to them later on if you find that some changes make the latency worse.
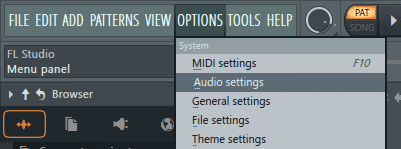
In FL Studio, go to: Options > Audio Settings
Take a screenshot of this view so you can easily go back to your original settings if needed later.
Tip: pressing ‘Win + PrintScreen’ on your keyboard will instantly save a screenshot to your Pictures library on Windows.
Don’t worry if you don’t know what these settings do, we’ll walk through each one.
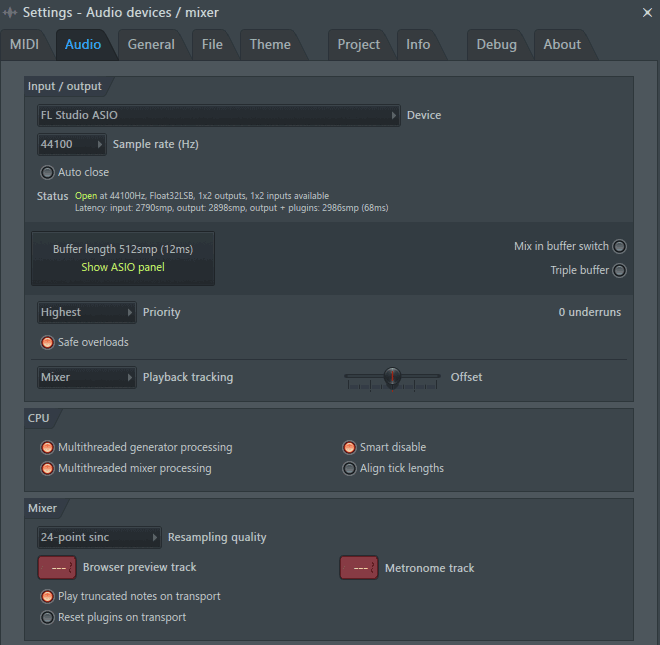
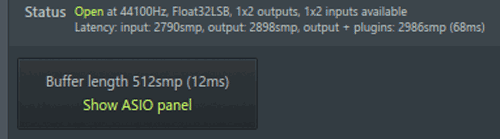
The current latency will show in the status section as shown below:

You can see that it shows you a breakdown of the input, output, and plugin latency in smp (sample bits) as well as the total latency in ms (milliseconds).
Depending on how many plugins you’re using in your project, you might instantly be able to see where your latency issue is coming from. But don’t jump to conclusions yet. Walk through these steps and you’ll track down the issue and fix it.
Fix Latency Step 2: Adjust Buffer Size
The easiest way to fix a lot of latency issues is to change the buffer size in your audio settings area.
Think of the buffer as the chunk of audio your DAW is going to process and send to your speakers. It will process a chunk of audio and send it to your speakers before moving on to the next chunk of audio.
As you might guess, the bigger the chunk of audio your DAW processes, the longer it will take to move between chunks. This creates latency.
A large buffer size creates more latency than a small buffer size. So decreasing the buffer size will reduce latency.
Take a look at your current buffer size, buffer latency, and total latency.
For example, in the above screenshot, you can see that the current buffer length is 512smp, the buffer latency is 12ms, and the total latency is 68ms.
Now go into your ASIO panel settings and change the buffer to something smaller. For example, if you’re using the ‘FL Studio ASIO’ driver, the next smallest buffer setting below 512 is 384.
Select a smaller buffer size and look at how it changes the buffer latency and total latency.
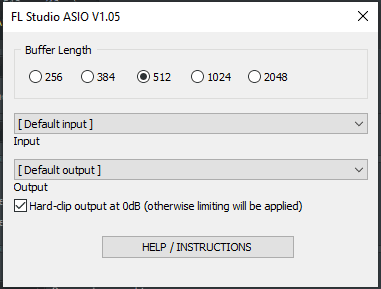
In my example, you can see that reducing the buffer size from 512 to 384 changed the buffer latency from 12 to 9 ms and the total latency from 68 to 65 ms.
Try recording with these new settings and listen to how it changes your results.
Important: it’s important you test out any changed settings and don’t just jump to the smallest buffer size possible.
A small buffer takes less time to process but creates a higher CPU load. So while lowering the buffer size will reduce latency, lowering it too much can overload your system – especially if you have an older or lower-level computer.
If the buffer size is too low, you’ll start hearing weird pops, cracks, and glitches in the audio output. Your system may even crash if it can’t handle the buffer, so gradually lower the buffer size instead of dropping it to the lowest option.
Try playing around with the buffer setting and do a test recording each time. Try to use the lowest buffer size possible without creating any audio glitches or problems.
Extra Tip: check the “Triple buffer” option is turned off, the priority is set to High or Highest, and the CPU “Multithreaded processing” options are enabled if you have a suitable CPU (shown below):
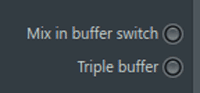
As you might expect, the triple buffer option can significantly raise your latency, so make sure it is turned off.
Fix Latency Step 3: Change ASIO Drivers
The audio driver you use plays a massive part in latency. Simply changing to a different driver could be all that it takes to completely solve some latency problems.
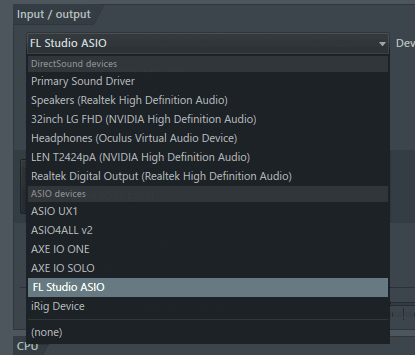
When using FL Studio in Windows, there are three main options for audio drivers:
- FL Studio’s ASIO Driver
- Your Audio Interface’s ASIO Driver
- Third Party ASIO Drivers such as ASIO4ALL
Everybody seems to have different results with drivers so there’s no way to know which driver will work best for you until you try all three options.
FL Studio’s ASIO Driver
FL Studio’s inbuilt ASIO driver seems to solve latency issues for some users, but many people say that they have the worst latency problems when they use it.
If you’re currently using a different driver, try switching to ‘FL Studio ASIO’ in the Options > Audio Settings menu.
Take a look at how changing the audio driver changes your latency stats.
After you change the audio driver, you might want to revisit Step 2 and play around with different buffer sizes. You may find that you can successfully use smaller buffer sizes on some drivers.
Your Audio Interface’s Driver
If your audio interface didn’t automatically install an ASIO driver when you first set it up, go to the website for your audio interface and download the suitable driver if available.
You may find that the audio driver designed for your interface produces the best results. Sometimes this isn’t the case, but it’s usually a good option to try.
For example, the Line 6 AXE I/O SOLO and the Line 6 AXE I/O ONE audio interfaces I regularly use have their own separate drivers:
Go into your audio interface’s driver settings panel and go through all the settings. Make sure everything matches up to how you want to use your interface (eg: you may need to enable/diable different features) and the settings match what you need from FL Studio.
Here’s a screenshot of the audio settings screen for my AXE I/O audio interface:
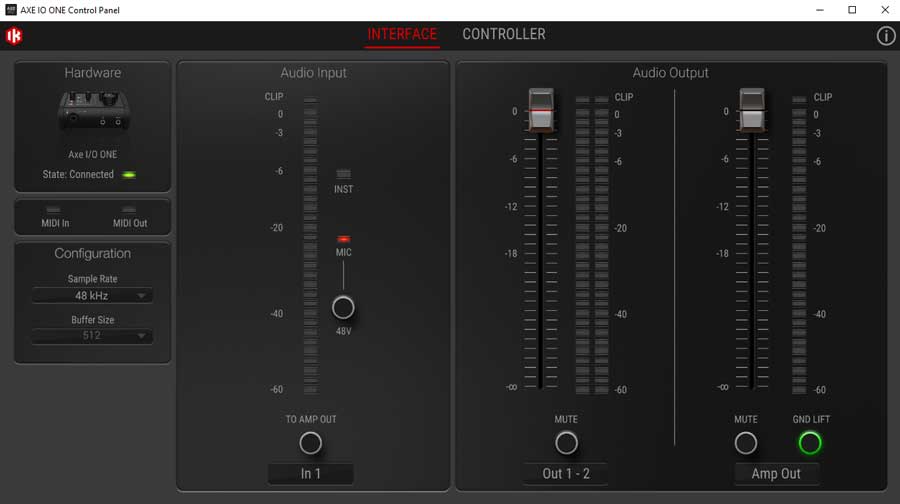
As you can see, different drivers can look very different, but they will all have the basic options such as sample rate and buffer size.
Third-Party ASIO Drivers
Another option that often produces low latency is when you use a third-party ASIO driver such as ASIO4ALL or FlexASIO.
I often find that ASIO4ALL produces the best results for some of my setups – especially if I want to route the audio to my computer speakers instead of using the audio interface’s audio outputs.
Read this tutorial on recording guitar in FL Studio for more details on setting up ASIO4ALL. Even if you don’t play guitar, you can follow the same steps.
Here’s a screenshot of the ASIO4ALL settings panel to give you an idea of how flexible it is with trying out different buffer sizes and signal routing options:
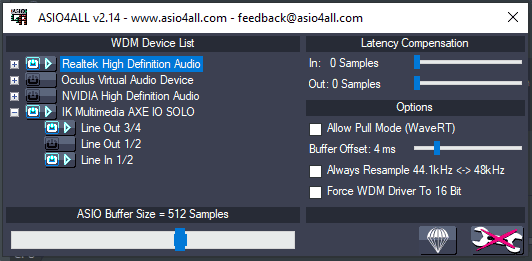
Tip: click the spanner icon on the bottom right to access advanced options.
Remember that you may need to adjust the buffer size whenever you change audio drivers, so play around with different settings each time you try out a different driver.
Fix Latency Step 4: Disable Nonessential Plugins
Plugins can significantly contribute to latency, especially if you use a lot of CPU-intensive plugins.
Temporarily disabling plugins on other tracks or non-essential plugins on the track you’re recording can improve latency while recording.
For example, you can disable plugins such as reverb, EQ, compression, and other effects on tracks while recording. Once you finish recording, you can turn the plugins back on while you mix and edit your song.
Keep in mind that latency is only a big issue when recording, so it doesn’t matter if the latency returns when you enable the plugins again after you finish recording.
You may even want to consider muting entire tracks while recording if the recording musician doesn’t need to hear them for their performance.
For example, maybe you’re recording vocals and your track has a CPU-intensive synth background instrument in another track. You can temporarily mute that track while the singer records their parts and it will help improve latency. The singer probably won’t need to hear that background effect to give a good performance, so it’s just going to add to latency by keeping it active.
Fix Latency Step 5: Freeze CPU Intensive Tracks
If you have a lot of CPU-intensive plugins and you need them active while recording other tracks, there is a simple workaround you can use to keep those tracks while reducing latency.
FL Studio allows you to ‘freeze’ a track, which is a way of rendering a track and all of its plugins and effects into a single audio file.
This is handy for any virtual instrument tracks you have that use a lot of memory or CPU (eg: virtual drums or keyboards).
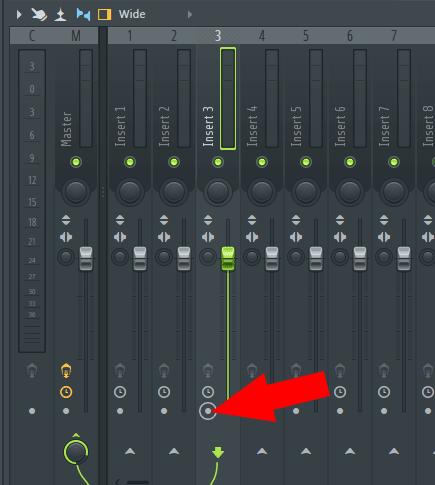
First, make sure none of the mixer tracks are armed for recording. Then right-click the arm recording icon on the mixer track you want to render to audio:
A window will open asking where you want to save the audio track. Choose a location and file name and hit save:
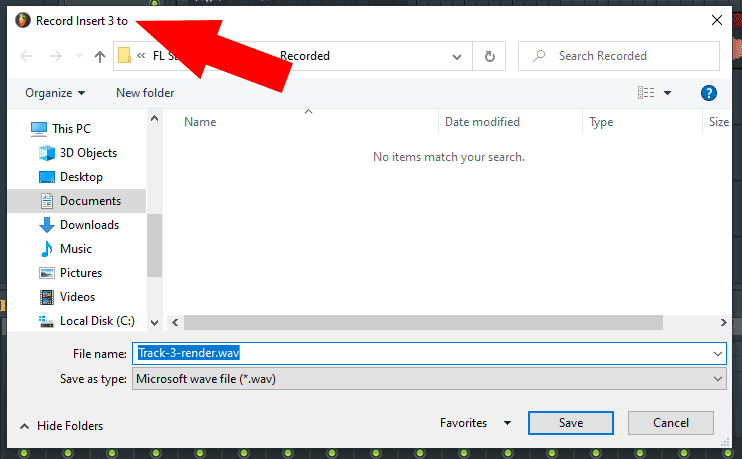
Notice that the top left of the window makes it clear which track you’re trying to save to a file.
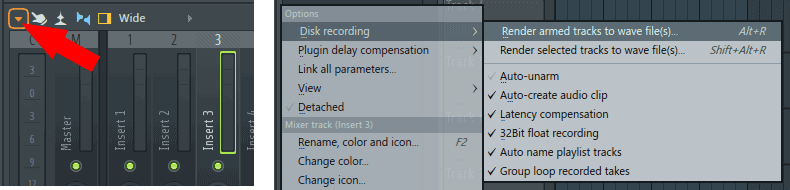
Click the menu dropdown icon on the mixer, then select “Disk Recording > Render Armed Tracks to Wav File(s)”. Or you can press “Alt + R” on your keyboard.
A window will appear asking you to confirm details such as the audio quality for the rendered file. When you’re happy with the settings, click Start.

Once rendering is complete, you’ll find the wav file set to the name and location you set. This wav file now has all of the effects and plugins applied, so you can disable or delete the original track in your project and completely replace it with this wave file.
Keep in mind that following this process means you won’t be able to change any settings in the plugin or effects for that track after you render it to audio. So only use this method when you’re completely happy with the track.
Or you can save a copy of the project before you render tracks to audio so you can always go back and re-edit those tracks.
This is a guaranteed way of significantly improving latency if you use a lot of plugins in your projects. When I have a plugin-heavy project, I render all the tracks to audio, then set up a new project with the rendered audio tracks to use for low-latency recording. Then when I’m finished recording, I can import the recorded audio tracks back into my plugin-heavy project.
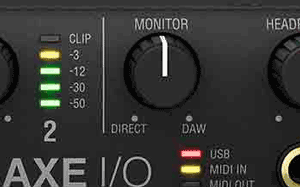
Fix Latency Step 6: Try Using Direct Monitoring
Many audio interfaces have a feature commonly called “Direct Monitoring”. Some brands call this “zero latency recording” or similar.
The basic idea is that you’ll have a switch or mix knob that allows you to switch between hearing the DAW output (with latency) or the direct signal from your input source (with zero latency).
This method works great when you want to record instruments such as drums where you don’t need to use any plugins on the track while recording. If you’re recording an acoustic guitar or any instrument using a mic, you may want to try this feature out.
It doesn’t work very well when you want to record a dry guitar signal and use amp simulator plugins for your tone. The reason it doesn’t work well is that you’ll hear your dry signal instead of the simulated guitar amp when you switch to direct monitoring.
You may also not like it when recording vocals if you want to hear any reverb plugins while you record. Hearing dry vocals while recording can be distracting to many vocalists.
Simply switch your audio interface to Direct Monitoring mode (or adjust the mix fader if it uses one) and try this mode out.
Fix Latency Step 7: Change Sample Rate
The chances are you will have reduced your latency significantly by this step. I only suggest the next few steps if you’re looking for other options.
The sample rate you use on your project will directly impact latency. This is because latency = buffer size / sample rate.
The sample rate is how a computer slices up audio. A sample rate of 48 kHz means audio is split up into 48,000 slices per second. A sample rate of 44.1kHz means the audio is split up into 44,100 slices per second.
A higher sample rate creates smaller slices of audio, which means there is less latency as your system processes each slice.
Take a look at your current sample rate and what other options your audio interface supports.
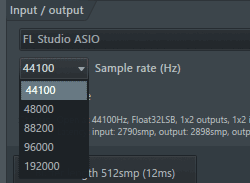
For example, most modern audio interfaces support sample rates of 44.1, 48, and 96 kHz.
Try moving up to the next highest sample rate. FL Studio will need to reload your project if you change the sample rate.
Important: before you change your project’s sample rate, it’s important to understand a couple of potential downsides. While increasing the sample rate can improve latency, the main downside is that the file size of your recordings will be significantly larger.
That means audio processing will take longer and you’ll need more disk space for your files. A sample rate of 96 kHz will have half the latency of a sample rate of 48 kHz, but it will come at the cost of double the file sizes.
Another point to keep in mind is that while sample rate directly impacts latency, it’s usually at a much lower impact than the latency created by the buffer size and plugins. So don’t stress too much about the sample rate.
It’s important that you choose a sample rate you’re happy with and stick with it for all of your projects. Chopping and changing between 44.1, 48, and 96 kHz sample rate projects can quickly become a pain and you don’t want to start dealing with a project that has audio recordings all in different sample rates.
Fix Latency Step 8: Close Any Other Programs
If your latency issue is caused by running out of memory or a high CPU load, it’s worth closing any other program running in the background.
Check how much memory and CPU different programs are using in Windows by pressing “Ctrl + Shift + Esc” to bring up the Task Manager:
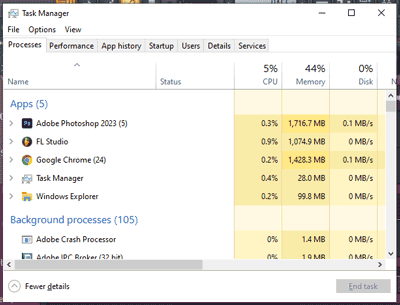
Here you can see how much memory and CPU FL Studio and other programs are using.
Some programs such as Google Chrome can take up a lot of memory, so close them if your system is struggling. You can see in the above screenshot that Google Chrome and Adobe Photoshop are using up a lot of memory, so it makes sense to close them and free up memory if the system starts to struggle.
Fix Latency Step 9: Check Your Computer’s Performance Settings
If you’re running FL Studio on a laptop or tablet PC, check to make sure the performance settings are set for best performance and not for battery life.
Note: these settings may look different depending on what version of Windows you use.
Open Windows Settings and search for “power”, then select “Power & Sleep Settings” in Windows 10 or “Power & Battery” in Windows 11.
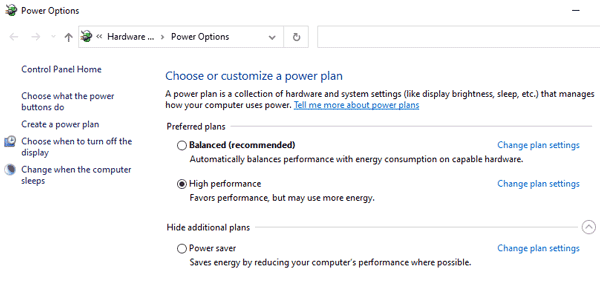
In Windows 10, click “Additional Power Settings” on the right to access the power modes.
Make sure “High Performance” mode is selected:
In Windows 11, make sure the Power Mode is set to “Best Performance”.
Fix Latency Step 10: Upgrade Your Hardware
The last resort if you’re still experiencing latency after following all of the previous steps is to consider upgrading your hardware.
Almost all latency issues can be solved in the earlier steps, but if you’re running an old computer and trying to pack in a lot of plugins and effects, your system may struggle.
If you’re using an old audio interface, you may or may not find better performance with a good-quality interface. Check out this guide on Best Audio Interfaces to learn more.
Check the Performance tab in the Windows Task Manager to see what may be causing the bottleneck in your system’s performance.
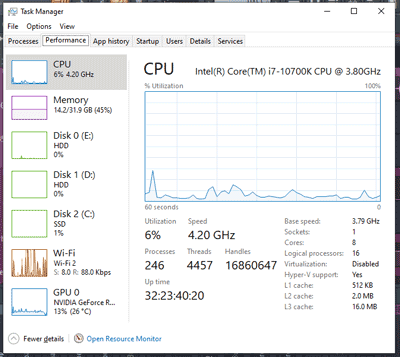
Hit play in FL Studio and watch the CPU, Memory, Disk, & GPU charts to figure out what your system is struggling with.
For example, if you see the Memory chart fill up close to 100%, that’s a good sign that you should consider upgrading your RAM. Or if the CPU needs to work hard whenever you hit Play in FL Studio, it’s a sign you might need an upgrade.
Upgrading RAM is usually a simple and relatively cheap upgrade, but will only improve performance if you’re currently running out of RAM while your DAW is running.
There is a lot to consider when upgrading computer hardware, so I recommend reading advice from a good quality computer hardware website or YouTube channel to help make an informed decision.
Here are some more useful guides on FL Studio and recording:
- How to Install Plugins in FL Studio
- How to Record Guitar in FL Studio
- Ultimate Guide to Guitar VST Plugins
- Best Drum VST Plugins
- Best Free Guitar Plugins and Software
- Best Audio Interfaces