
Hammer-ons are an essential guitar technique every guitarist should learn.
The sooner you learn this technique, the easier it will be to learn the songs you want to play – no matter what style of music.
The good news is that you can master hammer-ons by practicing only 6 exercises. I have been giving these 6 exercises to my students for 15 years and when practiced properly, they’re extremely effective.
If you practice these 6 hammer-on exercises every day, you’ll quickly master the skill and develop a solid legato technique.
This lesson shows each exercise in Guitar TAB and Standard Notation (click links to learn how to read music).
After you try out these hammer-on exercises, add them to your guitar practice routine and spend a few minutes working on them daily.
Also, check out this lesson on pull-offs as it’s important to work on both hammer-on and pull-off techniques evenly.
Why Practice These Exercises Daily
The goal of practicing these exercises is to build up your finger stamina and dexterity as well as practice every possible finger combination you may use in a song.
I noticed that a lot of other lessons on this topic ask you to practice scales up and down the neck. These exercises take a different approach.
The idea with these exercises is to work on each finger combination you may use in any scale and work on it until you can play each combination with blazing speed and accuracy.
These exercises are also a great warm-up for your hand – especially once you start feeling comfortable with them and are able to build up your speed.
Hammer-On Exercise Tips
Here are a few simple tips to help you get the most out of these hammer-on exercises:
Use a metronome: playing these exercises along with a metronome is absolutely essential if you want to develop rock-solid timing and fluid technique. Download a free metronome app on your phone and use it to guide you as you work through these exercises.
Start at a slow tempo: if you want to be able to play lightning-fast hammer-ons, you need to start at a slow tempo. Play each exercise perfectly at a slow tempo and only increase the tempo if you can play each exercise 3-4 times without a single mistake. If it feels too slow, it’s probably the right starting point. Rushing leads to sloppy technique, so take your time to play with flawless technique.
Gradually increase the tempo over time: treat these exercises like an athlete would treat exercise. You need to gradually build up the tempo over time – don’t expect to be able to play these with perfect accuracy at a high tempo on day 1.
Spend extra time on the difficult finger combinations: some of the finger combinations you practice will feel natural and easy, while others will feel slow and awkward. While you should practice every finger combination, spend extra time on the combinations that feel awkward. Practice them until they feel natural. That way, when that finger combination shows up in a song, you’ll be able to easily play it without thinking.
Hammer-On Exercise 1
This fundamental hammer-ons exercise helps you focus on executing perfect technique while keeping a steady rhythm.
The number one mistake beginners make when trying to play hammer-ons is to rush them. Hammer-ons are often played lightning-fast in solos, so it’s tempting to try and play these exercises as fast as possible.
But if you’re just learning hammer-ons now, it’s best to start out extremely slow so you can focus your attention on how your finger hits the string and the timing of your picking.
Slowly work your way through the exercise without a metronome so you know what you need to do. Take your time and play it with perfect technique. Don’t worry about how long it takes you, just aim to play without any mistakes. If you make a mistake, start again. There’s no rush.
Once you can play the exercise slowly without any mistakes, use a metronome and start at a tempo no higher than 40 bpm. There will be a click every time you move to the next string.
The painfully slow metronome will force you to think about how to time your hammer-on so you end up with a smooth and constant flow of notes.
Only increase the tempo when you can play the entire exercise 3-4 times in a row flawlessly. I suggest only increasing the tempo 5 bpm at a time.
Exercise 1 Guitar TAB
Here is the Guitar TAB and Standard Notation for Exercise 1:
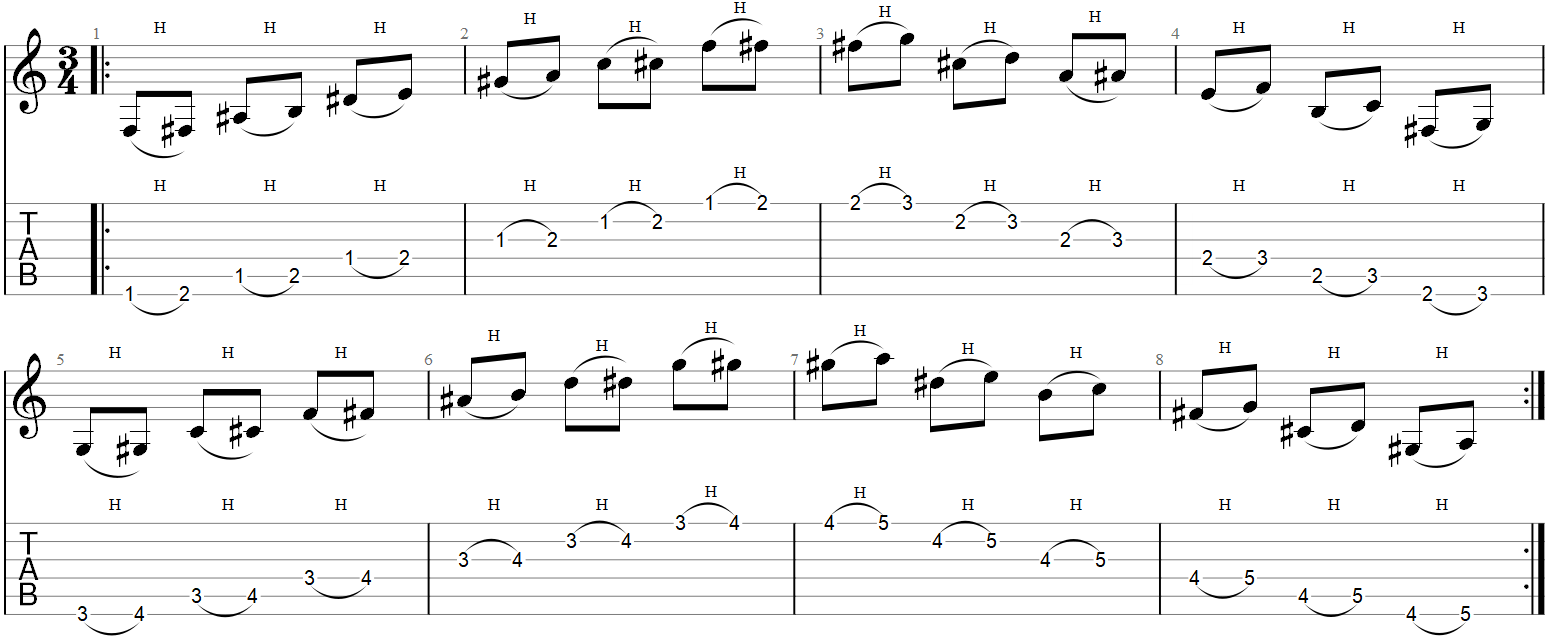
Tip: if you want to spend more time working on any of these exercises, you can simply continue the pattern up the neck. So for this exercise, you would continue by playing the 5th and 6th frets, then the 6th and 7th frets, and so on.
Finger Combinations to Practice
The key to this exercise is to make sure you cover all possible finger combinations you might possibly play in songs.
There are three possible finger combinations for this exercise:
- First and Second fingers (index and middle fingers)
- Second and Third fingers (middle and ring fingers)
- Third and Fourth fingers (ring and pinky fingers)
It is crucial that you practice all three finger combinations or else you’ll end up with weak areas in your technique.
You will likely find that the first finger combination (1st and 2nd fingers) feels fast and easy, while the third combination (3rd and 4th fingers) feels awkward and slow. This is normal. Be patient and keep spending extra time working on any awkward finger combinations. Your fingers will gradually get stronger and faster if you keep working on them. Eventually, all of the finger combinations will feel completely natural.
Hammer-On Exercise 2
While Exericse 1 is crucial to developing your hammer-on technique, Exercise 2 is what shows up more often in songs.
Being able to hammer-on to a note two frets up is found in countless solos, riffs, and scale runs.
Follow the exact same advice covered for Exercise 1 and you’ll find that this exercise is easy to master.
Exercise 2 Guitar TAB
Here is the Guitar TAB and Standard Notation for Exercise 2:
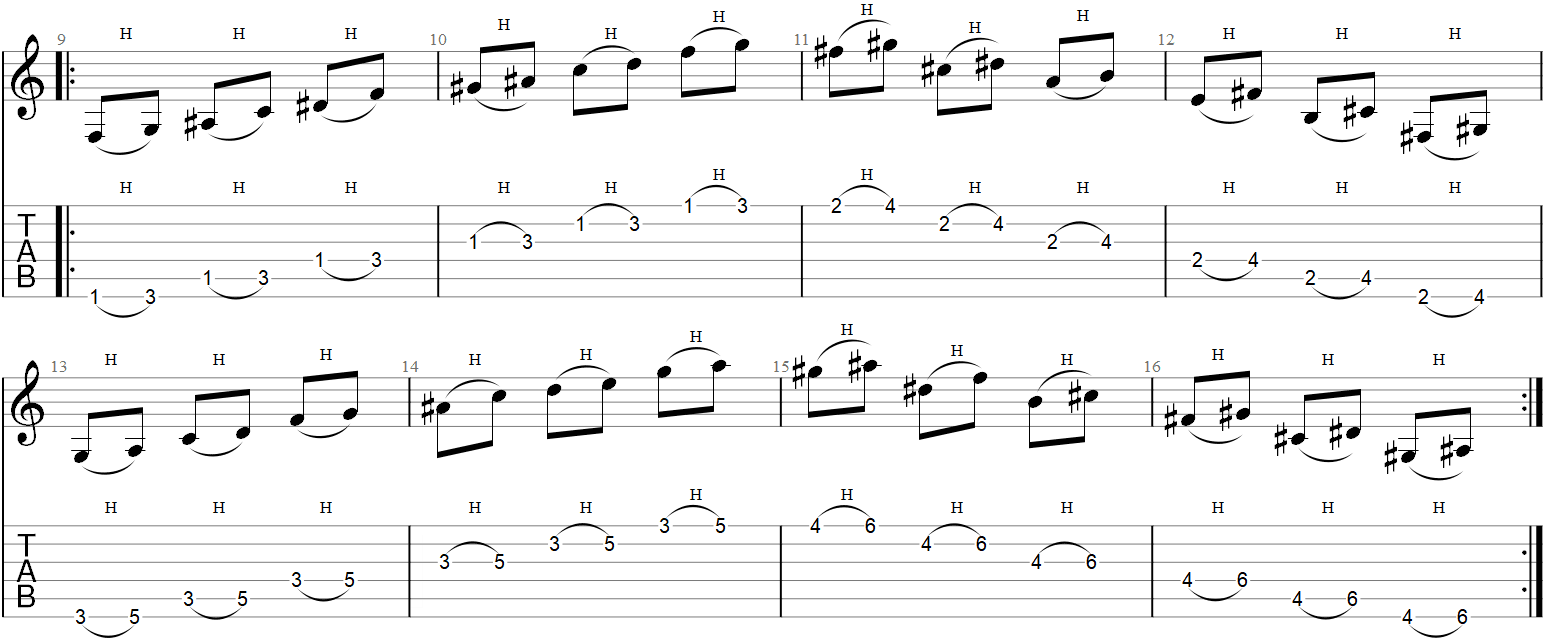
Tip: you can also play this exercise backward (still using hammer-ons) and move down the neck instead of moving up. For example, when you get to the end, move back up the fretboard using the 4th and 6th frets, then shift back and play the 3rd and 5th frets again. This will help you feel confident moving up and down the neck while using hammer-ons.
Finger Combinations to Practice
There are two possible finger combinations for this exercise:
- First and Third fingers (index and ring fingers)
- Second and Fourth fingers (middle and pinky fingers)
The first finger combination (1st and 3rd fingers) is what you’ll be using most in songs. Any solo that uses the Pentatonic Scale will likely use this finger combination over and over.
The second finger combination 2nd and 4th fingers) is far less common, but it’s a great way to develop finger strength and dexterity. Remember that if something feels slow and awkward, it’s worth spending extra time working on it.
Hammer-On Exercise 3
This exercise only uses your first and fourth fingers (index and pinky). It does a great job of helping you develop strength and control over your pinky finger (fourth finger).
You may find that you need to slow down when playing this exercise compared to the previous two exercises. Just keep working on it and over time you will speed up.
You may also find that your hand gets tired and may even cramp up when playing this exercise for the first few times. If your hand feels tired or sore, take a break and work on something else.
Exercise 3 Guitar TAB
Here is the Guitar TAB and Standard Notation for Exercise 3:
Tip: if you find it difficult to stretch your fingers out in this exercise or any of the other exercises, simply shift the entire exercise up the fretboard. So instead of starting on the 1st and 4th frets, try starting at the 5th and 8th frets, or move up higher to the 10th and 13th frets. As you move up the fretboard, the frets are closer together so it will be less of a stretch for your fingers.
Finger Combinations to Practice
This exercise only works on the first and fourth fingers (index and pinky) due to the wide stretch. So you won’t need to spend as much time on this exercise compared to the other exercises that can be played with a variety of finger combinations.
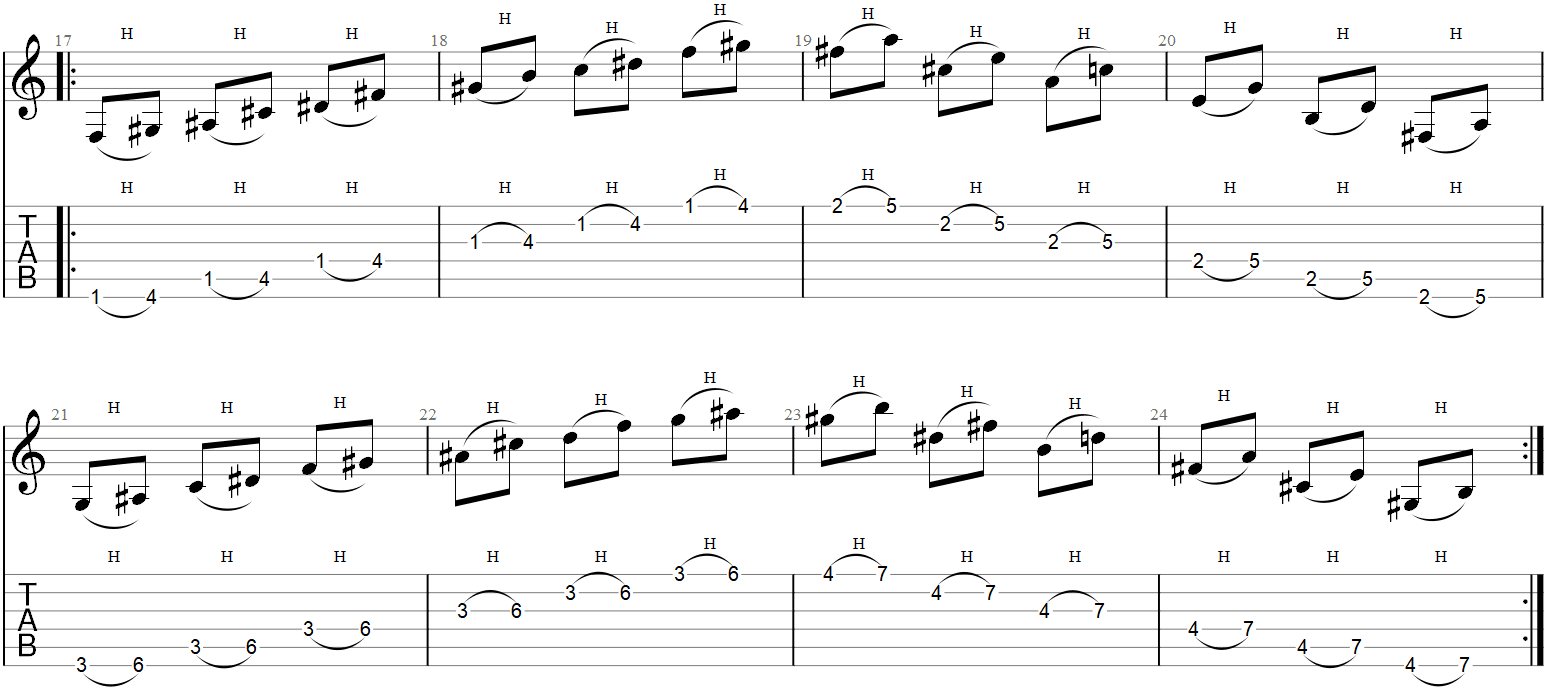
Hammer-On Exercise 4
Think of the first three exercise as the core exercises to work on your hammer-on technique. Don’t work on the below exercises until you feel reasonably confident in your technique with the first three exercises.
These exercises build on the technique worked on earlier and combines two hammer-ons in a row.
Being able to play two hammer-ons in a row isn’t difficult, but there are a few important things you need to keep in mind to play them properly.
The most important point to remember with this exercise is to keep your timing consistent.
Beginners will often play the hammer-ons fast, then have a slight pause as they move to the next string. This creates a gallop-feel in the rhythm instead of a steady flow of notes.
It should sound like “one – two – three – one – two – three” (evenly spaced notes) and not “one-two-three, one-two-three, one-two-three”.
An easy way to make sure you evenly space your notes is to set up a slow metronome and play one-note-per-click. This will force you to keep a steady rhythm.
Once you’re able to play one-note-per-click perfectly, you can change to playing three notes per metronome click. Just make sure the spacing between each note and string stays even.
Exercise 4 Guitar TAB
Here is the Guitar TAB and Standard Notation for Exercise 4:
Remember with this exercise that you only pick each string once at the start.
Tip: Exercises 4, 5 & 6 use triplets for the rhythm so you can play one string per metronome click. Make sure you evenly space each note so it doesn’t sound like groups of three notes. It should sound like a constant flow of notes – just like the earlier exercises.
Finger Combinations to Practice
There are two finger combinations I recommend you work on with this exercise:
- First, Second, and Third fingers (index, middle. and ring fingers)
- Second, Third, and Fourth fingers (middle, ring and pinky fingers)
While it is possible to use other finger combinations (eg: first, second, fourth), I recommend sticking to the one-finger-per-fret general rule.
Practicing these finger combinations on the lower frets will also help give your fingers a good stretch.
If you find that it’s too hard to stretch your fingers out to play the hammer-ons properly, shift the entire exercise higher up the fretboard. Then over time you can work your way back down and further stretch your fingers out.
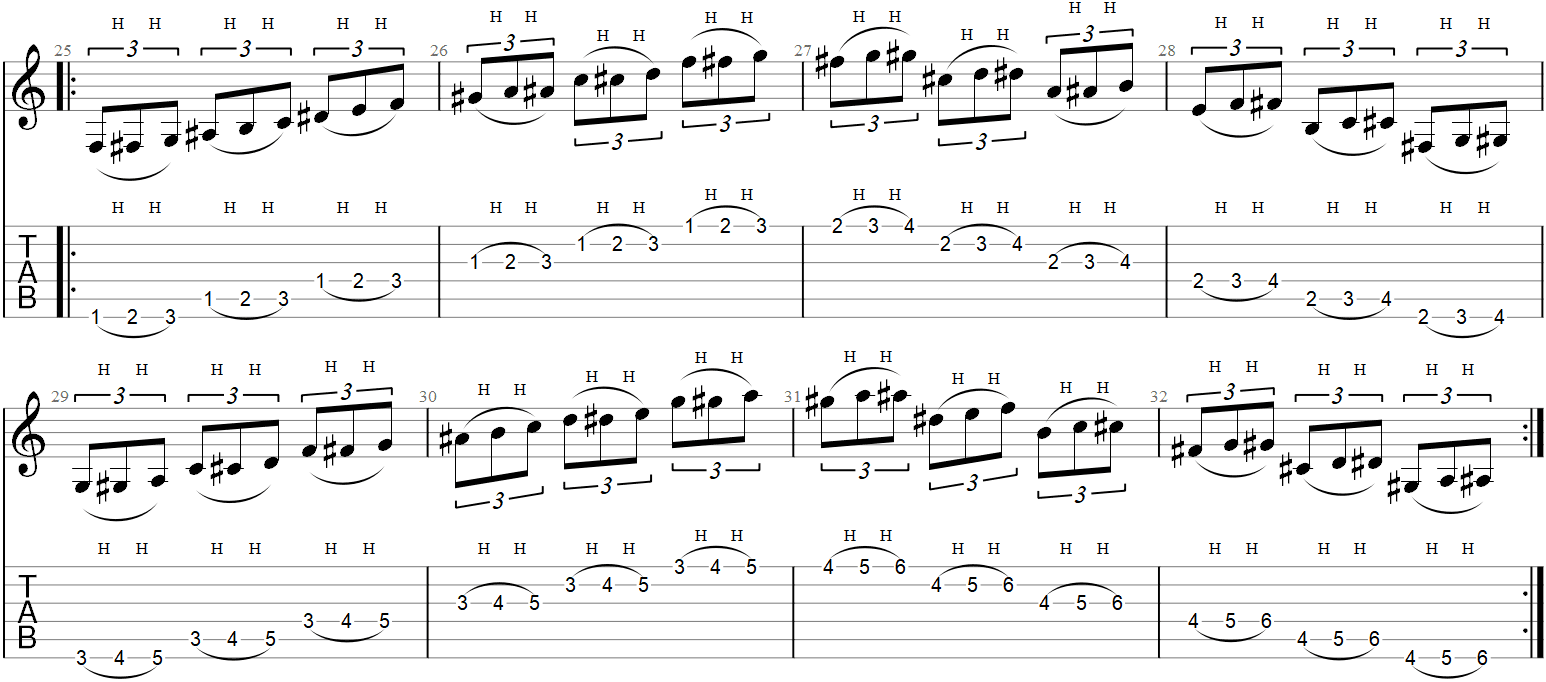
Hammer-On Exercise 5
The finger pattern used for this exercise is extremely common in scale runs and solos, so it’s worth spending some time working on it.
As you might guess from the below TAB, this exercise uses your first, second, and fourth fingers (index, middle, and pinky).
Don’t stress if you initially have trouble getting your fourth finger to play in time. Many beginners first struggle to control their fourth fingers, but with enough practice, you will be able to play it as effortlessly as your other fingers.
Some of my beginner students initially had a lot of trouble with this exercise, but within a couple of weeks, they were able to play it without any issues. Just stay consistent with your practice routine and you’ll get there.
Exercise 5 Guitar TAB
Here is the Guitar TAB and Standard Notation for Exercise 5:

Keep the same points mentioned in Exercise 4 in mind when working on this exercise. Mainly, make sure you keep your rhythm steady.
Make sure each note rings out clearly without any fret buzzing or muted sounds. Your goal should be to play everything perfect. If you can play it perfectly at a slow tempo, you’ll find it much easier later on to play it perfectly at a high tempo. Guitarists who rush the early stages usually find they end up with sloppy technique when they try to play fast. So take your time and get it right from the beginning.
Hammer-On Exercise 6
This last exercise is also extremely common to see in scale runs and solos. After you spend time working on all six of these exercises, you’ll find that you will be able to pick any scale and easily glide up and down the fretboard with rapid-fire hammer-ons.
Spending time working on these fundamental exercises is the best way to develop your hammer-on technique.
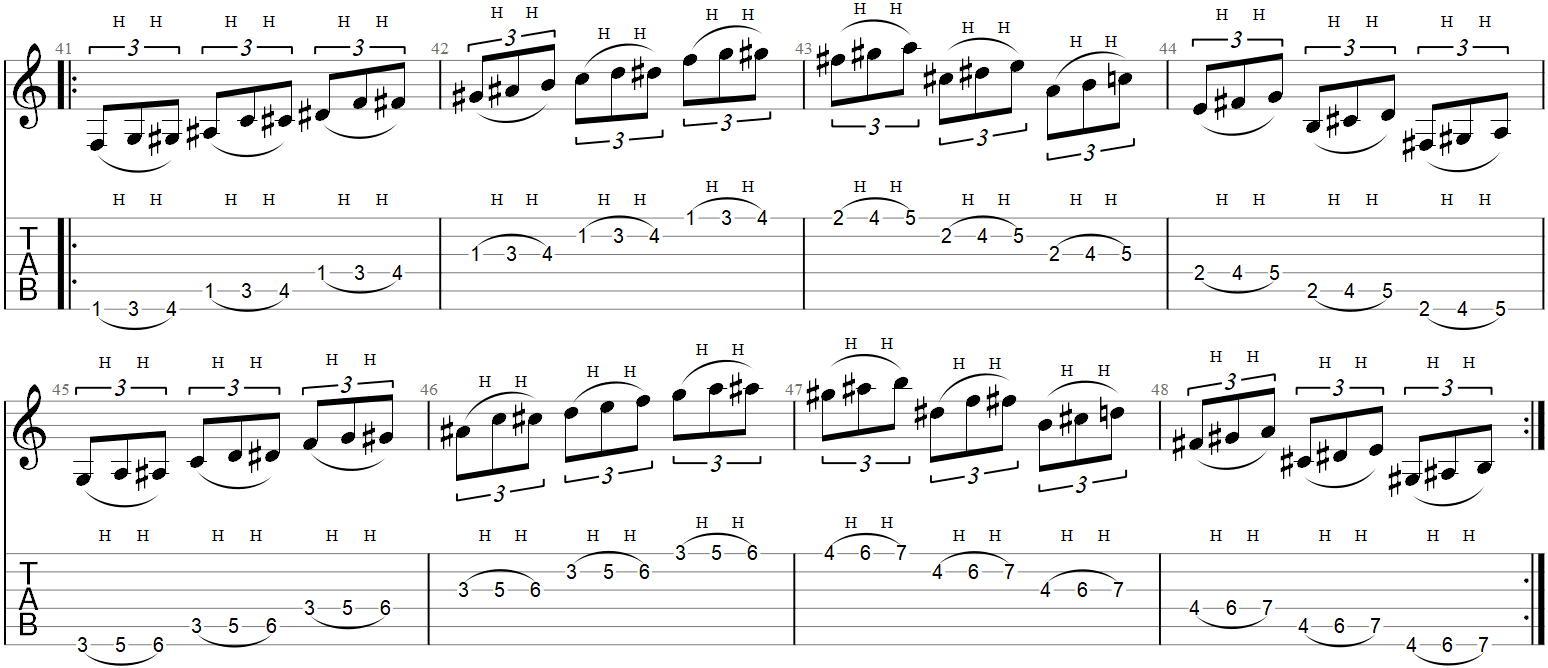
This exercise works on your first, third, and fourth fingers (index, ring, pinky). Some guitarists find Exercise 5 easier than this one, while others will find this one easier.
Whichever one you find easier, make sure you work on both of them until both feel just as easy to play perfectly.
Exercise 6 Guitar TAB
Here is the Guitar TAB and Standard Notation for Exercise 6:
Tip: if you want to spend more time on any of these exercises, simply continue the pattern higher up the fretboard. Keep shifting up one fret and reverse direction until you reach the highest frets on your guitar.
The added benefit of continuing the exercise up the fretboard is that it will help you feel confident playing hammer-ons anywhere on the fretboard. Playing rapid-fire hammer-ons on the lower frets feels completely different than playing high up where the frets are close together.
Once you master all of these exercises, you can start looking at exercises that make use of pull-offs, slides, bends, or a combination of different techniques. But it’s a good idea to start by focusing on one technique at a time before you start combining them.
Hammer-Ons Exercises Video
I’m working on a video that will demonstrate all of these exercises at different tempos.
Subscribe to my YouTube Channel here to get notified when the video is available.
Let me know what you would like to see in the video or any other video ideas here.
Useful Resources
Here are some lessons and guides to help you get the most out of this lesson:
- 6 Pull-Off Exercises
- How to Plan a Guitar Practice Routine
- How Long to Practice Guitar
- How to Practice Guitar Scales
- How to Read Guitar TAB
- How to Memorize the Fretboard