
Guitar scales are the building blocks of music and play a big part in learning songs, solos, and riffs. Whether you want to learn to play other people’s songs or write your own, scales will help you learn and write faster.
In this guide, I will go through different exercises you can use to practice guitar scales. You will learn different exercises, patterns, sequences, and scales to add to your daily practice routine.
Note: this is a long and detailed guide. I recommend bookmarking/favoriting this page so you can come back to it in the future and keep working on the exercises.
Before you get started with the exercises, I highly recommend reading my lesson explaining guitar scales. I explain what guitar scales are, why they’re important, and how to use them in basic terms without relying on music theory.
Once you read that article and have a basic understanding of guitar scales, use this lesson to start practicing scales.
Here are some more useful scales resources:
- How to Get Better at Guitar Scales
- What Guitar Scales and Modes Should You Learn?
- How to Memorize the Fretboard
- Guide to the Pentatonic Scale
- Guide to the Blues Scale
Guitar Scales to Practice Daily
There are some guitar scales that you will see used over and over in music, while other scales are rarely used at all. Before we go through different guitar scale exercises, let’s look at the types of scales worth practicing daily.
Here are the most important guitar scales worth practicing daily:
- The Minor Pentatonic Scale
- The Major Scale
- The Major Pentatonic Scale
- The Minor Scale
The above scales form most of the music you will likely play as a guitarist. Depending on the styles of music you play, other scales such as the Blues Scale may be common in the music you listen to. But for most guitarists, the above scales cover most music.
The Major and Minor Scales
If this seems like a lot to practice, the good news is that the Major Scale and the Minor Scale are really only one scale. Think of the Major and Minor scales as two sides of the same coin.
For example, here are the notes in the C Major Scale: C D E F G A B C
Here are the notes in the A Minor Scale: A B C D E F G A
What do you notice about the two sets of notes? Both scales use the exact same notes – they just start from a different note. This means when you practice a Major Scale (eg: C Major) you’re also practicing a Minor Scale (eg: A Minor).
This means you get to practice two different scales at the same time any time you work on a Major or Minor scale exercise!
As you saw above, the C Major Scale uses the same notes as the A Minor Scale. We say that C Major and A Minor are relative scales.
A quick way to find a parallel scale for any Major scale is to take the root note and move backward three frets. So C Major, which has a root of C (3rd fret on the fifth string), becomes A when you move three frets down the fretboard. This means A Minor is the relative scale of C Major.
If you’re practicing the G Major Scale, three frets down from G (3rd fret on the sixth string) becomes E. So the G Major Scale and the E minor Scale both use the same notes.
This works the other way as well. If you’re playing a Minor Scale and want to find the relative Major Scale, move up three frets from the root note. So the D Minor Scale becomes the F Minor Scale.
The Major and Minor Scales are the most important scales to learn, so spend time working on them daily. If you’re interested in learning modes in the future, then practicing the Major and Minor Scales is really important. Once you learn the theory behind modes, you’ll see how important this practice is.
The Minor Pentatonic Scale
The Minor Pentatonic Scale is extremely common in rock, blues, and similar styles. Most lead guitarists use the Minor Pentatonic scale during solos and lead sections. If you play lead guitar, you’re likely to come across licks and solos based around the Minor Pentatonic Scale.
It’s important to keep in mind that the Minor Pentatonic Scale is actually a part of the Minor Scale. Another way to think about it is that if you start with all of the notes of the Minor Scale and throw a few specific notes away, you end up with the Minor Pentatonic Scale.
This is useful to keep in mind whenever you see a solo that looks like it uses the Minor Pentatonic Scale, but you notice there are some notes that are outside of that scale. The chances are those other notes were taken from the Minor Scale.
If you play any lead guitar, you’ll want to practice the Minor Pentatonic Scale.
The Major Pentatonic Scale
Out of all of the above scales, the Major Pentatonic Scale is the least important to learn. Many guitarists don’t bother learning it because they have all they would ever need with the other three scales mentioned above.
If you like jamming with the Minor Pentatonic Scale and want something slightly different to experiment with, the Major Pentatonic Scale can add something new to your playing.
If you play blues, you might want to learn the Blues Scale instead of this one as you’ll get more use out of it. The Blues Scale is very easy to learn after you learn the Minor Pentatonic Scale because it simply adds one extra note to the scale.
Learn about the Blues Scale in this guide.
How long to spend practicing scales?
Depending on your current skill level and your goals, you might decide to spend anywhere from 5-30 minutes per day practicing scales. Some guitarists will benefit from more time spent practicing scales, while 3 minutes per day is plenty for other guitarists.
Think of guitar scale exercises in the same way an athlete sees exercises. They’re important to help you achieve your goals, but they’re not the end goal. The end goal is to play music!
Read this guide for a science-based look at how long to practice guitar per day. Once you work out how long to practice per day, you can decide how much of that time you will use for scales practice.
How to Practice Guitar Scales Effectively
When you practice anything on guitar, what you practice is what you become. If you were to only practice chords, you’ll end up as a player who plays a lot of chords. If you were to practice a lot of bends and slides, you’ll end up as a guitarist who plays a lot of bends and slides.
A lot of guitarists can get stuck by practicing scales in a robotic way. While you can greatly improve your skills and fretboard knowledge by practicing scale exercises up and down the fretboard, if that’s all you do you’re going to get stuck.
It’s important to practice what you want to play.
If you want to play lightning-fast scale runs in your solos, then practice scale runs along with a metronome and build your speed up. If you want to use scales to write interesting riffs, then practice scales with the goal of writing riffs. If you want to use scales to learn songs faster, practice the scales used in songs you want to learn.
Think of the exercises covered in this lesson as a buffet of exercises you can choose from. You don’t have to practice every scale exercise you see. Instead, pick the exercises that suit your goals as a guitarist.
The following exercises are designed to develop your scales ability and understanding in different ways.
If you only practice one type of guitar scales exercise, you’ll end up with very limited abilities. This usually happens when guitarists only practice scales going up and down (the first exercise shown below). They practice going up and down scales so often that they don’t know what else to do with them!
So even if you prefer one type of exercise over the others, try to have a mix of different types of exercises to work on. You don’t want to end up as a guitarist who can only play one scale in one particular way – you want freedom over the fretboard!
If an exercise feels easy, you’re not getting much out of it. Practicing the same exercise over and over once it feels easy is a waste of time. You won’t grow as a guitarist by playing easy exercises. If any of these exercises feel easy on the first attempt, move on to something more challenging.
If an exercise feels too hard, be careful it isn’t too advanced for you. Practicing exercises (or songs) that are too far outside of your reach can hurt your development.
You’re looking for the sweet spot where an exercise isn’t too easy and isn’t too hard. If an exercise feels challenging without feeling impossible, spend time working on it. Constantly challenge yourself and never settle for anything that feels too easy.
Guitar Scales Exercise: Up and Down
This is the most common guitar scale exercise you will find. It’s common because it’s easy to learn and easy to practice. So it’s a great starting point if you’re new to guitar scales.
But if you already have some experience with guitar scales, then limit how much time you spend with this exercise. This exercise will only get you so far, it’s not very good at pushing your skills to new levels or opening up the fretboard to you.
The basic idea with this exercise is that you start in one position on the lowest string, move up the scale across the strings, then when you reach the top string, move backward through the scale.
Here is an example of this exercise using the Minor Pentatonic Scale box shape:

Pretty simple, right?
All you do is move up the scale shape one string at a time, then when you reach the end, move backward. This simple exercise will help you memorize the scale and help your fingers feel comfortable with the position of each note within the scale.
Here is the Minor Pentatonic box shape if you haven’t learned it yet: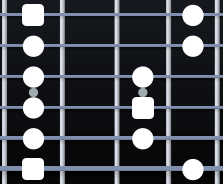
Compare the above scale chart to the TAB to see how we create this exercise. Learning how to create exercises from scale charts is an important skill to learn.
Now try to come up with an up and down exercise using this scale (the C Major Scale):
This time there are more notes in the scale, but the exercise will follow the same basic idea. Start at any note on the lowest string, then play each note in order until you reach the end. Then move backward until you reach the starting position.
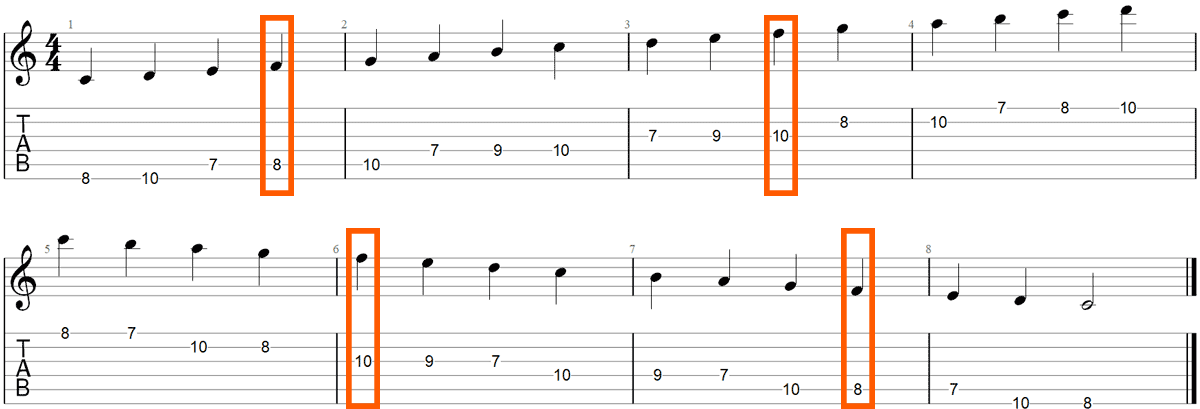
Here is the exercise in Guitar TAB format starting on the eighth fret (C):
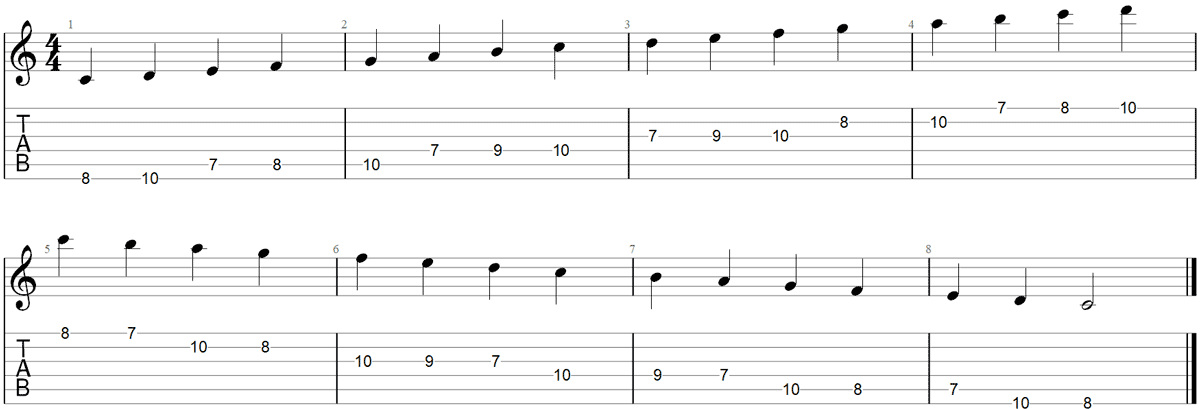
You might notice that this time the highest note is D (10th fret on the E string). There’s no rule to say that you must always start and finish on the root note. That really doesn’t matter – what matters is you learn where the notes in the scale are located. You can start and finish in any position you want on the fretboard.
How fast you play this exercise depends on how well you’ve memorized the positions and your current skill level.
Here are some tips to help you get the most out of the up and down scale exercise:
- Start off slow and gradually build up the tempo as you build confidence in the exercise
- Think carefully about which fingers you use for each note. Try to line your fingers up so you have one finger per fret
- Use a metronome to force yourself to play to a strict rhythm. This also helps you identify any weak areas of your scales abilities
- Practice coming up with up and down exercises for different scales from charts. Try to avoid looking up written out exercises in TAB/Notation format
- Set a goal to be able to play the exercise with your eyes closed
Any time you want to learn a new type of scale, start with this exercise as a quick and easy way to start memorizing the notes and positions. Once you feel confident, you can start adding other exercises to work on the scale in more challenging ways.
Guitar Scales Exercise: Random Directions
Note: I highly recommend this exercise for all guitarists. Please read through all of the instructions for this exercise to fully understand why it’s so valuable.
The problem with the up and down exercise is that it trains you to play scales in a very rigid way. Your fingers are trained to think about the next note in the scale rather than all nearby possibilities.
If you ever find yourself playing the same things over and over or you feel like your improvising is sounding robotic, this exercise will help.
This exercise trains you to see all the nearby notes in the scale from any position on the fretboard. This means instead of only thinking of the next note up or down, you’re aware of all nearby possibilities and can freely move around the fretboard without moving in a straight line.
If you’ve never tried something like this before, it will be a bit of a challenge. But even if you feel it’s too hard, spend time with it. This exercise will do wonders to your fretboard freedom.
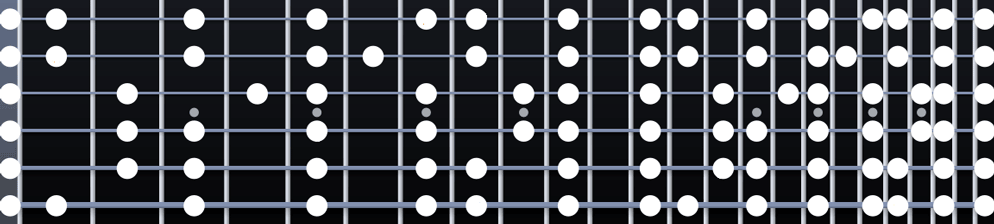
To understand this exercise, let’s look at how it would work with a scale. Here are all the notes in the C Major Scale:
To start this exercise, you pick any note shown above. Let’s start on the ninth fret on the third string:

The next step is to move one note across in any direction. You can move up the same string to reach the next note in the scale, down the string, across to a higher string, or back to a lower string.
Here are some the closest notes you could move to (highlighted in yellow):
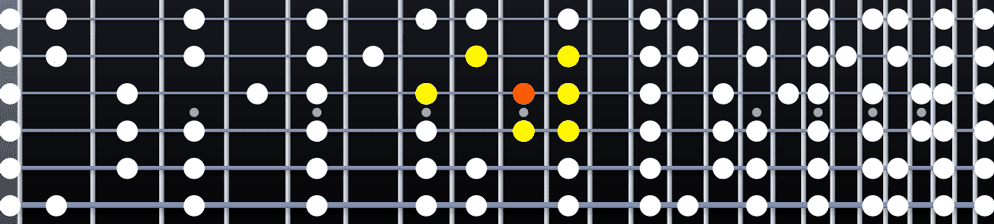
In this example, let’s move down the same string to the next note down in the scale at the 7th fret:

Now we repeat the above step for this new note position. You can move up, down, left, or right. Let’s move across to the next string up, which will land us on either the 6th fret or 8th fret. Let’s pick the 8th fret:

From this position, we repeat the above step and choose a new note in a random direction.
Here is an example of how we might continue to move across the strings following this exercise:

We can gradually move down the strings, across the strings, or up the strings as we choose each note. The basic idea is that instead of following a set sequence of notes that you must strictly follow, you’re learning to find the notes in the scale.
I can’t overemphasize how valuable this exercise is. Most guitar scale exercises you’ll see only focus on set sequences of notes to follow. While those exercises are important (many are covered later), they’re limited.
This exercise might seem strange, but it can completely transform your playing.
Not only are you strengthening your memory (you need to try and remember each nearby note at every step in the exercise), you’re also learning to think about which fingers to use for each new note. This type of practice is so powerful for when you start improvising or composing your own music.
Try this exercise out by starting with the A Minor Pentatonic Scale as shown below:

Start on any random note, then think about what possible notes you have to choose from for your next note. Consider all possibilities (to check you really do know what they are) then choose one of them.
Move into that new note using the appropriate finger, then repeat the above step from the new position.
Continue to move through the notes and if you ever get stuck in a certain area of the fretboard, spend more time on that area. Don’t shy away from fretboard positions where you get stuck. Expand your comfort zone until you’re comfortable in any position on the fretboard.
Here are some tips to help you get the most from this exercise:
- Try to practice this exercise from memory. Think about all possible nearby notes in your head
- Only use a scale chart to check if you played a correct note – don’t use it to find the notes!
- Pay attention to areas of the fretboard you have trouble with. Spend more time on those areas
- Start with scales with fewer notes such as the Pentatonic scale to get comfortable with this exercise
This exercise is easiest when you’ve already partly memorized the scale using the up and down exercise. It is very possible to learn a scale from scratch using this exercise, but it can be more challenging.
Guitar Scales Exercise: Find a Note
This exercise is a great way to test yourself. Once you think you know a scale well, use this exercise to check whether you’ve properly memorized it, or whether you’ve only memorized a bunch of patterns (not that there’s anything wrong with that).
Some guitarists will turn away from this exercise because it focuses on note names rather than patterns. I get it, learning scales using patterns is quick and easy. I’m not saying you shouldn’t learn that way. But there is a huge advantage in learning the note names as well.
The goal of this exercise is to help you identify the notes within the scale so when you’re playing you always know what you’re playing.
Let’s say you want to improvise over a jam track found on YouTube. The jam track is in E minor and the chords appear on the screen as you’re playing. You see a progression show up: G, Am, C, Em. What should you play over those chords?
By learning the notes within a scale, you’re able to pick out notes that will work with each chord in the progression. As the chord Am is playing, you can emphasize notes that fit with that Am chord (eg: A, C, E). Then when the next chord of C starts playing, you can shift your focus on notes that fit with that chord (eg: C, E, G).
This is how many advanced guitarists improvise. They’re able to come up with amazing melodies, licks, and ideas on the fly because they know what notes they’re playing at all times. That’s a hard thing to learn and it’s exactly what this exercise aims to teach you.
There are two prerequisites to using this exercise:
- You need to have a basic understanding of the notes on the fretboard
- You need to have a basic understanding of a scale
If you don’t know the notes on the fretboard, spend time memorizing them before you try this exercise.
If you don’t know a scale yet, start with the other exercises in this guide to memorize the basic shapes and patterns. Once you have a basic understanding of both these things, you’ll find this exercise much easier.
To see this exercise in action, let’s use the C Major Scale as an example. Here are the notes in the C Major scale up to the 12th fret:

Now to start this exercise, you need to pick a note within the scale. Let’s start with the note C.
Your job is to find all of the positions where there is a C on the fretboard. Here are all of them highlighted up to the 12th fret:

There are a couple of ways you could practice this. You could simply jump around and try to figure them all out randomly. Start with the positions you know well, then gradually try to figure out the positions you’re not confident with.
Here is how that might look as you play:

This is a great way to practice because it forces you to use your memory. You can’t rely on patterns or sequences – you need to think about the entire fretboard.
The other way of practicing this is to take it one string at a time. All notes will show up once per string below the 12th fret. So you only need to find six notes and you have half of your fretboard covered. If a note is found on an open string, it also appears on the 12th fret. So that’s easy.
Here is how it would look taking it one string at a time and finding every C position:

Simple, right?
After you find all of the positions, you pick another note from the scale.
Let’s do this again for the note F.
Try to do this on your own. Start on the sixth string and find F. Then once you find it, move to the next string and find F. Keep going until you find all positions.
Then repeat the process for another note in the scale. Keep going until you work through all notes.
This can be a very challenging exercise for beginners and intermediate guitarists, so take your time. It might seem really slow now, but this exercise can have a massive impact on your abilities.
Advanced note-finding exercise
Once you have gone through this exercise for a scale, there is a simple way you can start applying it. Play the up and down exercise for the scale and call out loud every time you land on a specific note (eg: F).
What this does is it trains you to think about the note names while you’re playing. Here is what the exercise would look like when identifying the note F in the C Major scale with the up and down exercise from before:
If you correctly identified all the F notes while playing, repeat the scale exercise with a new note to focus on (eg: B). Do this over and over until you’ve practiced all notes in the scale.
I don’t recommend calling all of the notes out as you play (eg: “C D E F G …”). While you might think that lets you practice all notes at once, it takes about as much effort as saying the letters in the alphabet in order. By focusing only on one specific note, you’re forcing yourself to use your memory. The more challenging the exercise, the more it strengthens your memory.
Here are some tips to help you get the most out of this exercise:
- Take as long as you need to find the correct notes. There’s no point rushing in the beginning
- Practice identifying specific notes while you play other things such as riffs, licks, or full songs. Pick a note (eg: E) and mentally call it out every time you play it
- If you struggle with this exercise, spend more time memorizing the notes on the fretboard
- You’ll know when this exercise is starting to improve your ‘fretboard vision’ when you start thinking about note names while you play songs you already know
For many guitarists, this exercise is what helped them shift from an “intermediate” guitarist to an “advanced” guitarist. Merely being able to instantly recognize what you’re playing as you play it can have a massive impact on your musical abilities.
Guitar Scales Exercise: Sequences
This is a very popular scales exercise that takes the up and down exercise idea and pushes it further. This exercise will help you break out of moving in one straight line up and down the scale into more interesting patterns.
The basic idea is that you come up with a sequence of moves (eg: up up up down) and repeat that sequence over and over to move up or down the scale.
If you’re bored with the up and down exercise but not quite ready to move on to the more advanced exercises in this lesson, spend some time with this exercise.
Here is an example of this exercise in action:

Now let’s break down what’s happening in this exercise so you can start applying it to any scale you want to practice.
The scale used in the above exercise is the C Major scale. Take a closer look at the exercise (or play it on your guitar) and try to work out what the sequence of moves is.
You should notice that the sequence moves up four notes in a row, then moves back one note. Then the sequence starts again from that lower note.
So if we started on the note A, we start by playing four notes up in order (A B C D), then we move back one note (C). We now start the sequence again from C. We move up four notes (C D E F) then move back one note (E).
Here is the sequence played over and over (with every second sequence shown in bold): A B C D C D E F E F G A G A B C B C D E
Try playing the above sequence starting on your open A string.
Here is what it would look like moving up the A string:

Why is this exercise worth practicing? This exercise helps you break a scale down into short chunks of notes. Instead of lining all the notes up in one direction (like the up and down exercise), you’re getting used to stopping and changing directions.
The good thing about this exercise is that you can easily come up with any sequence you want to practice.
Here are a few examples of different sequences to practice:
- UP UP DOWN UP
- DOWN DOWN DOWN UP
- UP UP UP DOWN(SKIP A NOTE)
- UP DOWN UP UP UP
- UP DOWN(SKIP A NOTE) UP UP UP
Try practicing all of the above sequences using any scale you want. Some of these sequences will be easy and they’ll feel just as easy as the up and down exercise.
Other sequences might take some time to memorize before you build your confidence. Remember that if anything feels challenging, it’s worth spending time on. Challenging exercises is where you make real growth in your abilities. If you only practice easy exercises, you’ll never grow as a guitarist.
Here are some tips to help you get the most out of this scale exercise:
- Practice different sequences for any scale you want to practice. The more different sequences you practice, the more confidence you will develop for that scale
- Spend the most time working on difficult sequences
- Try using string skipping or large jumps to make sequences more interesting
- Try combining this exercise with the ‘Find a Note’ exercise and call certain notes out loud as you play
- Use a metronome to practice to a strict rhythm
If you listen to some lead sections and solos, you might notice some of these sequences in action. This style of playing is very common in metal and similar styles. If you notice repeating sequences in songs you listen to, these exercises will help you learn those songs faster.
Guitar Scales Exercise: Play Music!
All of the above exercises are designed to help you build confidence in scales so you can start using them. But there’s a big difference between practicing a scale up and down and actually using it in a musical way.
This exercise helps you practice scales in a musical way. On other guitar sites and on YouTube you’ll see a lot of guitar scale exercises that look like the up and down exercise, but rarely will they talk about this exercise (because it’s hard to teach).
The goal of this exercise is to build your confidence in applying a scale in a musical way. That’s something that sequences and up and down exercises can’t do.
Try this exercise out after you’ve built up some confidence using all of the above exercises. If you can’t play sequences with your eyes closed or you haven’t practiced finding notes within the scale, this exercise will feel harder than it needs to be.
To practice this exercise, you first pick a scale you’re reasonably confident with. Let’s use the A minor Pentatonic scale as an example.
You then go to YouTube and search for “A minor guitar backing track”. If you want to practice with a certain style of music, add that to your search (eg: “A minor blues backing track”).
You will see plenty of different options. Pick one and have a listen to it. If the video shows the current chords on screen, that’s a bonus. Here is an example for a blues backing track in A minor:
This video shows the current chords playing which is great if you also want to practice targeting specific notes while playing (great for intermediate and advanced guitarists).
Now you’re reading to start improvising along with the track.
Depending on your current knowledge and skill level, this could mean many different things. Let’s go through a few examples to show how this exercise would work for guitarists at different skill levels.
Level 1: “I’ve never jammed before and I have no idea what to do”
Everybody needs to start somewhere. If you’ve never done something like this before, it can feel incredibly daunting.
Don’t stress, we’ll start off in the simplest way possible and over time you can gradually work your way up to the higher levels as shown below. Bookmark/favorite this page so you can come back in the future.
If this is the first time you’ve tried something like this before, here is what you do: pick any note in the scale and try to play it in time with one of the drum hits or chord hits you hear in the backing track. Then on the next beat/chord, move up to the next note in the scale or down to a lower note in the scale (similar to the random directions exercise).
At first you may need to keep it simple and just play up and down the scale. Once you feel confident with playing in time, you can start changing directions. Then you can mix things up by playing two notes in a row, or hold a note longer.
Here is a basic example of what this exercise might look like for a complete beginner:
Notice how the direction of the notes keeps changing? The rhythm also changes as the guitarist gains confidence in playing in-time. Once you feel confident with playing one note per beat/chord, you can experiment with mixing things up.
Note: at this stage, it won’t sound like music. It will sound like you’re playing random notes in the scale. That’s okay – we need to start somewhere. Only after you can confidently play like this can you move on to more musical sounding ideas.
Level 2: “I know techniques like slides, hammer-ons, and pull-offs, but I don’t know to use them”
If the Level 1 exercise was easy for you (make sure you try it – even if you think you’re above that level), then we can start incorporating some techniques into it.
The exercise at this level is exactly the same as in Level 1, but this time we’re using techniques such as slides, bends, and legato to make things sound a bit more interesting.
This time when you play along with the backing track, try to add in some of the techniques you know. Play a slide when moving between two notes in the scale. Use hammer-ons or pull-offs to change back and forth between notes. Play a bend and hold it. Try adding some vibrato to a held note.
Here is an example of what somebody playing a Level 2 exercise might look like:
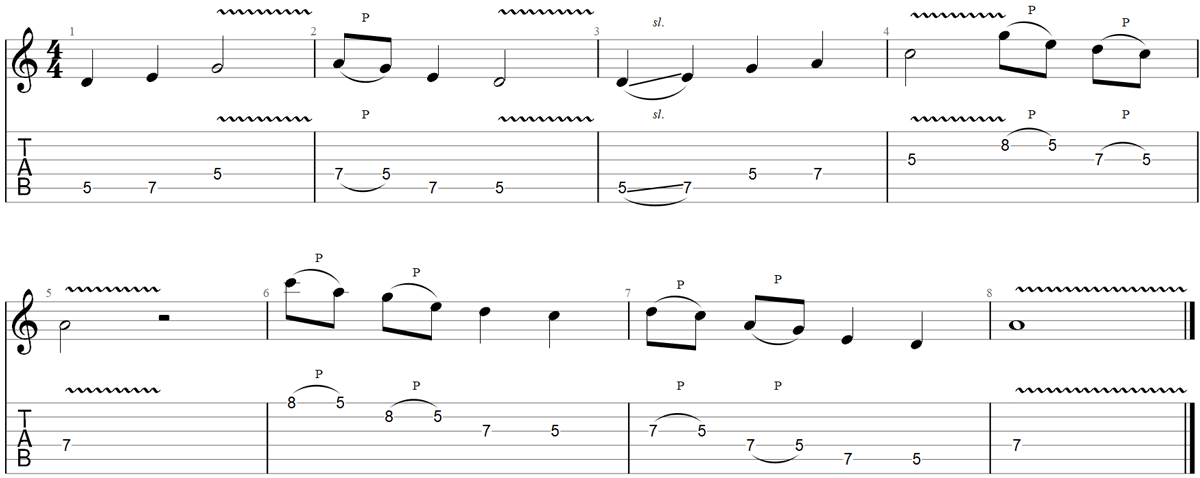
At this level, it starts to sound more like music. You’re still moving randomly up and down the scale, but the added techniques make it sound far more interesting.
Level 3: “I know some licks and I have a little bit of experience jamming”
At this level, the focus becomes making what you play sound less like a scale exercise and more like real music. The goal is to think in musical ideas and come up with phrases that fit within the scale.
You can definitely throw in some licks you already know – but only if those licks fit within the scale. Remember that we’re still practicing a scale, so this isn’t the time to show off you’re memorized lick collection.
Here are some things you can do to make your improvising sound more musical:
- Jump around the fretboard. Play in the upper register as well as lower down to mix things up
- Stop and start. Don’t try to constantly play. Add some breathing space so you can think about what you might play
- Use memorized licks sparingly. This is a scale exercise – not a lick memory test
- Use string skipping, repeated sequences, bends, palm-muting, and any other technique to add some spice to your playing
- If you play something you like the sound of, repeat it. Play it a few times then try to expand the idea
Here is an example of what a guitarist might play at Level 3:

Depending on your current skill level, the above example might look easy or it might look confusing. The more you practice this exercise, the easier it will be to come up with interesting ideas that sound like real music.
Level 4: “I’m confident with my improvising”
Some guitarists will spend years at Level 3, so don’t stress if you don’t feel ready to move up to this level. At this level, the goal is to really dig down into what you’re playing and look for opportunities to improve.
This is where the ‘Find a Note’ exercise can do wonders for your playing. One of the easiest ways to improve your playing is to be aware of what notes you’re playing and how they relate to the backing track.
For example, if the chord in the background is a D7, what notes would sound best over the top of that chord? What notes would add some tension or anticipation in your playing? What notes would sound boring against that chord?
If you can’t answer that question off the top of your head, this exercise will help you.
For this exercise, pick a backing track that always shows the current chords in the video. Being able to quickly see what chords are coming up and what is currently playing will help you figure out what notes work over each chord.
If you’ve never thought about notes while improvising before, an easy way to start is to try playing at least one root note per chord. So when the chord Am comes up, try to play the note A at least once. When Dm starts, play a D, when E7 plays, play E, and so on.
If you know all of the notes in each chord (eg: Am contains the notes A, C & E), then you can target all of those notes while that chord is playing in the background. When Em plays in the backing track, you can target the notes E, G & B (if they are in the scale you’re practicing).
This will be easy for some guitarists and challenging if you haven’t spent much time practicing the ‘Find a Note’ exercise. If you can’t keep up with the chord progression, spend more time with the Find a Note exercise.
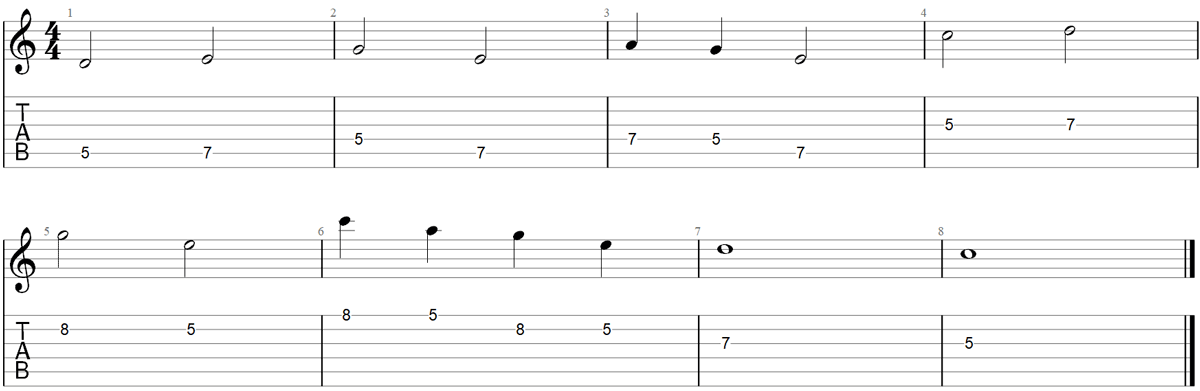
Here is an example of what a guitarist might play with the chord tones of each chord highlighted:

The goal here isn’t to play super fast or flashy. The goal is to think about the notes you play and match them up against the backing chords.
Notice that for each chord (chords are mentioned above the staff), the guitarist closely sticks to playing the notes that match each chord. When the chord changes from Am to Dm (in bar 3), the guitarist shifts focus to the notes D & A (both are part of the Dm chord). Then when Em starts at bar 5, the focus turns towards the notes E & G.
If this feels like too much to think about while playing, stick to focusing on the root note for each chord. Once you find it easy to play the root note for each chord, you can start looking at other chord tones.
Here are some tips to get the most out of this exercise:
- Don’t feel pressure to move up to a higher level exercise. The right exercise for you is the only that gives you a challenge but isn’t overwhelming. Do a great job at Level 2 instead of doing a horrible job at Level 3
- It’s okay to move back to Level 1 any time you learn a new scale. Even advanced guitarists may need to move back to a lower level when they learn a new type of scale. Take your time and get it right
- Try playing along with backing tracks in styles of music you never listen to or play. If you’re a metal guitarist, try playing with a blues or jazz backing track. If you play blues, try your hand at a heavy metal backing track. It’s okay if you don’t like the style of music because this is an exercise and changing the style of backing track forces you to play in different ways
Being able to improvise using a variety of scales to any backing track is a fantastic way of developing freedom on the fretboard. If you’re only able to improvise with a certain scale, in a certain key, in a certain style, you’re going to become a very limited guitarist. Try to expand your comfort zone and you’ll quickly see how you’ll grow as a guitarist.
Downloadable Guitar Scale Charts in PDF
To get the most out of the above exercises, it helps to have some references to scales you want to practice.
I’m currently working on creating a set of scale charts in PDF. To get access to these downloads when they’re ready and a range of other useful downloadable resources, sign up to my email newsletter.
In addition to practicing scales, it’s a good idea to practice chords. If you don’t already know how to play some basic open chords, check out this lesson. The lesson includes exercises to get you started learning chords.
Here are some more useful scales resources:
- Guitar Scales Explained Simple
- How to Get Better at Guitar Scales
- What Guitar Scales and Modes Should You Learn?
- How to Break Out of the Pentatonic Box
- How to Memorize the Fretboard
- Guide to the Pentatonic Scale
- Guide to the Blues Scale