
Learning how to smoothly change between guitar chords is an important skill to learn. Many styles of music rely heavily on chords, so practicing guitar chords should be a big priority for beginners.
In this lesson, you will learn:
- Which guitar chords to learn first
- How to practice guitar chords
- Guitar chord exercises to practice every day
- Answers to common questions about guitar chords
If you’re a beginner and want to learn chords, bookmark/favorite this page so you can keep coming back to it to go through the exercises.
Guitar Chords to Practice Daily
Before we look at how to practice guitar chords, let’s look at the first chords you should learn and practice.
The first chords you should learn are easy open chords that are used in countless songs.
The eight guitar chords you should learn first and practice daily are: Em, Am, C, D, G, E, A, Dm.
Learning these chords will allow you to start learning some of the Easy Chord Based Songs in This Lesson.
Here are the chord diagrams for the eight guitar chords to practice:
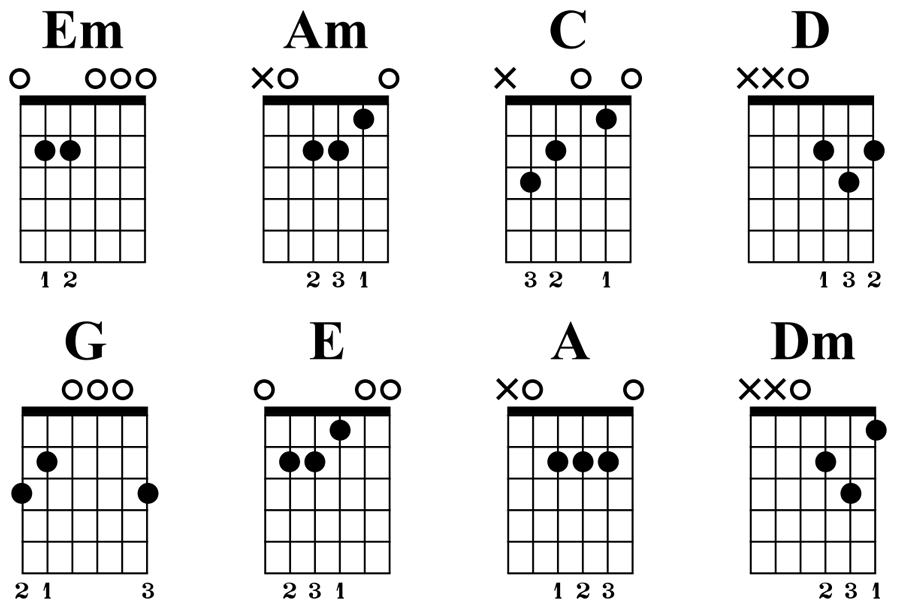
If you don’t know how to read the above chord diagrams, read this guide on chord diagrams. The guide includes a handy printable PDF.
The guitar chords shown above are split into two types: Major and minor.
The chords with the little ‘m’ next to the letter are minor chords. When you see something like ‘Am’ or ‘Em’, you call those chords ‘A minor’ or ‘E minor’.
When you see a chord name and it is only a letter like ‘A’ or ‘G’, those chords are Major chords. You would call those chords ‘A Major’ or ‘G Major’. Some musicians prefer to just call these chords ‘A’ or ‘G’ and leave off the ‘Major’. So if somebody says “play the chord C”, they mean the chord C Major.
There are many other types of guitar chords, but as a beginner, start by learning some basic Major and minor open chords.
If you want some more easy guitar chords to learn, check out these 10 Easy Guitar Chords Lesson.
How Long to Spend Practicing Guitar Chords
As a guitar teacher, I can tell you that the key to memorizing guitar chords is not how long you spend practicing them, the key is to practice them regularly.
If you want to get good at playing guitar chords, practice them every day without fail for at least five minutes.
As long as you practice every day, you will improve at a rapid rate. Short and regular practice sessions are far better than one long practice session.
If you practice your chords for 10 minutes every day, you will do far better than somebody who practices chords for an hour but only does it once per week.
If you really want to learn guitar chords quickly, practice your guitar chords twice per day. Have a short practice in the morning and another practice in the evening before you go to bed.
Splitting your practice up like this is far more effective for your memory than one long practice session.
How to Practice Guitar Chords Effectively
To practice guitar chords effectively, you need to split your practice into three areas:
- Memorization: learn to recall each chord instantly by memory
- Chord Changes: be able to instantly switch between any two chords
- Timing: be able to move into a chord at the right time
The exercises covered below will help you develop all three areas so you can practice guitar chords effectively.
How to Memorize Guitar Chords
Before you start practicing guitar chords, you need to know what to play.
Memorizing guitar chord shapes will help you move your hands into the chord shapes faster and change between different chords faster.
This is an important first step and if you skip it, it will take a lot longer to be able to play guitar chords.
The good news is that you can practice memorizing guitar chords anywhere – you don’t even need to have a guitar with you. Read through this guide for advice on practicing guitar without a guitar to learn more.
Here are the steps to memorizing guitar chords:
- Choose a chord to memorise
- Study the chord diagram
- Close your eyes and imagine placing your hand into the chord shape
- Open your eyes and look at the chord diagram to check if you were correct
- Repeat for a different chord
While the above steps might sound too simple to work, it is ridiculously effective.
Let’s go through an example to show you how to do it.
Memorizing Chords Exercise
Step 1 is to choose a chord to memorize. Let’s use the chord G Major.
Step 2 is to study the chord diagram. Here is the chord diagram for G Major:

Here are all of the things to look for when studying a chord diagram:
- How many strings you need to play
- The frets you need to place a finger on
- Which finger to use for each fret
Take a look at the above diagram for G Major and find these three things before you continue.
Here is what you should have found:
- How many strings you need to play: All six
- The frets you need to place a finger on: third fret on the sixth string, second fret on the fifth string, and third fret on the first string
- Which finger to use for each fret: first finger on the fifth string, second finger on the sixth string, and third finger on the first string
This is all the information you need to play the chord, so that’s why it’s important to memorize it.
Step 3 is to close your eyes and imagine placing your hand in the chord shape. If you’re in public and it would be strange to close your eyes, just imagine it in your mind.
This might feel strange at first, but it’s an extremely powerful memorization technique. As a guitar teacher, I spend a lot of time learning about different memorization techniques and visualization works incredibly well.
Just close your eyes and try to remember all the details from Step 2.
Remember which frets you need to play and which strings to play them on. Then imagine where you need to place each finger. Finally, imagine how many strings you need to strum.
Imagine what your hand looks like as you play the chord.
Try this now before you move on.
Step 4 is to open your eyes and check how accurate you were against the chord diagram.
Take a look at the G Major chord diagram above and think about how close you were to what it shows. Did you position all of your fingers in the correct places?
Step 5 is to pick a new chord a repeat the steps.
Pick one of the other eight basic open chords from earlier and try repeating the steps.
Jumping back and forth between the different chords helps you reinforce your memory.
You’ll get the best results if you practice each chord 3-5 times.
I know this might feel like a strange exercise because you don’t play anything on your guitar, but it will speed up the learning process.
Students who use this exercise to memorize chords before they try to play them on guitar learn the chords significantly faster and with less effort.
Guitar Chords Exercise 1: Getting Comfortable With Guitar Chords
The first thing to do after you have a decent memory of a few chords is to get used to playing them.
The goal at this stage is to simply feel comfortable moving your hand into the chord shapes.
For most beginners, this might be tricky and your hand may feel awkward in some of the chord shapes. Don’t worry if it feels awkward at first, you will get better.
To practice this exercise, simply pick a chord and move your hand into the chord shape.
Choose one of these chords to start practicing:
Place one finger down at a time starting with the lowest number finger the chord uses (eg: 1 = 1st finger).
Tips for getting the best chord sound:
- Use your fingertips. Using your fingertips helps avoid accidentally touching adjacent strings
- Place your finger as close to the fret at possible. The further away from the fret you are, the harder you need to press down to avoid buzzing
- Keep your thumb low on the back of the neck. If your thumb is hanging over the top of the neck, you will find it hard to reach with your fingers
Once you have all the fingers needed in the correct positions, strum all of the strings the chord uses (eg: C Major uses five strings).
If the chord sounds good (make sure you’re in tune!), pick each string individually to make sure each string is ringing out properly.
If you notice that a string doesn’t ring out when you pick it, check your hand position. Either a finger isn’t pushing down correctly or another finger is accidentally touching the string.
Finally, lift your hand out of the chord shape and repeat the above steps. Every time you start again and place your fingers back into the chord shape, it will help you feel comfortable with the chord.
Go through all of the eight chord shapes multiple times. Take a short break then do it again. The more times you do this, the sooner you will begin to feel comfortable with the chord shapes.
Guitar Chords Exercise 2: Slowly Moving Between Chord Shapes
Once you start to feel comfortable placing your hand in different chord shapes, the next step is to get used to changing between chords.
Being able to smoothly change from one chord to the next is an important skill to learn before you try to learn any chord-based songs.
In this exercise, the goal is to make every chord sound perfect. Don’t rush or else you’ll end up with slopping technique.
For this exercise, pick two chords to practice. In this example, let’s work on C Major and G Major.

Start by placing your hand in the first chord shape. Strum the chord once and make sure you play the right number of strings (five string for C Major).
Now move your hand into the second chord shape. Strum the chord as soon as all fingers are in place.
Go back and forth between the two chords over and over. Don’t try to speed up your chord changes. Focus on playing each chord perfectly.
Don’t worry about how long it might take to change between the chord shapes. With this exercise, the goal is to get used to changing between the chords – speed doesn’t matter.
Here are some tips to get the most out of this exercise:
- Some chord changes are easier than others. Look for chords that share the same shapes (eg: Am and E), or only move one finger between the two chords (eg: C and Am). Start with those chords and work your way to harder chord changes
- If you notice a string isn’t rining out properly, check your hand position. If you notice a finger is accidentally touching another string, stop and start again.
- Take it slow. Playing slow gives you more time to make sure your fingers are placed in the right positions. If you rush, you will make mistakes and slow down the learning process
- Try to practice every possible chord combination. Learning how to change between any two chords is important for when you see those chords used in songs
Once you feel comfortable changing between any two chord shapes, you can move on to the next exercise.
Don’t move on to the next exercise until you are ready. If you try to rush ahead, you’ll end up with sloppy technique.
Guitar Chords Exercise 3: Playing Guitar Chords in Time
As explained earlier, the third part of being able to play chords is to have good timing. Once you have memorized the chords and can comfortably change between them, turn your practice focus towards rythym and timing.
In this exercise, the goal is to play each chord in time with a beat. This is an important step before you try to play complicated strumming patterns.
If you feel comfortable with Exercise 2, this one is almost the same. The difference here is that you need to switch to the next chord at a specific time instead of whenever you feel like it.
Here is the exercise for the chords E minor and A minor:
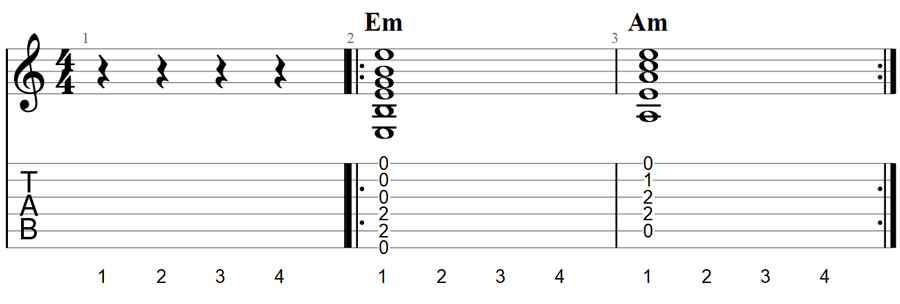
If you don’t know how to read the above exercise, read this Guide on Reading Guitar TAB. Alternatively, you can learn How to Read Standard Notation here.
While you can use a metronome to keep you in time, I recommend counting the beat out loud. This will put you under a little less pressure than a metronome clicking.
Start by counting the beat at a slow and comfortable pace. Say out loud “one two three four”. Then after four, strum the first chord as you say “one” again.
Continue to count the beat as shown in the exercise. You can start preparing your hand to move into the next chord as soon as you want after the first beat.
The goal here is to have your hand in position for the second chord so you can immediately strum it as you say “one” in the second bar.
If you don’t move your hand in time to play the second chord on the beat, stop and start the exercise again from the beginning. This time count the beat slightly slower to give yourself more time.
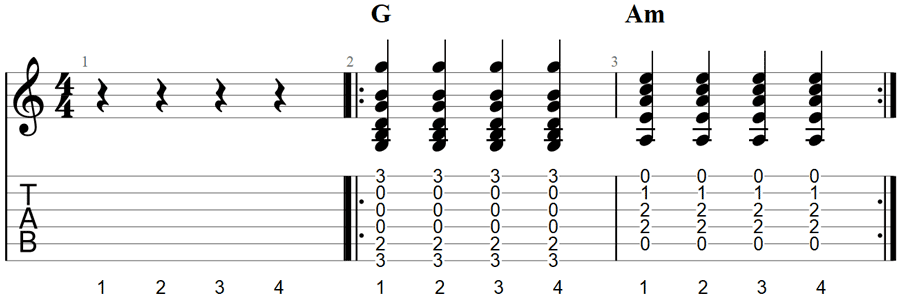
Here is the exercise for the chords D Major and G Major:

Follow the same steps as before. Count four beats before you start, strum D Major as you say “one”, continue counting the beat, change your hand into the G Major chord shape, then strum it when you get to the first beat of the second bar.
With some practice, this exercise will start to feel easy and you won’t have to think as much as you will need to in the beginning.
If you have trouble counting a steady beat, use a metronome set to a very slow tempo.
Make sure you practice all chord combinations before moving on to the next exercise. You should also feel comfortable counting and playing at the same time before moving on.
Guitar Chords Exercise 4: Speeding Up Chord Changes
Now that you can change smoothly between any chord combinations and you can count the beat while playing, the next step is to speed up your chord changes.
These exercises will only work if you have mastered the three previous exercises.
If you haven’t mastered those exercises yet, don’t attempt this exercise. Keep working on the previous exercises until you feel completely comfortable with them. Trying to rush ahead will give you sloppy technique.
In this exercise, we use a metronome to gradually force you to speed up chord changes.
This is a very common method guitarists use to speed up their technique and you will use it often if you want to play fast or complicated parts.
The exercise is exactly the same as Exercise 3. You need to strum a different chord at the start of each bar as shown below:

The difference this time is that you will be gradually increasing the metronome’s tempo to keep pushing you to play the chord changes faster.
Let’s say you start with the metronome at 80 bpm (beats per minute). You can comfortably change between the two chords over and over at that tempo.
What you need to do now is gradually increase the tempo. Set the metronome to 85 bpm and try the exercise again.
If it feels easy, you increase it again. Only increase the tempo of the metronome if it feels easy to change back and forth between the two chords without any mistakes or timing errors.
Eventually, you’ll get to a fast enough tempo that you start making mistakes. Maybe you’re a bit late on one chord, which causes the next chord to be even later.
Take note of the tempo – that’s your current limit.
The goal of this exercise is to gradually increase your limit. Over the next couple of weeks, you will notice that your limit seems to magically increase every time you sit down to practice.
You will notice that some chord changes you can play a lot faster than others. That’s norml. Just keep working on all chord combinations and try to push each combination’s limit up slightly every day.
Once you can play all of the chord changes with ease at about 150 bpm, it’s time to move on to the next exercise.
Guitar Chords Exercise 5: Rapid Chord Changes
The goal of this exercise is to speed up your chord changes so you can rapidly change between any two chords.
In the previous exercise, you could change your hand into the next chord at any time after strumming it. In this exercise, you have less time to make the change.
The metronome is used again to gradually speed up your chord changes. Start with a low tempo that feels comfortable and gradually increase the tempo.
Here is the exercise for the chords G Major and A minor:
You can see from the exercise above that this time you are playing a chord on every beat. Every time you hear the metronome click, you should be playing a chord in sync with it.
This means you can only lift your hand to change chords after the fourth chord. This gives you very little time to change chords, which forces you to get used to rapid changes.
If you play any mistakes, slow the tempo down. There’s no point playing fast if your playing is sloppy. You want to develop nice and tight rhythm skills.
Learning Chord-Based Songs
Once you have mastered this exercise, practice these simple chord strumming songs.
The lesson includes strumming patterns and Guitar TAB for each song, as well as introduce some other easy open chords.
Remember that there are three areas you need to master before you start learning to play chord-based songs:
- Memorization: learn to recall each chord instantly by memory
- Chord Changes: be able to instantly switch between any two chords
- Timing: be able to move into a chord at the right time
The above exercises will help you master all three areas.
Work on the exercises every day and you’ll find that you can memorize and learn to change between chords in a very short time.
Guitar Chords FAQ
Here are some common questions beginners have about guitar chords. If you found this lesson helpful, subscribe to updates here to be notified of new lessons and guides.
What Guitar Chords Should You Learn First?
The eight guitar chords you should learn first and practice daily are: Em, Am, C, D, G, E, A, Dm.
These chords are incredibly easy to play (compared to other chord shapes) and they are the most common chords you will see used in songs.
Once you learn those eight chords, you can learn more open chords such as seventh chords (eg: E7, A7), suspended chords (eg: Asus2, Dsus4), and start learning how to play barre chords.
Check out this lesson on the first guitar chords to learn for chord diagrams and tips.
How Do You Get Good At Guitar Chords?
You get good at guitar chords by practicing them over and over every day. Practice changing between different chords to get used to each position.
Here are some tips to help you get good at guitar chords:
- Start slow and aim for perfect form
- Memorize the chord shapes before you try to play them
- Use a metronome to help you speed up your chord changes
- Practice changing between every possible chord combination
- Have short and regular practice sessions
Even if playing guitar chords feels hard now, you can master them in short time if you follow the exercises covered in this lesson.
Find out how long to practice guitar per day in this guide. If you follow the advice in that guide, you’ll learn guitar chords in less time.
How Do You Practice Changing Chords?
The way to practice changing guitar chords is to slowly change back and forth between two chords. Pick any two chords you know and strum one of each over and over.
Use the above five exercises to get used to changing between chordds and start speeding up your chord changes.
Being able to quickly change between any two chords is something that can only happen when you have put a lot of time into practice.
When you see a guitarist who can rapidly switch between chord shapes, that guitarist has spent a lot of time working on building up that skill. You can do it to if you put the effort in.
What Are the Three Most Used Guitar Chords?
While every style of music tends to use different chords, the three most commonly used guitar chords are G Major, C Major, and A minor. With these three guitar chords, you can play a lot of simple songs.
If you learn a few more chords on top of those three chords, you’ll be able to learn countless songs.
Chords such as E minor, D Major, A Major, D minor, and E Major are used in so many popular songs.
Check out the chord diagrams at the start of this lesson to learn these chord shapes.
Why Are Barre Chords So Hard?
Barre chords are hard to learn because they require a lot of force from your index finger. Your index finger needs to press firmly across all six strings, which can be difficult for a beginner. With practice, barre chords become easier.
That’s why everybody starts off learning simple open chords like the ones covered in this lesson.
Once you master open chords, you can start learning how to play barre chords.
While chords are crucial to learn, another important area is scales. Find out how to learn and practice guitar scales in this guide.
The lesson includes exercises you can use to learn and master some common guitar scales.