If you want to learn how to read music for guitar, you have a few options as explained in this guide.
In this guide, you will learn the basics of how to read Standard Notation. Standard Notation is the formal way of writing music for many different instruments.
In almost all sheet music books you can buy for guitar, Standard Notation will be used. Many guitar books will also include Guitar TAB alongside Standard Notation.
Note: this is a long guide to cover everything you would want to know when learning how to read standard notation for guitar.
I recommend bookmarking/favoriting this page so you can refer back to it as you learn to read music.
By the end of this guide, you will know enough to read sheet music for guitar and be able to slowly work out how to play it.
It will take practice to be able to read sheet music for guitar, but this guide will explain everything you need to know to get started.
How to Read the Staff
The first thing we need to understand when reading sheet music for guitar is the staff.
Staff and Bar Lines
The staff is made out of five horizontal lines:

Notes are placed on or in-between these lines to represent notes on the guitar.
The staff is split up into bars (or measures) using vertical lines called bar lines:

The position of these bar lines depends on how many notes are in the bar and the time signature (covered later). Every bar lasts the same length of time unless a time signature tells you otherwise.
Clef Symbols
At the far left of the staff, a symbol called a clef is used to tell you what type of staff this will be.
There are three types of clef symbols you may see used in music as shown below: G Clef (Treble), F Clef (Bass), and C Clef (moveable).
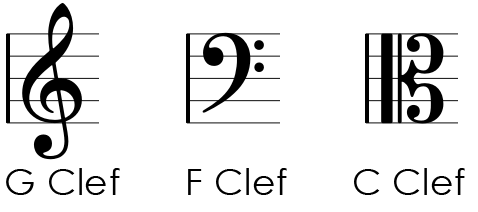
Guitar sheet music is typically written with a Treble clef and bass sheet music is typically written with a Bass clef.
The end of the little curve is positioned close to the second line, which means that this line represents the note G.
The C clef is used with other instruments, so we won’t look into it in this guide.
Staff Note Positions
With the Treble clef in position, we can now look at the note positions on the staff.
A note can be placed on each of the five lines to represent a note as shown below:
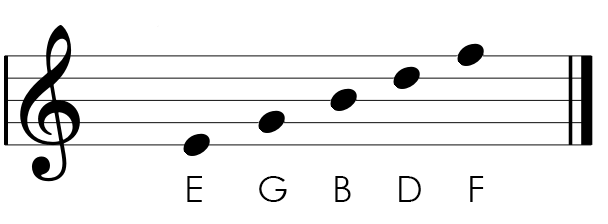
The bottom line is E, the second line is G, the third line is B, the fourth line is D, and the fifth line is F.
We can also place notes in-between the lines which are called spaces.

The space below the bottom line is D, the bottom space is F, the second space is A, the third space is C, the fourth space is E, and the space above the top line is G.
Here are all of the notes in the staff when we combine the lines and spaces:

If you count all of those dots, you end up with eleven notes.
Obviously we can play a lot more than eleven notes on a guitar. To solve this problem, we use different symbols to extend the staff to cover the entire range of the fretboard.
Ledger lines
The lowest note shown above is D below the bottom line. What if we wanted to play a note lower than this?
One way we can do it is with ledger lines. A ledger line is a short line you add to the staff to extend it above or below the five lines.
Here are a few examples of ledger lines below the staff:
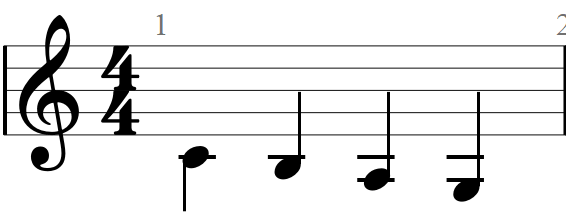
The very first note is on a ledger line below the staff. We know that the lowest space below the staff is D, so the next note down from D is C.
The space below this ledger line is B, followed by A on the second ledger line.
Here are a few examples of ledger lines above the staff:
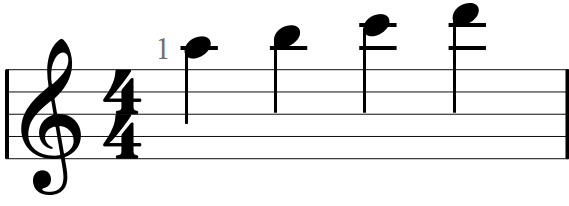
The very first note is on a ledger line above the staff. We know that the highest space above the staff is G, so the next note up from G is A.
The space above this ledger line is B, followed by C on the second ledger line.
8va and 8vb
We can extend ledger lines as far as we have space, but it can become hard to read when a lot of ledger lines are used.
If we need to play very low or high notes on the guitar, instead of using ledger lines, we can use a symbol to ‘shift’ the staff up or down an octave.
In the below example, you can see that there is ‘8va’ and a dotted line written above the staff.

This means that every note below the dotted line should be played an octave higher than what is written.
The second bar shows the exact same four notes without 8va written. You can see that using 8va makes these notes easier to read.
8va means ‘an octave above’ and 8vb means ‘an octave below’.
This means we have two ways of writing low or high notes. We can use ledger lines or 8va/8vb.
If a note is really high up the fretboard, you might see 15ma used. This is the symbol for two octaves above.

Here are the same four notes as before with 15ma. These are the same notes, but they’re written lower down on the staff. This is very handy when reading music really high up on the fretboard.
What about really low notes? While a standard tuned guitar won’t need anything further than 8vb to show all of the notes, some guitarists tune down (eg: drop tunings or extended range guitars).
Instead of using a different symbol, you’re more likely to see the bass clef used. Notes on the bass clef are positioned differently than the Treble clef, so keep this in mind if you see the bass clef.
Note: if this information feels overwhelming, don’t stress. Continue reading to learn how to match the notes on the staff to notes on the guitar and focus your practice there.
Later on, when you start seeing ledger lines or 8va/8vb symbols in music, you can come back and refresh your knowledge.
Finding Notes on the Guitar
Now that you know how to read the basic staff and the note positions on the staff, let’s look at how to find those notes on the guitar fretboard.
Let’s start by finding the open string notes on the staff.
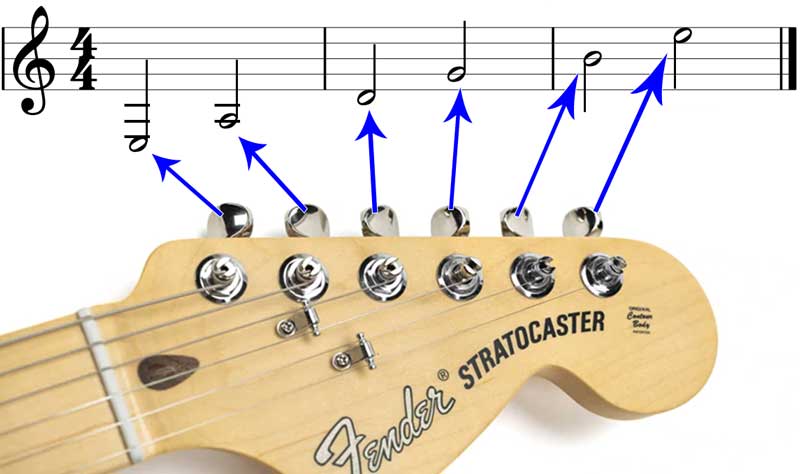
As you can see in the above diagram, the open string notes cover a wide range of the staff.
Ledger lines are used for the lower strings E and A, so you’re likely to see a lot of 8vb used when playing low riffs.
The high E string matches the top space on the staff. This means that every note on the E string is above the staff, so you can expect to see a lot of ledger lines or 8va for high licks and solos.
Here is an example of the C Major scale played from the low open E string all the way to the high E string:
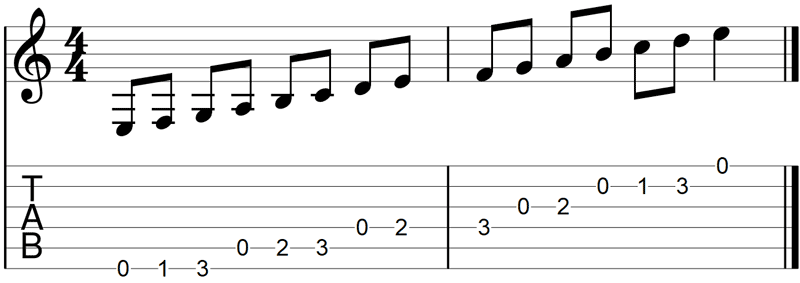
I’ve included Guitar TAB below the Standard Notation so you can use it to help you learn the note positions. Just remember that everything lines up vertically, so each Guitar TAB number matches the note above it.
If you don’t already know the notes on the fretboard, read this Guide to Memorizing the Fretboard. Memorizing the notes on the fretboard will speed up your learning and help you read music faster.
Guitar sheet music and other instruments
One important thing to understand about sheet music for guitar is that the notes on the staff and the notes you hear on your guitar aren’t exactly the same.
Sheet music for guitar is written one octave higher than it sounds.
What this means is that if a piano plays the note middle C and you play what looks like middle C on your guitar, you will notice that your guitar sounds an octave lower than the piano.
The technical reason for this is because the guitar is a transposing instrument. The note you hear sounds an octave lower than written.
This doesn’t affect the way you read music, but if you share sheet music with musicians who play other instruments, you will notice a difference in what they play with your sheet music.
Sharps and Flats
Now that you have read all of the notes on the staff, it’s time to look at the in-between notes.
For example, here are the notes E, F, and G (open, first, and third frets) on the high E string:

What if we wanted to play the second fret?
To show these in-between notes on the staff, we use sharp and flat symbols.
A sharp symbol (looks like a #) means to play the note one semitone higher. One semitone on guitar is one fret distance.
So to play the second fret on the high E string, we use a sharp symbol to the left of the note F to say we want to play a note one semitone higher than F:

This note is called ‘F sharp’. It is one semitone higher than F.
Alternatively, we can use a flat symbol (looks like a b), which means to play the note one semitone lower.
So instead of calling the second fret note F sharp, we can call it G flat because it is one semitone lower than G.

Whenever you see a note with a flat symbol next to it, just think to yourself that you need to shift down one fret to play it.
You may notice that the note G suddenly shows a new symbol, this is called a natural symbol and is explained later.
Here are some other examples of sharp and flat notes.

Practice figuring out what these notes are called, then try to find them on the fretboard.
Repeating Sharp and Flat Notes
What happens if you want to play four C# (C sharp) notes in a row?
In Standard Notation, you don’t write the sharp symbol four times in a row. Instead, you write the symbol the first time and it is assumed that the same note is played on the next three repetitions.

In the above example, it may look like you need to play C# followed by three C notes, but it is actually four C# notes. The sharp symbol continues until the end of the bar.
If you want to continue to play C# in the next bar, you will see the sharp symbol appear the first time C# is played again in the second bar.

In the above example, you can see that there are eight C# notes. Four in the first bar and four in the second bar. The sharp symbol is only shown once per bar at the first C#. The second time you see a C note, it means to continue to play it as C#.
Everything covered above also applies to flat notes. If you want to repeat a flat note, you don’t need to write the symbol again if it is in the same bar.
Natural Symbols
What happens if you play an F#, then you want to play F after it in the same bar?
To do this, we use a natural symbol as shown below:

The natural symbol tells us to cancel the sharp or flat symbol that was used before it and play the note natural (eg: play F instead of F#).
Natural is simply a way to say ‘play the normal note without the sharp or flat’.
To understand how these work, let’s play the notes F F# F# F F F# F F:

If the above example looks confusing, just take it one note at a time from left to right. If there is no symbol next to the note, take a look at the previous note to figure out what it should be.
You can see from the above example that a natural symbol is only used when changing from F# back to F.
The natural symbol isn’t used in the very first note of the bar because the bar doesn’t start with a sharp symbol (something that can happen as explained later during the section on key signatures).
How to Read Rhythm Notation
So far, you have learned how to read the notes on the staff and how to find those notes on the fretboard.
Now, let’s look at how long to play each note for.
Rhythm notation is the symbols used to tell us how long to play each note. Rhythm notation is so important that even modern Guitar TAB uses it.
The shape of the dots on the staff represent different lengths of notes.
Note Symbols
The first note symbol is a widened circle:

This note is called a whole note (American terminology) or semibreve (British terminology) and lasts for four beats.
Note: there are two names for every type of note – an American name and a British name. It doesn’t matter where you live, I recommend learning both names so you can understand all musicians.
If there are four beats in a bar (known as 4/4 time), a whole note will last the entire bar.
If you see a note that looks like a whole note but has a stem (vertical line) attached to it, this is called a half note (American) or minim (British).

A half note lasts for two beats. The stem can either point up or down to make the sheet music look easier to read (eg: high notes will have the stem point down and low notes will have the stem point up).
If a half note’s circle is filled in black, this is a quarter note (American) or crotchet (British) and lasts for one beat.

Most of the time when you count 1 – 2 – 3 – 4 in your head to the beat of the music, you are counting in quarter notes.
If you see a black note with a stem and a tail, this is an eighth note (American) or quaver (British) and lasts for half a beat.

As you can see above, an eighth note can either have a tail at the top of the stem, or it can be connected to another eighth note with a beam (it can be connected to all of the below notes as well).
A black note with two tails or two connecting beams is a sixteenth note (American) or semiquaver (British) and lasts for a quarter of a beat.

You can see that each type of note is half the length of the previous note symbol.
We can continue adding tails or beams to the notes to continue to halve the note length.
So if you see a note with three tails or beams, it is a thirty-second note or demisemiquaver and lasts for an eighth of a beat.

This can continue to sixty-fourth notes and further, but you are unlikely to see anything past thirty-second notes.
Rest Symbols
All of the above symbols are used to tell you how long to play a note. But what about when you don’t want to play a note?
Rest symbols are used to tell you how long to play nothing but silence.
For each of the above note symbols, there is a matching rest symbol.
Here is a whole rest symbol which lasts for four beats (same as a whole note):

Here is a half rest symbol which lasts for two beats:

When comparing the whole and half rest symbols, look at how the blocks connect to the lines. A whole rest symbol touches the second line and the half rest symbol sits on the third line.
Here is a quarter rest symbol which lasts for one beat:

Here is an eighth rest symbol which lasts for half a beat:

Here is a sixteenth rest symbol which lasts for a quarter of a beat:

As you can see, a sixteenth rest symbol doubles up the eighth rest symbol which is similar to how a sixteenth note uses two beams instead of one.
You can probably guess what a thirty-second rest looks like if you follow the above example:

This same pattern continues, but you’re unlikely to see shorter rests than this.
Any combination of the above symbols can be used in a bar as long as the total length of rests and notes adds up to the correct number of beats (explained later).
Dotted Notes
You might notice that each new symbol halves the length of the previous one. But what if we want to play a three-beat note or a one-and-a-half beat note?
There’s a simple way to do this and it is called a dotted note:

By placing a dot to the side of a note or rest symbol, it means that symbol lasts for one-and-a-half what it would normally last for.
To figure out the length of the dotted note, you multiply the original note length by 1.5.
So if the symbol is a one beat note, a dot next to it means to play it for one-and-a-half beats (1 x 1.5 = 1.5).
If a dot is next to a half note (two beats), it now lasts for three beats (2 x 1.5 = 3). You can see a three-beat note in the above example.
Any note or rest symbol can have a dot next to it to change the duration.
Tuplets
What happens if you have a four-beat bar but you want to play three notes evenly throughout the bar?
A Tuplet is when you divide the beat into irregular values that don’t line up with normal note lengths.
Tuplets can quickly become complicated, so I’ll keep the examples basic.
The below example shows how you can play three notes spread over four beats:

Normally, each of the above notes lasts for two beats. That means there would be six beats in the bar – which doesn’t work when there are only four beats in a bar.
The bracket and ‘3’ under the notes tells us to play these as tuplets.
When there is a ‘3’ in the bracket, this is called a triplet. A triplet is one of many different types of tuplets and the most common you will see.
An easy way of thinking about this is that the 3 tells us to play these three notes in the time of two notes. Two of these notes adds up to four beats, so that’s why this bar works.
Here is another example of triplets using eighth notes:

Normally, three of these notes would add up to one-and-a-half beats. If you count up all of the eighth notes, you’ll notice there are too many to fit in the bar.
But when eighth notes are played as triplets, they are played in the time of two eighth notes (one beat).
Tuplets can become really confusing when they are grouped in numbers higher than 3, so for now, just be aware that they can exist.
How to Read Chords
Now that you know how to read notes, rests, and the rest of the staff, you can start learning music!
Chords are easy to read in standard notation as you only need to remember one thing: when notes are stacked on top of each other, they are played at the same time.
A chord is simply a bunch of notes stacked on top of each other as shown below:

It will take some time for you to get used to reading chords and it will be slow at first as you will need to figure out each individual note.
Over time, you will learn to identify chords instantly without having to stop and figure out each individual note.
Here are some common chords in standard notation:
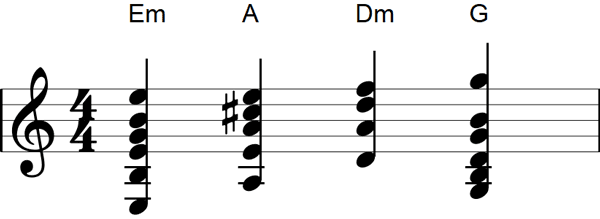
A limitation of standard notation is that it doesn’t tell you where to play these notes (it’s rare to see notation to say which string to play the notes on). So you need to figure out whether these chords should be played open or as barre chords.
In sheet music, chord diagrams are usually placed on the first page for a song so you know what chords will be used.
In the below example, you can see that chord diagrams for the song are shown first (highlighted in yellow), then the chord names are placed above the staff to help you quickly identify each chord.
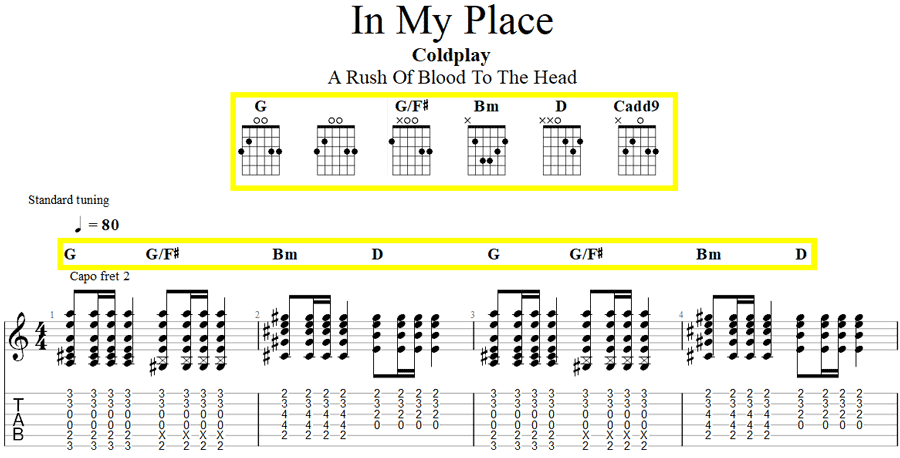
I highly recommend learning to read chord diagrams so you have two different ways you can identify chord shapes. Check out this Guide on How to Read Chord Diagrams.
How to Read Time Signatures
It’s important to know how many beats are in a bar. Some songs follow the typical 4-beat pattern (eg: 1 2 3 4 1 2 3 4), others use a 3-beat pattern (eg: 1 2 3 1 2 3), while others are a bit more complicated.
You can tell how many beats are in a bar by reading the time signatures at the start of the staff as well as any time the beats change.
Time signatures are also known as meter signatures or measure signatures.

In the above example, you can see that the song starts in 4/4 time (say: four four time).
What this means is that there are four beats in a bar (the top number) and each beat lasts for a quarter (the bottom number).
Have a look at the below example and what the time signature means:

This time signature is telling us that there are three beats in a bar (top number) and each beat lasts for a quarter (bottom number). We call this 3/4 time (say: three four time).
The bottom number isn’t always 4, but it is the most common you will see. Here is an example of 6/8 time:

This time signature means there are six beats in a bar and each beat lasts for an eighth.
If you compare 3/4 time and 6/8 time, you might notice that as fractions they are exactly the same.
The difference between 3/4 time and 6/8 time is how it feels and how you count.
In 3/4 time, we count ‘1 2 3 1 2 3’. In 6/8 time, we count ‘1 2 3 4 5 6 1 2 3 4 5 6’.
If the tempo is the same for both examples, we would be counting the beats in 6/8 time twice as fast as we count the beats in 3/4.
They may look the same, but the way we think about and feel the music changes.
A song can change how many beats are used in a bar at any time. Some styles of music (eg: progressive metal) are well known for using a lot of time changes.
Here is an extreme example from Dream Theater’s The Dance of Eternity:
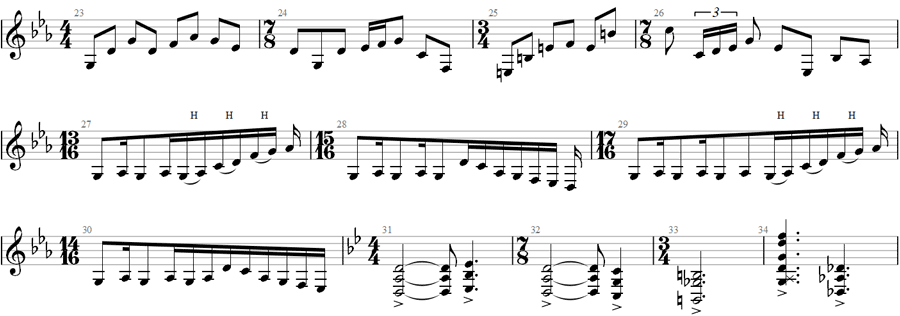
You can see that almost every bar changes time signatures. The example starts in 4/4 time before changing to 7/8 time.
A 7/8 time signature means there are seven beats per bar and each beat lasts for an eighth. Think of it as seven eighth notes in a row.
Remember that this is an extreme example, so you’re unlikely to see time signatures like 13/16 or 17/16.
Odd time signatures (with an odd number on top) aren’t very common.
A lot of songs stick to only one time signature, so you’re likely to only see a time signature at the very start of the sheet music.
But keep an eye out for any changes so you can continue to properly count the beat.
How to Read Key Signatures
If a song is written using the C Major scale (C D E F G A B), you’re unlikely to see any sharp or flat notes.
But what if we’re playing with a scale that uses a lot of sharp or flat notes?
Having a lot of sharp or flat notes can quickly make sheet music hard to read. Take a look at the below example and how cluttered the sharp symbols make it to read:

This can be tricky to read because even the notes without sharp symbols may be sharp if a sharp symbol was previously used in the bar. There are two notes above that don’t have sharp symbols but are still sharp notes!
Fortunately, there is a different way of writing sheet music that makes it easier to read.
A key signature basically takes all of the sharp or flat symbols you would use throughout the bar and places it at the start.
Here is the above example again, but this time it uses a key signature:

Notice all of the sharps after the Treble clef? That’s a key signature.
What this means is that each time you see a sharp symbol in the key signature, it’s telling you to play that note as a sharp from now on.
So the first sharp symbol we see is on the top line, the note F. This key signature is telling us that every time we see an F (in any octave), we need to play F# instead.
There are five sharp symbols in this key signature, so there are five notes that we need to remember to play sharp instead of natural.
Here is a simpler example:

This key signature has one flat note on the middle line, which represents the note B. This key signature is telling us to play B-flat instead of B from now on.
All of the other notes stay the same, but when we get to what looks like B, we need to remember to play B flat.
Key signatures aren’t always used. Sometimes the person writing the sheet music will use sharps and flats throughout the piece, while other people will use key signatures.
A key signature can change at any time, so lookout for new signatures.
There is a key signature for every major scale. So the above key signature with one flat is the key signature for the scale F Major. The earlier key signature with five sharps is the key signature for B Major.
The circle of fifths is a really useful resource to understand key signatures and major scales. I’m currently writing a guide on the circle of fifths, so subscribe to updates here to be notified when it is available.
How to Read Tempo
The song’s tempo is usually indicated at the start of any sheet music as shown below:
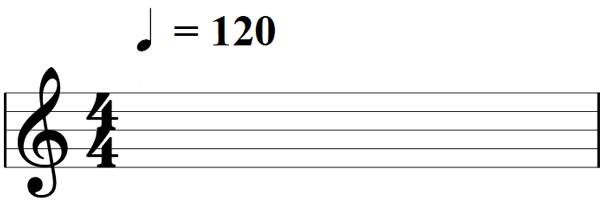
This number tells us the beats per minute of the song. So if the tempo shows 60, that means 60 beats per minute (a beat every second). If the tempo is 120 bpm, that means two beats per second.
If you want to find out how fast any tempo is, all you need is a simple metronome.
You could buy a physical metronome, but there are plenty of free metronome apps you can use that do the same job.
The tempo of a song can change, so keep an eye out for tempo symbols throughout the sheet music.
How to Read Music Symbols
Similar to how Guitar TAB uses different symbols to indicate different techniques (find out about Guitar TAB symbols here), standard notation also uses symbols.
If you already know how to read the symbols used in Guitar TAB, you will find many of the symbols used in standard notation easier to read.
Here are the most common symbols you are likely to see and what they mean.
Curved Lines
A curved line can mean two different things. If a curved line connects two notes together of the same pitch, it is called a tie:

A tie is telling us that the second note is a continuation of the first note. In other words, you keep holding that first note and don’t pick it again.
Ties can connect notes together in the same bar and they can also carried over to the next bar as shown below:

In the above example, the last note in the bar continues to ring out for two beats in the second bar.
To work out the total length of a note, you add up the lengths of all of the notes under the tie (more than two notes can be tied together).
If a curved line connects different notes together (two or more), this is the symbol for legato.

Legato is when you pick the first note, but don’t pick the next notes. Hammer-ons, pull-offs, slides, and tapping are all forms of legato.
Sometimes sheet music will use H or S along with a curved line to tell you to play hammer-ons or pull-offs as shown below:

In the above example, you pick the note G, then hammer-on to A. Then you pick the note B and hammer-on to C.
If you see a sloped line connecting the notes as well as a curved line as shown below, that’s telling you to play a slide.

The letters sl. may also appear to indicate slides.
Repeat Signs
When a part of a song is repeated over and over (eg: a riff that keeps repeating throughout the song), instead of writing the bar over and over, a repeat sign can be used.
There are two parts of a repeat sign: the start and the end as shown below:

The double vertical lines and the two dots are used at the start and end of the section that is to be repeated.
The above example is telling us to play the four notes, then play the four notes again before moving on to the next bar.
A single bar can be repeated or a long section can be repeated. The dots are always on the inside of the bar lines of the section to be repeated.
If a bar is to be repeated more than twice, it will tell you with a number above the end repeat sign as shown below:

This example is telling us to repeat the bar three times before continuing.
Alternate Endings
Quite often, something will repeat a few times, then on the last repetition, there will be a slight change.
Instead of having to write the entire section out, we can use alternate endings to repeat everything except the last bar.

What the above example means is that the first three times, you repeat the first two bars. Then on the fourth time, you play the first bar, then you skip ahead and play the third bar.
The numbers tell you what to play on each repetition. That’s why we play the third bar (labeled with 4) on the fourth repetition and skip the second bar (labeled with 1-3).
Alternate endings may seem confusing at first, but they make sheet music much easier to read as you can seriously cut down on how many pages it takes to write out a song.
Shuffle Feel
Some music doesn’t have what is known as a ‘straight feel’. In music such as blues, it might have a ‘shuffle feel’.
Instead of re-writing sheet music to match the rhythm of something with a shuffle feel, we can write the music as normal and add a shuffle feel symbol as shown below:

What this means is that instead of playing eighth notes as normal (eg: 1 and 2 and 3 and 4 and), you play them with a shuffle feel (eg: 1 and2 and3 and4).
While the above notes look evenly spaced, they’re played with a shuffle.
There are different types of shuffles you could use, but the above example with eighth notes is the most common.
Finger Numbers
While it is uncommon, you might be lucky and sheet music may include some suggestions on what fingers to use.

In the above example, the number next to the first note is a recommendation on which finger to use.
Index finger is 1, middle finger is 2, ring finger is 3, and pinky is 4.
Sometimes most of the notes will be given numbers, but it’s more common to see the first number of a part with a number. Then you need to figure out the other fingers on your own.
Normally once you know which finger to start with, it’s pretty easy to figure out the rest.
String Numbers
A limitation of standard notation is that the notes on the staff don’t tell you where to play them on the fretboard.
For example, an E in the top space on the staff could be played on six different positions (if you have a 24 fret guitar).
It’s rare, but you might be lucky and sheet music will tell you which string a note is to be played on using a number in a circle.

In the above example, the first note is to be played on the fifth string.
Usually, only one or two notes will have this notation and you have to figure out the rest.
There are plenty of other symbols used in standard notation, but the above examples should give you enough to get started and start reading music.
As most sheet music available today provides a combination of standard notation and Guitar TAB, you may find learning both methods helpful.
Check out this Guide to Learn How to Read Guitar TAB. Many of the symbols used in standard notation also apply in Guitar TAB, so you might want to check out the symbols section in the guide.
If you will be learning songs that use a lot of chords, make sure you know how to read chord diagrams by reading this guide.
