
Guitar chord diagrams or charts are important to understand as they give you a quick way of learning new chords. Once you learn how to read guitar chord diagrams, you’ll be able to start learning countless chord-based songs.
In this guide, I will show you:
- The five points on how to read guitar chord diagrams
- Tips to help you understand some strange chord diagrams
- A downloadable PDF with some useful chord diagrams
By the end of this visual guide to chord diagrams, you’ll know everything you need to about chord diagrams.
Check out this Guide on How to Read Guitar TAB after you finish this guide to learn the other popular way of writing music online.
Alternatively, you can learn to read music using chord diagrams and standard notation. Learn how to read standard notation in this comprehensive guide.
Once you learn how to read guitar chord diagrams, check out this lesson to learn some easy songs that use basic open chords. The lesson includes strumming pattern diagrams and explanations.
How to Read a Guitar Chord Diagram
Here are the five main points on how to read a guitar chord diagram:
- The vertical lines represent the guitar strings
- The horizontal lines represent the frets with the top line representing the guitar nut
- The black dots represent where you place your fingers
- The numbers tell you which fingers to use
- An ‘O’ tells you to play a string and an ‘X’ tells you to not play a string
I’ll go through each of the above five points in detail with plenty of diagrams so you know exactly what they all mean.
This is a chord diagram:
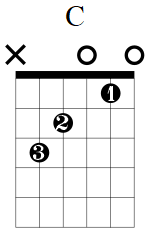
Let’s go through the five points to understand how we should play a chord diagram like this one.
1. Vertical Lines
The first point is the vertical lines. The vertical lines represent the strings on your guitar.
The far-left line represents the thickest string on your guitar (low E) and the far-right line represents the thinnest string on your guitar (high E).
Here is a diagram labeling the strings on a blank chord diagram:
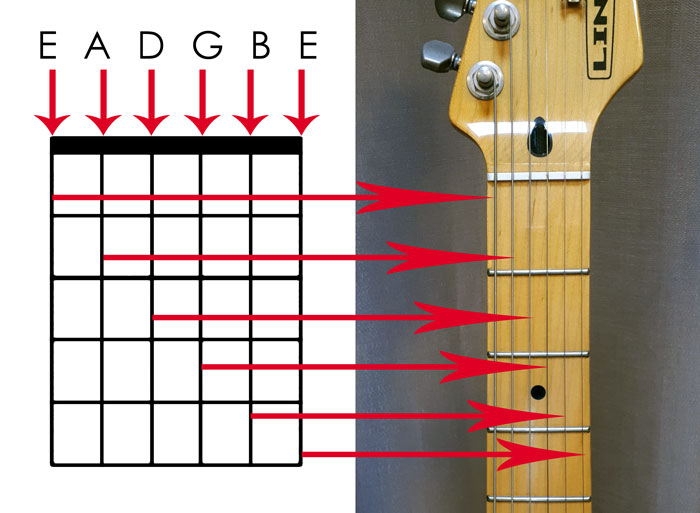
So when you read a guitar chord diagram, it’s showing you your guitar from a sideways point of view.
2. Horizontal Lines
The second point to know is the horizontal lines. The horizontal lines represent the frets on your guitar with the thickest top line representing the guitar nut.

In the above photo, you can see how the frets match up to the lines in the blank diagram. You also know that the vertical lines represent the six strings, so the above photo shows you exactly how to think about a chord diagram.
3. Black Dots
The third point to know is the black dots. Sometimes these dots are numbered and sometimes they aren’t (explained later). The black dots show you where to place your fingers on the guitar fretboard.
The first dot is on the first fret on the second (B) string. The second dot is on the second fret on the fourth (D) string. The third dot is on the third fret on the fifth (A) string.
The above diagram is telling us we need to use three fingers to play this chord. To know which fingers to use, we look at the numbers as shown in the next step.
4. Numbers
The fourth point to know is the numbers. The numbers on the black dots or below the chord diagram tell us which fingers to use to play the notes.

As you can see from the above diagrams, sometimes the numbers are shown on the black dots, sometimes they’re shown below the diagram, and sometimes they’re not shown at all. If a diagram doesn’t show you any numbers, you need to figure out which fingers to use on your own.
Here is how we number the fingers on our fretting hand:
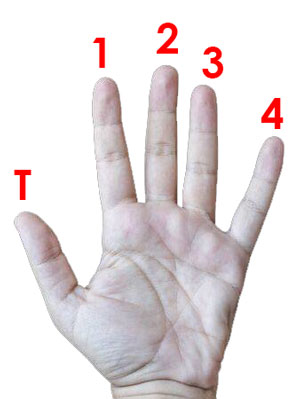
Once you memorize how to number your fingers, you’ll be able to match up which fingers to use for any diagrams. The thumb is numbered ‘T’, although you’re unlikely to see it used in many chords.
If you’re left-handed, you may wonder whether there are chord diagrams made specifically for you.
As a guitar teacher, I’ve taught many left-handed students over the years. While it is possible to create chord diagrams better suited for left-handers (the diagrams would be flipped over), I don’t recommend using them.
The reason I don’t recommend learning to read ‘left-handed chord diagrams’ is because you’ll almost never see them used in real life. Whenever you look up chords for songs, you’ll see standard chord diagrams used.
While I know it might feel like a hassle to be forced into learning diagrams written for right-handed guitarists, I highly recommend it. Once you learn to read these chord diagrams, you’ll be able to mentally flip them over in your head to match your left-handed guitars.
Learning to read standard chord diagrams means you’ll be able to use any online resource without having to search for a left-handed version (most of the time they don’t exist anyway).
When reading this guide, practice mentally flipping the diagrams and the photos in your head. My students quickly learned this skill and were never bothered by it again.
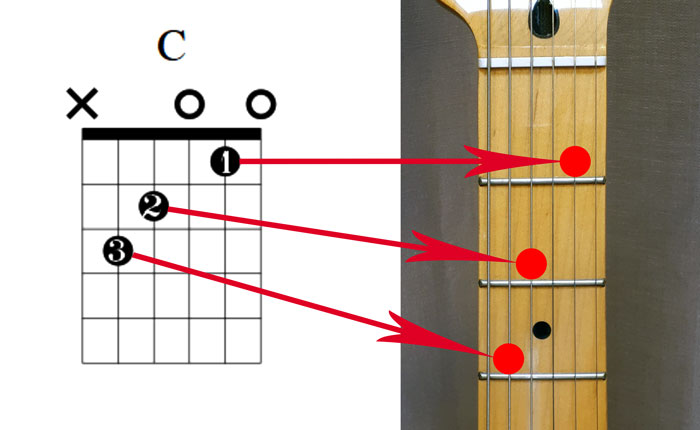
You can see from the below photo how each finger matches the black dots on the diagram.
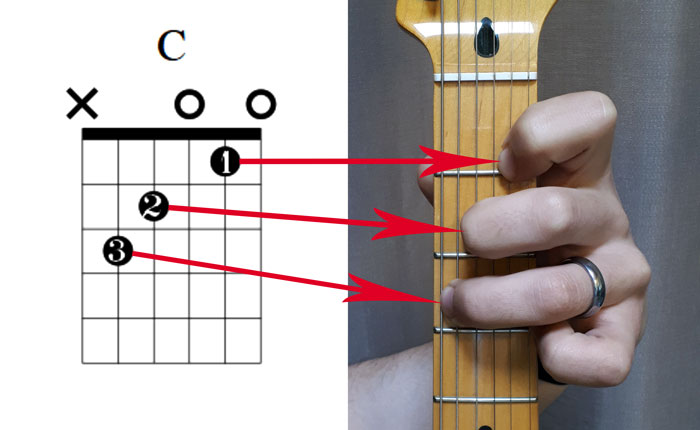
My first finger (index) is on the second fret on the second string. That matches the ‘1’ dot on the diagram. My second finger (middle) is on the second fret on the fourth string, matching the ‘2’ dot. My third finger (ring) is on the third fret on the fifth string, matching the ‘3’ dot. I don’t need to use my fourth finger because there isn’t a dot with a ‘4’ on it.
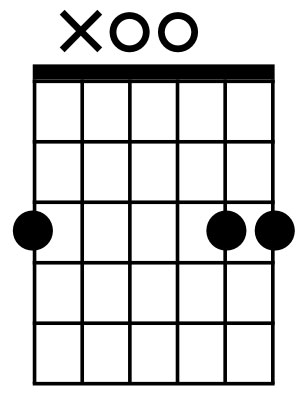
5. Os and Xs
Now we have the right fingers on the right frets. The fifth point to know is which strings to play. The ‘O’ and ‘X’ you see above each vertical line tells us whether we should play a string or not.
If a string doesn’t have an ‘O’ or an ‘X’ above the string, check if there is a dot on the string. A dot on the string means you need to play the string.
If there is an ‘O’ above a string, it means to play that string as part of the chord. If there is an ‘X’ above a string, it means not to play that string.

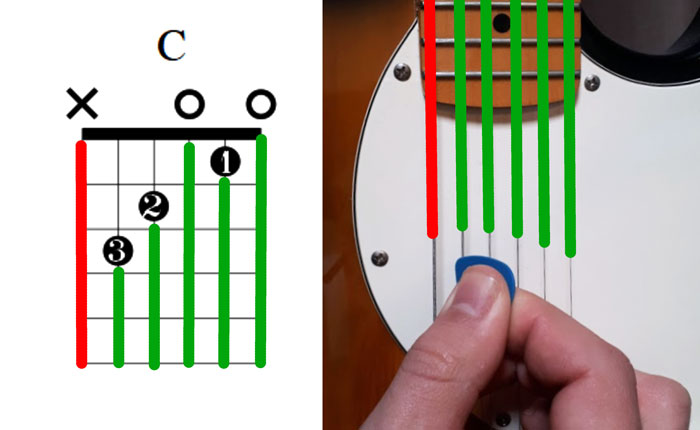
In the above chord diagram, there are two ‘O’s and one ‘X’. This means we skip strumming the low E string and play all the other strings (the other three strings without an ‘O’ have dots on them).
In the below photo you can see that I have my pick ready to strum the five strings and skipping the low E string.
Some chord diagrams will have you strum all strings and some may only use five or four strings. Always look at how many strings to strum or else your chords may sound wrong.
More Chord Diagram Examples
Take a look at the below chord diagrams and use the five points to figure out how to play the chords.

When reading chord diagrams, take it one black dot at a time. Many guitarists like to start at the high E string and work through one string at a time until they get to the low E string. You might find that you learn the chords faster when you go in a string-by-string approach.
Here are how you play the above chord diagrams with the chord names:

Go through each chord diagram again and check your hand position against the photos to see if you were right. Try to strum each chord and make sure you strum the right number of strings.
Reading Barre Chord Diagrams
So far we’ve only looked at open chords (that use the lower three frets). But what happens if you want to play a chord higher up the neck as you do with a barre chord?
The good news is that barre chords use the same diagrams. You only need to look out for two things to know where to play the chord:

In the above chord diagram, you can see that there are two new things compared to the earlier chord diagrams.
Barring your Finger
First, you will notice that there is a thick black line covering the entire fret across all six strings. Some chord diagrams use a thick line to tell you to ‘bar’ your first finger across the strings.
Other chord diagrams use a curved line as shown below:

The curved line and the thick black line both mean the same thing – flatten your first finger (index) across all of the strings.
Not all barre chords stretch over all six strings. In the below chord diagram, you can see there is an ‘X’ above the low E string:

This diagram has a thick black line across the remaining five strings, so you bar your finger over those five strings. When you strum this chord, start strumming from the fifth (A) string.
Starting Fret
The other difference with a barre chord diagram is the number on the side of the diagram. This number tells us what fret the chord diagram starts at. Unlike open chord diagrams, the top line doesn’t mean the guitar nut.

The above chord diagram has a ‘5’ on the side of where we place our first finger, so we start the chord on the fifth fret on the guitar.
The below chord diagram has a ‘7’ on the side, so we start the barre chord (notice the shape of the chord is exactly the same) on the 7th fret.
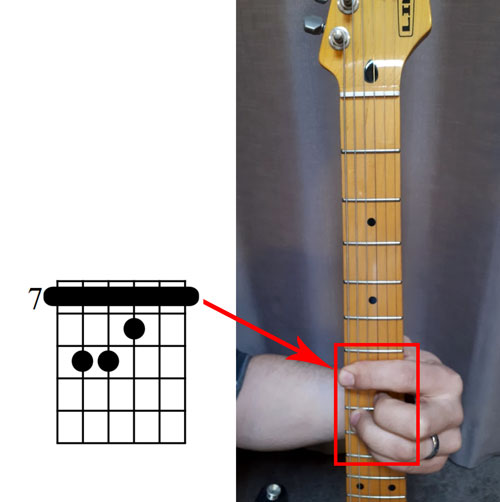
If you are a beginner, you may feel that barre chords are too hard to learn. But they’re incredibly useful. See how the same chord shape can move up and down the fretboard to create new chords? That’s how powerful barre chords are. You memorize one chord shape and you can play it all over the fretboard.
Guitar Chord Diagram Tips
Sometimes you will come across a chord diagram that doesn’t seem quite right. Read through the below tips for important points to keep in mind as well as tips on how to learn chords faster.
The Numbers Are Only a Suggestion
There will be times when you see a chord diagram using different numbers on a chord you already know. Take a look at the below chord diagrams as an example:
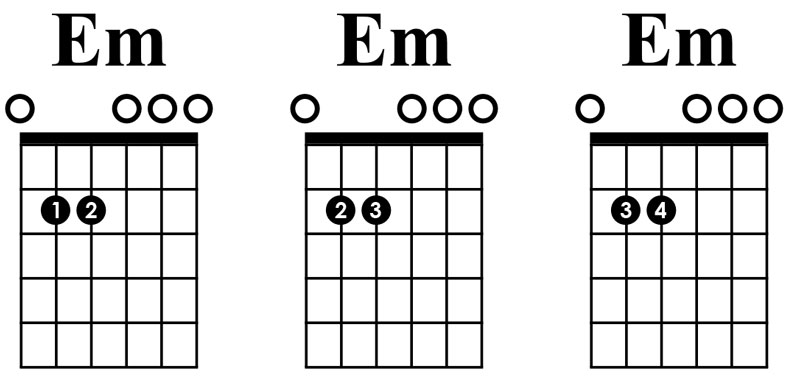
The diagrams are all for the exact same chord, but the numbers a different.
This is because some chords can be played with different finger combinations. There is no ‘right’ way to play the above chord. You can use any finger combination and it will still sound the same.
Here are the three different ways you can play Em as shown in the above chord diagrams:
If you try to play all three, you might notice that some finger combinations feel more comfortable than others. As you develop your guitar skills, you will learn that sometimes it makes sense to change which fingers you use to play a chord. Different finger combinations make it easier to switch into different chords.
The key point to remember is that the numbers in the diagrams are only suggestions – if you think of a different combination of fingers to play the chord, that’s fine.
Guitar Chord Diagrams With a Weird X
Sometimes you might see a chord diagram like this one:
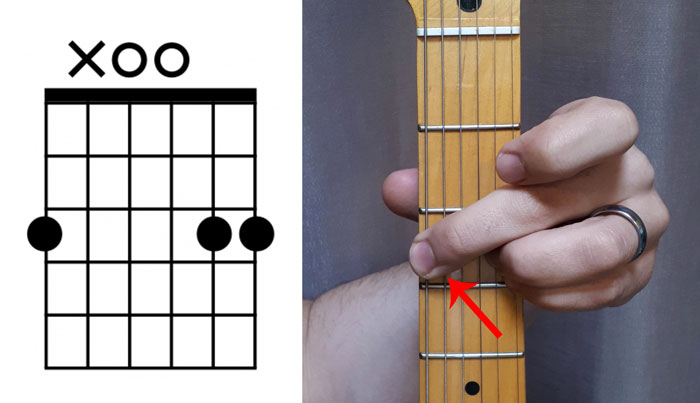
This chord diagram is telling us to play the low E string, skip the A string, then strum all the other strings. How is this possible?
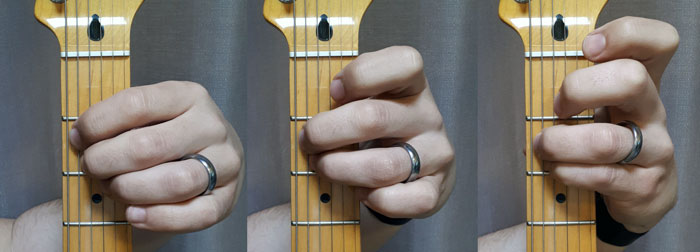
The way to do this is to use your finger to rest against the A string and mute it.
In the below photo, you can see that I use the side of my second finger to rest against the A string. Then I can strum all six strings and the fifth string will stay muted.
If you’re a beginner, keep this in mind for later on if you ever come across a chord diagram like this. If you see an X on one of the middle strings, think about which finger you can use to mute that string.
How to Use a Capo With Chord Diagrams
The great thing about chord diagrams is that you can easily play them anywhere on the fretboard with a capo.
Here is a chord diagram played in the open position, then the same chord shape played on the third fret using a capo:
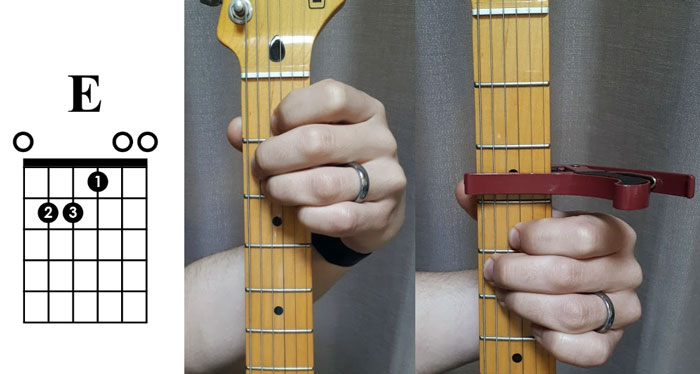
You can see that my hand plays the same chord shape, but the capo allows me to move the chord up the fretboard.
While the chord shape remains the same, playing a chord with a capo changes what chord you’re playing. So in this example, when I play the ‘E’ chord chape (E = E Major) with a capo on the third fret, the chord turns into a G Major chord. Once you learn some basic music theory and the notes on the fretboard, this will make sense.
The main point to remember for now is that playing with a capo changes the chord names.
If you find a song that uses a capo, read the chord diagrams so that the top thick line matches your capo instead of matching the guitar nut. It’s as easy as that.
Guitar Chord Diagrams PDF
If you are just starting to learn guitar chords, it might feel overwhelming with how many chords there are. While there are countless chords, some show up again and again.
The below PDF includes chord diagrams for the most common open and barre chords you will play on the guitar.
If you memorize all of the chords in the PDF, you will be able to start learning countless songs. Check out this lesson to start working on easy chord-based songs.
For more downloads and updates, subscribe to email updates here. Thank you to all my subscribers for supporting Guitar Gear Finder so I can write helpful guides like this one. If you found this guide helpful, please share it on social media to help spread the word.
Guitar Chord Diagrams FAQ
What do the vertical lines mean on chord diagrams?
The vertical lines on chord diagrams represent the strings on the guitar. The far-left line matches the low E string on your guitar. The far-right line matches the high E string on your guitar.
What do the horizontal lines mean on chord diagrams?
The horizontal lines on chord diagrams represent the frets on your guitar. The top horizontal line usually represents the guitar nut.
What do the numbers mean on chord diagrams?
The numbers on chord diagrams are suggestions on which fingers to use to play the chords. Each finger is numbered with the index finger being 1, middle finger being 2, ring finger being 3, and pinky being 4.
What do the black dots mean on chord diagrams?
The black dots on chord diagrams tell you where to place your fingers on the guitar. You place your fingers on the frets and strings that match what you see on the chord diagram. The numbers tell you which fingers to use.
How many strings do I strum on a chord?
A chord diagram tells you how many strings you need to strum for a chord. An ‘O’ above a string tells you to play that string. An ‘X’ above a string tells you to not play that string. Every chord is different, so look at the chord diagram to find out how many strings you need to strum.
What guitar chords should I learn first?
The first chords you should learn should be simple open chords. Simple open chords such as Em, G, Am, D, C, and E are used in countless songs and are quick and easy to learn. Check out the PDF for more easy chords to learn.
Now that you know how to read guitar chord diagrams, read this Guide on How to Read Guitar TAB. Once you know how to read Guitar TAB, you’ll be able to start learning almost any song you want from one of the Best Guitar TAB websites in this guide.
Alternatively, you can learn how to read standard notation as well as using chord diagrams. Find out how to read standard notation in this guide.
Before you start learning to play some chord based songs, check out this lesson on how to practice chords. The lesson explains how to practice changing between chords so you can learn songs easier.