
If you’re just getting started learning guitar, finding some easy songs to play is a good starting point.
Some songs are far easier to play than others. In this lesson, let’s look at some easy songs that use some of the simplest guitar chords you will learn.
In this lesson, you will learn:
- Some easy guitar chords (if you don’t already know them)
- 4 songs that use those easy chords
- A nice variety of strumming patterns and techniques
- How to practice the songs using simple strumming patterns
These songs are surprisingly easy to learn so read through all the advice and you’ll have everything you need to get started.
If you plan on singing along with the chords, read through this guide on how to memorize song lyrics. You can also use the same methods and tricks to memorize the chord progressions.
Important: If you don’t know how to read chord diagrams, check out this Ultimate Guide to Reading Chord Diagrams. The guide explains everything you need to know to read guitar chord diagrams, including how to use a capo with the diagrams and other helpful tips. It also includes a PDF you can download with common chord shapes.
Read this lesson to learn how to practice guitar chords as well as how to rapidly change back and forth between chords. If you find it difficult to play these songs, try going through the exercises in that lesson.
Riptide by Vance Joy
Riptide is an easy song to learn because it only uses four basic open chords. The strumming patterns are also very simple so it’s a good starting point if you’re just starting to learn chord-based songs on guitar.
This song uses a capo on the 1st fret. You don’t have to use a capo to play this song, but if you want to play along with the recording a capo is recommended.
If you don’t have a guitar capo, check out this Ultimate Guide on Capos to find out why they’re handy and what type to get.
Chords used in Riptide
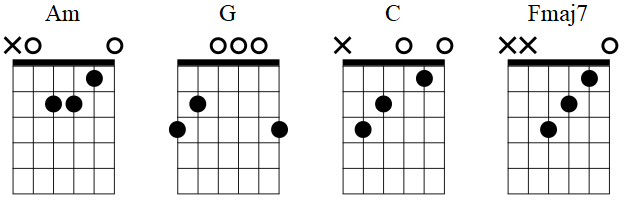
There are only four chords used in this entire song and for most of the song only three of those chords are used.
The main progression for the verse and chorus is: Am, G, C.
That means if you practice those three chords in that order, you can play almost all of the song.
During the bridge (after the solo section), a fourth chord is added to make the progression: Am, G, C, Fmaj7.
Here are the four chords you need to know for this song:
Note: If you don’t know how to read the above chord diagrams, check out this Ultimate Guide to Reading Chord Diagrams before you continue reading this lesson.
If you don’t already know these chords, memorize them. Am, G, & C are used in countless songs. Fmaj7 is an easy alternative to F, so if you see a chord that uses F but you can’t properly play it yet, you can substitute Fmaj7.
Strumming Patterns in Riptide
There are two basic strumming patterns used in this song. Of course, you can experiment with adding variations to the strumming patterns, but start by learning these two patterns.
Start practicing these strumming patterns using one chord (eg: Am), then when you build your confidence in the pattern you can practice it with the full chord progression (eg: Am G C).

You will notice that the second strumming pattern is almost identical to the first. Listen to the song and see if you can pick when the first pattern is used and when the second pattern is used.

Practice alternating between the two strumming patterns to build your confidence in each one. Then while you play the song you can effortlessly change back and forth as you want.
Zombie by The Cranberries
Zombie is a great song to learn because it combines an interesting strumming pattern with some surprisingly simple chords that have complicated names.
Every other beginner lesson I’ve seen online doesn’t give the proper chords for this song, so if you’ve seen this song on another website and wondered why it didn’t sound right, it’s because they gave you the wrong chords.
Chords used in Zombie
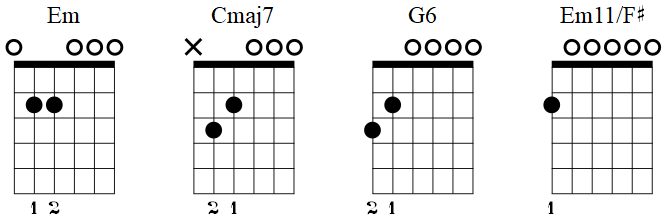
There are four chords you need to know for the verse: Em, Cmaj7, G6, Em11/F#.
Before you freak out over some of those chord names, relax! They’re actually ridiculously easy!
I’ve seen some sites say to ‘simplify’ the chord progression into: Em, C, G, Em. While that might sound like a good idea, it ruins the sound of the song.
The good news is that the original chords not only sound better, but they’re easier to play. So there’s no need to ‘simplify’ the chords at all.
Here are the four chords:
Pretty easy, right? The ‘simplified’ chords you might see suggested by other sites are actually harder to play than these chords.
The chord with the complex name (Em11/F#) only uses one finger!
This is a good example of why you shouldn’t stress whenever you see a chord with a confusing name. Some of them are easy to play.
If you had to say this chord’s name (Em11/F#) out loud, you can say “E minor 11 with F sharp in the bass”. It basically means we’re playing an Em11 chord, but we’re playing an F# as the lowest note.
During the chorus, the progression is: E5, C5, G6, Em11/F#.
If you haven’t seen E5 or C5 chord names before, you might know them as something else: power chords. Any time you see a note name with ‘5’ at the end, it’s a power chord. Check out the Guitar TAB to see how we play the E5 and C5 power chords.
Zombie Strumming Patterns
The below pattern might seem long and complicated, but if you take it slow you’ll find it’s very straightforward.

The key to practicing a pattern like the one above is to constantly move your hand up and down as if you were hitting the strings each time. When you see an arrow, hit the strings in that direction. When you don’t see an arrow (eg: on the first ‘e’), still move your hand in the natural direction (eg: up), but don’t hit the strings.
This might feel awkward if you haven’t done this before, but it will make a big difference to your strumming abilities. Your strumming hand should be constantly moving up and down and only hitting the strings when there is an arrow in the diagram.
The strumming pattern for the chorus is ridiculously easy but plays an important role in getting the right sound.

If you listen to the song, each chord hit sounds powerful and consistent. Playing every hit with a downstroke helps achieve this sound. If you were to play down-up-down-up, the rhythm would be the same, but each chord would sound different (try it to see what I mean).
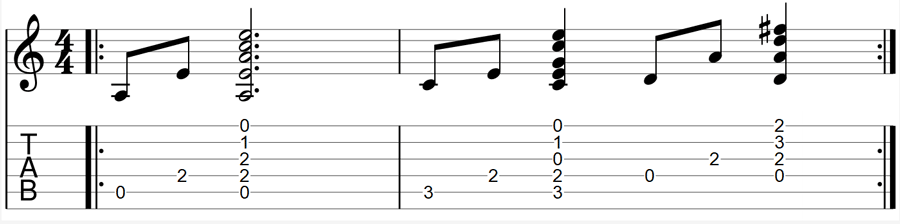
Zombie Guitar TAB
The below Guitar TAB shows the verse chord progression. It may look confusing, but keep in mind that what you see below is the exact same strumming pattern as shown above.
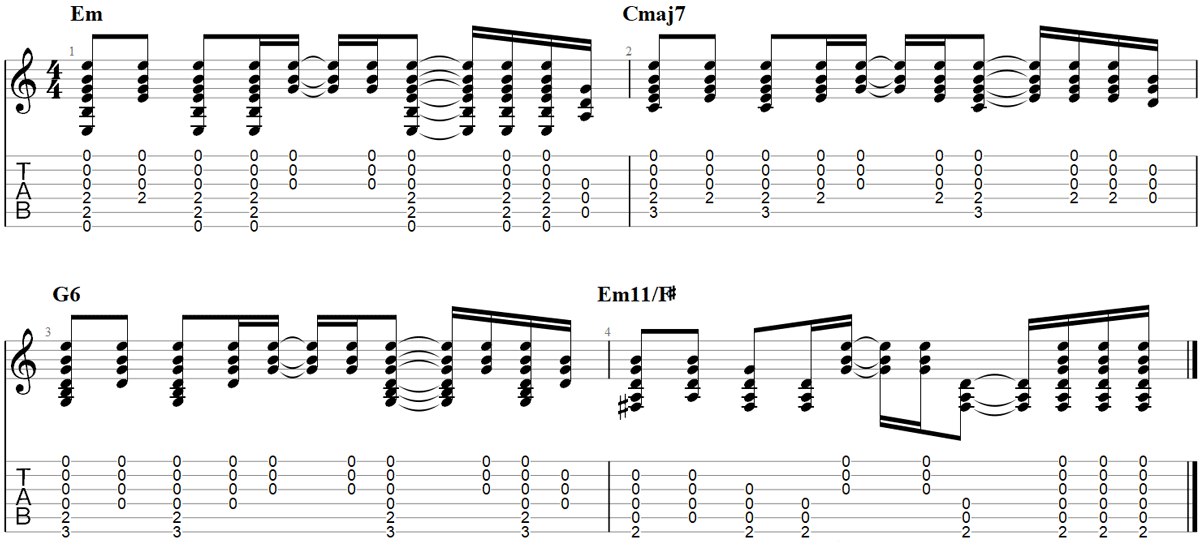
Notice that all of the strings aren’t played for every chord hit? This is an important point to keep in mind when learning to strum chords. By only strumming some of the strings instead of all of the strings, you can change the way the chord sounds.
In this song, try alternating between strumming the high strings and all the strings. Don’t worry about being precise in which strings you hit. If the above TAB shows only the top three strings and you hit the top four strings, that’s fine.
To understand why this is important, try strumming every chord the same by playing all strings. Sounds kind of boring, right? By breaking the chords up and changing how many strings you play each time, it makes the progression sound more interesting.
Remember this when learning other strumming songs. If the strumming sounds a bit boring, try breaking the chords up when strumming.
The below Guitar TAB is for the chorus. This is meant for a distorted electric guitar, but you can still play it on an acoustic.

Remember that each chord hit uses a downstroke to give it power and consistency.
Hurt by Johnny Cash
This is a great song for beginners to learn as it covers a lot of important skills.
You can start off with a simplified version, then as you learn new skills you can move towards the actual recorded version.
What I like about this song compared to many of the other songs in this list is the way it splits up the chords. Instead of strumming all of the strings during the intro and verses, you split the chords up as shown in the Guitar TAB later.
This might take some practice if you’re a beginner, but it’s worth the effort.
Chords used in Hurt
Almost all of the chords are basic open chords you learn straight away as a beginner.
The chord progression in the verse is: Am, C, D.
The chord progression for the chorus is: Am, F, C, G.
Here are all of the chords used in Hurt:
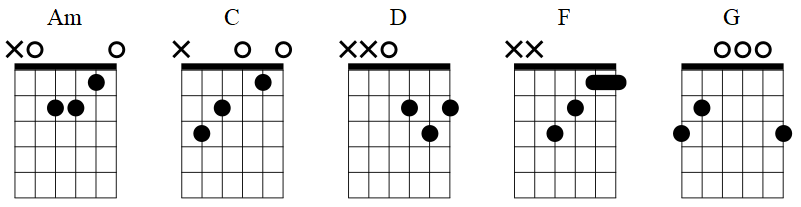
Many beginners have trouble with F, so instead of listing the full barre chord version, I’ve listed the simplified four-string version. With this simplified version, you flatten your index finger across the first fret on the first two strings.
If you can’t play this chord yet (you will with practice), you can substitute it for Fmaj7 as shown earlier in the Riptide guitar chords.
Strumming Patterns in Hurt
The way you strum the chords in the verse is important to get right or it won’t sound like the song.
The verse is incredibly easy. You strum Am three times in a row, then after a pause, you strum C three times then strum D three times.
The below strumming pattern will help you get the right timing for the three chords.

Normally when playing something like this you would strum down-up-down. Other sites I noticed suggest that strumming pattern. The reason I recommend all downstrokes is because it better prepares you for what is actually played in the song.
As you will see in the Guitar TAB later, playing all downstrokes makes it easier to play the part correctly.
There are two ways you can play the chorus. The reason there are two ways is that there are two guitar parts layered on top of each other in the recording.
One guitar constantly strums the chords in a constant down-down-down-down pattern. But this pattern only works if you play a certain way, which I will explain later.
The other guitar follows this strumming pattern:

I recommend learning both patterns and you can decide which pattern you like better.
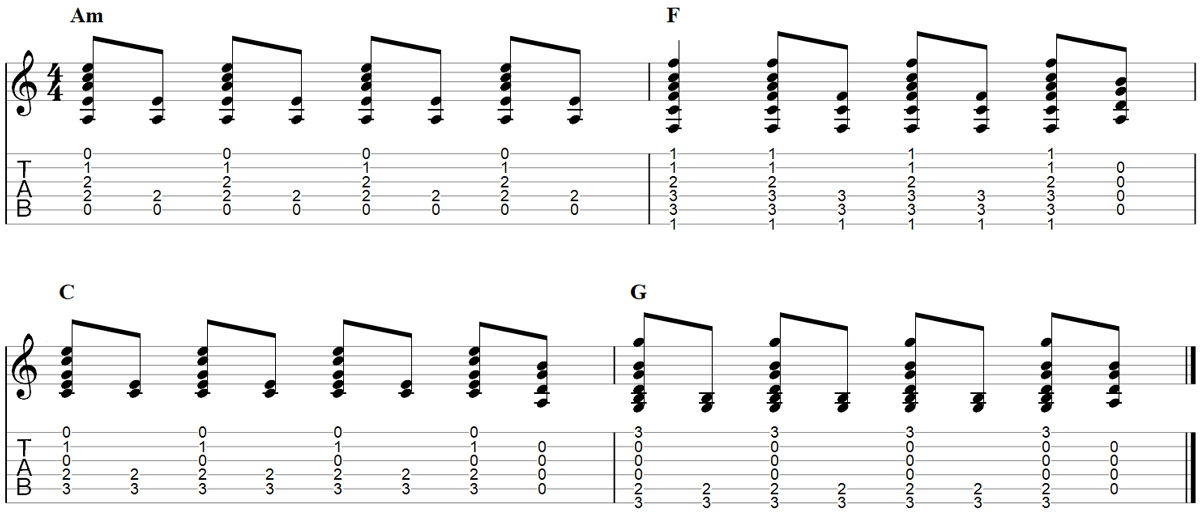
Hurt Guitar TAB
The verse in Hurt is simple: play Am three times, C three times, then D three times.
But if you strum those chords, it probably doesn’t sound anything like the song. Why?
The difference that will make it sound like the song is when you split the chords up as shown in the below Guitar TAB:
Notice that you don’t strum all of the strings for each chord every time?
In fact, for the first two hits of the chord, you only play a single string. You still place your hand in the full chord position and hold it, but you only pick one string.
If you play the above TAB, you’ll instantly hear how it matches the song. This is why I listed the strumming pattern as all downstrokes. Playing this as all downstrokes is easier and sounds best.
Remember how I said there are two ways you can strum the chorus? Well, let’s look at the first way where you’re constantly strumming.
Here is the constantly strumming version of the chorus:
All of this is played with downstrokes. Notice that almost every second hit only plays the bottom couple of strings. That’s really important to get right, so take your time practicing this at a slow tempo before you speed it up.
You will also notice the last chord hits for F, C & G lift the fingers completely off of the strings. As you will see in a lot of other songs, many guitarists like to do this to give them extra time to move into the next chord shape.
Some guitarists see this as lazy technique, while other guitarists think it’s completely fine.
I’m Yours by Jason Mraz
This is another song where 90% of it only uses four basic open chords that you probably already know.
What makes this song interesting to play compared to the other songs in this lesson is the strumming patterns. There are two really interesting strumming patterns to learn in this song.
If you’re looking at working on your rhythm skills, this is a great song to learn.
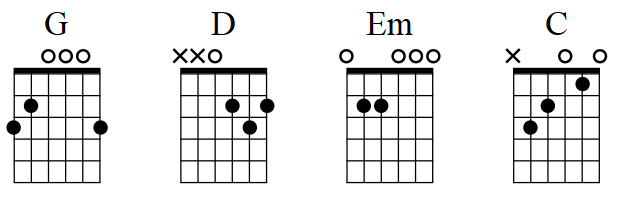
Chords used in I’m Yours
The actual recording uses barre chords, but when placing a capo on the 4th fret, we can turn them into nice and simple open chords. Find out more about capos in this guide if you don’t have one yet.
For almost the entire song, the chord progression is (when using a capo on the 4th fret): G, D, Em, C.
Leading up to the chorus an A7 is held and there are other chords during part of the bridge. But if you’re just getting started, I recommend focusing on developing the main chord progression and worry about these other chords later.
Strumming Patterns in I’m Yours
The main strumming pattern is interesting for two reasons.
First, it uses a ‘shuffle’ rhythm. It’s what gives this song a bouncy or rolling feeling that you don’t hear in other songs in this lesson. Mastering a shuffle rhythm is an essential skill so it’s worth learning. I’ll explain how to do the shuffle rhythm below.
The other reason this strumming pattern is interesting is that it uses palm-muting to give the chords a different quality. You can play this strumming pattern without palm-muting, but adding palm-muting really transforms this song.
Here is the main strumming pattern:
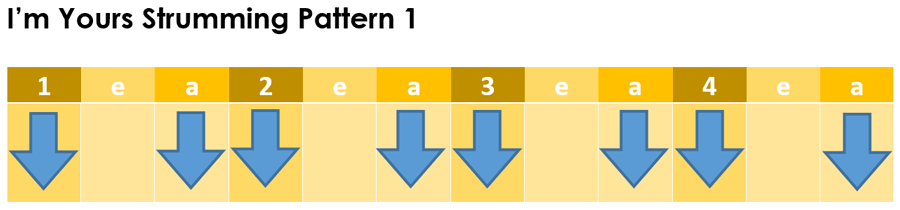
If you’ve seen strumming patterns for this song on other websites, they probably didn’t show all down strumming as I have. While you could play this strumming pattern in any way (eg: down-up-down-up, or down-down-up-up-down), I highly recommend all down strumming.
The reason I recommend all down strumming is that it sounds infinitely better while palm-muting. When you play palm-muting, it can be awkward to play upstrokes. They don’t sound quite right and can throw off your rhythm.
All downstrokes are not only easier to play while palm-muting but sound better too. You’ll also see later in the Guitar TAB that using all downstrokes gives you better control over how many strings you strum.
The second strumming pattern you will hear in the song uses an off-beat pattern common in Reggae.
If you have never played an off-beat strumming pattern before, it might feel a bit awkward on your first attempt. But I highly recommend you work on it because it’s a great way to develop your rhythm skills.
The idea behind an off-beat strumming pattern is that instead of playing on the beat (eg: 1 & 2 & 3 & 4 &), you play off the beat (1 & 2 & 3 & 4 &).
Playing on the ‘and’ instead of on the beat creates a completely different feel in a song.
Here is the strumming pattern:

To play the rests as shown above, simply use your strumming hand and rest it on the strings to stop them from ringing out. Resting on the beat helps emphasize the off-beat chords.
Playing all these chords as upstrokes helps you remember that these are off-beat chords. Think of the rest as a downstroke and the chords as the upstroke.
Try to always think of the beat as the downstroke and the off-beat as the upstroke. While there are songs that may flip this pattern, most songs follow this method.
I’m Yours Guitar TAB
In the below Guitar TAB for the verse chord progression, pay attention to how many strings are hit each time.
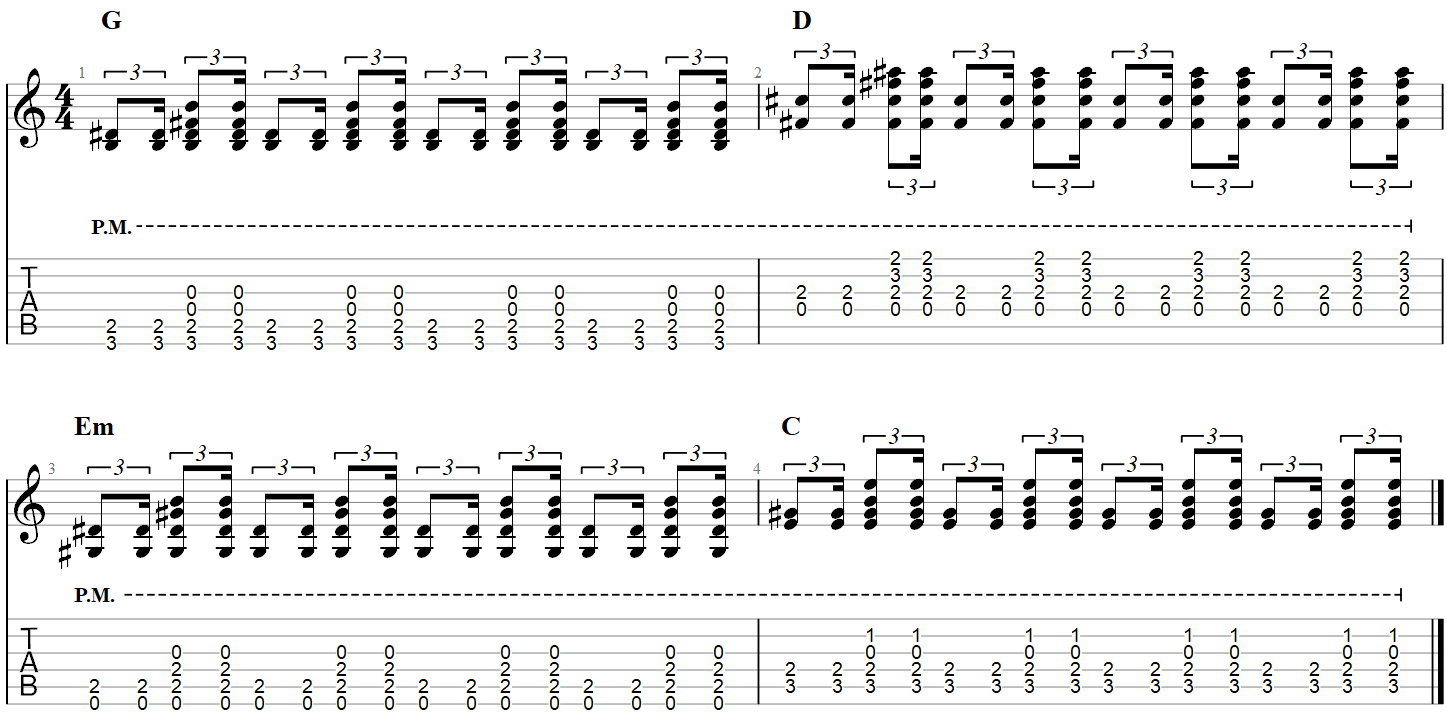
Notice that it alternates between two hits of the lowest two strings and two hits of the lower four strings. This is a common way of playing shuffle rhythms.
At no point do you strum the full six strings on any of the chords. This is because the song is aiming for a lower sound. There is no rule that says you need to strum all strings for every chord and this is a good example of how to break that rule to come up with interesting sounds.
When you play this strumming pattern using all downstrokes, you’ll find that it becomes quite easy to accurately hit the right number of strings. This is partly why I recommend playing all downstrokes for this pattern.
Want more songs?
If you found this lesson helpful and would like to learn more songs, please let me know here.
This lesson was a test to see if people are interested in this type of lesson and the feedback I get will tell me whether I will write more of them or stick to writing only articles based on guitar gear.
If you liked this lesson and want to see more like it, let me know and share this lesson on social media to help spread the word.
Once you’ve learned these strumming patterns, you can find strumming patterns for countless other songs on some popular Guitar TAB websites. Check out this guide for the Best Guitar TAB websites that include strumming patterns.
Check out these other lessons to learn some other easy songs:
Learning a mix of strumming, fingerpicking, and riff-based songs is a great way to develop your skills as a guitarist. Mixing things up by learning a solo or two can help you develop new techniques and grow as a guitarist.