
The easy guitar riffs in this lesson will give any beginner a good starting point to rocking out to some popular songs. Some of these riffs are easy enough for absolute beginners to play, while other riffs may take a bit longer to master.
I’ve included Guitar TAB for each riff and explained what to focus on when learning these riffs. Once you learn these riffs, you will have a good idea of which songs to continue learning and which you may need to leave for later on.
Find out how to read Guitar TAB in this guide so you can get the most out of this lesson.
If you listen to the songs in this lesson, you’ll hear some very different guitar tones. Some songs use a clean tone, some use effects, and others use different drive tones.
If you’re wondering what you need to do to get your guitar amp to sound like the song, I highly recommend reading my Ultimate Guide to Guitar Amp Settings. It’s one of the most important guides I’ve ever written and will explain how to think about your guitar amp properly.
After you learn these guitar riffs, check out these 7 Seriously Easy Guitar Solos. Learning some easy guitar solos is easier than you might think.
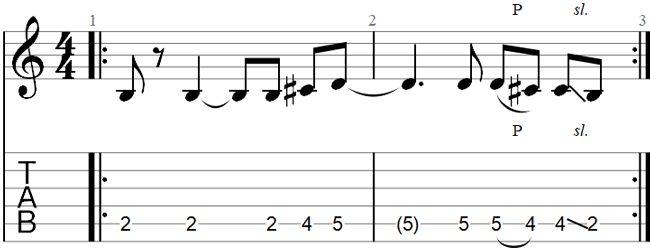
Come As You Are by Nirvana
This simple song is played on an electric guitar with a clean tone. A chorus pedal is used in the song, but you don’t need to use one. If you like the sound of the effect in the song, check out my Guide to Chorus Pedals here to learn more.
Tuning: the guitar in this song is tuned a whole-step down, but you can still play it in standard tuning and it will sound fine. If you want to play along with the song with the proper tuning, tune your strings down to D G C F A D.
Here’s the intro riff:

In the above TAB, start slow and make sure each note rings out clean without any buzzing or fret noises.
Those thick lines at the start of the second bar and the end of the third bar mean to repeat those sections over and over. That means when you get to the end of the last bar, repeat the second and third bar.
Use your first finger (index) to play the first fret notes and your second finger (middle) to play the second fret notes. Practice this riff slowly until you can play it with ease without any mistakes. Gradually increase the tempo (speed) but make sure it never sounds like you’re rushing.
A good way to tell how well you know how to play a riff like this is to try and play it with your eyes closed. Learn to feel where to place your fingers and where to pick each string. If you can easily play this riff with your eyes closed and you don’t make any mistakes, you can move on to more complex riffs.
You can use alternate picking for this riff, or play everything using down picking. Alternate picking is when you pick down, up, down, up, down, up. I highly recommend you practice this riff using both alternate picking and all-down-picking so you can feel comfortable with both picking methods.
If you like the guitar tone in this song, find out more about the effects used by Kurt Cobain in this guide.
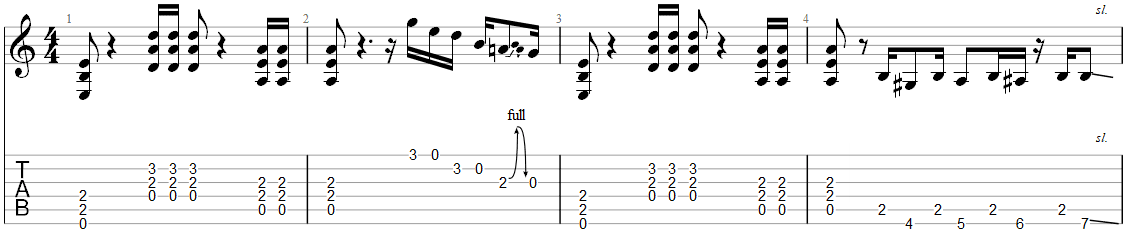
You Really Got Me by The Kinks
This riff is so simple that anybody can learn it in a short time. It’s also a great way to learn and practice power chords.
The first version shown below is meant for absolute beginners trying to learn their first riffs. Use your first and third fingers and practice moving back and forth between the two positions.
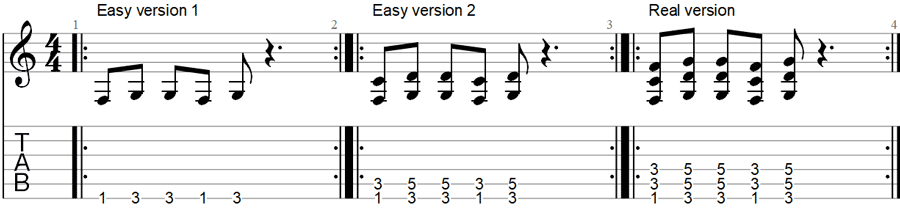
The second version uses two-string power chords. This time you need to practice sliding your hand back and forth between the two positions.
The riff is fairly fast, so practice moving back and forth slowly until it feels easy, then you can speed up the position changes. Aim for accuracy instead of speed. You don’t want it to sound sloppy or rushed.
The third version is the actual way the riff is played. These are still power chords, but this time they’re played across three strings. Use your first finger (index) on the sixth string, your third finger (ring) on the fifth string, and your fourth finger (pinky) on the fourth string to play these power chord shapes.
If this version is too hard for you now, keep practicing the second version. It will sound essentially the same as the real version. But I recommend you keep practicing until you can play all three versions. This will make it easier when you see three-string power chords in other songs.
Important note: if you look up the Guitar TAB for this song on any free Guitar TAB site, you’ll see two possible versions. The first version matches the above Guitar TAB. The other version will be one fret higher, playing the riff on the second and fourth frets. The reason you’ll see two versions is that the actual recording isn’t quite in tune.
The song was most likely slightly sped up in the studio, which slightly raised the pitch (they used tape to record back then). This means the guitar sounds slightly higher than the version shown above. So don’t stress if it sounds weird if you try to play along with the song, it’s not your fault.
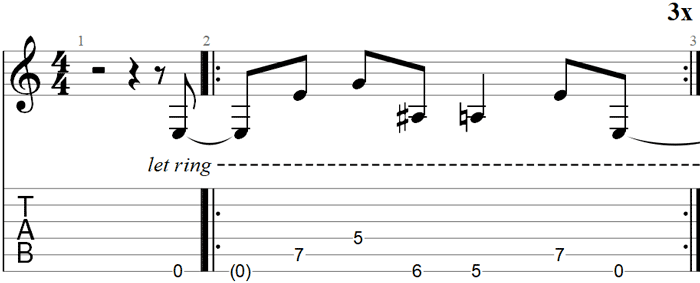
Seven Nation Army by The White Stripes
One of the simplest riffs you can learn was a massive hit in the early 2000s. Any beginner can learn to play this easy guitar riff and you can play it on acoustic or electric and both will sound fine.
The guitar in this song is tuned to Open A tuning, but you can play this riff in standard tuning and it will sound exactly the same as the song. Find out about Open A tuning in this guide on alternate tunings.
Later on if you want to learn the entire song, I recommend learning how to play with a guitar slide. A slide is used in this song and plays a big part in making the song sound great.
Here’s the main riff that plays throughout most of the song:
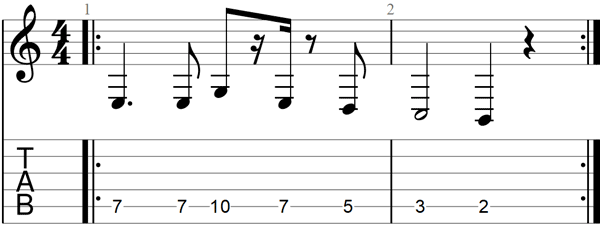
You have a few different ways you can play a riff like this. Which fingers you choose to use can completely change how a riff feels to play.
Here are two different ways you can play this riff:
All with one finger: the way most beginners will first try to play this riff is to play every note with your first finger. Simply start with your index finger on the seventh fret, then move it back and forth to play all of the notes.
While it might feel easy to play this riff using one finger, it starts to feel awkward when you try to play the riff at full speed. You’ll notice that you need to jump around the fretboard fast and it can be difficult to play at full speed.
While there’s nothing wrong with learning how to play this riff using only one finger, I suggest you try the other method below so you can learn how to think about finger placement for this riff and for other riffs.
Play the tenth fret with your pinky: the idea here is that you play all of the notes with your first finger, but play the tenth fret with your fourth finger (pinky).
The reason this method will feel more comfortable than playing everything with your first finger is that the jump from the 7th fret to the 10th fret is quite wide. So instead of sliding your index finger back and forth between those two frets, it makes more sense to use a different finger to play the 10th fret.
Play the 7th fret and the 10th fret back and forth over and over again using your first and fourth fingers and once you feel comfortable using your pinky, you’ll understand why it’s a better way to play this riff.
After you can comfortably play the riff using the two above methods, have a think about which other notes you might want to change to using a different finger. For example, which fingers should you use to play the last two notes? Should you keep playing both of them with your first finger, or does something else make more sense?
How to Get the Right Tone
This riff sounds like a bass guitar in the song because of an effect pedal used on the guitar.
A Whammy pedal was used to lower the pitch of the guitar down an octave. This simply means a pedal was used to make the guitar sound like a bass.
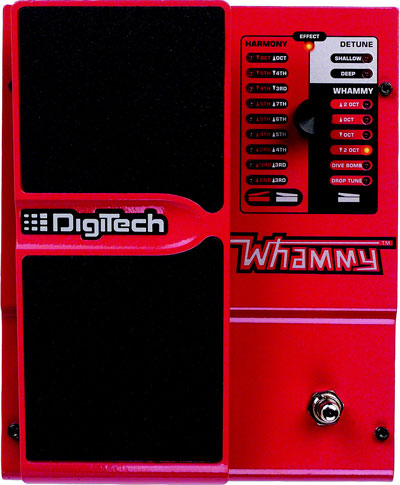
The above pedal is what was used in this song and there are a lot of interesting ways you can use a whammy pedal.
Find out about other songs that use a Whammy pedal here and learn to use a whammy pedal in this lesson.
A whammy pedal can be ridiculously fun to use, so if you like the idea of turning your guitar into a bass or you like the other songs in the above guide, you might want to check out a whammy pedal like the DigiTech Whammy DT.
You can still play this riff without a whammy pedal, only it won’t sound quite like the song. But it’s still a good riff to learn to get you used to moving around the fretboard.
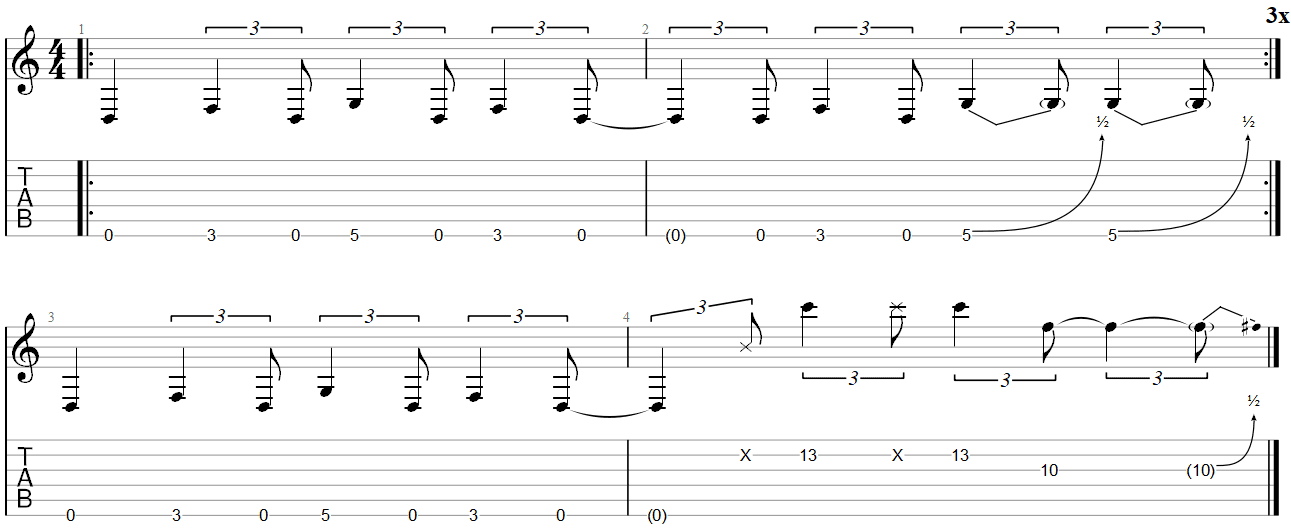
Smoke on the Water by Deep Purple
This classic guitar riff is easy to play and one of the most iconic riffs of all time.
While this riff is easy to play, a lot of people play it wrong. There are a lot of memes about this riff because it is so iconic and so many people play it wrong.
To play this riff, flatten your first and third fingers over the third and fifth frets. This makes it easier to move between the fret positions without any sliding noise.

After you pick the open strings at the very start, use either your left or right hand to dampen the strings before you move on to the next notes. If you listen to the song, you’ll hear the short punchy sound of each note hit, so muting your strings with your hands is an easy way to create that punchy sound.
The above version is a slightly simplified version that makes use of the open strings. The actual way this riff is played is shown below:

I know that everybody is used to seeing the riff written as 0-3-5, but it’s not played that way.
While the two versions may sound identical, there are reasons why advanced guitarists will prefer to play the second version. You will learn these reasons as you develop your skills, but the basic idea is that you have more control over how fretted notes sound compared to open string notes.
When you play the fifth fret instead of the open strings, you don’t need to use your hand to mute the strings. You just lift your finger off of the fret and the note cuts out. This is how they got that punchy sound in the recording.
If you really want to play this song properly, you need to play it with your fingers and pluck the strings hard. The twangy sound you get from plucking the strings with your fingers will help you get closer to the actual tone in the song. It will sound fine playing with a guitar pick, but playing with your fingers will get you closer to the right sound.
Use a light distortion or overdrive, but don’t go overboard. Riffs like this one sound better with less gain. If you use too much gain, it will sound like a mushy mess.
If you were to listen to 10 beginners playing this riff and compared it to 10 advanced guitarists, the main difference you would hear is that the advanced guitarists would use far less distortion. While it can be fun to crank the gain up, more isn’t always better. Find out more about dialing in good guitar tones in my Guitar Effects Course.
Psycho by Muse
This simple riff is a great way to get started with Drop D tuning. Drop D tuning is when you lower the tuning of your low E string down to D.
Many great rock and metal songs use Drop D and there are a lot of easy guitar riffs in Drop D, so check out this guide on Drop D Tuning to learn more.
The Drop D guide includes 6 more songs in Drop D tuning with Guitar TAB – so once you put your guitar in Drop D, check that guide out for more riffs to learn.
If you enjoy playing this riff, check out this lesson to learn how to write your own riffs in Drop D tuning.
The main thing to keep in mind when playing this riff is the groove. The timing of each note plays a big part in how heavy this riff feels. Listen to the song a few times and try to match the timing of each note to what you hear.
Start off by memorizing the order of the notes, then you can spend time working on the rhythm by listening to the song.
With the bends, lightly pull on the string to bend the note up. A 1/2 bend is the same as one fret distance, so a bend on the fifth fret should sound the same as a sixth fret note. If this is your first time trying to play bends, it may take some time before they feel comfortable.
If you don’t recognize any of the symbols in the above TAB such as the brackets on the (0) or the X, check out my lesson on How to Read Guitar TAB. It explains the most common symbols you will see used in Guitar TAB.
Muse has a lot of great guitar riffs worth learning. While some of their guitar riffs are hard to play, many of them will be surprisingly easy for you to learn.
Check out this lesson on the Top Muse Guitar Riffs here to learn more Muse riffs.
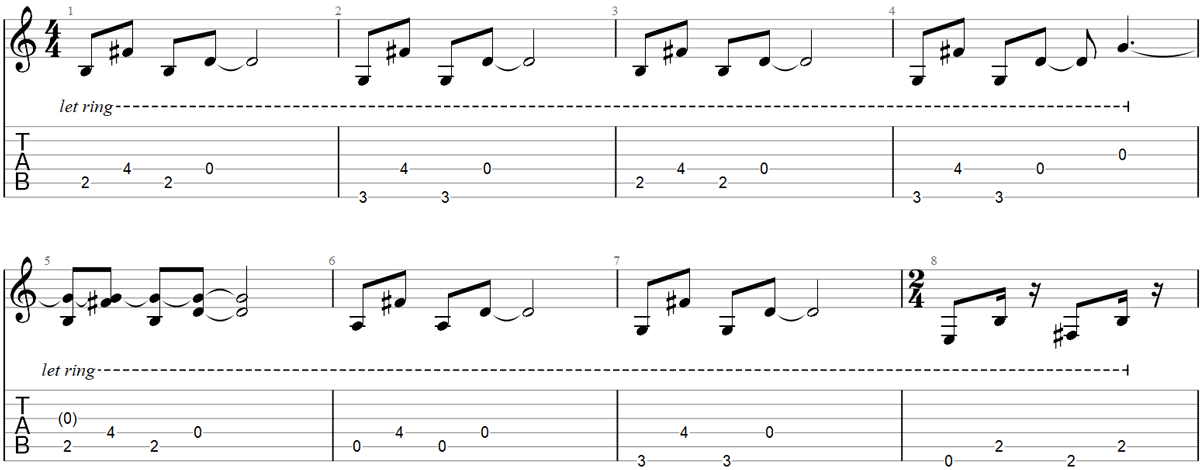
Sunshine of Your Love by Cream
This might be an old riff, but it’s fun to play and instantly recognizable to a lot of people.
What makes this riff great to play is that anybody can learn it and you can make it sound better as you learn more skills on guitar.
Here is the first version of the riff you hear at the very start of the song:
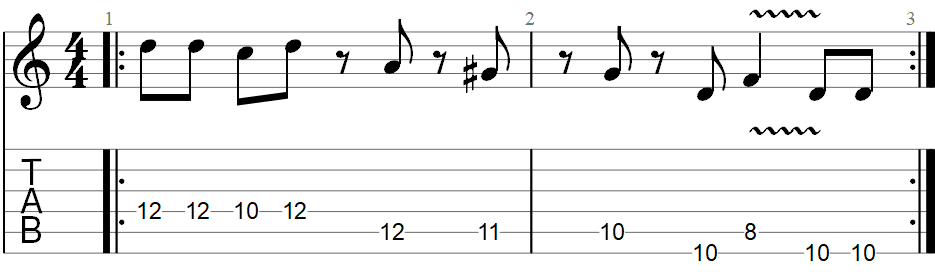
In the first bar, play the 12th fret with your third finger, the 10th fret with your first finger and the 11th fret with your second finger.
In the second bar, play the first 10th fret with your first finger. Then shift your hand down two frets and play the next 10th fret with your third finger.
The reason you will want to do this is so you can easily play the 8th fret with your first finger. If you don’t shift your hand down then, the riff will suddenly feel awkward to play.
The wavy line above the 8th fret is for vibrato. Vibrato is when you smoothly wiggle your finger up and down. If you don’t know how to play vibrato yet, just ignore the symbol and play it normally. Then you can add vibrato in later on.
Pick the notes hard and lift your fingers off of the frets to get a short and punchy sound. Use light distortion or overdrive to help the riff pack some more power.
If you want to enhance how this riff sounds, you can add in a few slides as shown in the below version:
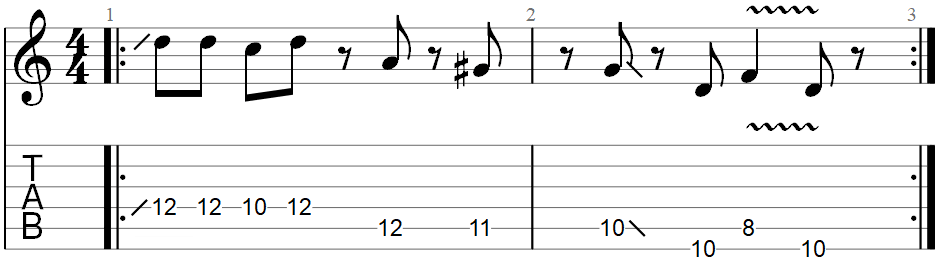
Little slides like these can turn an okay-sounding riff into a great-sounding riff. If you’ve ever heard an advanced guitarist play a riff you know how to play and you wondered why it sounded so different when they played it, they likely used little techniques like this to enhance the riff.
The way you play this first slide is to start with your hand lower than the 12th fret (maybe position your finger on the 8th fret). Then start sliding your hand up while pressing your finger against the string. Before you reach the 12th fret, pick the string.
If you do this properly, you’ll hear a quick slide up into the 12th fret. Just remember to start sliding your hand before you pick the string or it won’t sound right.
If you really want to test your skills, try playing the below version which comes up in the song after a few repetitions.
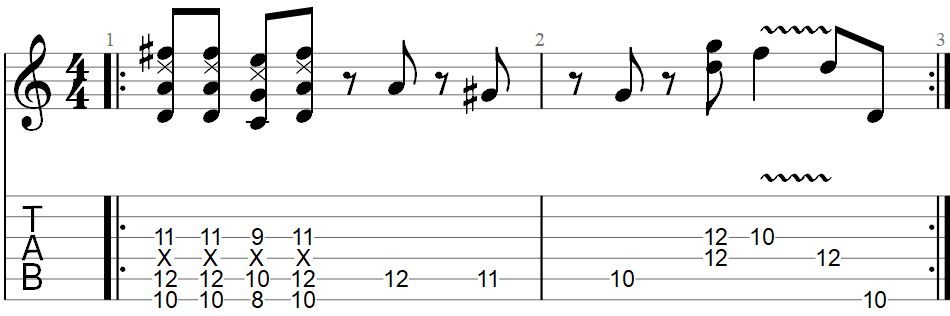
This time the riff uses chords instead of single notes. If you can’t figure out how to play these chords, practice the other two versions and come back to this version later on. It’s a lot of fun to play, so keep working on it.
It might look confusing at first, but with practice, you will be able to play this as easily as you play the first version.
In My Place by Coldplay
While most guitar riffs are played low on the fretboard, here is a simple riff played on the higher strings to help you feel comfortable with a different area of the fretboard.
Use a clean tone with your neck or middle pickups to give your tone a more mellow sound.
Play the ninth fret with your first finger and the twelfth fret with your third or fourth fingers. Hold your fingers down and try to let the notes ring out as you pick the different strings.

This riff may take some time for beginners to learn because of the wide stretch and the awkward way it moves back and forth between the two positions.
If you want to take this simply riff further, try adding in some effects such as reverb or delay.
Reverb is a great way to give your clean tone some extra life and feeling. Find out about reverb in this guide.
Delay is one of the most popular guitar effects and can be used in almost any style of music. A soft and long delay sounds great with this type of guitar riff. Find out more about delay in this guide.
Once you learn a riff like this one, a great riff to learn is the intro to Sweet Child O’ Mine by Guns N’ Roses.
Paranoid by Black Sabbath
Paranoid is another classic rock riff that’s fun to play and ridiculously easy to learn. Many advanced guitarists you hear today grew up learning riffs like this one.
Once you learn this riff, try learning the easy guitar solo in this lesson.
The hammer-ons in the first bar are really fast, so practice coordinating between both hands to make sure you pick the strings right before you hammer-on to the 14th fret.
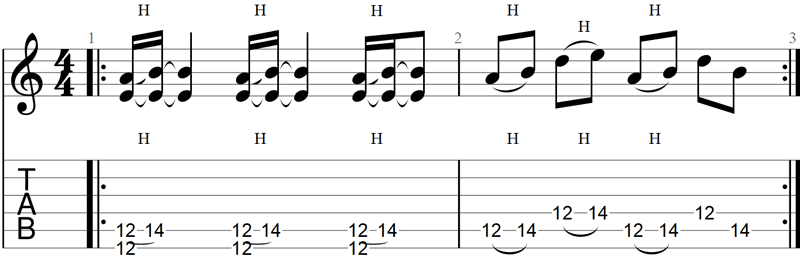
Listen to the song to get an idea of the rhythm. You may need to start by practicing this riff at a slower tempo and gradually speed up as you build your confidence.
The riff used in the verse is a great way to practice your palm-muted power chords. Play all of these power chords with down picking to emphasize the chugging sound you hear in the song.

If this riff is too fast to play, practice it slowly until you build up your skills. If you consistently practice, you will get there.
(I Can’t Get No) Satisfaction by The Rolling Stones
This simple guitar riff only uses three notes on the same string. Use your first, third, and fourth fingers to play these notes.
The first few times you play it, ignore the pull-off and slide symbols. Pick each note and get used to the rhythm. Once you can play it with ease, try adding the pull-off and the slide to see how it changes the feel of the riff.
This song uses a fuzz distortion pedal. While you can use a normal overdrive or distortion pedal, to get the authentic tone, you’ll want to use a fuzz pedal.
Check out my Guide on Fuzz Pedals to learn what fuzz is and why it’s so popular. If you want to hear more examples of fuzz distortion, check out these Songs Using Fuzz Distortion.
Enter Sandman by Metallica
While there are other Metallica songs that are far easier than Enter Sandman (another Metallica song is included further down this lesson), Enter Sandman is easy and fun to play.
Metallica also have some easy guitar solos you might want to learn. Check out this lesson for some easy Metal Guitar Solos including a detailed look at the intro solo in Fade to Black.
This is the intro riff, which is played on a clean electric guitar.
Hold your fourth finger down on the seventh fret, then use your first, second, and third fingers to play all the other notes. While this way may seem more complicated at first, it’s how James Hetfield plays the riff. Playing it this way allows the strings to ring out the entire time.
Here is the main riff which uses a heavy distortion:
This may be the most complicated riff in this lesson, so take your time learning it one note at a time. Take it slow and get used to sliding up the fretboard to the seventh fret.
Don’t go overboard with the distortion or else it will sound mushy. You want a tight sound, not a completely over-saturated tone. If you can play this riff, you will find the rest of the song much easier.
If you want to learn more songs by Metallica, check out this lesson on How to Play Metallica Songs on Guitar. The guide covers techniques and useful exercises to work on.
Purple Haze by Jimi Hendrix
There are a lot of fun riffs and licks in Jimi Hendrix’s music, but a lot of it is pretty advanced for beginners.
The main riff to Purple Haze is fairly simple once you learn some basic techniques such as bends and slides.
Unlike other Hendrix songs, this song is in standard tuning. This means you can play along with the recording without retuning your guitar (Hendrix normally tuned a half-step down).
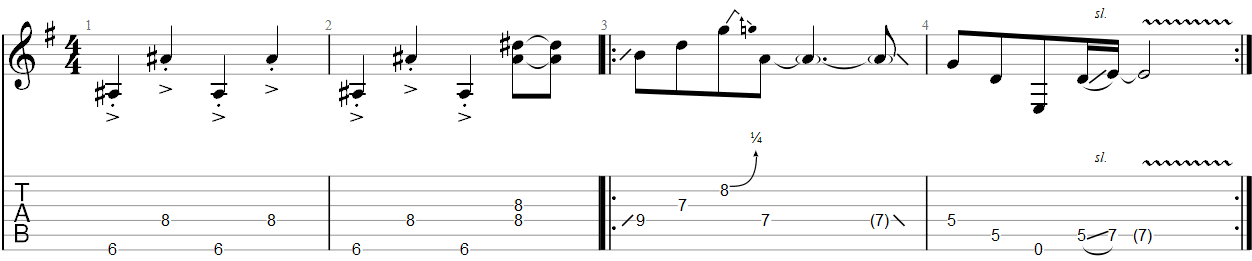
The first two bars are pretty simple. Pick the notes hard and lift your fingers off of the frets to cut short each note. This creates a punchy sound you hear in the song.
With the bend in the third bar, only push the string up slightly to push it out-of-tune. A quarter bend is the easiest bend to play because you don’t need to push it far.
Think carefully about which fingers you use as your choices will completely change how easy this riff feels to play. Think about the first two bars, which fingers make the most sense to use to play these notes? Using the first and third fingers is the most natural way to play a part like this.
Start the riff in the third bar by sliding up to the ninth fret using your third finger. From there, which fingers make the most sense to play the next three notes? Hopefully, you’ll see that using your first finger on the seventh fret and second finger on the eighth fret makes the most sense.
Whenever you learn a new riff, try to think carefully about which fingers you use to play it. If you take your time to plan out which fingers you will use, you’ll cut down on the time it takes to properly learn to play a riff.
To learn about the effects and gear Hendrix used, check out my Ultimate Guide to Jimi Hendrix. It covers everything you would want to know about the pedals, guitars, and effects he used to create his iconic tone.
Back in Black by AC DC
AC DC have many great guitar riffs that are easy to play. Unlike the other guitar riffs in this lesson, this one focuses heavily on power chords.
Start by playing the power chords and skipping the single-note parts. Get used to muting the strings after each group of power chords. The key to making this riff sound good is to keep your rhythm spot-on.
Practice strumming the power chords along with the song until you can play it with ease. Then you can work on the single-note parts and add them in.
Don’t worry if you have trouble playing a full bend on the second fret. It takes some finger strength to do this, so at first your bends may be a bit flat. Keep working on it and you’ll get better.
With the single-note part at the very end, think about which fingers you should use for each note. There are some wide jumps, so make sure you’re using the fingers that make it easier to play.
Iron Man by Black Sabbath
This is a strange guitar riff because it slides power chords around. You may find this easy to do, or it may feel awkward.
If it feels awkward to slide both fingers at once, slow the riff down. Get used to each individual slide and practice them over and over. Then you can put it all together and get used to sliding up and down the fretboard.

Once you feel comfortable sliding the power chords around, think about your rhythm. Listen to the song and try to time your slides so each power chord is ready to hit at the right moment.
Being able to slide power chords around like this is a great exercise to work on. Practicing this riff will build your confidence with power chords and get you used to moving around the fretboard. Use the dot markers on the side of your fretboard to keep track of which fret you’re on.
One by Metallica
Here’s another Metallica song with an easy riff. The intro riff to One uses a clean guitar and is nice and slow. While the rest of the song may be quite difficult for a beginner to learn, the intro is easy.
With each bar, think about which fingers you should use. You want the notes to ring out, so be careful that your fingers don’t accidentally touch adjacent strings. If your finger accidentally touches a string that is ringing out, it will cut the note off and won’t sound right.
Once you get used to playing this riff, check out the intro to Fade to Black. That intro uses similar finger positions, so you should find it easy to learn.
Check out this detailed lesson on how to learn the intro rhythm guitar parts to One with video demonstrations and practice tips.
If you are interested in learning more Metallica songs, check out this lesson on how to learn Metallica songs on guitar. The lesson talks about the techniques and skills you need to learn to play this style of music.
There are plenty of other easy riffs you can learn, but the above examples are great starting points. Subscribe for updates here to be notified of other lessons like this one.
Here are some related lessons to learn more songs:
- Easy Chord Songs. The lesson includes chord diagrams, strumming patterns, and some easy strumming songs to learn
- Easy Fingerpicking Songs. Learning riffs, strumming, and fingerpicking is a great way to quickly build up your skills as a guitarist
- Easy Guitar Solos. Guitar solos can be incredibly fun to play and these solos are easier than they sound
- Easy Metal Guitar Solos. Even if you’re not interested in metal, these solos are a great way to improve your lead guitar skills