
One by Metallica is an incredible song to learn as a guitarist. It gives you a mix of simple and difficult riffs and solos, as well as both clean and distorted parts.
In this lesson, let’s look at the intro to One and how to play the rhythm guitar parts.
The lesson includes Guitar TAB of the parts, video demonstrations, and half-speed tracks you can use in your practice.
By the end of this guide, you’ll know how to play these riffs and how to practice them to make them sound as good as possible.
To learn more Metallica riffs, check out this guide on how to learn Metallica songs on guitar. The guide includes Guitar TAB for some of the easiest Metallica riffs you can learn.
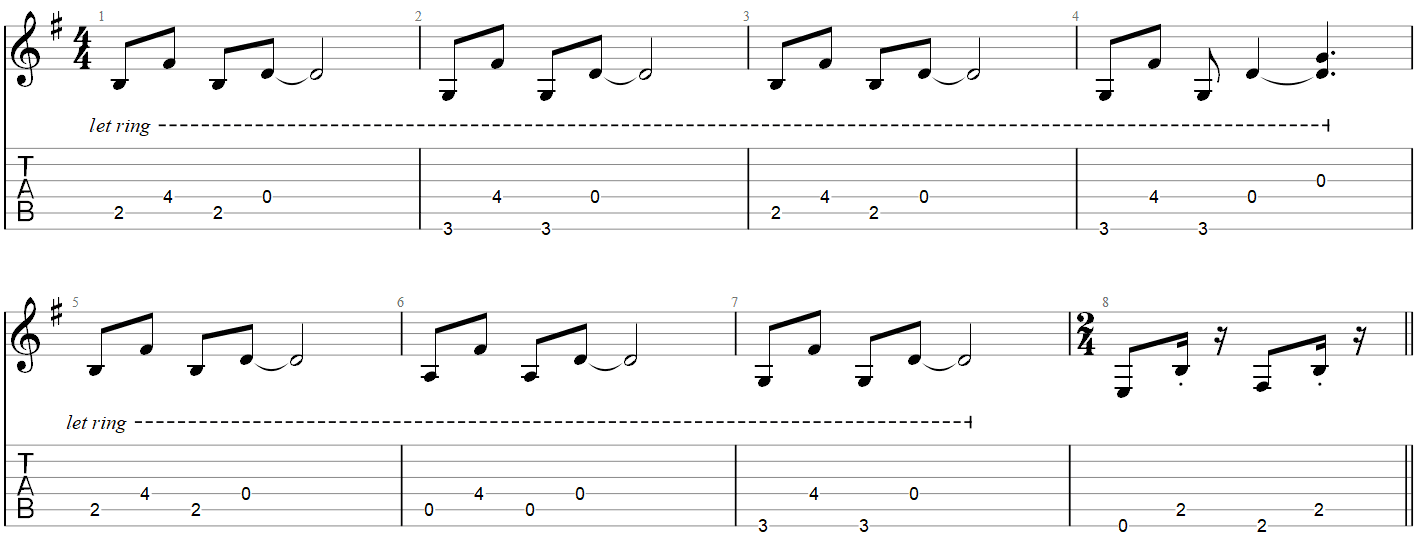
Intro Rhythm Guitar Part 1
The first guitar riff you hear in One is one of the easiest guitar riffs you can learn. While the latter part of the song has some difficult riffs and solos to learn, this is a great starting point for any skill level.
Here is the Guitar TAB for the first riff in One.
If you don’t know how to read the above Guitar TAB, check out this Ultimate Guide to Reading Guitar TAB. The guide covers everything you need to know and explains what all the symbols mean.
Here is a demonstration of how to play the above riff at half tempo:
Note: if you can’t see the above video, some browser extensions such as ad blockers are known to cause issues.Even if you’re a complete beginner, you should feel confident that you can learn how to play the above riffs.
The above riff is pretty simple and easy to understand once you watch the video demonstration. Each bar (apart from the last bar) starts by picking three notes, then an open string.
The notes used for each bar are different, but the basic pattern is the same throughout the entire riff.
Intro Part 1 Full Tempo Practice Track
The earlier demonstration of the riff is a good starting point as it halves the tempo.
If you can easily play along with that track, try playing along with the full tempo as shown in the below video.
If you have any trouble playing along with the above video, that’s fine.Use a metronome and try playing along with it starting at 50 bpm (beats per minute).
If that feels easy, increase the metronome’s tempo to 55 bpm and try again.
If that feels easy, continue increasing the metronome’s tempo until you start making mistakes or you feel rushed.
Over the next few days, repeat this process starting at 50 bpm and increasing it every time you get through the part without any mistakes.
If you stick to this practice routine, you’ll eventually reach 100 bpm, which is the tempo of the above video.
Picking Styles to Practice
You can pick simple riffs like this one pretty much any way and it won’t affect how the riff sounds or feels.
But I recommend using this riff as a way to practice two very useful picking styles.
Anchoring Your Picking Hand
As a beginner, you may accidentally pick the wrong string from time to time. This can be annoying, but with a slight change in your picking hand, your picking accuracy will improve.
In the below photo, you can see how I position my picking hand.
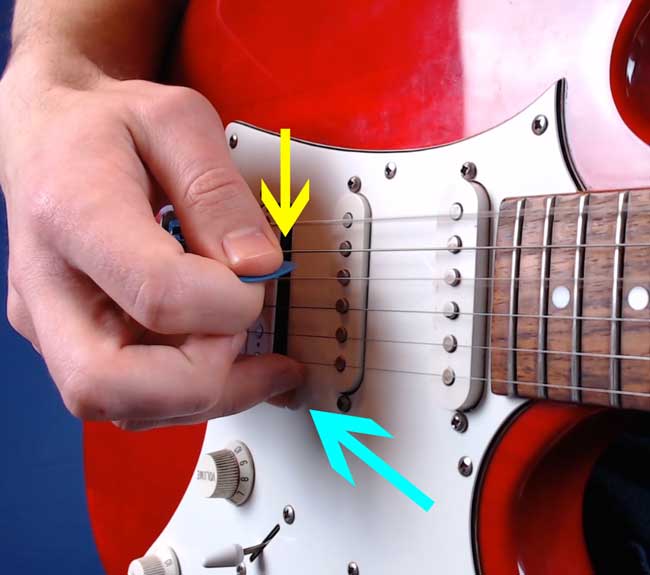
The blue arrow shows how I ‘anchor’ my hand to the guitar to keep it stable.
Floating your hand above the guitar makes it harder to accurately pick the strings because you have to guess where the string is or look at your hand every time you want to pick a note.
By anchoring your hand, you will quickly learn to pick the correct strings without needing to look at your hand.
To anchor your picking hand, rest your pinky or ring finger on the body of guitar. This keeps your hand locked in position.
It might feel strange at first, but this will make a huge difference to your picking accuracy.
Anchor your hand to your guitar all the time except when you want to strum chords.
All Down Picking
The first picking style to use to practice this riff is all-down-picking. It’s exactly as it sounds – you pick every note in a downward direction.
For beginners, this is the easiest picking style to practice. It’s also the preferred picking style James Hetfield uses. A lot of his riffs are played completely with down picking.
Simply anchor your picking hand to the guitar and pick all of the notes with a down stroke. Simple.
Alternate Picking
Alternate picking is when you alternate between down and up picking.
So for this riff (or any other), you would pick following the pattern: down, up, down, up, down, up, etc.
For slow and easy riffs like this one, alternate picking may feel harder than all-down-picking.
But for more complicated riffs, alternate picking is essential.
I recommend practicing alternate picking with this riff to prepare you for using it for the next riff.
Intro Rhythm Guitar Part 2
The next rhythm guitar part in One takes the first riff and adds a few notes at the end of each bar.
This riff is more complicated than the first part, but once you master the first part, this one will feel a lot easier.
Here is the Guitar TAB for part 2:
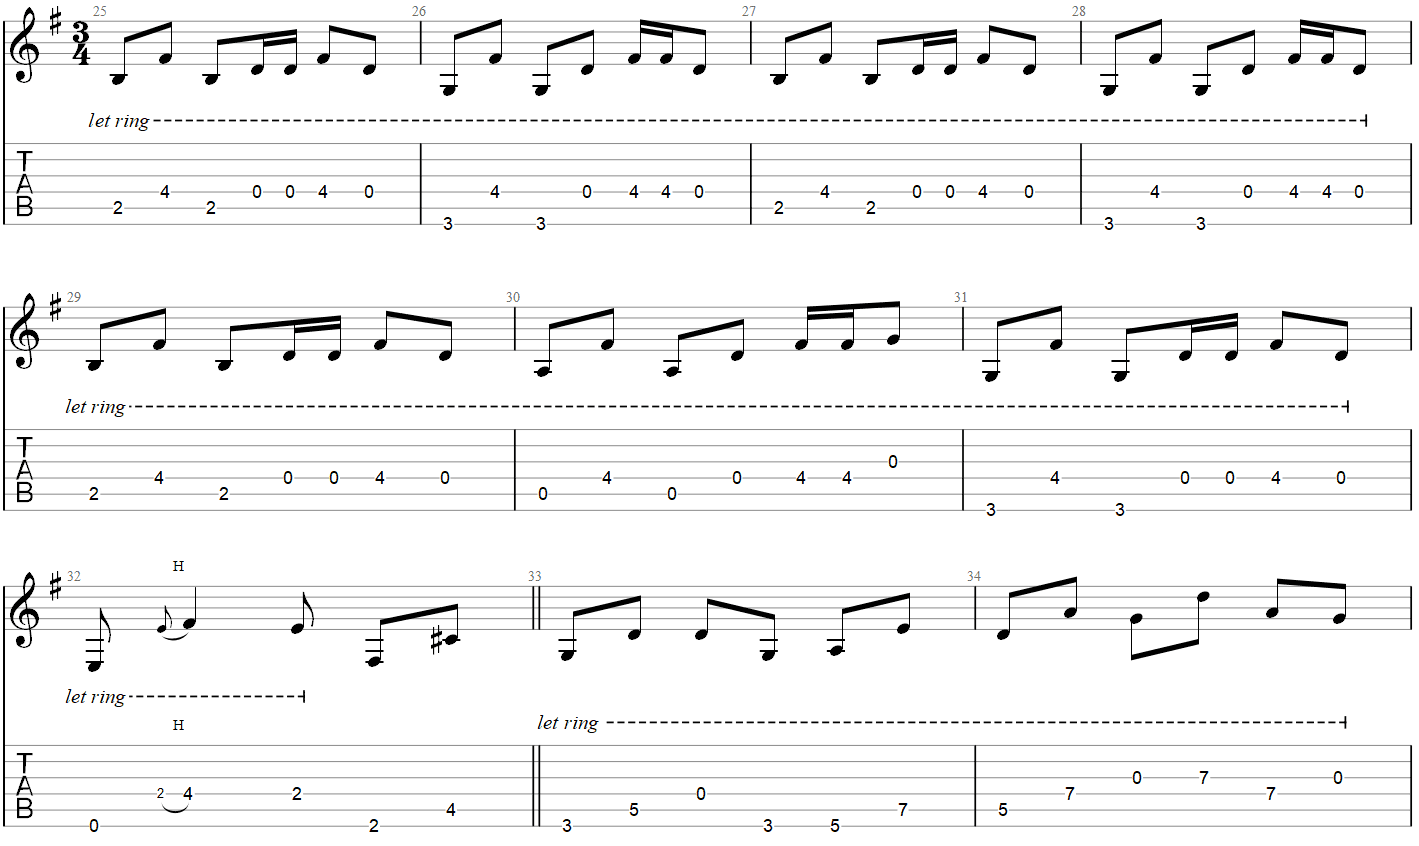
You will notice that for most of this part, the first four notes of each bar are identical to the notes used in Part 1.
This is why I recommend mastering Part 1 before you look at Part 2.
At the end of each bar, you’ll notice that three extra notes are added. Take a close look at each bar and you’ll notice a pattern with the three extra notes.
These extra notes are faster than the rest of the riff, which is why I recommend using alternate picking for this entire part.
Here’s a demonstration of this part at half tempo:
The extra notes at the end of each bar make this riff a lot harder than the first riff, but with practice, you’ll eventually find it easy to play.The last three bars shown in the above Guitar TAB lead on to the next section of the song. I recommend leaving those out for now and only start practicing them after you have memorized the rest of the part.
Intro Part 2 Full Tempo Practice Track
Once you have spent some time practicing with the half-tempo video (50 bpm), use a metronome to gradually increase the tempo until you reach 100 bpm.
The below video is at 100 bpm and once you can play along with it without any mistakes, you’ll be ready to tackle the next part of the song.
Don’t stress if this feels too fast for you right now. If you follow the technique and practice tips covered below, you’ll be able to quickly get to the point where you can easily play along with the above video.Technique and Tips
Now that you have seen the riffs in action, here are some important tips and technique advice to play these parts.
When learning new riffs like these, it’s just as important to think about how you play something as thinking about what you’re playing.
You could play the above riffs note-for-note and have them sound nothing like the song. How you play the riffs matters.
Use One Finger Per Fret
A good general rule to follow when playing something on guitar is to use one finger per fret.
To do this, you look at the range of frets used in a riff, then use your index finger to play the lowest note. You then assign one finger per fret above that.
So for the first two bars in One, look at the below Guitar TAB and find the lowest note:
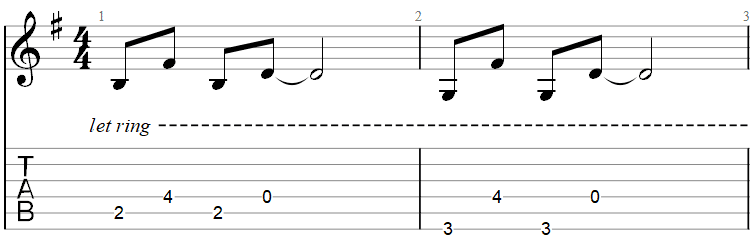
There are notes played on the second, third, and fourth frets as well as the open string.
So the lowest fret you need to play is the second fret. This means you use your index finger on the second fret.
You then assign one finger per fret above this. So the third fret will be played with your middle finger, the fourth fret with your ring finger and the fifth fret (not played in this riff) would be played with your pinky.
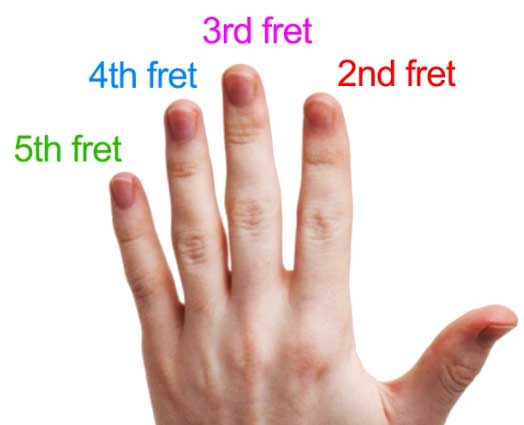
If you follow this general rule, it takes a lot of the guesswork out of what fingers you should use to play something.
There are times when you need to break this rule, but it works in a lot of riffs and licks.
‘Let Ring’
You may have noticed the ‘let ring’ mentioned on the Guitar TAB. This is crucial to getting the riff to sound right.
The ‘let ring’ marking tells you that any notes under the dashed line need to continue to ring out – even after you move on to the next note.
In the first two bars, you can see that all of the notes need to ring out.
To do this, you need to hold your fingers down on the frets and keep holding them down.
When you play the first three notes in the first bar, you should be holding down both your first (index) and third (ring) fingers.
After you pick the third note, you should still hear two notes continue to ring out.
To play the open string, you only lift off the finger on that string (your ring finger). Don’t lift your index finger off of the other string, or else that note will stop ringing out.
This will be hard at first, but it’s a crucial technique to learn. If you don’t do this, you’ll notice that the riff doesn’t quite sound like the song.
Use Your Fingertips
It’s important you use your fingertips when playing the notes in these riffs.
You want each note to keep ringing out after you play them, so you need to make sure you don’t accidentally touch adjacent strings.
If you play a note and it doesn’t ring out properly, look closely and you may notice that one of your fingers is accidentally touching the string.
In the below photo, you can see how using your fingertips helps avoid touching adjacent strings.
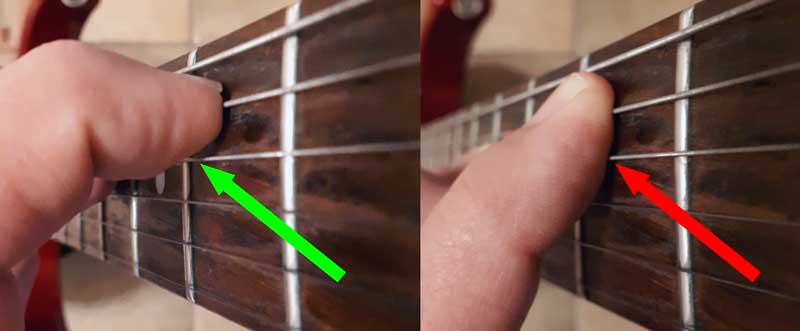
In the photo on the left, I’m using my fingertip. There is plenty of space between my finger and the next string. This means when I need to pick the fourth string, it will continue to ring out.
Notice how my finger goes straight down onto the fretboard. Try to do this when you play something on guitar.
In the photo on the right, you can see what happens when you don’t use your fingertips or your finger doesn’t go straight down onto the fretboard.
My finger is touching the fifth string as well as the fourth string. This means if I want to play the open fourth string, I need to lift my finger completely off of the string or else it won’t ring out. Not good.
Key point: use your fingertips and line your fingers up to come straight down onto the fretboard.
Practicing These Riffs
Whether the above riffs feel easy or hard for you, you can only get better if you practice them.
Practice is the most important thing you can do for your guitar skills and not all practice is equal.
Here are some guides to help you get the most out of your practice sessions and master these riffs faster:
- How Long to Practice Guitar
- Can You Practice Guitar Too Much?
- How to Plan a Guitar Practice Routine
- Setting Up a Guitar Practice Space
If you’re serious about learning these riffs or the full song, I highly recommend taking the time to read all of the above guides.
Here are some tips on practicing these riffs:
- Only start practicing the second riff after you have mastered the first riff. The first riff helps prepare you for the second riff
- Try to master both riffs before you move on to the rest of the song
- Gradually build up the tempo using a metronome to keep your rhythm and timing tight
Next Steps
Did you find this lesson helpful? Want to learn the rest of One by Metallica in a lesson like this?
This lesson was a test to see if people are interested in this style of lesson format. If you found this helpful, let me know by commenting on the video for this lesson on YouTube. If enough people find it helpful, I’ll continue these lessons for the full song (as well as other songs).