
A guitar slide can completely transform your guitar playing and open up new licks and ideas. Playing guitar with a slide is almost like playing a completely new instrument.
In this lesson, you will learn:
- How to correctly hold a guitar slide
- How to play slide guitar in standard tuning
- Simple slide guitar exercises to practice
By the end of this lesson, you will feel confident in playing slide guitar and will know the important techniques to get a good slide guitar sound.
Once you feel confident with the basic slide guitar exercises in this lesson, check out this list of Easy Slide Guitar Songs. Guitar TAB is included for each song along with tips and advice.
If you don’t have a guitar slide, check out my Ultimate Guide to Guitar Slides to find a guitar slide right for you. The guide includes a sizing chart to help you find the right size guitar slide for your fingers.
What Finger Do You Put a Guitar Slide On
The finger you put a guitar slide on makes a big difference to what you are able to play.
You can put a guitar slide on any finger, but most guitarists choose between the middle finger, ring finger, or pinky. The best finger depends on your style of playing.
You will see different guitarists place a guitar slide on different fingers, so there is no rule on which finger you should use.
The right finger to place the slide on depends on what you will be playing. Let’s see how placing a guitar slide on different fingers changes the way you play guitar.
Guitar Slide on Index Finger
While it is possible to play the guitar slide on your index finger, it isn’t common.
Most guitarists don’t like to place the slide on the index finger because it makes it impossible to properly mute the strings behind the slide.

As you can see in the above photo, there is no way for me to make sure the strings stay muted behind the slide. As you will learn later, muting the strings is crucial to getting a good slide sound.
I don’t recommend playing with a guitar slide on your index finger.
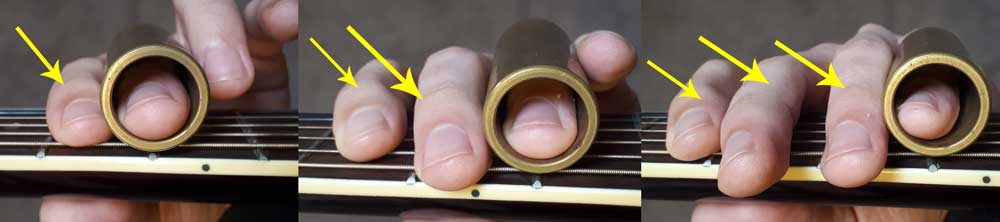
Guitar Slide on Middle Finger
Many guitarists feel placing a guitar slide on your middle finger gives you the best access to playing normal guitar parts at the same time.
Take a look at the below photo and think about what you are able to play with the other three fingers when not playing slide licks:

Having the first and third fingers (index and ring fingers) free means you can play almost any normal riffs and licks while keeping the slide on your middle finger.
You are also able to mute the strings behind the slide using your index finger.
For example, here’s a power chord with the slide on the middle finger:

Having the slide on the middle finger makes power chords fairly easy to play.
Playing basic licks and scale runs is also fairly easy as you have your first, third, and fourth fingers ready to go.
If you will be playing a combination of slide licks and normal guitar riffs or licks, then placing the guitar slide on your middle finger is the best option.
Guitar Slide on Ring Finger
Placing the guitar slide on the ring finger (third finger) is possibly the most common way to play slide guitar.

You can see in the above photo that Derek Trucks places his slide on his ring finger.
The advantage of putting the guitar slide on your ring finger is that it gives you great control over the slide. Many guitarists feel most comfortable playing slide guitar when it is on the ring finger.
You are also better able to mute the strings behind the slide as you now have two fingers to use to keep the strings quiet.
The downside of placing the slide on your ring finger is that it limits what you are able to play when playing normal guitar parts.
Guitarists use the ring finger for a lot of riffs and licks, so placing a guitar slide on that finger makes it harder to play normal guitar parts.
It is still possible to play a lot of normal parts with some modifications. The below photo shows how you would play a power chord with a guitar slide on your third finger:

Some riffs and licks will still be possible, but it won’t be as comfortable as having the guitar slide on the second finger.
If you plan on playing mostly slide guitar licks without normal riffs and licks mixed together, then placing a guitar slide on your ring finger is likely to be the best choice.
Guitar Slide on Pinky
Some guitarists prefer to place a guitar slide on their pinky because it also allows them to play normal chords, riffs, and licks with ease.

As your pinky is a smaller finger, you may also find that more guitar slides fit on that finger. I have a chrome guitar slide that fits nicely on my fourth finger but doesn’t fit on any other finger.
This is great for guitarists who want to strum some chords and add in a few slide licks. You can do all of it while keeping the guitar slide on your pinky.

You can see in the above photo that I’m easily able to play an open chord while the slide remains on my pinky. If it was on any other finger, it would be almost impossible to play most open chords.
If you plan on mostly playing normal guitar parts with a few slide licks added in, placing the slide on your pinky may be a good option.
How to Hold a Guitar Slide
How you hold a guitar slide against your guitar strings is crucial to get right. If you don’t hold a guitar slide correctly, you will experience problems such as buzzing or out-of-tune notes.
There are three things to remember when playing with a guitar slide: position, pressure, and muting.
Let’s go through each of the three now before we get into some licks and exercises.
Guitar Slide Pressure
The pressure of the guitar slide will impact how clearly the note rings out.
If you apply too much pressure on the strings with the guitar slide, the string will likely push down into a fret as shown below:

Pressing down too hard makes the string ‘fret-out’ and instead of hearing a nice smooth slide as you move the slide up and down the fretboard, you end up with a jumpy mess as the strings push against the frets.
If you don’t apply enough pressure, you will end up with buzzing. Buzzing happens when the slide isn’t pushing down enough on the strings. When the string vibrates, it hits against the slide.
Key lesson: if you hear buzzing, apply more pressure onto the strings. If you hear the pitch jump as you slide up or down, apply less pressure.
Guitar Slide Position
The position of the guitar slide on the string changes the pitch. To play a note in tune, you need to perfectly position the guitar slide.
The first thing to keep in mind when positioning a guitar slide is the angle of the slide across the strings.
The below photo shows the right and wrong way to angle the guitar slide:

The straight guitar slide on the left photo will play in tune across all six strings. The slide on the right will be in tune on the low-E string, but the other strings will be out-of-tune with the high-E string horribly sharp.
The key point to remember is to keep the guitar slide parallel to the frets.
Line your guitar slide up to the fret and you will find it much easier to keep the notes in tune. As you slide up or down the fretboard, make sure you continue to keep the slide parallel to the frets. If you don’t pay attention, your hand is likely to change the angle of the slide the further up or down you move.
If your guitar slide is tilted on an angle, you will find it hard to play in-tune. Chords will sound wrong and you will need to constantly readjust your slide position depending on what strings you are playing.
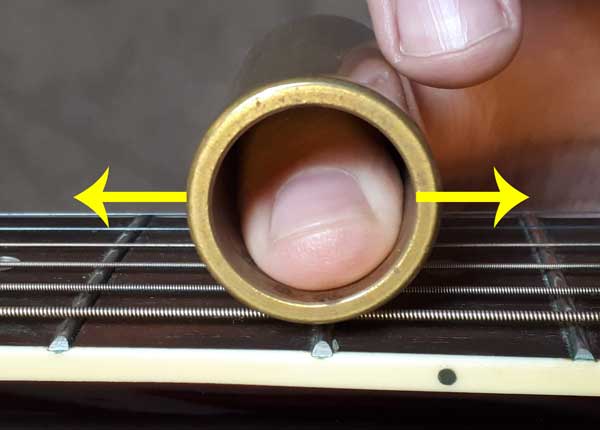
Once you have properly angled your guitar slide parallel to the frets, you can think about the position of the slide up and down the string.
The key point to remember is that your guitar slide should be directly above a fret when playing notes.
Placing the guitar slide directly above a fret will make sure the note is in-tune. If the guitar slide is to the right or left of the fret, it will sound out-of-tune.

If you keep your guitar slide lined up to the frets, you will hear in-tune notes.
The only time when you will want to move away from this position is when you’re sliding to different frets, or you’re playing vibrato.
When playing vibrato, you will slide left-and-right, but you want to stay close to the fret position to stay in-tune. We will look at some vibrato exercises and licks later.
Here is what you should see when looking at your guitar slide while playing:

The guitar slide is directly above the fret and you can see it is parallel to the frets. If you keep your guitar slide lined up parallel to the frets and keep it directly above the fret, you will hear in-tune notes.
Muting Behind the Slide
When you press a guitar slide against the strings, you will probably hear some notes ring out as soon as the slide touches the strings.
The slide causes the strings to vibrate in two places – above the slide and below the slide as shown below:

While we want the slide to cause notes to ring out below the slide (highlighted in green), we don’t want anything vibrating above the slide (highlighted in red).
If the strings vibrate above the slide while you’re playing, you will hear weird overtones and notes sounding like they’re sliding the wrong way.
To avoid this problem, we need to keep the strings above the guitar slide muted.
Simply rest one of the fingers above the slide against the strings as shown below:
You can see in the above photos that there are different ways to mute the strings depending on which finger you have the slide on.
You will know if you are properly muting the strings when you pick a note. If you are properly muting the strings, the note will ring out crystal clear.
If you aren’t properly muting the strings, you may also hear a second note ring out in the background. This can quickly become a problem when playing complicated slide licks, so get used to muting the strings now.
Simple Guitar Slide Exercises
Now that you know how to correctly hold a guitar slide against the strings, let’s go through some basic guitar slide exercises.
These exercises will help you build control over the guitar slide.
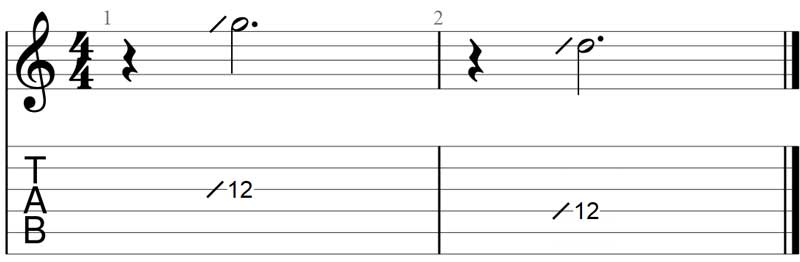
Exercise 1: Sliding Up to Pitch
This exercise will help you feel confident at sliding up to the correct pitch. You will get used to stopping the slide at the exact position where the note is in tune.

Play this exercise slowly and make sure the slide continues to stay parallel to the frets as you slide up. You can slow down as you arrive at the 12th fret and make sure you stop directly above the fret.
Check that you did land on the correct pitch by playing the 12th fret with your finger. Check the pitch you hear against what you played with the side. If it sounds the same (and your guitar has proper intonation), it means you landed at the right spot.
As you feel confident with this exericse you can start to speed it up or try sliding up to different frets. Practice this exercise on all six strings to get used to applying consistent pressure to the slide.
An important part of playing with a slide is playing notes at the correct pitch. This is easy when we play using frets because the frets keep the notes in tune. But with a slide, you have to use your ears.
Developing your ears to identify when you’re playing in-tune and when you’re out-of-tune is critical to becoming a good slide player.
A good way to check that you’re playing in-tune is to have a guitar tuner running in front of you.
As you play a note, glance over at the tuner to see how close you are from the correct pitch. The more time you spend checking that you are playing the correct pitch, the better your ears will become.
Any chromatic tuner with an inbuilt microphone will work perfectly fine. You can even use a tuner app on your smartphone.
Exercise 2: Sliding Down to Pitch
This exercise is similar to Exercise 1 with the main difference being that you are sliding back down the fretboard.

Take it slowly at first to make sure you land at the correct pitch. Gradually speed up the exercise as you build your confidence.
Check you are landing on the right pitch by playing the ending note with your finger after you use the slide. The pitch should be exactly the same if you landed at the right spot.
Exercise 3: Sliding Up and Down
This exercise will get you used to quickly arriving at a pitch, then sliding back down again. If you can play the first two exercises with ease, this exercise should also feel easy. Use your ears to tell you whether you landed at the right pitch or not.

Play the 12th fret with your finger and keep that pitch in mind when you slide up to it. As soon as you hear that pitch, slide back down again.
Practicing this exercise on different strings and different frets will help you train your ears and build your confidence with the slide.
Exercise 4: Adding a Second Note
What makes the guitar slide interesting is that you can play more than one note at a time and slide both of them around. This exercise will get you used to adding a second note and sliding it around.

If the above TAB looks confusing, there are only two notes you need to pick. You pick the third string starting on the 4th fret, then after you slide up to the 7th fret, you pick the first string. While both notes are ringing out, you slide up to the 12th fret.
If you have your guitar slide parallel to the frets, both notes should sound in tune when they ring out together. If your slide is crooked, one of the notes will sound out-of-tune.
Make sure you still hear two notes ringing out by the time you slide up to the final position. All the other strings should remain silent.
Applying consistent pressure to the strings with the guitar slide will help you make sure both notes continue to ring out. If a note cuts out or you hear buzzing, it means the pressure was lifted too much.
Exercise 5: Sliding into Notes
This exercise will give you practice at keeping the strings muted with your fretting hand as you move the slide around.
Start by muting all of the strings with your fretting hand. Now slowly move the slide up while keeping the strings muted. Pick the string when the guitar slide is somewhere around the 5th to 7th fret (don’t worry about the exact position). Continue to move the slide without slowing down or speeding up until you arrive at the 12th fret.
The idea here is that you should hear a smooth glide that doesn’t start on a specific note. You just suddenly start hearing the slide move up.
This is an important skill to master so take your time practicing it. It sounds best when you move the slide fast, so build up the tempo as your coordination improves.
How to Play Vibrato With a Guitar Slide
Vibrato is what takes your guitar slide playing from good to great. Being able to properly add vibrato to your slide playing makes the guitar slide much more fun to use.
To play vibrato with a guitar slide, you simply rock it left and right along the string as shown below:
Use your entire hand to move the slide left and right. Some guitarists who use aggressive vibrato use their entire arm to play vibrato with a slide.
You can control how wide the vibrato sounds by adjusting how far you move the slide. Some licks will sound great with a gentle and shallow vibrato, while others will sound great with a wide and aggressive vibrato.
You can also control the speed of the vibrato by how fast you move the slide left and right.
Start your practice by slowly moving the slide left and right and gradually speed it up as you build your confidence.
Tip: try repeating the earlier exercises and add vibrato to the held notes. Make sure you first land on the correct pitch, then add the vibrato to make the note sing.
How to Play Slide Guitar in Standard Tuning
Slide guitar plays often prefer to play in open tunings as open tunings work great with the slide. But it is still possible to play slide guitar in standard tuning.
The way to play slide guitar in standard tuning is to think of the fretboard in blocks. Look for positions where you can play multiple notes across the same fret while staying in key.
Take a look at the below fretboard diagram with the C Major scale notes:
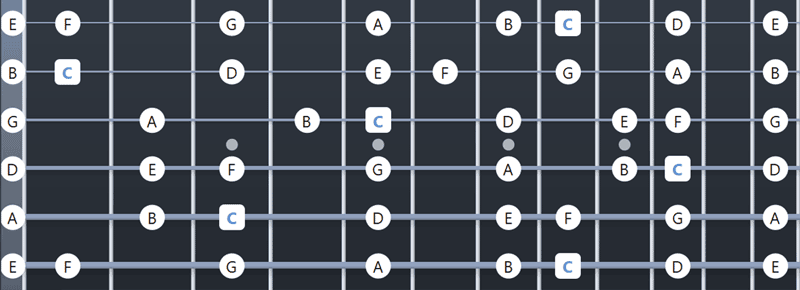
If you wanted to jam along with a backing track in C and come up with some slide guitar licks, it helps to change the way we think about the fretboard.
Instead of thinking of all the individual notes in the above diagram like we normally do, think about each fret as a block. The more notes across a single fret, the more useful that fret is to you when you’re using a guitar slide.
Here are all the ‘blocks’ across the fretboard in standard tuning highlighted:

The frets with the red highlighted blocks are the most useful to you when you’re using a guitar slide because you can play any string across that fret and it will be in key.
This means you can slide back and forth as much as you want between the 5th, 10th, and 12th frets and come up with plenty of licks and ideas.
Now take a look at the 4th, 6th, and 11th frets. These frets aren’t very useful to you when using a guitar slide because those frets don’t give you many options for useful notes.
There is only one note on the 4th fret that you can play that will be in key. While you could still play that note, you’re limited in what other options you have. If another string is ringing out when you slide up to the 4th fret, that string will suddenly sound out-of-tune.
The yellow and orange highlighted blocks show other useful positions where you can come up with licks and slide back and forth between them.
Here is a simple example of how to play slide guitar in standard tuning by thinking about blocks:

Compare the above TAB with the blocks diagram to see how these basic ideas were created. All I did was pick a few blocks (5th, 10th, 12th frets) and pick a couple of the notes and slide back and forth.
Try coming up with similar licks as the above example by picking a few blocks and sliding back and forth between them. The more notes in a block the more useful that fret is when you’re playing with a guitar slide in standard tuning.
Memorizing these block positions will help you feel comfortable improvising using a guitar slide. Check out this guide for foolproof methods you can use to memorize the notes on the fretboard.
Once you learn how to play with a guitar slide in standard tuning, I highly recommend trying an open tuning. It’s so much easier to use a guitar slide with open tunings as the ‘block’s line up across more strings. Check out this Guide to Open G Tuning for some great songs (with Guitar TAB) in Open G tuning.
Ready to start learning some slide guitar songs? Check out this guide for Easy Slide Guitar Songs to learn including Guitar TAB and tips. Once you learn the basic licks and solos from the guide, there is a list of some of the best slide guitar songs to keep developing your slide guitar skills.