
Learning the notes on the fretboard is one of the most important things you can do when learning the guitar. While it is possible to become a great guitarist without learning the notes, it’s going to make things much harder than it needs to be.
Memorizing the notes on the fretboard is something you can do in a very short time. I’m not going to lie to you like some YouTube videos and say you can memorize the notes in 10 minutes, but if you follow the method in this article, you can memorize the entire fretboard in no time.
In this article, you will learn:
- Why learning the notes on the fretboard is worth the effort
- What you can do after you memorize the fretboard
- Two effective methods to strengthen your memory of the notes
- A practice plan to follow with step-by-step instructions
While you might be tempted to skip ahead to the methods, I highly recommend reading everything so you can memorize the notes in the most effective way possible.
Memorizing the notes on the fretboard is also something you can do when you don’t have a guitar with you. Find out more on my guide on How to Practice Guitar Without a Guitar.
Why Learn the Notes on the Fretboard
Putting the effort into memorizing the notes is much easier if you know why it’s worth doing. So let’s look at some useful things you can do if you memorize the fretboard.
Barre chords become easier
Barre chords allow you to take a chord shape and play it anywhere on the fretboard. It allows you to play chords like C#m, Ebm, F#m, Gm, all with the same chord shape. There isn’t an open chord shape for C#m, but you can easily play it if you know the barre chord shape and you know where to find C# on the fretboard.
Barre chords are only useful if you know where to play them. Knowing the notes on the fretboard (especially the low E and A strings) will let you play any barre chord anywhere you want.
Build chords and scales from scratch
Let’s say you’re playing in a band and the rhythm guitarist has come up with a nice riff using the E Harmonic Minor Scale and asks you to try coming up with a solo over the top of it. What do you do?
If you have memorized the notes on the fretboard, all you need to know is the notes to that scale. You don’t need to find any scale shapes, you just need to know the notes. If the guitarist tells you the notes are E F# G A B C D#, you now know all you need to play the scale all over the fretboard.
Build chords from scratch
A lot of guitarists can only play some basic open chords and barre chords because they never learned the notes on the fretboard. If the only place you can play Em is in the open position, that limits what you can play.
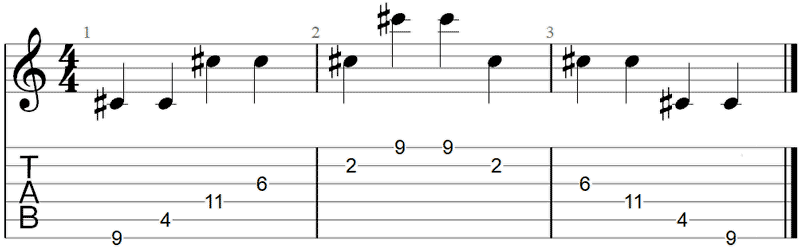
If you know the chord formula or the notes in a chord, you can build the chord anywhere you want on the neck. Here are a few examples of the different ways you can play an E minor chord across the neck:
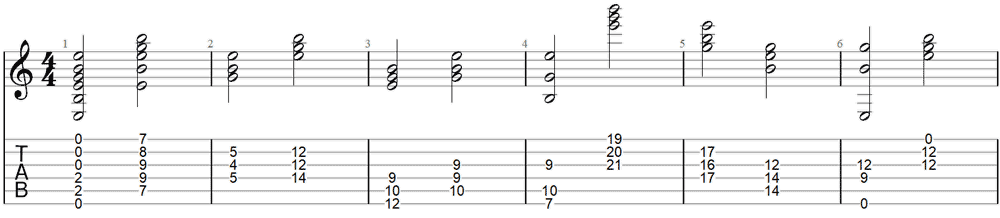
You might recognize a couple of the chord shapes (especially the first two), but all of them are E minor chords. When you learn the notes on the fretboard, you’re able to build any chord you want in almost any position. Try playing some of the above chords. While they all sound similar (they’re all E minor), they’re all different. Different chord shapes can be used in different songs and open up so many doors for your playing.
Instead of being stuck with one or two chord shapes, you can unlock all the chord shapes across the entire fretboard.
If you learn the notes on the fretboard, you can do this with any chord.
Get better at improvising
If you haven’t already, at some point you might want to start improvising or soloing over some backing tracks. It’s great fun and an excellent way to build your skills. Most guitarists learn by memorizing a few Pentatonic box shapes.
The box shapes make it easy to get started with improvising, but there’s a downside. A lot of guitarists eventually get stuck in a rut. The problem with memorizing scale shapes is that you don’t learn why certain notes sound better than others.
When you learn the notes on the fretboard, you can start targeting specific notes that work over the backing chords. For example, if the chord in the background is C Major, while you’re improvising you can target the notes C, E, & G (the chord notes of C Major). If the background chord changes to Dm7, you can target the notes D, F, A, C (the notes in Dm7).
Until you try this out for yourself, it’s hard to understand how much control this gives you over your playing. Instead of playing random notes in scale shapes, you can choose the perfect notes at the perfect time.
Understand music better
Possibly the most important reason to learn the notes on the fretboard is that it improves your understanding of music. Instead of riffs, chords, and solos being a series of patterns and shapes, you can understand why certain chords work well together and others don’t. You can understand why the licks you’re trying to play over a backing track don’t sound quite right when they sounded fine over a different backing track.
Learning the notes on the fretboard opens you up to a new level of understanding music. It will help you build a better understanding of the songs you play as well as anything you write.
Making the Fretboard Easier to Memorize
It’s no surprise that a lot of guitarists put off learning the notes on the fretboard.
At first, memorizing the notes on the fretboard seems overwhelming. Just look at the below diagram:
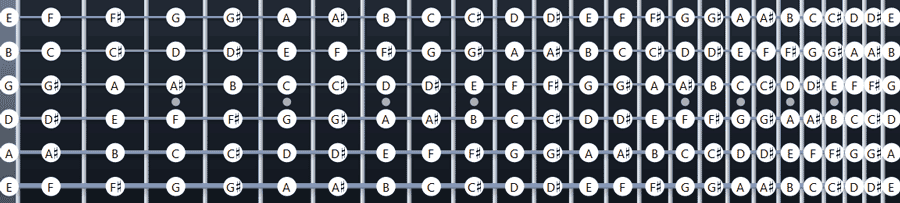
Insane, right?
If it looks overwhelming to you, don’t worry. Let’s break the fretboard down and make it easier to learn.
Everything repeats at the 12th fret
Ever wondered why there are normally two dot markers on the 12th fret and the 24th fret (if your guitar has 24 frets)?
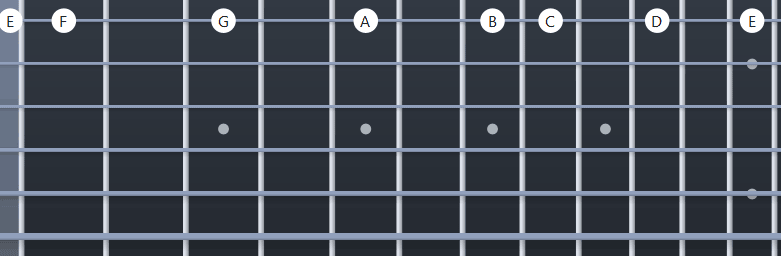
Take a look at the notes on the open strings, the 12th fret, and the 24th fret below:
There are 12 notes in music, so everything repeats if you move up 12 frets. The 12th fret is where the open string notes repeat and the 24th fret is where they repeat again.
This means you only need to memorize half of the fretboard because the other half repeats. If you memorize the notes up to the 12th fret, the exact same notes repeat above the 12th fret.
Great, right?
We’ve already cut the number of notes you need to memorize in half, but let’s cut it down some more.
Removing chromatic notes
Take a look at the six notes below and think about how you would memorize them:
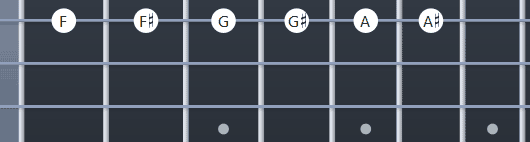
Do you really need to memorize all six? What do you notice about the notes with the # (sharp) sign?
What might notice is that all the sharp notes have the same note letter as the note to the left of it. F# is always one fret higher than F, G# is always one fret higher than G, etc.
This means you don’t need to memorize all of the above notes. You don’t need to memorize the position of F and F#. You can simply memorize the position of F and remember that F# is one fret to the right.
It’s the same with flat notes. The note Gb is one fret to the left of G. Eb is one fret to the left of E. So you don’t need to memorize any flat notes either – just memorize the ‘natural’ notes (eg: A, B, C, D, etc.) and remember that if you want a flat note, move one fret to the left.
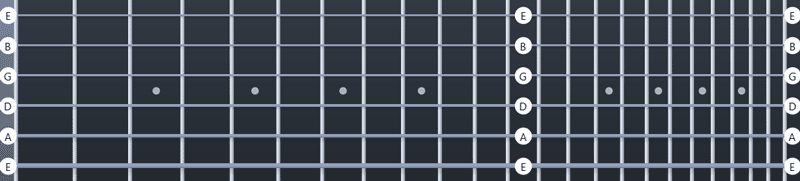
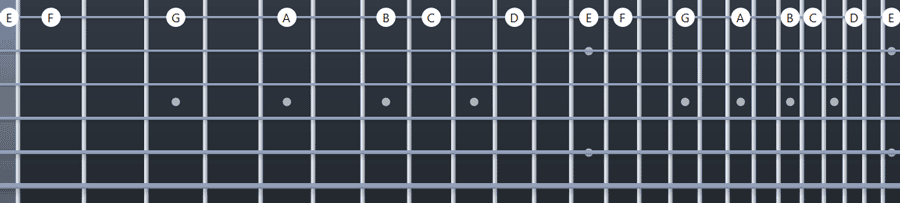
Here’s our fretboard again with all of the sharp notes removed as well as all the notes above the 12th fret removed:

The above diagram is all you need to memorize to know all the notes on the fretboard. Not too bad, right?
It’s also worth mentioning that the above diagram is the C Major scale. So by memorizing the natural notes on the fretboard, you will also memorize one of the most important scales to learn on guitar.
Now let’s get into how to memorize the notes on the fretboard in the easiest and most effective way possible.
Using Two Methods to Memorize the Fretboard
The best method of learning to memorize the notes on the fretboard is to use two methods together.
The reason I strongly recommend using two methods is due to the way our memory works.
The more different ways we study something, the easier it is to memorize.
Think of it like cutting a tree down with an axe. If you only cut from one side of the tree, it’s going to take a long time and will be a lot of work. Instead of only cutting from one side, it’s far easier to cut half-way from one side, then cut from the other side of the tree.
Our memory works in the same way. You could try repeating the same method over and over and eventually it will sink in. But if you combine two methods, you’ll memorize it faster and easier.
It’s why people who memorize decks of cards use words and images to memorize cards rather than the card number and suit. It’s how people are able to memorize 10,000+ digits for the number pi. They don’t sit down and try to memorize all those numbers. Instead, they use images or words to memorize groups of numbers.
It’s also why when we smell or taste certain things (eg: a cooked apple pie), it can instantly bring back childhood memories. Those childhood memories are strengthened by smells and tastes (this is called ‘multisensory integration’).
The reason this is important to know is that a lot of what you do on guitar depends on memorization. If you use methods that are better suited to how our memory works, you’ll learn things faster and easier. The methods I cover in this article apply good memorization practices.
If you combine two methods to memorize the notes on the fretboard, the notes will sink in deeper into your memory. You can even use three different methods at once and you’ll learn faster and develop a stronger memory. But too many methods can get confusing. I’ve found that my students memorized the notes fastest when we combined the two methods covered here.
Let’s look at the two methods, then I’ll give you a practice plan so you can get the most out of the methods.
Method 1: One String at a Time
This is an incredibly easy way to start memorizing the notes on the fretboard. The basic idea is to look at each string separately instead of trying to learn everything at once.
The below diagram shows how you would practice memorizing the notes on the high E string:
When you practice one string at a time, you’re able to completely focus on that string. In the above diagram, you only need to memorize eight note positions.
Once you memorize those eight notes, you continue past the 12th fret:
Before I explain how to memorize the notes, let’s look at what happens after you finish memorizing the high E string notes.
Once you memorize the notes on the high E string, you only need to memorize four more strings. Why? Because the high E string and the low E string use the exact same notes in the same positions:
For this reason, I highly recommend starting with either the low E string or the high E string. Once you memorize those notes, you only need to memorize four more strings.
How to practice using this method
This is a great method to use because it’s easy to practice. Even if you’re a beginner, you’ll find this method easy to use. Let’s look at how to practice the high E string notes with this method.
Here’s what you would play for the high E string:
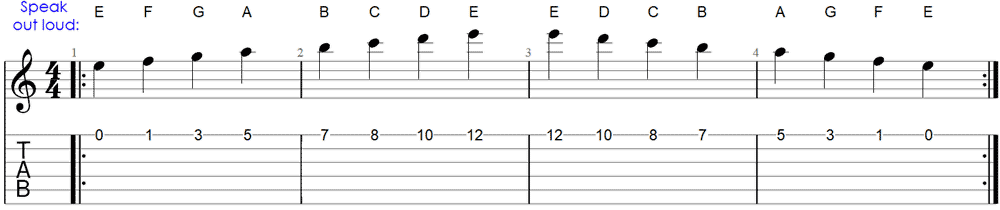
You start off on the open string and play one note at a time moving up the fretboard. Once you reach the 12th fret (E), you move backward one note at a time until you reach the open string.
Important: as you play, you must call the note names out loud. So while you’re playing, you need to be saying “E, F, G….” as you play each note. The reason this is important is because of the way our memory works. You’re making use of multisensory integration when you call the note names out loud.
It might feel strange to say the note names out loud while you play, but it will make a huge difference to how quickly you memorize the notes.
Here are some tips when using this method:
- Start off as slow as you need to. Don’t rush. If you rush the note names won’t sink into your memory. Take it easy in the beginning
- Focus hard while practicing. The more you focus on each note name and position, the faster you will memorize them
- Don’t worry about what fingers you’re using to play the notes. Your focus should be completely on the note names and positions – not on playing technique
- Focus on any areas you don’t feel confident in. Turn your weak areas into your strong areas
The first few times you do this might feel frustratingly slow. That’s okay. If something feels hard, it’s a good sign that you’re learning. Don’t get frustrated. Be patient and keep practicing as slow as you need to. Over the next few days, you’ll notice that it gets easier to remember the right positions and note names. You’ll gradually get faster and won’t get stuck in certain areas of the fretboard.
Here’s the exercise for the B string so you can see how to continue across the rest of the strings:
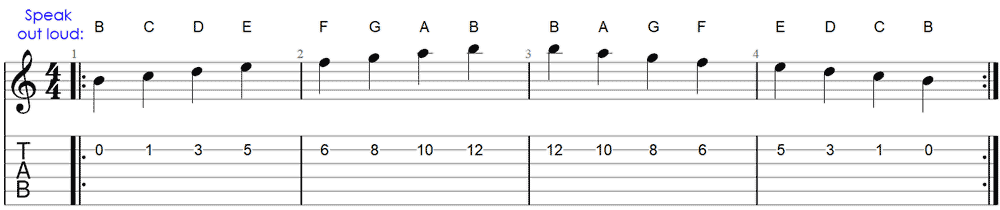
Follow the same method as before. Make sure you call the notes out loud and really focus on each note’s position. You can even think to yourself something like “the note on the fifth fret is E, 6th fret is F, 8th fret is G”. The more focus and effort you put in, the faster the notes will stick in your memory.
Practice each string at least 15-20 times before moving on to the next. In each practice session, make sure you practice each string at least twice. You’re going to become an expert with the E strings very quickly, so make sure you give the other strings more attention.
Why this method works
This method works because it teaches you to think linearly. Instead of memorizing a shape or scale position, you’re thinking about how the notes on a string are connected together. When you practice this method, you learn things like ‘G is always two frets up from F’, ‘B is always one fret down from C’, etc.
This means, in the future when you’re improvising, you will always know what notes are above and below the current note on each string. If you’re playing an ‘E’, you will instinctively know that F is one fret to the right and D is two frets to the left.
Practicing each string separately means you won’t develop ‘weak areas’ on the fretboard. A lot of guitarists feel uncomfortable playing on some areas of the fretboard because the shapes and patterns they memorized don’t cover those areas. When you practice using this method, you learn to feel confident all over the fretboard.
Method 2: One Note at a Time
With Method 1, you’ll get really good at finding notes up and down a string. But we don’t just play up and down strings, we also move across strings. If you only use Method 1, you’ll end up with weak areas in your fretboard knowledge. That’s where Method 2 comes in.
This method is completely different from method 1 and at first, it will feel far more difficult. That’s why it’s so effective – it forces you to memorize the notes in a way where you can’t ‘cheat’. If you find this method hard, it means the notes haven’t sunk into your memory properly. Once you master this method, you will be able to instantly find any note you want in any position on the fretboard.
This method teaches you to memorize the positions of any note across the entire fretboard without needing to refer to other notes. For example, at the moment if you want to find the note ‘A’ on the B string, your mind will probably think “well the 12th fret is B, so A must be two frets lower on the 10th fret”. That’s fine, but this method will teach you to instantly jump to the 10th (or 22nd) fret.
Here’s how the method works:
- Pick a note. With this method, we focus on one note at a time. The goal of the method is to find all the positions across the entire fretboard for the note you’re working on.
- Find that note on the low E string up to the 12th fret. As explained earlier, we have a full octave from the open string up to the 12th fret. That means you will find your note once (unless it’s the open string which will also be the 12th fret). Find that note as quickly as you can then play it.
- Move to the next string and find the note up to the 12th fret. After you find the note on the low E string, move to the next string and find the note on that string.
- Continue moving across all strings. Each time you find the note, move up to the next string and repeat the process. Once you get to the high E string, move back through the strings until you return to the low E string (or lower if you play 7 or 8 string guitars).
- Repeat the steps and pick a new note. Gradually work your way through all notes (including notes like A#/Bb)
It’s a simple method, but it might feel strange. It removes any memorization of shapes if you do it properly. Try to avoid cheating by thinking in rules like “the note on the next string is five frets down”. While these shortcuts might make it feel like you’re making progress faster, they actually hold you back. The goal of this method is to memorize the note positions without needing to refer to any other position. If you use this method properly, you will become free over the entire fretboard.
How to practice using this method
Let’s look at an example of this method in action so you can see how to practice it. The below fretboard shows the position of the note ‘A’ across all six strings up to the 12th fret:
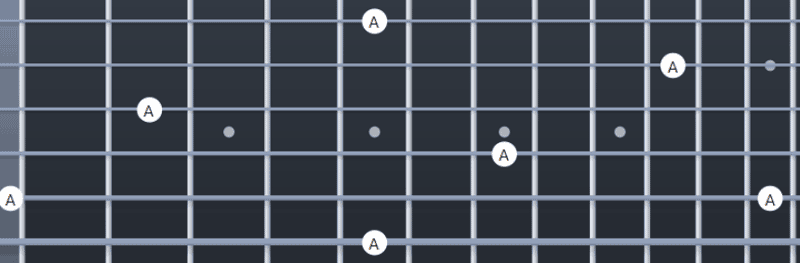
As you can see, the note shows up once per string apart from the A string. The goal of this method is for you to be able to find all of these notes instantly without first needing to think about any other positions or notes. So even if you can see some shapes or patterns that might make it easier to find the note positions, ignore them. You’ll end up with a far stronger memory if you ignore any shapes or patterns as you practice using this method.
Here’s what you would play if you follow the steps listed earlier:
Notice that we don’t play the open A string? The chances are you’ve already memorized the open string notes, so you can skip those notes and focus on the fretboard notes. Once you get to the end, you pick a new note and repeat the steps. Here’s the exercise again with C# as our focus note:
What you might notice after you do this for all notes is that some notes are harder to find than others. For example, you will be really good at finding notes like E & A because those notes are used regularly on guitar due to the tuning. But other notes like C# or Bb aren’t used as often so you might notice it takes you longer to find those positions.
That’s the point of this exercise – it shows you what your weak areas are when you remove any ‘cheats’ like memorized shapes. If one note is easy to find and the other note is hard to find, that’s a sign you haven’t properly memorized the fretboard. When you get to the point where all notes are easy to find, nothing will hold you back.
Here are some extra tips for this method:
- Listen carefully to what you play. It should be obvious whenever you play a wrong note because it will stand out. Playing a C# when you meant to play a C will be obvious if you’re listening carefully.
- If you played the above exercise, you should notice that as you move to a higher string, the note will either stay exactly the same, or it will jump up an octave. Try to remember what happens for each string as it will be handy in the future when you’re improvising or songwriting.
- Call the note names out loud while playing. This might feel silly, but it helps strengthen your memory. The idea is that you want to link the note position with the note name in your memory. It’s much easier to link the two together by calling the note name out loud.
- Time yourself for each note and record the results. This is a great way to keep track of your progress and find any weak areas. You might find that within a week you halve the time it takes to go through the exercise. Or you might find that some notes take you twice as long as others.
With consistent daily practice, you should start to feel really confident in your fretboard knowledge within a couple of weeks.
Taking this method further
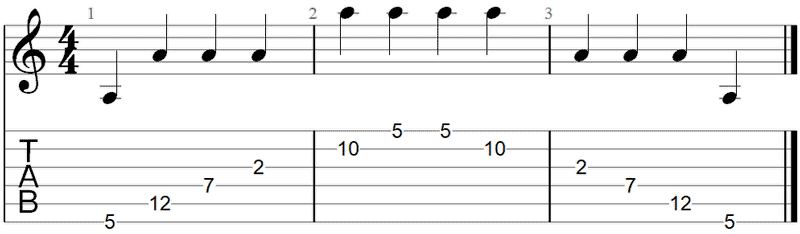
With enough practice, this method will start to feel easy. This could mean one of two things. Either you’ve memorized the fretboard perfectly, or you’ve memorized the pattern of jumping between strings. A quick way to check whether you have properly memorized the notes or not is to jump randomly between notes without moving across adjacent strings.
Here’s an example of what you might play to test your knowledge:
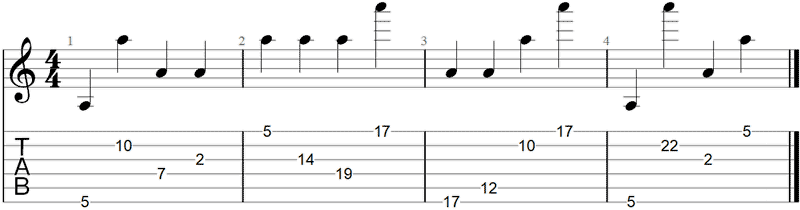
If you can randomly jump between strings like in the above example, that’s a good sign you’ve properly memorized the notes. If you get stuck in certain positions or it takes you longer, it means you still have work to do.
Memorizing the Fretboard Practice Plan
When you combine the two above methods, you end up with a very fast and effective way of memorizing the fretboard. Let’s look at an example practice plan to give you an idea of how you might like to practice.
Week 1
It’s important you don’t put too much pressure on yourself in the beginning. The last thing you want is to get frustrated because you don’t feel like you’re making progress. So a good way to start is by using Method 1 at a slow tempo.
Here’s what you might practice in a 5-10 minute practice session:
- Play up and down the low E string 10 times slowly while calling the note names out loud
- Play up and down the A string 10 times slowly while calling the note names out loud
- Play up and down the D string 10 times slowly while calling the note names out loud
- Play up and down the G string 10 times slowly while calling the note names out loud
- Play up and down the B string 10 times slowly while calling the note names out loud
- Play up and down the high E string 10 times slowly while calling the note names out loud
- Take a short break, then come back and repeat the above
This is a good way to get started because it gives you time on each string to start feeling comfortable with the note positions before you move on to the next string. Even if you’re really slow at first, you’ll find that after a couple of days you’ll already be gradually speeding up and finding it easier to call the right note names out loud.
Week 2
At this point, it’s a good idea to gradually bring in Method 2. If you rely too much on Method 1, you’ll get stuck. We’ll also make Method 1 a bit harder to work on to keep you pushing yourself.
Here’s what you might practice in a 10-minute practice session:
- Play up and down the low E string 5 times as fast as you can while calling the note names out loud
- Find all note positions for ‘A’ across all strings, moving up and down one string at a time
- Play up and down the A string 5 times as fast as you can while calling the note names out loud
- Find all note positions for ‘B’ across all strings, moving up and down one string at a time
- Play up and down the D string 5 times as fast as you can while calling the note names out loud
- Find all note positions for ‘C’ across all strings, moving up and down one string at a time
- Continue across all strings and all note positions
By trying to play Method 1 as fast as you can, it tests how well you really know those notes. If you find you get stuck, slow down and practice the string 10 times instead of 5. Mixing up the practice session by alternating between Methods 1 and 2 is a great way to keep you working hard. Remember that if something feels hard, it’s a good sign that you’re learning.
Week 3
If you’ve been practicing consistently, you should feel pretty confident at this point. So let’s ramp up the intensity to check how well you know your fretboard.
Here’s what you might practice in a 10-minute practice session:
- Play up and down all six strings one-after-the-other as fast as you can while calling the note names out loud
- Find all note positions for ‘C#’ across all strings including the positions above the 12th fret. Jump randomly between strings
- Play up and down all six strings one-after-the-other as fast as you can while calling the note names out loud
- Find all note positions for ‘Ab’ across all strings including the positions above the 12th fret. Jump randomly between strings
- Continue for all note positions
At this point you want to focus most of your practice time on the notes you feel the least confident in. There’s little point practicing notes like E & A because you would have easily memorized those notes by now. Time yourself for each note and practice your worst ones.
If you follow this practice plan and practice it daily, you will quickly build a stronger knowledge of the fretboard than most guitarists. Most guitarists aren’t willing to put this type of effort in. It’s much easier to memorize a few shapes and use them to find the notes. But if you’re willing to put the effort into following this practice plan, you’ll end up with a stronger fretboard memory and you won’t need to rely on any shapes or patterns. Whenever you need to play a C# or an F, you’ll instantly know where all the positions are for those notes.
Next Steps
The above methods will only help you memorize the note positions on the fretboard. While that fretboard knowledge will be extremely useful, it’s not enough on its own. To really get the most out of memorizing the fretboard, you need to practice applying it.
Here are some ways you can take your fretboard knowledge further:
- Learn scales using notes rather than shapes
- Practice finding new chord shapes across the fretboard using notes rather than memorized shapes
- Improvise over backing tracks in different keys and practice shifting your attention to different notes
- Write riffs and licks, then transpose those parts to different areas of the fretboard
The goal of the above ideas is to get you used to think with notes instead of shapes or patterns. If you can create any chord or scale without needing to think about shapes, it gives you freedom. It might be a lot of work to get to that point, but it’s worth the effort.