
There are a lot of chords you can learn on guitar and some are easier to start with than others.
In this lesson, let’s look at 10 easy guitar chords you should learn first and why you should learn them.
The great thing about these 10 guitar chords is that a lot of songs use them and they’re easy to learn. You’ll be able to immediately learn a lot of popular songs after you learn these chords.
I’ve included practice tips with each of the chords in this lesson, so read through each one even if you already know some of the chords.
After you learn these 10 chords, check out these chords resources and lessons:
- How to Practice Guitar Chords
- Easy Guitar Chord Songs
- 8 Easy Fingerpicking Patterns
- Easy Fingerpicking Songs
- How to Get Better at Guitar Chords
- Best Free Guitar TAB Websites
What Guitar Chords Should You Learn First
The 10 first guitar chords you should learn are A Major, A minor, C Major, D Major, D minor, E Major, E minor, E minor 7, F Major, G Major.
Almost all of these chords are ‘open’ chords and are very easy to learn.
The reason you should start by learning the chords covered in this lesson is that these are the most common open chords you will see used in songs.
After you learn these 10 open chords, you can learn more open chords or start to learn how to play barre chords. Barre chords can be difficult for beginners to learn, so take your time learning open chords first.
How to Learn and Practice These Guitar Chords
This lesson will show you how to play these ten chords using chord diagrams, Guitar TAB, and photos of my hand in each chord position.
Learning how to read chord diagrams and Guitar TAB will help you learn the chords faster and learn to recognize these chords whenever they are used in songs.
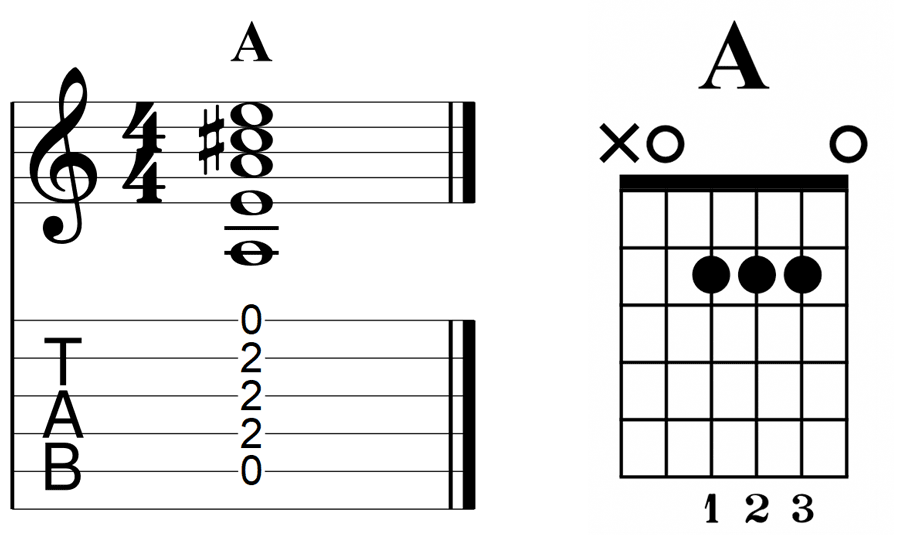
Chord Diagrams
The below image is an example of a chord diagram:

Chord diagrams are used to quickly show you how to play a guitar chord and you’ll see these diagrams all the time in sheet music.
If you don’t already know how to read chord diagrams, it’s worth spending five minutes to learn the basics so you can use these diagrams whenever you want to learn a new song.
Read this guide to learn how to read chord diagrams.
Guitar TAB & Standard Notation
There are two main ways guitar music can be written: Guitar TAB (or Tablature) and Standard Notation.
The below example shows both Guitar TAB and Standard Notation:
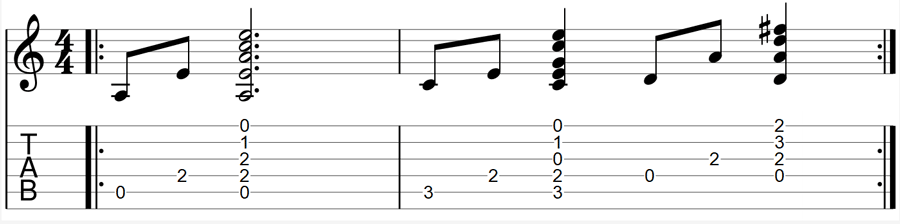
Once you learn how to read at least one of these formats, you’ll be able to start recognizing chords used in songs.
The above example uses three chords covered in this lesson. After you learn the chords below, scroll back up to here and see if you can figure out what these three chords are.
It’s up to you whether you learn to read Guitar TAB, Standard Notation, or both. Every guitarist has different opinions on these formats, so choose the one that suits you best.
Learn to read Guitar TAB in this lesson.
Learn to read Standard Notation in this lesson.
Once you learn how to read one of these methods, you’ll be able to use one of these popular free Guitar TAB websites and learn almost any song you want.
How to Practice Guitar Chords
While this lesson will give you a good starting point to learning the 10 chords, you need to practice them regularly if you want to be able to use them.
It takes time to memorize chord shapes, learn where to place your fingers, and build up enough muscle memory to be able to quickly change between chords.
Having a solid practice plan and regularly practicing your guitar chords will help you learn them faster and feel more confident in using them.
Read this guide to learn how to effectively practice guitar chords.
A Major and A minor Guitar Chords
The A Major and A minor open chord shapes are easy to learn and are used in a lot of popular songs.
A Major Guitar Chord
Major chords are usually written in music as just a letter (eg: A, C, G). Some musicians will call the chord ‘A Major’, while others will just say ‘A’. Both refer to the same chord.
Here is the chord diagram, Guitar TAB, and Standard Notation for A Major:
This chord is slightly harder to learn than most of the other chords in this lesson because it requires you to squish three fingers in a tight spot on the fretboard.
Here is a photo showing how to play A Major on guitar:
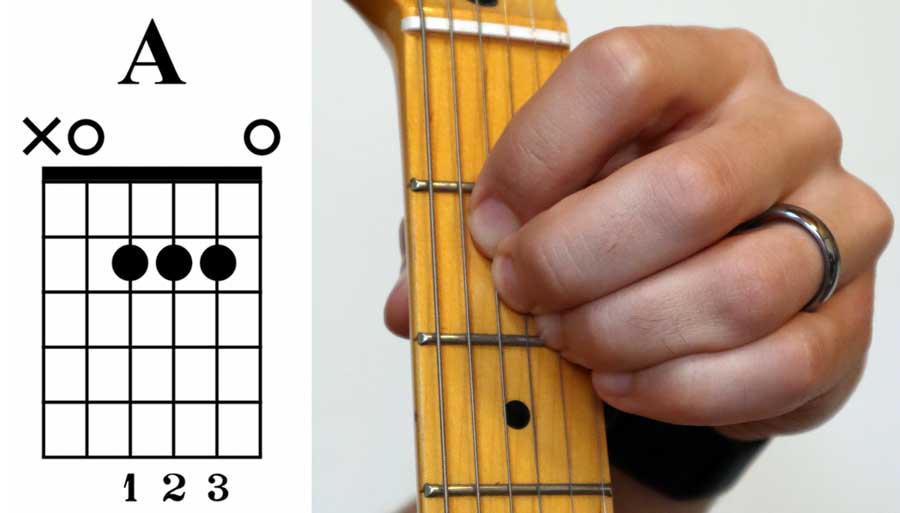
You can see that you need to line up your first, second, and third fingers (index, middle, ring fingers) across the same fret.
If you have large hands or fat fingers, you may find this chord difficult at first. But with enough practice, you’ll master it.
If you struggle to squeeze your fingers into this position, you can try swapping the position of your first and second fingers so your fingers line up 2-1-3 instead of 1-2-3.
You’re still playing the exact same notes, but some people find it easier to play A Major like this. I have quite chunky fingers and I prefer to switch my finger position to 2-1-3 when playing this chord.
Some chords use all six strings, while other chords only use four or five strings. Make sure you check the chord diagrams for any new chord you learn and memorize how many strings you need to strum.
If a chord only uses four strings and you strum all six, it won’t sound right.
When you see an ‘X’ on a string in the chord diagram, it is telling you to not strum that string. If you see an ‘O’ on a string, it means to play that string open.
A minor Guitar Chord
Minor chords are written in music with a little ‘m’ after the note letter (eg: Am, Dm, Em). So if you see ‘Am’ listed as a chord in a song, it means ‘A minor’.
A minor is easier to learn than A Major, so you can learn this one first if you want.
Here is the chord diagram, Guitar TAB, and Standard Notation for A minor:
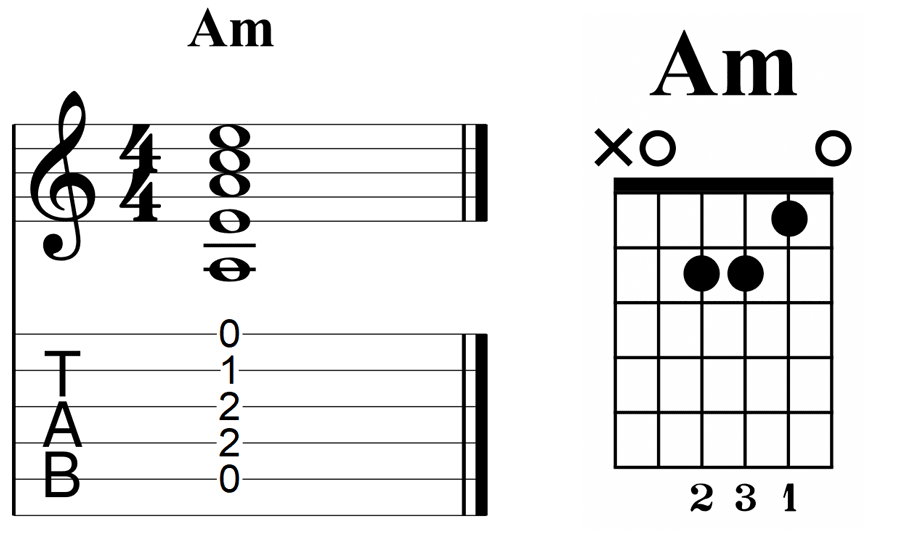
If you carefully compare the chord diagrams between A Major and A minor, you might notice that there’s only one note difference between the two. On the second string, you play the first fret for A minor and the second fret for A Major.
This is a pattern you’ll quickly learn when comparing Major and minor chords so keep this in mind for the other chords in this lesson.
Here is a photo showing how to play A minor on guitar:
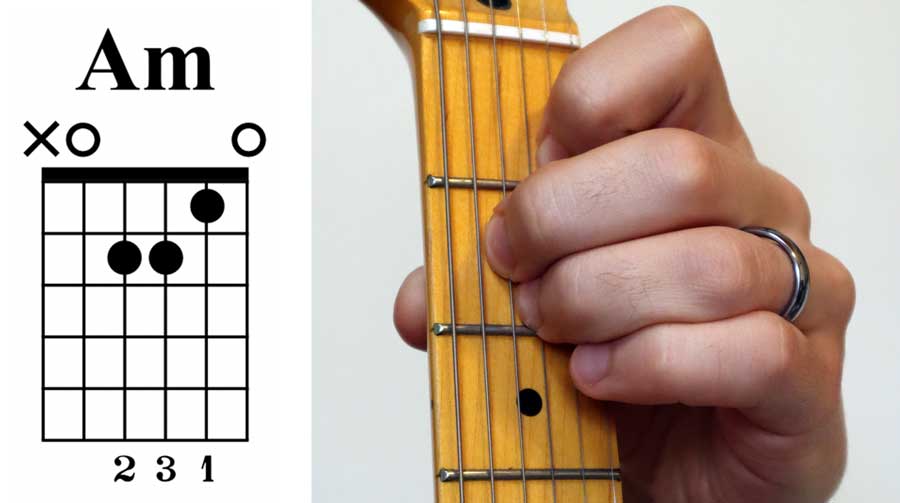
Just like A Major, this chord only uses five strings. You don’t strum the low E string, so be careful when practicing this chord that you avoid playing that string.
If you are new to learning guitar, your fingers have probably felt sore from time to time. Learning chords is often frustrating for beginners as some chords can feel uncomfortable and your fingers may even hurt.
To help avoid any pain, try to keep your fingertips as close to the frets as possible. The closer your fingers are to the frets, the less pressure you need to apply to the strings.
It is very common for beginners to press down way too hard on the strings, which causes their fingers to hurt. If your fingers hurt when trying to play these chords, you’re likely pressing down too hard.
Practice placing your fingers as close as possible to the frets and listen carefully to the chord. Try to apply the least amount of pressure possible. If you hear any buzzing when you strum the chord, apply more pressure and strum the chord again. If you don’t hear any buzzing, you don’t need to press down any harder.
C Major Guitar Chord
C Major is an easy chord to learn once you get used to using your fingertips and avoid touching adjacent strings.
C Major (or ‘C’ for short) is used in countless sounds (check out this lesson for some easy chord-based songs). You’ve probably heard of the C Major Scale as it is one of the most common scales used on the guitar. The C Major chord is used heavily in that scale as well as other common guitar scales.
Here is the chord diagram, Guitar TAB, and Standard Notation for C Major:

The main thing to watch out for when playing this chord is that your fingers don’t accidentally touch adjacent strings. Your second and third fingers are reaching over the fretboard in a way that makes it easy for them to accidentally touch other strings.
If you pick each string separately and you notice that some strings sound dead, check your finger positions. Trying to use your fingertips will help avoid this problem (see the tip later for more details).
Here is a photo showing how to play C Major on guitar:

The most common issue beginners have when learning chords is their thumb position on the back of the guitar’s neck.
The position of your thumb plays a massive role in how easily you can stretch over the fretboard.
If your thumb is off to the side or wrapped around the fretboard, you’ll have trouble stretching your fingers into position.
Keep your thumb in the middle of the back of the neck pointing up. This allows your fingers to easily reach around the fretboard and reach the correct note positions.
I’m working on a guide that explains proper thumb position. Subscribe to email updates here to stay up to date on new guides and lessons.
Every time you play one of these chords, check to make sure your thumb is in the correct position. It will take time, but eventually, you’ll get in the habit of placing it in the proper position.
D Major and D minor Guitar Chords
The D Major and D minor chords only use the higher four strings, so practicing these chords will help you develop control over your strumming hand. You want to make sure you avoid strumming the low E and A strings when playing these chords.
D Major Guitar Chord
The open D Major chord is easy to play and an easy shape to remember. If you look at the below chord diagram, you can see how the three notes form a triangle on the fretboard. Thinking of the shapes some chords make can help you memorize them faster.
Here is the chord diagram, Guitar TAB, and Standard Notation for D Major:

Watch out that your third finger doesn’t accidentally touch the high E string. Try to listen out for the high E string note when you strum the chord to make sure you’re playing it properly.
Here is a photo showing how to play D Major on guitar:

When you first try to learn guitar chords, you need to pay close attention to placing your fingers in the correct positions. After a while, you’ll start to feel comfortable with the chord shapes and you may even be able to place your hand in the correct position without looking.
A great way to test your chord abilities and knowledge is to try and play a chord with your eyes closed.
Close your eyes, then try to play a chord such as D Major or A minor. Try to feel the strings and place your fingers in the correct position without looking.
Once you think your hand is in the correct position, strum the chord with your eyes still closed. Listen to the chord and think to yourself whether it sounds correct or not.
Are all the right strings ringing out clearly? Do you hear any muted notes or buzzing? Does the chord sound like it should?
Practicing chords with your eyes closed is an advanced way you can improve your muscle memory and push your abilities higher.
You don’t want to have to look at the fretboard constantly while playing, so learning to play correctly without looking is worth the effort.
D minor Guitar Chord
The D minor open chord is very similar to the D Major chord. If you remember back to the A Major and A minor chords, only one note changed between them. It’s the same with D Major and D minor.
Here is the chord diagram, Guitar TAB, and Standard Notation for D minor:
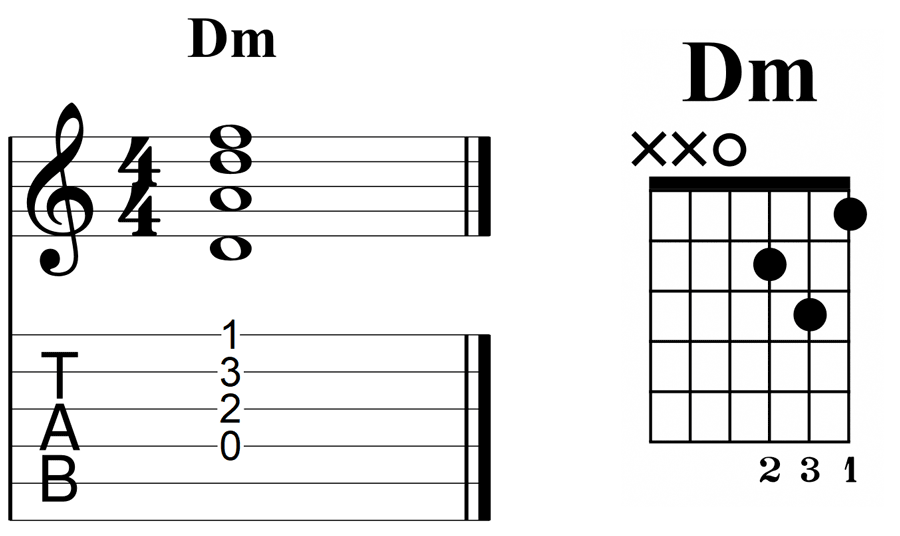
Notice that the D Major chord plays the second fret on the high E string and the D minor chord plays the first fret instead. Major chords will always play a note one fret higher than minor chords. You’ll learn why if you spend some time learning about music theory and intervals (check out this lesson on intervals for a start).
Here is a photo showing how to play D minor on guitar:

The key to getting guitar chords to ring out clearly is to use your fingertips. If you use your fingertips, you’re far less likely to run into issues with your fingers touching adjacent strings and causing muted notes or buzzing.
Keeping your fingernails short can help you press the string closer to your fingertips.
You may even notice if you let your fingernails grow longer, playing chords becomes harder. Long fingernails push your finger back and make it harder to place your fingers in the ideal position.
It is possible to play chords with long nails, but it will make the job harder. If you like having long nails, you’ll have to decide how long you can let them grow before they start causing problems in your guitar playing.
E Major, E minor, and E minor 7 Guitar Chords
Because there are two E strings in a standard tuned guitar, it’s common to see songs use chords based on E. Here are three common chords to learn that are used in countless songs.
E Major Guitar Chord
Here is the chord diagram, Guitar TAB, and Standard Notation for E Major:

The great thing about the open E Major chord is that you already know how to play it if you have learned the A minor chord. Take a look at the above chord diagram and compare it to the A minor chord diagram from earlier.
You should notice that both chords use the exact same shape and finger positions, only the shape starts on different strings. This makes it easier to memorize both chords as you use the same shape for both of them.
Practice strumming between A minor and E Major for a very simple chord progression. All you need to do is lift your hand and shift it back and forth between the two positions while keeping the shape the same.
Here is a photo showing how to play E Major on guitar:

When you strum a chord, it can be tricky to hear whether each string is ringing out properly.
If one of your fingers is accidentally touching an adjacent string, it may mute that string. You may not be able to hear it when you strum the chord.
Picking each string separately is an easy way to double-check that you’re playing the chord properly. Simply go through one string at a time while holding your hand in the chord position and listen to make sure each string rings out clearly.
If you hear that a string buzzes or has a dead/muted sound, check your finger positions. You’ll likely notice that one of your fingers is accidentally touching a string that it shouldn’t.
Each time you place your hand in a chord position, check each string separately after you strum it. After enough practice, you’ll learn to hear for any mistakes when you strum a chord and you won’t need to check each string individually.
E minor Guitar Chord
The open E minor chord (Em) is one of the easiest chords you can learn on guitar. The good news is that it sounds great and is used in a lot of songs – so it’s a great first chord to learn.
Here is the chord diagram, Guitar TAB, and Standard Notation for E minor:
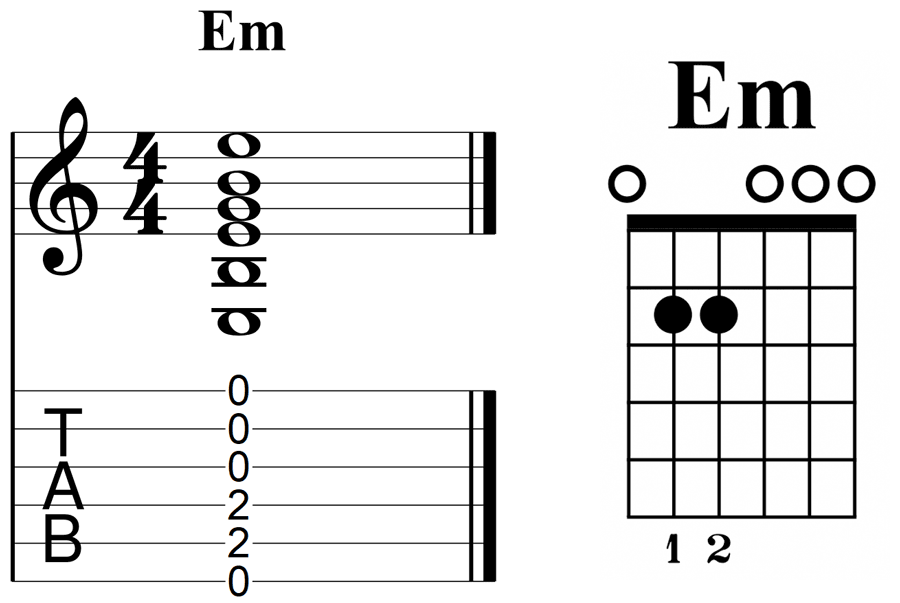
While the above chord diagram suggests using your first and second fingers, you can change this around if you like. Try using your second and third fingers, or switch the positions of your first and second fingers.
There are no rules on what fingers you must use to play chords, only recommendations. Sometimes it makes sense to play Em with your first and second fingers and other times it will make more sense to use your second and third fingers. It depends what other chords you’re playing before and after Em to make a faster transition.
For now, follow the finger recommendations in these diagrams, but keep in mind that you can change it for some chords if you find a more comfortable finger combination.
Here is a photo showing how to play E minor on guitar:
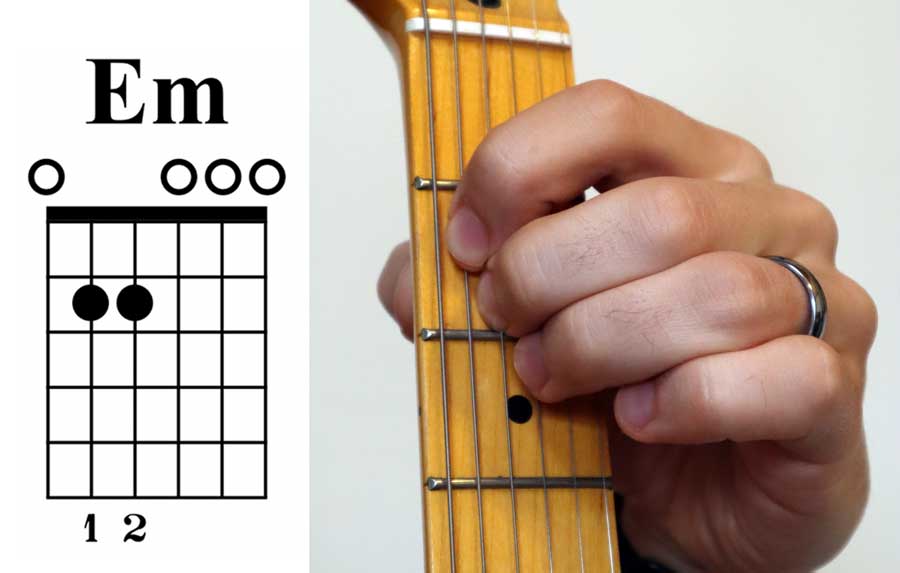
One of the most common issues I’ve noticed when students learn chords is that they tend to rush when playing a chord progression.
If you’re learning a chord progression from a song, you’ll naturally want to try and play as fast as the song.
But if your hands aren’t ready to switch fast enough between the chords, you’ll end up with bad habits if you try to play at full speed.
In the beginning when learning chords, take it slow. Really slow.
Slowly move back and forth between chords to ensure that you’re being as accurate as possible with your finger placements.
Only when the chords start to feel easy and you can move into the positions without looking should you start to think about speeding up your changes.
Start by focusing on accuracy and work on speed later on.
E minor 7 Guitar Chord
While Em7 (say: E minor seven) isn’t as common as most of the other chords in this lesson, it’s a great chord for beginners to practice.
Em7 is the easiest guitar chord you can play because it only uses one finger. If you’re looking for an easy chord to start with, start with Em7.
Here is the chord diagram, Guitar TAB, and Standard Notation for E minor 7:

While the above diagram suggests using your first finger, practice playing it separately with each finger on your hand. Get used to using your fingertip and make sure that your finger doesn’t accidentally touch the D string.
Here is a photo showing how to play E minor 7 on guitar:

One of the reasons I included this chord as a first chord to learn is because it shows you that complicated-sounding chord names like Em7 don’t necessarily mean the actual chords are difficult.
So in the future, if you see complex-sounding chord names, it doesn’t necessarily mean the chord will be hard to play.
Once you memorize a few chords, the next step is to start practicing changing between them.
Being able to change back and forth between chords is an important skill to develop. There is no point in learning chord shapes if you’re unable to move in and out of the shapes during songs.
An easy way to start practicing chords is to practice them in pairs. Pick two chords and practice changing back and forth between them.
For example, play Em7, then change into D Major. Then after you play D Major and it sounds right, move back into Em7 and strum it. Keep switching back and forth between the two chords over and over.
Focusing on two chords at a time tends to be a more effective way to practice compared to jumping around randomly between chords.
F Major Guitar Chord
F Major will be the hardest chord in this lesson for a lot of beginners. But it’s an important chord to learn and practicing it now will help you later on when you try to learn barre chords.
The F Major chord will teach you how to flatten your first finger across multiple strings – something you will need to do in every barre chord. A lot of beginners avoid learning this chord, but you will be able to play it if you work on it.
Here is the chord diagram, Guitar TAB, and Standard Notation for F Major:

Notice that the chord diagram shows the first finger for both the first and second strings. To play this, you flatten your finger across both strings and press down so both notes ring out.
This may feel awkward at first, but with enough practice, you will be able to do this without any problem.
You may think you need to apply a lot of pressure to do this, but it may surprise how little pressure you need to apply.
Flatten your finger across the strings and pick both notes. If both notes ring out clearly, slightly reduce the pressure you’re applying. Pick the strings again and listen if both notes ring out.
Keep doing this until one of the strings buzzes or sounds muted. Then slightly add more pressure.
Doing this will let you know the minimum pressure you need to apply for the chord to ring out clearly. As explained earlier, most beginners apply way too much pressure on the strings. So use this chord as a way to practice using the minimum pressure needed.
Here is a photo showing how to play F Major on guitar:

A lot of beginners will take one look at the F Major chord and decide it’s too hard for them.
Don’t make that mistake.
While F Major is harder than most of the chords on this list, it is something anybody can learn. Give it a go. It doesn’t matter if you don’t get it right today, tomorrow, or next week. Keep working on it. Eventually, you’ll get the hang of it.
Don’t avoid something because it looks or feels hard at first. If you challenge yourself, you’ll eventually succeed. If you avoid anything that looks hard, you’ll struggle to make progress.
G Major Guitar Chord
The last chord in this lesson is G Major. This chord may look difficult because it stretches over all six strings, but you may be surprised by how easy it can feel to play.
Here is the chord diagram, Guitar TAB, and Standard Notation for G Major:
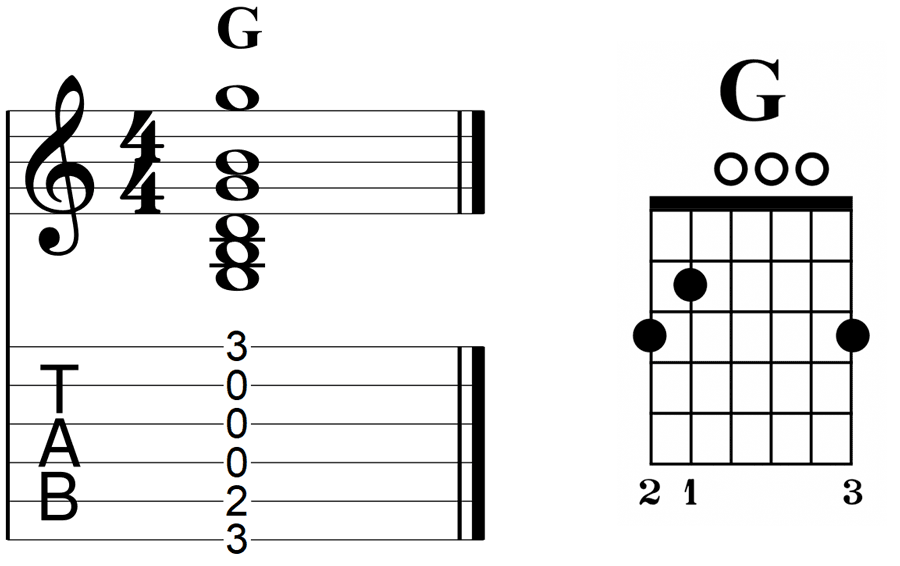
If you have trouble playing the high E string note with your third finger, you can try and use your fourth finger instead. Some people play this note with their third finger and some play it with their fourth finger.
Try both ways and see which feels more comfortable to you.
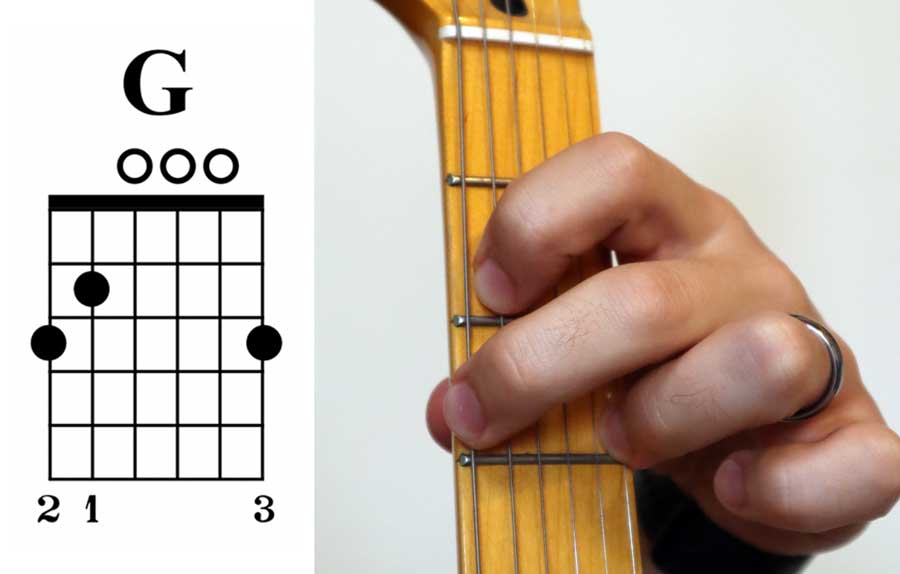
Here is a photo showing how to play G Major on guitar:
A poorly set up guitar can make it harder to play these chords. If you find that you have trouble pressing the strings down or you always hear buzzing in your chords, it may be due to a poorly set up guitar.
Read this guide on action height and this guide on truss rods to find out how to properly set up your guitar.
A well set up guitar makes it easier to practice and play these chords. You shouldn’t have to fight your guitar to get these chords to sound right.
Guitar Chord Learning Resources
The below guides and lessons will help you learn guitar chords faster, find easy songs that use the above chords, and get more out of your practice sessions:
- How to Practice Guitar Chords
- Easy Guitar Chord Songs
- 8 Easy Fingerpicking Patterns
- Easy Fingerpicking Songs
- How to Get Better at Guitar Chords
- Best Free Guitar TAB Websites
If you enjoyed this lesson and want to stay up to date on future lessons and guides, subscribe to email updates here.