
Guitar action is important to understand and know how to adjust. If you want your guitar to be as comfortable as possible to play, read through this guide to learn how to properly adjust your guitar’s action.
In this guide, you will learn what guitar action is, why it is important, how to measure it, and how to adjust it for acoustic or electric guitars.
Guitar action also plays an important part in your guitar’s intonation. Find out about intonation and how to adjust it in this guide.
What is Guitar Action
Guitar action or guitar action height is the height of the guitar strings over the fretboard. Guitar action plays a big role in how a guitar feels to play.
If the action is too high, the guitar will feel uncomfortable to play. If the action is too low, you will hear string buzzing.
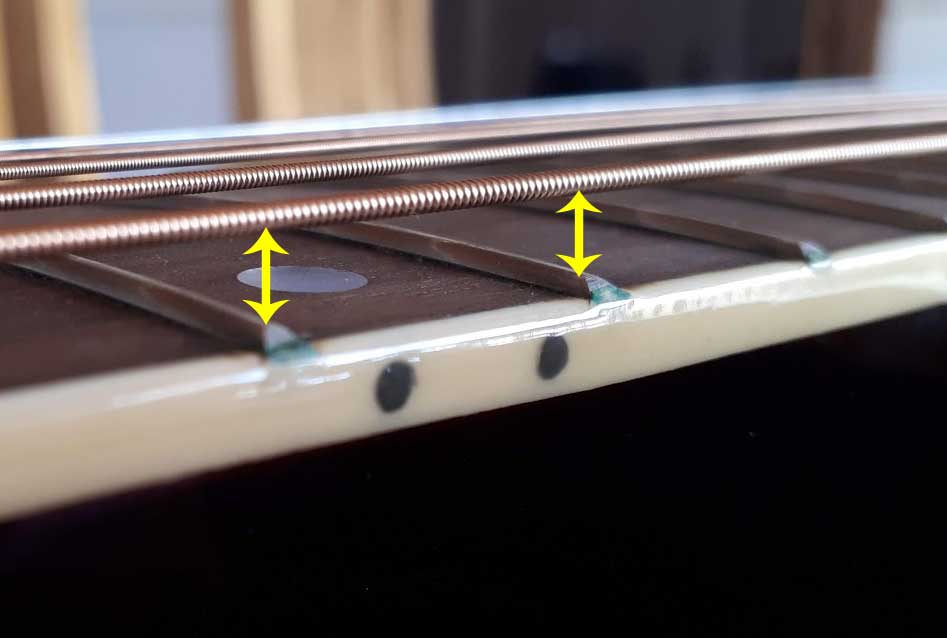
The below photo shows what is meant by the height of the strings over the fretboard:
Guitar action is important to get right because it can completely change how a guitar feels to play.
If your guitar’s action is too high, your fingers need to push the strings down really far before they come into contact with the strings. This can make it awkward to play and slows you down.
Before we look at how to adjust action, let’s look at how to properly measure it and what your action should be set to.
If you’re having issues with your guitar’s action height, make sure you fully understand truss rods and how they impact action.
This Ultimate Guide on Truss Rods explains how to check if your truss rod is set properly and how to adjust it for the best results. Read the guide to learn everything you would want to know about truss rods.
Once your guitar’s truss rod is set up properly, you can then measure your action height and make adjustments. But make sure your truss rod is first set properly.
How to Measure Guitar Action Height
Before you start adjusting your guitar’s action, it’s a good idea to measure it.
You measure guitar action height with an action gauge or ruler. Rest the end of the ruler against the 12th fret on your guitar and hold it against the string. You need to measure the distance between the top of the fret and the bottom of the guitar string.
To properly measure guitar action, you need to use the right type of ruler.
Rulers to Measure Guitar Action
The below ruler won’t work because it doesn’t start measuring from the very end:
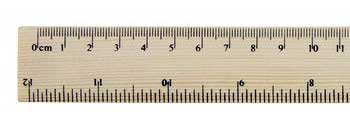
If you tried to use the above ruler, you’ll end up with a bad reading.
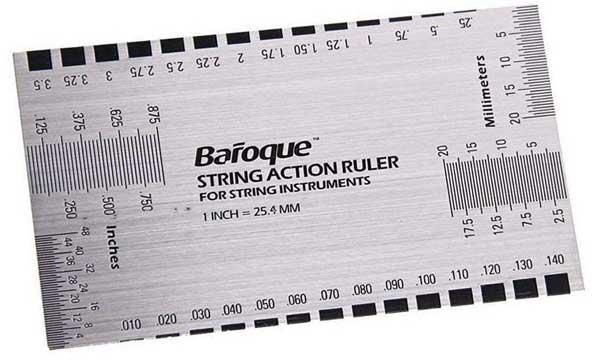
The below ruler starts the measurements from the very end, which is perfect for measuring guitar action height.

A ruler that starts the measurements from the very end allows you to press the ruler flush against the frets and get an accurate measurement.
An alternative to the above type of ruler is to buy a guitar action gauge like this one (link to Amazon):
A guitar action gauge is a custom ruler designed for measuring action on the guitar. They’re easy to use and give clear readings in inches or millimeters.
The FretGuru 2 action gauge shown below is more expensive than the above version but also measures fret height, fret wear and nut height.

An action gauge like one of the above versions is handy to have if you have multiple guitars.
Measuring Guitar Action
If you have an appropriate tool (covered above), measuring guitar action is simple.
Here are the steps to measure your guitar’s action:
- Tune your guitar. This ensures the right tension is applied to the neck
- Make sure your neck is straight and adjust your truss rod needed
- Rest the ruler or string action gauge tool on the 12th fret
- Read the ruler from the bottom of the string
- Repeat this for any other string on your guitar you need to measure
Note for step 2: if you’re unsure whether your neck is straight or you need to adjust your truss rod, read this Ultimate Guide to Truss Rods. Properly setting up your truss rod is crucial to get right before you adjust your guitar’s action.
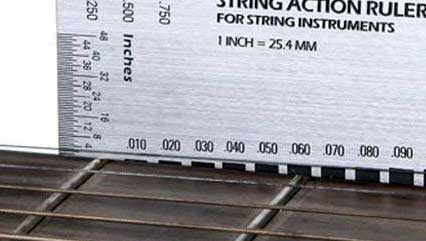
In the above photo, you can see that an action gauge makes it pretty easy to measure action thanks to the separate blocks. Simply move the gauge left or right until one of the readings matches the height of the bottom of the string. If you use a standard ruler, take multiple measurements to make sure you read the ruler properly.
Whether you need to measure all strings on your guitar or just the high and low E strings depends on the type of bridge your guitar uses.
If your guitar’s bridge allows you to adjust each saddle’s height, you need to measure the action on every string.
If your guitar’s bridge doesn’t allow you to adjust the height for each string, you only need to measure the action on the high and low E strings.
Later in this guide, we will look at different types of bridges so you can figure out whether you need to measure all of your guitar’s strings or not.
What Should the Action be on Your Guitar
The right action for your guitar depends on two things: the type of guitar you have and your playing style.
Let’s look at how playing style and action work together before we look at how action affects different types of guitars.
Playing Style and Guitar Action
The lower the action height on your guitar, the higher the chances your strings will buzz.
Low action isn’t a problem if you have a light playing style. If you are soft when picking the strings, the strings aren’t likely to buzz against the frets.
Imagine a jazz guitarist playing some fast and soft passages with gentle picking and a soft touch on the strings. Low action will probably suit the guitarist as it will make the guitar feel easier to play.
If you have an aggressive playing style, you may find that low action causes a lot of fret buzz. Raising the action can remove the buzzing and clean up your playing.
Imagine a hard rock guitarist bashing some power chords on stage. The aggressive playing style causes the strings to vibrate wide and low action would cause serious buzzing issues. This guitarist would likely prefer a higher action so he can hit the strings as hard as he wants without the notes fretting out.
Most guitarists tend to prefer lower action compared to a higher action. You will likely want the action height to be as low as possible without creating any buzzing.
This means if you are able to reduce action on your guitar without introducing buzzing, you will probably prefer the lower action.
What Should the Action be on an Electric Guitar
Electric guitars can achieve lower action than acoustic guitars. If you play an acoustic guitar and then pick up an electric guitar in a store, you will probably notice the lower action on the electric guitar.
A typical action on an electric guitar is at around 4/64″ (1.6mm) on the high E string and 6/64″ (2.4mm) on the low E string.
The photo below shows incredibly low action possible (without fret buzzing) on electric guitars.

Some electric guitarists prefer lower action than this while others prefer higher.
Set your guitar to the above action height and see how it feels. If you want to try and go for a lower action height, try lowering it slightly and listen for any increase in buzzing.
If you don’t hear any noticeable increase in buzzing, you can lower action again if you want. Try to find the limit on how low you can set your action to, then decide what the ideal height is for you.
It is important that you adjust and test the action on your electric guitar with the guitar plugged in.
When a guitar isn’t plugged in, even the slightest fret buzzing is instantly noticeable. But when you plug the guitar in, you may notice that the amount of buzzing you hear decreases significantly.
Low action causes the string to vibrate against adjacent frets. But the pickups are far away from this buzzing, which is why it doesn’t pick it up very well.
While the ideal setup is to have zero buzzing, electric guitars can get away with some slight buzzing. So if you hear some slight buzzing while testing your unplugged electric guitar, plug it in and test it out again. You may find that the buzzing almost completely goes away.
If you mainly use distortion or overdrive when you play, a slight buzzing will have zero impact on your tone.
There are many electric guitarists who are happy to have some slight buzzing in exchange for super-low action height.
What Should the Action be on an Acoustic Guitar
Unlike electric guitars, any buzzing due to low action is obvious on an acoustic guitar. This is why acoustic guitars usually have higher action than electric guitars.
A typical action on an acoustic guitar is at around 5/64″ (2.0mm) on the high E string and 7/64″ (2.8mm) on the low E string.
The slight increase in action height gives an acoustic guitar’s strings more room to vibrate. This gives you a clearer tone and allows you to strum chords without ending up in a buzzing mess.

The action you set on an acoustic guitar also depends on whether you use a capo often. A capo will lower the action across the fretboard and the further up the neck you place it, the lower the action will be.
So even if your guitar has high action, you may not notice it if you always use a capo and play mainly open chords. You may find that a slightly higher action works best when you regularly use a capo.
If you use a guitar slide on your acoustic guitar, you will likely prefer high action.
High action is recommended for slide playing because it gives you some extra room to move when pressing the slide on the strings.
The worst sound when playing with a slide is the strings fretting out. You want to hear a smooth glide between notes and having low action can completely ruin it.
If you play fingerstyle on your acoustic guitar, you will be able to play with a lower action compared to a guitarist who strums chords.
Is the Action on my Guitar Too High?
It is easy to tell when the action is too low. You end up with fret buzzing. But how do you know if the action is too high?
There are two ways to tell if the action on your guitar is too high: intonation and feel. If your guitar’s intonation is out or the guitar feels awkward to play compared to other guitars, the action may be too high.
High action can throw off your guitar’s intonation because you need to push the string further to reach the fret. The distance you push the string causes the note to bend out-of-tune.
Check your guitar’s intonation by playing a 12th fret natural harmonic and compare the pitch against the fretted 12th fret note. If you hear a difference between the two notes, it means your intonation is out.
High action can also be a result of a poorly set truss rod. If the neck has too much relief, it will cause high action.
Read through this guide to learn about Truss Rods and how to properly adjust them.
The key point to remember is that everybody has different preferences when it comes to action height. If you feel the action is too high on your guitar, try lowering it.
Learn more about intonation in this guide. The guide includes diagrams and step-by-step advice on how to adjust intonation.
How to Adjust Action on an Electric Guitar
Adjusting the action on an electric guitar depends on what type of bridge it has.
Some bridges allow you to adjust the action height for each individual string, while others only allow you to adjust the height across the entire bridge.
Important: if you want to raise the action on your guitar, keep in mind that this will cause the strings to raise in pitch. So it’s a good idea to slightly de-tune the strings before you make adjustments to avoid breaking strings.
Tune-o-Matic Bridges
Guitars with a Gibson Tune-o-Matic bridge give you two points where you can raise or lower action.
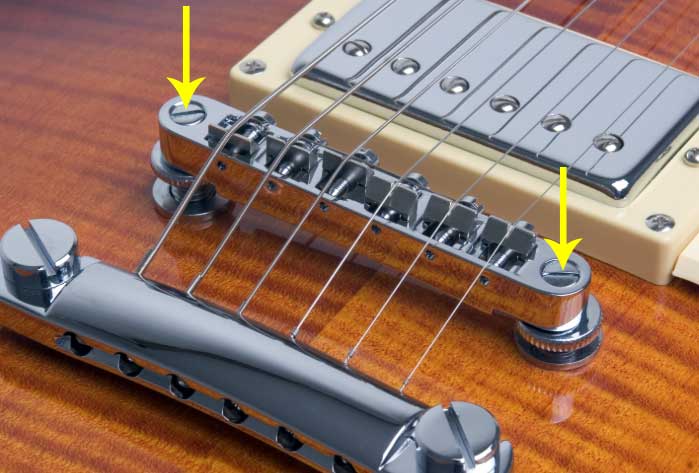
In the above photo, you can see that there are two screws you can adjust on the bridge posts. This gives you some control over the action on your guitar but not complete control over each individual string.
If your guitar has this type of bridge, you only need to measure the action height on your low and high E strings. Then you can adjust the heights of these two posts as needed.
Let’s say you have measured the action on your low E string and you want to lower it. Simply turn the screw on the bridge post next to the low E string and slightly lower the post.
Re-tune your guitar (every adjustment will impact your guitar’s tuning) and re-measure the action.
Once you have your ideal action height on the low E string, measure your high E string and adjust the other post as needed.
If the action on the middle strings is too low and causing issues, you will need to compromise and raise the action across all strings. That’s the limitation with this type of bridge.
Floyd Rose Bridges
Floyd Rose bridges use two posts to adjust the action and are similar to the above Tune-o-Matic bridges.
Find out more about Floyd Rose bridges in my ultimate guide here.

To adjust action height with a Floyd Rose bridge, use an Allen wrench (3mm) to adjust the height of each post.
It’s important to make sure your bridge is properly set up before you adjust for action.
For example, if your Floyd Rose bridge looks like this in it’s resting position, you need to fix it first before you consider adjusting the action:
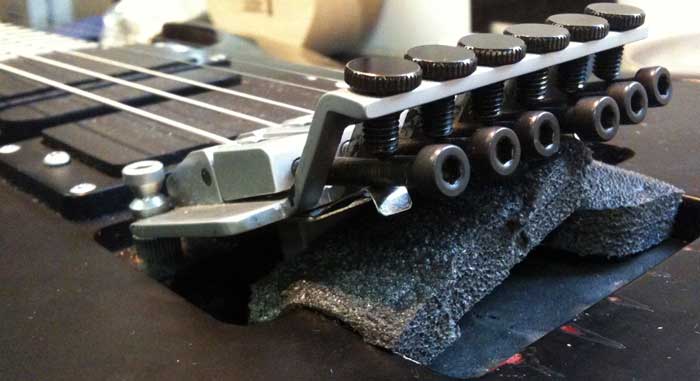
A poorly set up Floyd Rose bridge will cause action height problems as the bridge is designed to raise and lower. If the bridge is imbalanced, you will see a big change in action.
The above guitar will likely have action so high it becomes unplayable. Fixing the tension balance will significantly improve the guitar’s action without needing to touch the action adjustment posts.
Fender-style Bridges
Bridges with individual saddles give you the most control over action height, but require the most work to set up properly.
To adjust the action height on this type of bridge, you need to use a 1.5mm Allen wrench to adjust the two screws on each saddle.
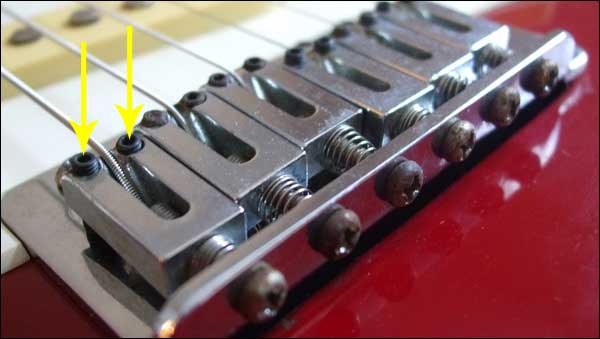
Make sure you adjust both height screws to the same height so your saddle stays flat.
With this type of bridge, you need to go through each string and check the action height for each one.
Some guitarists like to use an under string radius tool as shown below to adjust the action on each string to perfectly match the radius of the fretboard.
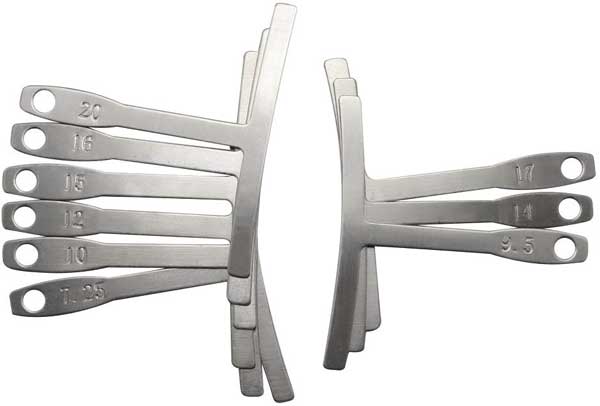
For most guitarists, buying this tool is overkill as you can properly set the action for each string with careful measurements. But if you want to use one, check out this set here.
To use this tool, start by adjusting the action for the high and low E strings.
Then hold the correct radius tool for your guitar under the strings near the bridge as shown below:

Make sure the tool touches both E strings. If it doesn’t, find out which string is touching the tool and raise that string’s action until the tool can rest against both E strings.
For example, if the G string’s action height is too low, it means that string will be pressing against the tool and the tool won’t be able to touch both E strings. By raising the action height of that string, it will eventually allow the tool to rest against all the other strings.
On the other hand, if a string’s action height is too high, the tool won’t be able to rest against it. Lowering the action height of that string until it touches the tool will make sure the radius is correct.
Now pick each string individually. If the string buzzes against the tool, it means the action is fine for the radius.
If the string rings out clearly, you need to raise the action for that string until it starts to touch the tool.
You know when you have set the action right on all of the strings when all of them touch the tool.
How to Adjust Action on an Acoustic Guitar
Adjusting the action height on electric guitars is fairly simple and easily reversible if you go too far in one direction.
Adjusting the action height on acoustic guitars is a bit of a pain and you need to be careful that you do it properly.
The issue with adjusting the action on acoustic guitars is that it requires you to modify the saddle.
In the below photo, you can see that the height of the strings is set by the height of the saddle. Imagine removing this saddle and replacing it with a shorter one. The action across the guitar would lower due to the shorter saddle height.
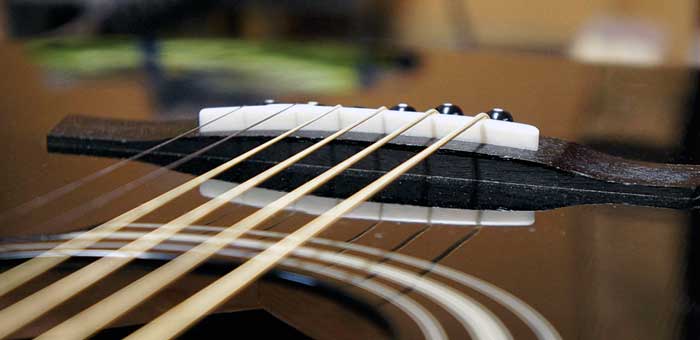
Changing the action on an acoustic guitar is a painful process as you first need to slacken the strings enough to slide the saddle out.
Let’s look at how to raise or lower the action of an acoustic guitar.
There are three ways you can control the action on an acoustic guitar.
The first way is by adjusting the height of the bridge saddle. This is the method I will be covering below because it will likely lead to the ideal action for most guitarists.
The second way is to adjust the height of the nut. A small change in nut height creates a big change in overall action, so I recommend leaving the nut and focusing on the saddle height first.
The third way is to adjust the truss rod, which should be set up to an ideal position before you look at action height.
Lowering Action on an Acoustic Guitar
If you want to lower the action on your acoustic guitar, you need to remove the saddle and file it down.
Once you measure the action, remove the saddle and use a file to shave material off of the bottom of the saddle while keeping it straight.
If you file too much off or accidentally create a curve in the bottom of the saddle, you’ll need to buy a new saddle and start again.
Because this is a delicate process, here are some tips to avoid mistakes:
Mark your saddle before you start filing: once you start filing, it can be hard to tell how much material you have taken off. So use a pen and ruler to mark a line on the saddle (shown below) so you can easily see how much you have filed off.
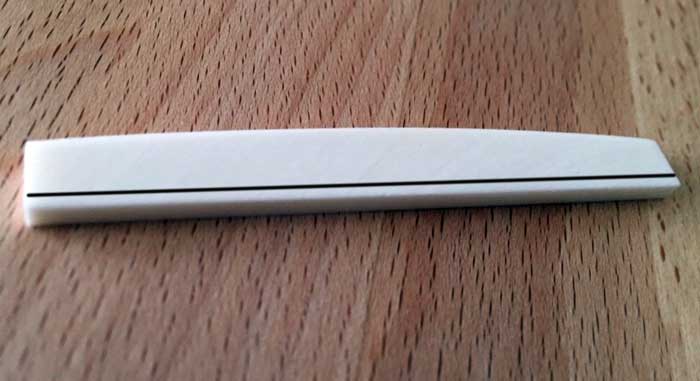
Marking the saddle with straight lines also helps you keep your filing straight. Be careful not to apply too much pressure on one side of the saddle or you’ll end up with uneven action across the strings.
Don’t try to file your saddle down in one go: there’s nothing worse than filing too much off of your saddle and having to buy a new one or shim it.
File off a small amount, replace the saddle in the bridge, tune-up the strings and measure the action again. While this is a lot more work, it may prevent filing off too much and having to start again on a new saddle.
What Changes Action Height
If you suddenly notice that the action on your guitar has changed, don’t worry you’re probably not crazy. There are some things that can affect your guitar’s action and change it over time.
Temperature and Humidity Changes
As you might expect, temperature and humidity affects wood. It’s common to see acoustic guitars warp due to a big change in humidity, so keep this in mind if you have an acoustic guitar.
If you notice that the changes in seasons affect the action of your guitar, you may want to consider how you store your guitar and the condition of the environment you keep it in. Otherwise, you’ll need to make adjustments to keep your guitar in an ideal condition.
String Gauges and Tension
If you change the string gauge on your guitar, it will change the tension across the neck. This can affect the bow of the neck (explained in this guide on Truss rods) as well as the guitar’s action.
Changing string gauge doesn’t always impact action, but if you notice a change in action after changing your set of strings, the new strings may have thrown your guitar out of balance. Be sure to check the bow of your neck before you start making adjustments to the action.
Find out more about string gauges and tension in this guide. The guide explains how string gauge and tension affect your guitar and will help you understand what gauge strings are best for you.