
Many guitarists are intimidated about truss rods and hesitate to make any adjustments to them.
In this guide, I will explain everything you would want to know about truss rods so you can confidently adjust yours to get the best results out of your guitar.
By the end of this guide, you will know whether you should adjust your truss rod and you’ll know exactly how to do it.
Once you understand how to correctly set up your truss rod, read this guide to learn about guitar action. The guide explains how to measure and adjust action for ideal playability.
The truss rod also impacts your guitar’s intonation. Find out about intonation and how to adjust it in this guide.
What is a Truss Rod
Before you try to adjust a truss rod, it’s a good idea to understand what a truss rod is and how it works.
A truss rod is a long metal bar that runs through the length of a guitar neck. This rod can be adjusted to help the guitar neck resist the tension created by strings.
Truss rods are usually made out of steel, but other materials such as graphite can be used in some truss rods.

As you can see from the above photo, a truss rod is installed in a channel inside the neck, under the fretboard.
Truss rods affect three things that will be covered in detail in this guide: relief, action, and intonation.
A truss rod can compensate for the tension in strings, seasonal changes in weather, fret wear, and different playing styles.
When you use a truss rod properly, you can set up your guitar for optimal playability and comfort. You will learn how to do this in this guide.
How Does a Truss Rod Work
When you tune up a guitar, the strings create a lot of tension on the neck. The strings basically pull the neck into a bow as shown below:

Heavier gauge strings create even more tension, which would add more pull on the neck.
If a guitar didn’t have a truss rod, the guitar neck would gradually bow over time until the action (height of strings over the frets) becomes unplayable.
To compensate for the tension created by the strings, a truss rod is installed in the guitar neck.
A truss rod works by countering the pull from the strings. By adjusting the truss rod, the bow in a guitar neck can be straightened out.
If you tighten a truss rod, it will gradually move the neck away from a forward bow (called relief) and towards a back-bow.
If you loosen a truss rod, it releases tension in the neck and gradually moves the neck into a forward bow (relief).
Here is a diagram showing how a truss rod affects the bow in a neck:

As you can see, the truss rod adds or removes tension in the neck which affects the way the neck bows. You can control the amount of bow to match the string gauge you use (find out more about string gauges and tension here) and playing style.
Truss rods are installed in a routed channel in the guitar neck, below the fretboard. Here is a photo of an installed truss rod before the fretboard has been glued to the neck:

A truss rod adds a significant amount of stability and control over the neck, which is why most guitars use them.
Single-Action vs Dual-Action Truss Rods
There are two types of truss rods found in guitars: single-action and dual-action.
Single-action truss rods are threaded on one side and the other side is fixed. Vintage electric guitars are more likely to use a single-action truss rod. These truss rods are limited as they are designed to only create a back bow.
You can adjust a single-action truss rod back and forth to adjust relief, but if you try to create a forward bow, you will soon hit a limit.
Dual-action truss rods are threaded on both sides and have a fixed bar running along the length.

Dual-action truss rods can be adjusted to create a back bow or a forward bow. These truss rods are far more common in modern guitars as they provide far greater control over your neck.
There’s no way to know whether your guitar uses a single-action or dual-action truss rod by looking at it. Look up your guitar online to find out which type it uses.
How Truss Rods Affect Playability
By adjusting the truss rod, you can change the relief of the neck, which affects the guitar’s action and intonation.
Let’s look at how relief, action, and intonation affect playability.
Relief
It should be pretty obvious by now that the main function of a truss rod is to adjust the relief of the neck.
The relief of the neck plays a big role in playability. A large bow can be frustratingly uncomfortable to play, while a straight neck with slight relief can feel amazing.
If you find that your guitar is harder to play in some areas of the fretboard than others, then you might want to check the relief of your neck.
Action
Action is the height of the strings over the frets. The greater the distance, the higher the action.
Every guitarist has a different preference when it comes to action. Some guitarists prefer the lowest action possible (strings very close to the frets), while others are happy with higher action.
Truss rods affect the action of your guitar, but it’s only part of the picture. The other part of controlling action is from your guitar’s bridge.
When you want to adjust the action on your guitar, you need to consider both your truss rod and your bridge.
For example, if you want low action, you want to start by adjusting your truss rod to get it straight with slight relief. This slight relief prevents fret buzzing. Then you can make further adjustments to action with your bridge.
The key point to remember with action is that too much action affects intonation (explained next) and too little action can create fret buzzing.
Find out more about action in this Ultimate Guide to Guitar Action. The guide explains how action affects playability, how to measure action and how to adjust it on acoustic or electric guitars.
Intonation
Intonation is how in-tune your guitar is across the fretboard. You might think that if you tune your strings that the entire guitar will be in-tune, but it isn’t that simple.
Intonation is mainly controlled from your bridge, but adjustments you make to your truss rod can affect intonation.
Imagine a guitar with a big forward bow (high relief) as shown below:
Now imagine you play a note on the 12th fret:

The red line and arrow show how far the string needs to be pushed to reach the fret. That extra distance creates extra tension in the string, which will push the note out-of-tune. This means the lower fretted notes and open strings will sound in tune, but as you move up the neck, the notes will gradually become out-of-tune.
To prevent intonation issues, we try to aim for a slight relief.
A slight relief in the neck creates low action in the higher frets while preventing fret buzz in the lower frets. Low action can create better intonation.
The key point to remember with intonation is that any adjustments you make to your truss rod can affect intonation. So if you do adjust your truss rod, check your intonation and make further adjustments from your bridge if you need to.
Find out more about intonation in this guide. The guide includes step-by-step diagrams and tips on how to properly adjust intonation.
How to Tell if a Guitar Has a Truss Rod
Not all guitars have truss rods. This is because not all guitars have a need for a truss rod.
Most classical guitars don’t use truss rods. This is because the tension created by the nylon strings isn’t as strong as the tension created from steel guitar strings.
For all other types of guitars (steel-string acoustic, electric, bass), you should expect it to have a truss rod.
You can tell if a guitar has a truss rod by checking at either end of the neck for either a truss rod cover or direct access to the truss rod. Some guitars provide access to a truss rod on the headstock, while others provide access on the guitar body.
Here are some guitars with truss rod access on the headstock:

Some of the above guitars use a truss rod cover to hide the truss rod. If your guitar has a plastic cover on the headstock with a screw holding it in place, behind it will be the truss rod.
Some guitars have direct access to the truss rod like the Fender in the above photo.
Here are some guitars with truss rod access on the other side of the neck at the guitar’s body:

Acoustic guitars typically provide access to the truss rod through the sound hole, but some provide access on the headstock, so check both areas on your guitar.
Truss rod access next to an electric guitar’s pickups are less common but found on some models such as the Fender Elite Stratocaster. The above photo shows a wheel you insert a truss rod tool into to make adjustments.
How to Adjust a Truss Rod
Now that you understand what a truss rod is, how it works, how it affects playability, and where to access yours, we can look at how to adjust it.
You can seriously damage your guitar if you incorrectly adjust your truss rod.
It takes a day or two for a truss rod adjustment to completely settle. This means you won’t immediately see the complete changes from any adjustments you make.
For this reason, it is highly recommended you only make minor adjustments to the truss rod and give your guitar time to settle before you make further adjustments.
Aim to only turn your truss rod 1/4 turn at a time and if in doubt, let your guitar settle before making more adjustments.
Before you make any adjustments to your truss rod, have a think about what you are trying to achieve. I recommend reading through this entire section before you adjust your truss rod.
Here are the steps to adjusting your truss rod:
- Check the current bow in your guitar’s neck
- Work out which way the truss rod needs to turn
- If you are tightening the truss rod, loosen your strings
- Adjust your truss rod in the appropriate direction
- Re-tune your guitar and let it settle
- Check the bow again and repeat the steps as needed
Now let’s go through this process so you know exactly what to do to adjust your truss rod.
First, check the current bow in your guitar’s neck.
You can easily do this by looking down from the headstock and checking the bow of the neck against the strings:

Take note of the bow of the neck and how close the strings are at different points along the neck.
Remember that we’re aiming for a slight relief for the best results, so don’t feel that your neck has to be perfectly straight or you may experience fret buzzing.
If the bow is quite large, it means you need to tighten the truss rod. A large bow is caused by too much tension from the strings, so tightening the truss rod will compensate for this tension.
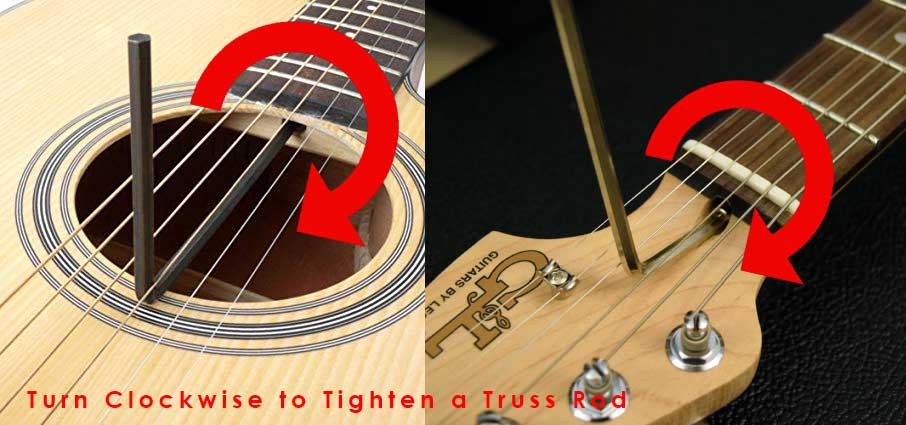
To tighten your truss rod, turn your truss rod tool clockwise:
Tightening your truss rod means it creates extra pull away from the strings. This means it will pull your strings out-of-tune. To avoid any problems, loosen your strings before you make adjustments to your truss rod.
If there is a back bow or you’re experiencing buzzing frets, it means you need to loosen the truss rod. Loosening the truss rod will allow the strings to create more pull on the neck.
To loosen your truss rod, turn your truss rod tool anti-clockwise:

As loosening the truss rod reduces the tension on the strings, you will notice your guitar drops in tuning after any adjustments. This means you don’t need to loosen your strings before making adjustments to the truss rod.
Make sure you re-tune your guitar to properly check your adjustment before you make any further adjustments.
Here are some tips to keep in mind when adjusting your truss rod:
- Only turn your truss rod 1/4 turn at a time at the most
- Re-tune your guitar to properly check changes after an adjustment
- Full changes from any adjustment can take a day or two to settle
- Never force your truss rod. If it feels hard to turn, it might be at its limit
- If nothing is happening while adjusting your truss rod, it may be a dual-action truss rod. Continue to make adjustments and you will eventually see changes in the neck
Truss Rod Tools
To properly adjust your truss rod, you need to use the properly sized tool. Unfortunately, this isn’t straight forward as the type of tool you need depends on the guitar.
The below truss rod toolset should you that there isn’t a one-size-fits-all tool for truss rods:
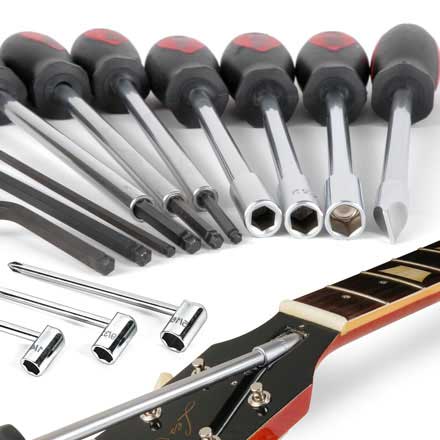
Some guitars use standard Allen hex wrenches in various sizes, while others use specifically made cranks that only work on certain guitars.
It is important that you use the appropriately sized tool to adjust your truss rod. If your guitar uses a standard hex wrench, make sure you use the right-sized wrench. Using the wrong size wrench can strip the nut and cause a lot of dramas.
As you can imagine, a truss rod isn’t easy to replace, so you want to avoid stripping the truss rod nut at all costs. If you have a hex wrench but aren’t sure whether it is the right size, take your guitar to a guitar shop to find out the exact size you need or order a set. Don’t risk damaging your guitar by using the wrong sized wrench.
Truss Rod Troubleshooting
Here are some common issues guitarists run into with truss rods and how to deal with them.
Can’t Turn Truss Rod
You should be able to adjust a truss rod without much force. If you can’t turn your truss rod one way, try turning it the other way. If it is able to turn the other way, it means your truss rod is at the limit.
If the truss rod can’t be turned the other way, it’s a sign that it is broken or damaged.
How to Get Rid of Fret Buzz
You can get rid of fret buzzing in most cases by adjusting your truss rod.
If your frets buzz in the lower part of the fretboard (eg: lower than 7th fret), it means there isn’t enough relief in the neck. Loosen the truss rod to create more relief.
If your frets buzz above the 12th fret but nowhere else, add some slight relief by loosening the truss rod. If that doesn’t work, adjust the bridge to slightly raise action.
Can a Truss Rod Be Replaced
A truss rod is installed beneath the fingerboard in a channel in the guitar’s neck. This makes it difficult but not impossible to replace.
To replace a truss rod, you would need to separate the fretboard from the neck to access the truss rod channel.
Truss Rod FAQs
Should I loosen strings before adjusting truss rod?
You only need to loosen your guitar strings before adjusting your truss rod if you want to tighten the truss rod. Tightening the truss rod creates extra tension on the strings, which can cause problems.
If you want to loosen your truss rod, you don’t need to loosen your strings.