
The guitar pedals in this guide are essential for any acoustic guitarist performing live.
While you can add effect pedals to your pedalboard to enhance your acoustic tone, these pedals give your tone a solid foundation for any performance.
In this guide, I will go through:
- 5 must-have pedals for acoustic guitar with best pedals for each type
- How to arrange the pedals in a pedalboard in the best order
- Advice on getting a good live acoustic guitar tone
If you are looking for effect pedals to add something different to your acoustic tone, check out these 7 Guitar Effects for Acoustic Guitar. The guide includes audio examples of each effect in action on acoustic guitar.
Acoustic Guitar Pedal Advice
Many acoustic guitarists are hesitant to build a pedalboard. You love the sound of your acoustic guitar so why would you want to mess with it?
The problem is that the natural and vibrant sound of your acoustic guitar can easily lose it’s sparkle when you have to rely on an internal pickup or microphone for a live performance.
Suddenly, your amazing acoustic tone can sound thin and brittle, or boomy and flat. Hearing a dry acoustic guitar through a PA system can sap away a lot of energy from your performance. Fortunately, with a few basic guitar pedals, you can add life back into your acoustic guitar tone.
Think of the guitar pedals in this guide as tools you can use to shape and balance your tone for the perfect live sound.
Any pedals you add in addition to the below can enhance your acoustic tone, but these pedals are the foundation to build on.
The main advice I recommend when thinking about your live acoustic tone is to have control over it.
If you don’t have any pedals for your live rig, you need to hope that the venue doesn’t sap the life out of your tone.
If the venue has no natural reverb, you’ll sound dry and dull. If the venue creates feedback problems for your guitar, it’s going to be a tough battle.
The below pedals give you control over your acoustic tone and help you restore the vibrant tone you’re used to hearing.
Guitar Tuner Pedal for Acoustic Guitar
Every live performer (acoustic or electric) should have a tuner pedal.
As an acoustic guitarist, you probably already use a clip-on tuner. They’re handy and do a great job. So I’m not surprised if you don’t feel the need to get a tuner pedal.
But there is a huge benefit of having a tuner pedal ready to stomp on at any point and it’s something you should consider as an acoustic guitarist.
Why a Guitar Tuner Pedal is Essential for Acoustic Guitar
Guitar tuner pedals also allow you to instantly mute your signal with a simple press of the footswitch.
There are two reasons why this is great as a live performer.
The first reason is that you can check and adjust your tuning in silence. Nothing screams ‘amateur’ as hearing a guitarist pluck the open strings repeatedly in-between songs.
With a tuner pedal, you simply hit the footswitch and can change or adjust your tuning in silence like a pro.
The second reason is that it gives you a handy killswitch. Being able to instantly mute your signal is handy when you need to switch guitars, fumble around with your capo, or get some unexpected feedback.
It might seem like a minor benefit, but being able to easily mute your guitar can improve the audience’s perception of you.
Recommended Guitar Tuner Pedal for Acoustic Guitar
There are many great guitar tuner pedals to choose from and all of them will work with acoustic guitar.
The guitar tuner pedal I recommend for acoustic guitar is the PolyTune 3 Mini by TC Electronic (link to Amazon for price and details):

Here are the main reasons why I recommend this pedal:
- You can check the tuning of all of your strings at once by strumming them
- The screen is bright enough to clearly read in daylight gigs
- You can choose between True Bypass or Buffered Bypass (read more about this here)
- The Mini version takes up less room than the standard version, so it leaves more room for other pedals
- You can choose between three tuning modes (Polyphonic, Chromatic, and Strobe)
The big advantage this pedal offers over other tuner pedals is the polyphonic tuning mode. Being able to strum all of your strings and see which strings need adjustment is such a time-saver.
Read more about the PolyTune in my review of the PolyTune 2 Mini here. The PolyTune 3 offers the same features (with improvements) as well as the extra choice of a buffered bypass.
Learn more about tuner pedals and other options (as well as clip-on tuners) in my Ultimate Guide to Guitar Tuners.
Reverb Pedal for Acoustic Guitar
Reverb is a crucial part of what makes an acoustic guitar tone interesting. Without reverb, acoustic guitars are dry and dull.
Reverb is also far more important for acoustic guitar than it is for electric guitar. So while reverb is nice-to-have for an electric guitarist, it is essential for an acoustic guitarist.
Why a Reverb Pedal is Essential for Acoustic Guitar
Take your acoustic guitar into your garage, your bathroom, your bedroom closet, and outside and compare what you hear.
While the base tone stays the same, you will hear a massive difference due to the reverb you hear in each location.
Your guitar will sound bright and shimmery when you strum it in a tiled bathroom and, it will sound oddly muted in a walk-in closet.
When you strum your acoustic guitar, you’re not just hearing your guitar. You’re also hearing your room.
Reverb is a crucial part of your acoustic tone, so that’s why a reverb pedal is considered a must-have part of any acoustic guitarist’s pedalboard.
The problem with performing live with an acoustic guitar is that you’re completely relying on the reverb from the venue. In some venues that have great acoustics, this can work in your favor. You’ll end up with a vibrant and rich tone.
In other venues, relying on natural reverb is a recipe for disaster.
A reverb pedal allows you to control the quantity and quality of the reverb. You can dial in a thick and lush reverb to give your arpeggios a dream-like quality, or you can dial the reverb back for a punchier tone.
There are different types of reverb and you can choose the best type for any style of music you play. You can even match the perfect reverb to each song you play.
Check out the below video for a great example of how the different types of reverb can completely transform the vibe of your tone:
If you’re interested in the pedal used in the video, check out my review of the MXR M300 Reverb here.
Recommended Reverb Pedals for Acoustic Guitar
There are two key features I recommend looking for when getting a reverb pedal for acoustic guitar:
Multiple reverb types with easy access: the above video demonstrates how changing to a different type of reverb can completely change the vibe of what you’re playing.
Being able to easily change between different reverb types is a huge benefit when performing live. Look for a pedal that has a knob that can toggle between different types of reverb.
The more types of reverb a pedal has, the more options you have for different songs and venues.
Stereo input/output: being able to run your acoustic guitar in stereo is a great ability to have. When combined with other stereo pedals such as chorus, a single acoustic guitar can fill a room with a lush quality not possible with a mono signal.
Even if you don’t run in stereo now, you may consider it in the future. So I highly recommend getting a stereo reverb pedal so you always have the option for the future.
While there are many great options for reverb pedals suitable for acoustic guitar, there are two I highly recommend.
The first one is the Hall of Fame 2 by TC Electronic:
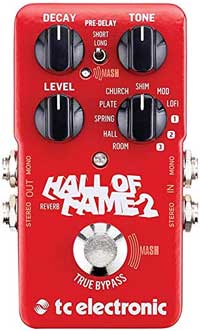
In the below photo, you can see that you can easily switch between 8 different types of reverb as well as 3 custom preset positions.
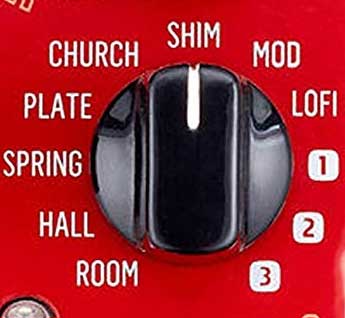
This gives you incredible flexibility over the type of reverb. You can easily change between types and save your own custom presets using TonePrint.
The Hall of Fame 2 also includes other handy features such as being able to change the pre-delay, stereo input/output, and the mash feature (basically uses the footswitch as a mini expression pedal).
Unlike other reverb pedals, it is compact while packing in a lot of different options. It’s a great option at a low price (it’s a third of the price of the next pedal).
Check out the full details of the Hall of Fame 2 Reverb here (link to Amazon).
The other reverb pedal I highly recommend is the Eventide Space Reverb:
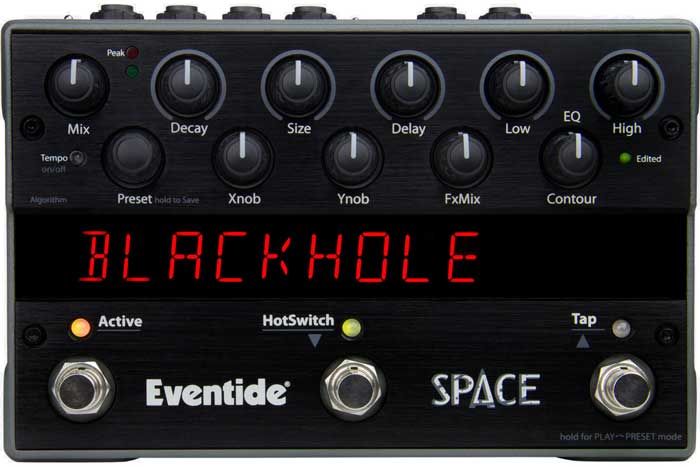
This pedal is three times more expensive as the Hall of Fame 2, but a quick glance of the above photo should tell you why.
It packs in 12 types of reverb along with a variety of other spatial effects such as delays, pitch shifting, modulation, and tremolo.
This pedal is suitable for acoustic guitarists wanting to expand their tonal options and look for unique ways of dialing in different sounds for different songs.
You’re able to create your own custom presets and easily switch between them while performing.
Check out the full details of the Eventide Space Reverb Pedal here.
If you’re looking for a standard reverb pedal I recommend the Hall of Fame 2. It’s a good quality pedal with plenty of reverb options.
If you’re looking for a reverb pedal with more freedom to create lush layers and interesting spatial effects to enhance your acoustic tone, I recommend the Eventide Space Reverb.
There are plenty of other great options to consider such as super-high-quality Strymon Big Sky or the EHX Cathedral (with an interesting infinite footswitch).
Find out more about these pedals and more advice on reverb in my Ultimate Guide to Reverb.
Compressor Pedal for Acoustic Guitar
Acoustic guitars are incredibly dynamic instruments. You can go from soft and delicate fingerpicking parts to mellow palm-muted riffing all the way to face-to-the-wall strumming.
While it’s great that acoustic guitars can be so dynamic when performing live, you need to have control over the dynamics. A compressor pedal gives you that control.
Why a Compressor Pedal is Essential for Acoustic Guitar
In my Guitar Effects Course, I go into great detail on how compressors work and how they process your guitar’s signal.
A simple way of thinking about compression is that instead of your guitar volume varying from anywhere from 0 to 100, you can set upper and lower limits.
So you could tighten up your signal so the volume is always between 60 and 100. That means when you play soft and mellow parts, the audience will still be able to hear it clearly. Then if you switch to hard strumming, you’re not going to blow the audience’s ears.
Think of compression as a tool you can use to keep your guitar’s volume in control.
You can make subtle use of compression to gently keep your volume balanced while you sing over it, or you can crank it up to keep your volume within a strict limit so it fits in perfectly with the rest of a band.
Every guitarist has different needs from compression and having a compressor pedal ready to go gives you a lot of control over your signal.
A compressor shouldn’t be used all of the time, but it is an essential tool to have available.
Recommended Compressor Pedal for Acoustic Guitar
Many compressor pedals were designed with electric guitar in mind. They create a warm tone that sounds great when applied to an electric guitar but doesn’t quite work with acoustic guitars.
For example, the MXR Dyna Comp is incredibly popular with electric guitarists because of the
The key feature I recommend looking for in a compressor for an acoustic guitar is a blend or mix knob. A blend knob allows you to mix between the compressed signal and your original signal.
This is a handy feature and allows you to dial in very subtle levels of compression all the way to a fully-compressed signal.
Any compressor with a blend knob is worth looking at, but the compressor pedal I recommend for an acoustic guitar is the Wampler Ego Compressor:
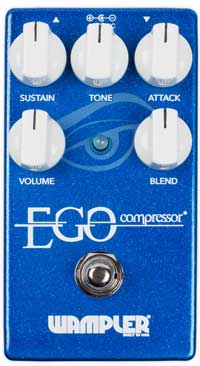
As you can see, it gives you five knobs (including a blend knob) to dial in the perfect compression settings.
The Wampler Ego is a highly rated compressor in terms of quality. If the pedal looks too complicated for you, I recommend the Xotic SP Compressor:
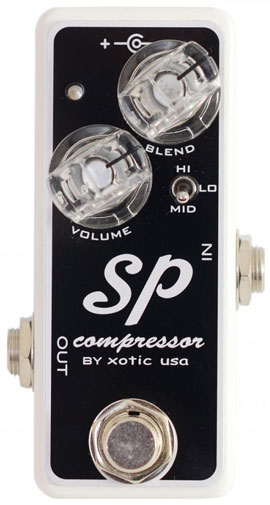
I found the Xotic SP incredibly impressive considering it only gives you two knobs and a toggle to play with (there are internal dip switches for extra settings). You can read all about it in my detailed review of the Xotic SP Compressor here.
If you want to learn more about compressors, check out my Ultimate Guide on Compressors for full details on how compressors work and other top compressor pedals to consider.
EQ Pedal for Acoustic Guitar
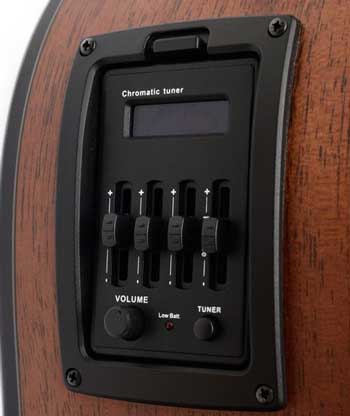
The chances are if you can plug your acoustic guitar into something, it will already have some EQ sliders like in the below photo:
So why would you also want an EQ pedal?
Why an EQ Pedal is Essential for Acoustic Guitar
EQ gives you a way to shape your tone. The more sliders you have, the more control you have over the shape of your tone.
While the three or four EQ sliders on your guitar give you decent control over your tone, it is limited.
You will notice how limited it is when you perform in a venue that doesn’t sit well with your guitar.
Some environments will create serious feedback issues for your guitar. If the venue has a soundman to deal with it, you’ll be fine. But if it’s up to you to fix an issue, you’ll quickly see that only having three or four EQ sliders isn’t enough.
A 10-band EQ pedal gives you incredible control over the shape of your tone.
You can easily identify any frequencies that are causing issues and deal with them without negatively impacting your tone.
With a 10-band EQ pedal, you can shape your tone to match the type of room you’re in and get the best tone possible every time.
Recommended EQ Pedal for Acoustic Guitar
When it comes to getting a good EQ pedal for acoustic guitar, the more bands the better.
A 10-band EQ pedal like the below one by MXR will give you more than enough control over your tone:
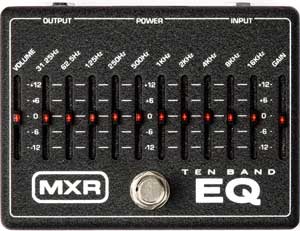
You can see there are sliders for volume and gain, which is an easy way to control your overall level without messing with any other pedal’s settings in your rig.
It’s hard to emphasize how powerful an EQ pedal like this can be in shaping your tone when you’re used to using only three or four bands.
Check out the MXR 10 Band EQ Pedal here.
Looper Pedal for Acoustic Guitar
Whether you’re a solo performer or play in a band, a looper pedal is an incredibly powerful tool you can use to add something different to your playing.
Why a Looper Pedal is Essential for Acoustic Guitar
A looper pedal gives you flexibility in what you can play in a performance. Being able to record and loop a chord progression allows you to add new layers to the rhythm and turn a solo performance into something bigger.
Some acoustic guitarists use a looper pedal to record a rhythm part to give them the ability to play a solo or lead section. Think of a looper pedal as a way of bringing in a second guitarist to play something – it gives you the freedom to explore different parts and ideas.
If you do get a looper pedal, learn how to use it by following the basic exercises in this Looper Pedal Lesson.
Recommended Looper Pedal for Acoustic Guitar
The right looper pedal for you depends on what you want out of looping. For example, a solo performer will likely want more features in a looper compared to a guitarist in a full band.
One of the most popular looper pedals for acoustic guitarists has been the BOSS RC-30 Loop Station:
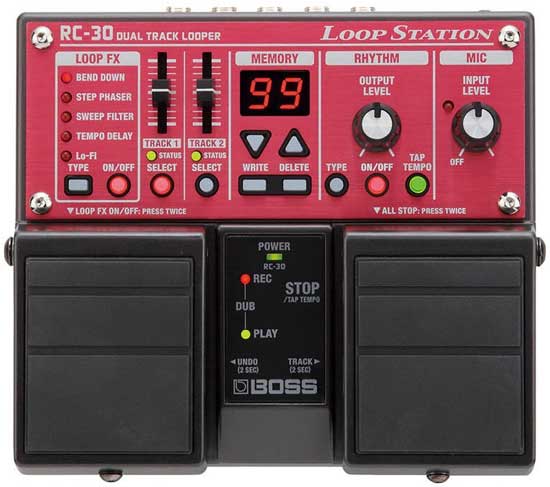
Having two footswitches gives you an easy way to start/stop/record/overdub your loops during a live performance. Find out all about the BOSS RC-30 in my review here.
The BOSS Loop Station range has a few different models to suit different guitarist needs. They have a compact and simple looper, a mid-range looper, and a fully-featured floorboard. Have a read through this guide to find out more about each model and which one might suit you.
If you haven’t used a looper before and aren’t quite sure how you would use one, you may want to get something a bit simpler to see what all the fuss is about.
The Ditto Looper is as simple as a looper can get and is ridiculously popular:
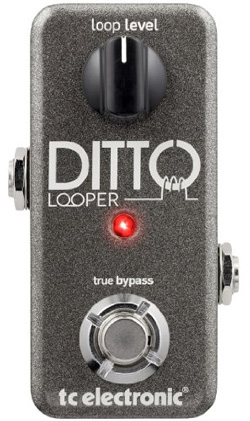
It’s a compact pedal at a low price and will give you the essential looper features. There are other simple looper pedals that still manage to pack in more features than the Ditto (like the BOSS RC-1), but the Ditto is a good entry point to learn about loopers and find out how useful they can be.
To learn about all of the important features in looper pedals and see some examples of other great loopers, check out my Ultimate Guide to Looper Pedals here.
Connecting Your Acoustic Pedalboard
If you buy all of the above essential pedals, your next step is to connect them together. There are two things you need to keep in mind when connecting your pedalboard: mounting and order.
When mounting your pedalboard, you can either sit the individual pedals on the floor or mount them on a fixed pedalboard. If you only play at home, you’ll probably be happy to have the pedals sit on your floor.
If you regularly perform live, then having a fixed pedalboard with all of your pedals securely mounted to it is recommended. It cuts down your setup time and keeps everything secure.
As I explain below, the order of the pedals matters. Taking the time to get the perfect pedal order will help you get the best results possible from your pedals.
Acoustic Pedal Order
I spend a lot of time in my Guitar Effects Course giving examples of what happens when you change the order of pedals and why following typical rules sometimes isn’t the best choice.
Learning how different effects work and how they interact with other effects is far better than blindly following pedal order rules-of-thumb you see all over the internet.
While I highly recommend spending the time learning about each effect you add to your pedalboard and properly figure out the ideal position, let’s go through some simple examples of a good pedalboard using the above pedals.
The pedal order I suggest as a starting point is the following:
Guitar > Tuner > EQ > Compressor > Looper > Reverb
Use this as a starting point then experiment by swapping pedals around to hear how it impacts your tone. It’s important to do this experimentation to really understand how each pedal interacts with the other pedals.
Reverb pedal tip: the reason I recommend ending your pedalboard with your reverb pedal is so you can make use of the reverb’s stereo signal. If you decide now or later that you want to run your rig in stereo (highly recommended), you need to have your stereo pedals at the end of your chain.
Looper pedal tip: If you buy a looper pedal that supports stereo such as the BOSS RC-30, you may prefer having the looper at the very end of the signal chain. That way you can record parts with effects applied to them, then change the effects for any parts you play over the top of the loop.
For example, you could record a dry guitar part with no reverb, loop it, then turn on reverb and it will only apply to the parts you play over the top of the reverb. While you can place your looper pedal anywhere in the signal chain, placing it at the end gives you a lot of flexibility.
Setting Up the Pedalboard
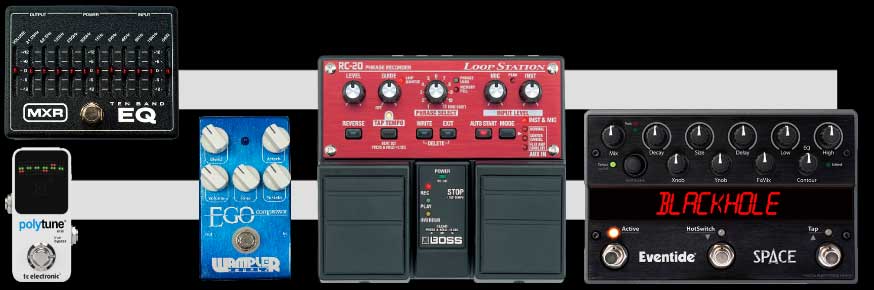
In the below examples, I’ve placed the pedals on the pedalboard from left to right to match the signal chain. You can choose to move these around in any way you want. You will probably prefer to have the pedals going right to left to make it easier to connect the pedals together. Experiment with different positions to see what feels best for you.
Mounting Pedals on a Pedalboard
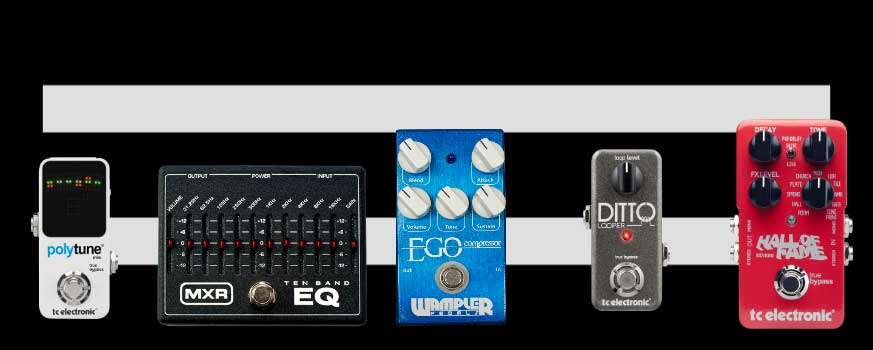
The below pedalboard places the above pedals on a Pedaltrain Metro 20 (link to Amazon):
You can see that all of the pedals comfortably fit on the pedalboard with plenty of room to move them around if you want to add one or two more pedals.
If you buy a pedalboard to mount your pedals, I highly recommend buying a pedalboard larger than what you currently need.
While it might look good to have a compact pedalboard that fits your pedals perfectly, if you ever want to add a pedal to it, it becomes a massive pain. Buy a pedalboard larger than what you need right now so you can easily add to the pedalboard without having to start again from scratch.
If you use the Ditto looper or any other smaller looper, the Metro 20 will give you plenty of room to add new pedals in the future:
You can see that there is plenty of room horizontally as well as vertically. You could basically add another row of pedals on the top of the pedalboard if you want.
Alternatively, you could get a slim pedalboard to fit all of the pedals on in one row like the Pedaltrain Nano+ as shown below:
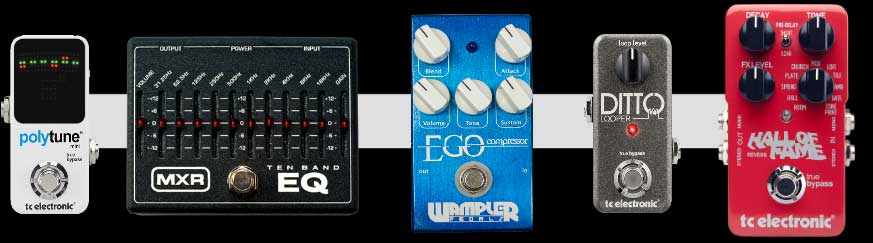
This pedalboard is a bit limited as you only have enough room to add another compact pedal by pushing the pedals closer together. If you swap out the Ego compressor for the Xotic SP, you will have even more room for future pedals.
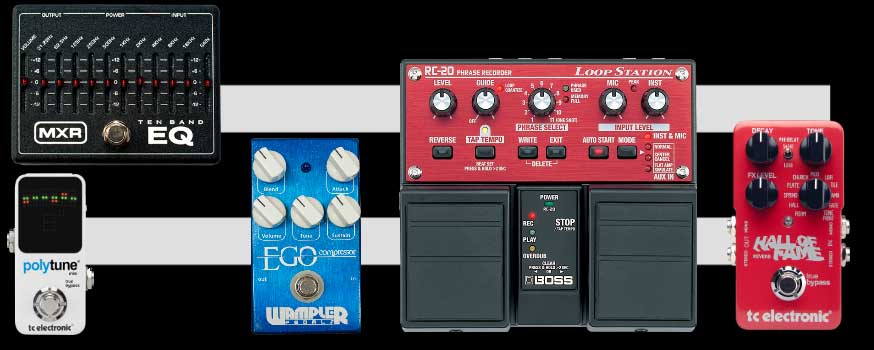
If you were to choose some of the larger pedal options covered in this guide such as the Eventide Space Reverb and the BOSS RC-30 Loop Station, you’ll need a Metro 24 or larger pedalboard:
Even in the above example, there is plenty of room to fit in other pedals – especially if you move the pedals closer together. The Wampler Ego, RC-30 and Eventide Space all connect from the top, so they can sit right up against each other without any problems.
Connecting Pedals Together
Once you decide on how you will mount your pedals and the order, you can buy some patch cables to connect everything together. Patch cables are short guitar cables that make it easier to neatly connect your pedals together.
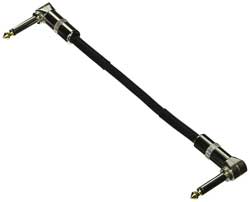
Patch cables can come in right angles (as shown above) or straight like a normal guitar cable. The different types of connections allow you to connect your pedals together tight on a pedalboard.
Check out the different types of patch cables here (link to Amazon).
Powering Your Pedals
There are a few ways you can power your pedals and it depends on what pedals you choose. Every guitar pedal has different power requirements (even if they are all 9V), so it’s a good idea to learn about power requirements when building a pedalboard.
Read through this guide on Powering Guitar Pedals to learn everything you need to know about power requirements.
The guide talks about external power as well as batteries to give you all of the options worth considering.
What I would recommend for a pedalboard using the pedals covered in this guide is to get a Voodoo Lab Pedal Power 2 Plus as shown below:
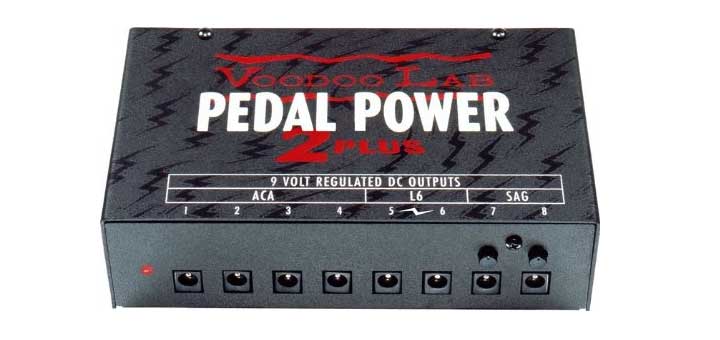
This power supply can power your entire pedalboard and is the most popular option for amateur and professional guitarists.
Read my full review of the Pedal Power 2 Plus to find out why it is such a popular power supply.
I still recommend reading the other guide so you know about different powering options such as how to daisy chain guitar pedals, but for most guitarists with a decent sized pedalboard, a reliable power supply like the Pedal Power 2 Plus is the best option.
Mounting the Pedal Power 2 Plus: if you buy a pedalboard from Pedaltrain, you will be able to mount it under the pedalboard for some models. The Novo, Classic, and Terra series have enough room underneath to buy a mounting bracket and mount the Pedal Power 2 Plus under it. If you buy a Metro model, you will need to mount the power supply on top of the pedalboard. So make sure you consider the space it requires.
If you want to learn about the above types of effects as well as every other type of guitar effect you may use, check out my Guitar Effects Course.
The course will introduce you to every main type of effect, how it works, audio examples of the effect in action, how to position and combine it with other effects, and more.
While the course focuses on electric guitar, it will teach you the principles needed to properly use effects with an electric or acoustic guitar.
If you are interested in using guitar effects pedals to add something more to your tone, check out these 7 Guitar Effects for Acoustic Guitar. The guide includes audio examples of each type of effect so you can hear how it works with an acoustic guitar.
If you want to learn more about guitar effects, check out my Guitar Effects Course. The course walks you through all types of guitar effects with audio examples so you can learn how each type of effect works.