
Learning new fingerpicking patterns can give you different playing options and take your music in new directions. The fingerpicking patterns in this lesson can be found in countless songs, so they’re worth practicing.
With each fingerpicking pattern, I will show you how to play it on three different chords, give you tips on how to play it, and how to come up with different variations on the pattern.
I recommend practicing each pattern with other chord progressions to get used to applying the pattern to different chords.
You can use play these patterns on an acoustic or electric guitar using any open chords or barre chords.
Once you get used to these fingerpicking patterns, check out these easy fingerpicking songs to start applying them in well-known guitar songs.
Guitar Chords Used in the Fingerpicking Patterns
While you can use these fingerpicking patterns with any chords, I’ve used the same three chords for each example: Am, Em, D.
Here are the three chords used in this lesson:

Note: if you do not know how to read the above chord diagrams, check out this Ultimate Guide to Reading Guitar Chord Diagrams. The guide explains how to read chord diagrams with helpful diagrams, tips, and a printable PDF with easy chords to learn.
The reason I’ve chosen those three chords is so you can see each fingerpicking pattern applied on a chord that uses six strings (Em), five strings (Am), and four strings (D).
Seeing how the pattern changes depending on how many strings a chord uses will make it easier for you to apply these patterns to other chords.
Note: all of these patterns are given in Standard Notation and Guitar TAB. If you don’t know how to read Guitar TAB, find out how to read Guitar tAB in this helpful guide. If you want to learn how to read standard notation, learn how to read Standard Notation in this thorough guide.
Fingerpicking Pattern 1
This fingerpicking pattern shows up over and over across many different styles of music and songs. Once you learn the basic idea behind this pattern, you’ll start to notice it in music.

As with many fingerpicking patterns, the first note plays the root note with your thumb.
The other notes stick to the first three strings. This means you can choose whether to use your middle (m), ring (a), and pinky (c), or you can use your index (i), middle (m), and ring (a).
I recommend using your index finger (i) on the G string, middle finger (m) on the B string, and ring finger (a) on the high E string. You can then use your pinky to rest on the guitar’s body if you want to anchor your hand in place for extra support.
The great thing about this fingerpicking pattern is that the thumb is the only finger that needs to change strings. The other three fingers always stay on the same strings. Fingerpicking patterns like this are easy to learn because your fingers will always stay on the same strings.
If this is the first fingerpicking pattern you are learning, take your time and make sure each note rings out clearly.
Fingerpicking Pattern 2
This pattern will give you plenty of practice of moving your thumb to different strings. It also gives you a glimpse of a style of fingerpicking that is common in Spanish, Flamenco, and Classical styles of music.

With this pattern, you can decide whether to stick to a classical style of fingerpicking (using three fingers and your thumb) or you can take a different approach.
An alternative is to use your thumb for the lower five strings and use your index finger on the high E string. This means you will be alternating between thumb and index for every note.
I recommend learning this pattern using your thumb and index, then try to learn it with a classical fingerpicking technique if you’re up for a challenge.
You might be surprised by how fast you can play this fingerpicking pattern after a bit of practice. If you like this style of playing, check out the traditional piece Malagueña.
Fingerpicking Pattern 3
This fingerpicking pattern is very common because guitarists love to group notes in three. The problem is that when playing eighth notes, you end up with an extra note. So guitarists tend to cut the last group of three into a group of two.
Take a look at the below TAB and see if you can find the groups of three and the group of two in each bar:

If you’re unsure what I mean by groups of three and a group of two, the first three notes are a group of three played with the thumb, index, middle. Then there is another group of three played again with thumb, index, middle. Then the bar ends with a group of two played with the thumb and the middle finger.
The rhythm is the same for all of the notes, but you can hear how the pattern is broken into two groups of three and a group of two notes.
I recommend spending time practicing this fingerpicking pattern because it shows up so often. Even outside of fingerstyle you will see this pattern of two groups of three and a group of two. When playing in 4/4 time, you can almost expect to hear it.
Fingerpicking Pattern 4
As I mentioned in the previous fingerpicking pattern, guitarists love to group notes in three. Something interesting happens when we change the rhythm to triplets and play in 3/4 time – we can play endless groups of three without needing to cut any notes off at the end of a bar!
Here is an example of endless groups of three played in 3/4 time:
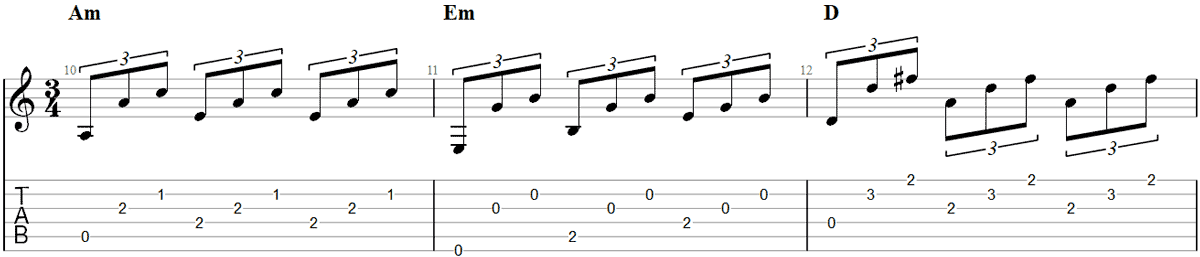
Don’t worry if you haven’t played in 3/4 time before. Just play it exactly the same as the other exercises with a consistent rhythm. Think of playing triplets in 3/4 as a technical way of saying we’re playing nine notes in a bar instead of eight. Over time you’ll start to understand how to think about time signatures other than 4/4.
A way you can create variations for this pattern is to play the first and second strings instead of the second and third strings for the first two chords. By moving your fingers up a string, it gives your thumb freedom to move the bass note around. Try it out and think about which version you prefer.
Fingerpicking Pattern 5
This fingerpicking pattern introduces playing two notes at the same time. At first, this might feel a bit complicated, but once you get used to it you’ll find it completely opens up your fingerpicking to new options.
Being able to play multiple notes at the same time is one big advantage of fingerstyle. Once you master this skill, you’ll be able to play things that would be impossible to play with a pick (unless you use hybrid picking).

The important point to remember is that the top two strings shouldn’t be strummed. They need to be plucked with two fingers at the same time. If you strum these strings, it won’t sound right.
I recommend using your middle and ring fingers on the top two strings with your index finger on the G string and your thumb for the bass notes. Practice plucking both two strings together with those two fingers until it feels natural.
Once you feel comfortable with this fingerpicking pattern, you’ll find it much easier to learn similar patterns that pluck multiple strings at the same time.
Try creating a variation for this pattern that plucks the second and third strings together instead of the top two strings. Use your index finger and your middle finger to play those two strings and get used to playing them at the same time.
Fingerpicking Pattern 6
This fingerpicking pattern plays two notes at the same time, but it feels very different than the previous pattern. This time the two notes aren’t on adjacent strings.

I recommend learning this pattern with your middle finger on the first string and your index finger on the second string. Play the rest of the strings with your thumb.
With this approach, you’ll be plucking your thumb and middle finger together, followed by your index finger playing the second string.
This fingerpicking pattern may look complicated at first, but once you practice it a couple of times you’ll see that it’s quite simple. Once you get used to plucking your thumb and middle finger together at the same time, the rest of the pattern becomes a breeze.
Once you learn this pattern, try playing it with classical fingerpicking technique using your ring finger on the first string, middle finger on the B string, and index on the G string. Depending on your playing style, you may find this makes the pattern easier or harder to play.
Fingerpicking Pattern 7
This fingerpicking pattern is very similar to pattern 5 in that you need to pluck two adjacent strings at the same time. The main difference is that this pattern is in 3/4 time. This gives you a good example of how you can change a pattern to fit different time signatures or rhythms.

Practice this pattern in the same way that you would practice pattern 5. Experiment with moving the bass note around if you want to try something different.
For an alternative way of playing this pattern, play the first and second strings with your index and middle fingers and use your thumb for all the other notes. Playing this pattern using those fingers will give you a different way of looking at the pattern.
Fingerpicking Pattern 8
This fingerpicking pattern is in 6/8 time, but it isn’t as complicated as it sounds. What makes 6/8 time different is the way it fits nicely with two groups of three notes or a group of six as shown below:

This simple pattern is what inspired James Hetfield to write Nothing Else Matters (Metallica). He was talking on the phone plucking the open strings and happened to play the second bar in the above pattern.
If you listen to the start of Nothing Else Matters, you’ll hear the pattern played on an open Em chord. The song is a great example of how you can start with a simple fingerpicking pattern and use it as inspiration for something more complicated.
Take a look at the first minute of Nothing Else Matters to see a great example of how you can take any of the above fingerpicking patterns and turn them into full songs. What you come up with doesn’t have to be as complicated as what you hear in Nothing Else Matters. Start with simple patterns like the above examples and experiment with changing them around.
Once you get used to the above fingerpicking patterns, check out these easy fingerpicking songs to try out some more challenging patterns and chords. The songs in that lesson are pretty simple but more interesting to play than some of these patterns.
Fingerpicking Patterns PDF Download
A great way to work on these fingerpicking patterns is to print them off so you can practice them every day. Download the below PDF so you can keep these patterns with you every time you want to practice your fingerpicking.
For more downloadable resources and to help support this website, subscribe to email updates here.
To learn some easy open chords to use with these strumming patterns, check out this Ultimate Guide to Reading Guitar Chord Diagrams. The guide includes a printable PDF with easy chords to learn.