
Alternate picking is one of the most popular and important guitar picking skills you can learn.
Every guitarist should learn the basics of alternate picking and many guitarists use alternate picking as their go-to picking method.
Learn how alternate picking compares to other picking methods in this guide.
The alternate picking exercises in this lesson will take you all the way from complete beginner to expert picker.
The exercises are ordered from easiest to hardest, so you should start with exercise 1 and only move on through each exercise after you have mastered the previous one.
The first 10 or so exercises in this guide may seem too easy for many guitarists, but they are the most important exercises to work on regardless of your skill level.
Most of these exercises are designed to be easy for your fretting hand so you can focus on your picking technique. Don’t let how simple they look trick you into thinking you don’t need to work on them.
A lot of alternate picking exercises you see online focus on scale runs that work out the fretting hand, but they don’t challenge the picking hand. The exercises in this guide are completely focused on developing your picking skills, not memorizing scale run patterns.
For more exercises, check out this Ultimate List of Guitar Finger Exercises.
How to Develop Good Alternate Picking Skills
There are three steps to learning alternate picking. First, you need to develop good picking accuracy. Second, you need to work on syncing both hands with good coordination. Finally, you should work on building up your speed.
You will only develop good alternate picking once you have both skills under control.
Let’s have a closer look at each skill so you know what to focus on when working through the exercises.
Step 1: Picking Accuracy
Picking accuracy is all about being able to accurately pick the correct string in the correct direction.
The best way to work on picking accuracy is to focus 100% on your picking hand and completely ignore your fretting hand.
An easy way to do this is to just play open strings. By playing open strings, you can focus completely on your picking hand. You won’t need to worry about playing the right frets or even thinking about what note to play next. You can place 100% of your attention on the way your pick hits the strings.
This is why most of the exercises in this guide include a version that only uses open strings.
Everybody should start with the open string exercises because they allow you to focus completely on your picking accuracy.
Don’t skip the open string exercises just because you think you’re too advanced for them. These exercises are crucial to help you improve your picking accuracy – even if you’re already an intermediate guitarist.
There are a lot of alternate picking exercises on other websites that use patterns that are complicated for the fretting hand. If an exercise feels hard because you need to focus on what your fretting hand is doing, it’s not going to help you develop your picking skills.
If you spend some time working on the open string exercises, you will find it much easier to develop your hand coordination in the other exercises.
Step 2: Hand Coordination
Hand coordination is how well you’re able to place your fretting hand fingers down on the string in time for you to pick the note correctly.
If you notice any muted notes or fret buzzing while playing, it could be a sign that your hand coordination is off.
Both hands need to be perfectly in sync or else your picking won’t line up with what your fretting fingers are doing.
Keep in mind that you can only start developing hand coordination after you have developed your picking accuracy.
To develop your hand coordination, you need to focus on the timing of both hands. As you play through the exercises, focus on how each note sounds and watch out for any time you notice a muted note or buzzing.
Step 3: Speed
Speed should be the last thing you think about when working through these exercises.
Don’t try to play any of these exercises at a high tempo until you have developed your picking accuracy and hand coordination to a high level.
The reason speed is important to work on is that it helps you push your alternate picking skills up to a high level. Even if you don’t want to play fast, working on your speed will significantly improve your skill and confidence when using alternate picking.
When you’re ready to work on building up your speed, use a metronome and gradually raise the tempo.
Only raise the tempo if you can play the exercise perfectly. If you start noticing mistakes creep into your playing, it’s a sign that you’re trying to push yourself too fast. Back the tempo off slightly and try again.
Focus on accuracy and the speed will follow. If you try to push the speed too soon, you’ll end up with a sloppy picking technique. Remember: accuracy is the main goal.
Alternate Picking Exercise 1: Single String
In this exercise, you play everything on the same string so you can focus completely on your picking technique.
This is a great starting exercise for every skill level. Work on the open string version until it you can play it over and over without any mistakes, then try the 1-2-3-4 version.

In all of these exercises, the notation starts with down-up-down-up. Continue that pattern for the entire exercise, then practice it again starting with an up-pick (eg: up-down-up-down).
Tip: you can move this exercise up or down to different strings to get used to using alternate picking across all strings. Practice this exercise on all strings until each one feels completely comfortable.
With the 1-2-3-4 version, use one finger per fret so you can practice stretching your hand out. See the finger exercises in this guide to learn more about this important exercise.
Remember to start out at a slow tempo and only increase the tempo (with a metronome) when you can play the exercise perfectly with ease.
Alternate Picking Exercise 2: Adjacent Strings
This exercise builds off of what was covered in Exercise 1. This exercise will get you used to switching back and forth between two adjacent strings while keeping your alternate picking consistent.
Playing four notes per string makes it easy to switch back and forth between strings because each string will follow the same picking pattern.

Focus completely on your picking hand when you play the open string version and pay close attention to how your pick hits the strings.
It’s up to you the angle you use to hit the strings or how you hold the pick. Every guitarist holds and uses the pick differently, so there’s no rule you should follow.
Just make sure your hand is relaxed and you’re not tensing up as you play. If you notice your wrist or arm tenses up, try to relax or you could develop bad habits that can lead to repetitive strain injury in the future.
Practice this exercise across all six strings and make sure each string feels comfortable to play. If you notice that a certain string feels harder to play than the others, spend some more time on it until it feels comfortable.
Alternate Picking Exercise 3: Moving Strings
This exercise plays two notes per string to get you used to moving your hand up and down the strings. You have less time to think about everything, so play this exercise slowly at first.

You can play this pattern across all six strings if you want instead of only four strings.
The important point is that you pick the string consistently the entire time. Make sure each string is picked with the same strength and angle so the notes sound consistent.
After you feel comfortable playing down-up across every string, reverse the pattern and practice playing up-down on every string.
When you play the fretted note version, pay close attention to how the notes sound. Each note should ring out clearly and you shouldn’t hear any muted notes or fret buzzing. If your hand coordination is even slightly off, slow the exercise down and focus on your timing.
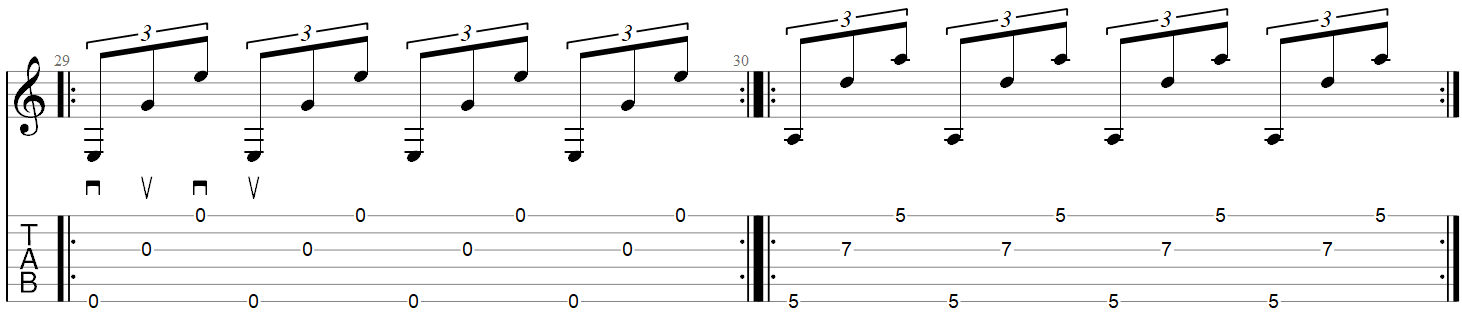
Alternate Picking Exercise 4: Three-Notes-Per-String
Three-notes-per-string (often named 3NPS online) is very common in lead playing, so it’s worth spending some extra time on this exercise.
Notice that the direction you pick each string changes each time you move to a higher string. If you start a string with a down-pick, the next string will start with an up-pick.

At first, this might feel awkward if you have never tried alternate picking with three-notes-per-string before. Practice it slowly and focus on your picking accuracy.
Only move on to the fretted version when you are confident that your picking accuracy is spot on.
If the up-down-up pattern feels awkward, it just means you need to spend more time practicing it. Eventually, it won’t matter whether you need to play down-up-down or up-down-up because both patterns will feel equally comfortable.
Alternate Picking Exercise 5: String Skipping
This exercise introduces string skipping, which is when you need to jump over to a non-adjacent string. String skipping often trips up beginners, so take it slowly if you notice you keep picking the wrong string.

You can anchor your picking hand’s pinky on your guitar’s pickguard or body to help keep your hand stable. By anchoring a finger onto the guitar’s body, you can have far more control over the position of your picking hand.
Once you feel confident with the open string version, the fretted version will help you work on your hand coordination. Try to avoid staring at your strings and learn to feel where the pick needs to jump to.
Alternate Picking Exercise 6: Skipping Up the Strings
This string skipping exercise will help you feel more comfortable across all six strings. Only work on this exercise if you feel completely comfortable playing Exercise 5 at a high tempo.

The main point with this exercise is that it helps your picking hand learn to feel the strings and where to jump for each string.
You can reverse the exercise if you want to work on jumping down through the strings. Again, try to avoid looking at the strings, or else you won’t develop your ability to pick the correct string by feel.
Don’t forget to reverse the picking pattern so you also practice starting each string with an up-pick. While it feels more natural to start each string with a down-pick, it’s important that you spend some time working on both picking directions.
Alternate Picking Exercise 7: Inside and Outside Picking
Inside and outside picking are important to understand if you want to get the most out of your alternate picking technique.
These techniques are used when you need to constantly pick back and forth between two strings.
Inside picking is where the pick starts the picking motion from in-between the two strings. In other words, you always bring your pick back to the ‘inside’ of the two strings before picking the next string.
Outside picking is where the pick starts every picking motion from the outside edge of the two strings. Your hand will always go to the ‘outside’ of the two strings before picking a string.

Try the two above exercises and the difference between the two picking styles will make more sense.
Some guitarists like how outside picking feels while other guitarists prefer inside picking. There’s no right or wrong way to play the above part, you can choose to use the picking style that feels the most comfortable to you.
I recommend spending some time working on both inside and outside picking before you decide which style you prefer. You may find that you start off disliking one style only to find that it grows on you over time.
Alternate Picking Exercise 8: Jumping a String
This exercise takes the inside and outside picking styles from the previous exercise and makes it slightly harder by adding in string skipping.

This is a good exercise to see how a picking technique can feel different when it is applied in different ways.
If you preferred inside picking from the previous exercise, you may notice that it feels very different in this exercise. Outside picking on the other hand will probably feel more or less the same whether you need to skip a string or not.
This is why it’s so important to spend time working on a range of different picking exercises and techniques. Exercises like this one help prepare you for anything you might come across in songs.
Alternate Picking Exercise 9: Ascending Arpeggios
Alternate picking suddenly feels very different when you need to play arpeggios. The next few exercises will help prepare you for arpeggios using a few different picking patterns.

At first, you may think to yourself that you would just play all downstrokes if you had to play the above exercise in a song.
Something like the above exercise might feel a lot easier to play using all downstrokes at a slow tempo, but it starts to feel and sound awkward when you need to increase the tempo.
Work on the above exercise and build up the tempo until you can play it consistently at a high tempo.
Once you can do that, you’ll start to feel more confident in your alternate picking abilities. Later on, you can look at other picking styles such as economy picking or sweep picking and compare how the part sounds using those techniques.
In some songs, you may play the above part using economy or sweep picking. In other songs at a different tempo or style, you may find that alternate picking works the best.
The point of working on exercises like this is that it gives you more options on what picking techniques you can choose to use.
Alternate Picking Exercise 10: Descending Arpeggios
If Exercise 9 feels easy, then this exercise should be quick and easy to learn. But don’t rush through this – put the time in to master this exercise before you move on.

Some guitarists find that playing descending arpeggios isn’t as easy as ascending arpeggios. If you’re one of those guitarists, just take your time and focus on whichever version feels harder.
You want to get yourself to the point where you can play descending or ascending arpeggios at the same tempo and both feel equally easy.
Alternate Picking Exercise 11: Four String Ascending Arpeggios
Whenever you see a repeating pattern and it uses an even number of notes, the picking pattern will be the same on each repetition when using alternate picking. That means the below arpeggio patterns are picked the same way every time.

Don’t forget to also practice this exercise starting with an up-pick to reverse the picking pattern.
You can also extend this exercise to five or six strings if you really want to work on moving your hand across the strings.
Alternate Picking Exercise 12: Four String Descending Arpeggios
Work on this exercise and make sure you can play it just as well as the ascending version. If you find one exercise harder than the other, spend more time on it until both feel natural.

You can use different arpeggio shapes if you get sick of hearing the D Major chord.
Alternate Picking Exercise 13: Combining Arpeggios
This exercise is a good test of how well you have practiced the previous four exercises. If you have trouble with this exercise, work on the previous four exercises to build up the fundamental skills needed.

This is a six-note repeating pattern, so each arpeggio pattern follows the same picking pattern. Make sure you reverse the picking pattern to practice it both ways.
After you master this exercise at a high tempo without any mistakes, try doing the same thing with a five-string or six-string arpeggio.
Alternate Picking Exercise 14: Wide String Jumps
An important skill you need to develop is to be able to pick any string at any time without having to look at your hand.
Learning to feel the string positions and correctly jump to the right string at any time takes some practice, but it is a crucial skill to learn. This exercise will help you develop that skill.

At first, it’s okay if you look at your hand as you practice the open string version of this exercise. But try to stop looking at your hand as soon as possible and learn to feel the string positions.
If you hear that you have picked the wrong string, don’t start again. Stop and try to pick the correct string before continuing.
This is important for any exercise you practice – learn to immediately correct any mistakes instead of stopping and going back to the start.
Once you can easily pick the correct strings without looking, try the fretted version to give you something else to focus on. Focus on your fretting hand and see if you can keep picking the correct strings without a single glance at your picking hand.
You can reverse the exercise or change which strings to pick if you want to challenge yourself before moving on to the next exercise.
Alternate Picking Exercise 15: More Wide String Jumps
This exercise should feel relatively easy if you have spent enough time working on Exercise 14. If it feels hard, go back to Exercise 14 and spend more time on it.
Remember that having a three-note repeating pattern means the picking order changes on each repetition.
Make sure you don’t accidentally pick the pattern the same way each time or else you’ll miss out on the benefits this exercise has to offer.
It will probably feel weird playing this exercise using alternate picking. That’s great for an exercise, but if a song played something like this, it would make more sense to use a different picking style such as economy picking or fingerpicking.
Sometimes an exercise will feel weird because you need to develop some skills before it feels natural. Other times, it feels weird because it’s asking you to do something weird. This is an example of something that probably isn’t best played using alternate picking, but as an exercise, it’s a great workout.
Alternate Picking Exercise 16: Four Note Pattern
If you want to be able to play alternate picking solos at a high tempo, this is a great exercise to work on.
It’s a simple four-note repeating pattern, which means the picking order stays the same on each repetition. That makes it easier to play fast as you play it the same way with each repetition.

Remember to swap the picking order after a while to get used to starting the pattern using an up-pick. Some guitarists will prefer playing this part with an up-pick while others will feel that a down-pick makes more sense. Practice both to figure out which feels best for you.
This is a great exercise to develop hand coordination at speed. The open string version should be easy to build up to a very high tempo. The fretted version requires a lot of finger movement, which will slow you back down.
Most scales and alternate picking exercises you see elsewhere are challenging because they focus on your fretting hand. It’s an important skill to work on, but make sure you work on your picking accuracy first.
Only move on to the next exercise if you can effortlessly play the fretted version at a very high tempo. That could mean 120bpm or it could mean 180+bpm depending on your current skill level. You don’t need to force yourself too much.
If you do want to play guitar fast, check out this lesson to learn how to build up speed effectively.
Alternate Picking Exercise 17: Scales Practice Pattern
This is an example of a very common scales exercise you will see everywhere on any lesson on alternate picking.

If you have practiced all of the above exercises in order and have spent a decent amount of time on each one, you will notice that you’ve practiced this before.
You practiced three notes per string back in Exercise 4, so the open string version should feel easy.
The fretted version simply adds in notes from a scale. If you’ve ever been intimidated by scales exercises before, this exercise should make it clear that there’s nothing to worry about.
The fretted version should feel easy for your picking hand. You’ve practiced the skills needed enough that there should be zero challenge in picking the correct strings.
The only thing the fretted version works on is your hand coordination. If the exercise feels challenging, that’s only due to the focus you need to place on your fingers and which note to play next.
This is why I keep saying that most alternate picking exercises focus too much on your fretting hand. You can find countless scales exercises in alternate picking lessons, but they all focus heavily on what your fretting hand is doing.
Next Steps
If you have practiced all of the exercises in this lesson with a heavy focus on the open string versions, then you will have built up all the skills needed to apply alternate picking in any situation.
You don’t need to work on a hundred different scales exercises to become a great alternate picker. You just need to focus on the fundamental picking skills covered in this lesson.
Once you master the fundamentals such as picking three notes per string, inside picking, outside picking, skipping strings, and everything else covered in this lesson, you’ll find that every other exercise or lick simply combines those skills in different combinations.
There are a few different paths you can take from here if you want to push your alternate picking skills further:
Learn Some Songs
While these exercises are crucial for developing your picking skills, it’s important to work on things that sound musical.
Working on songs and learning how to correctly apply alternate picking is an important next step after working on these exercises.
Go through songs you listen to and try to use alternate picking in different riffs, solos, and parts. Don’t look up songs that use alternate picking, instead, try to apply alternate picking everywhere to learn when it works and when it doesn’t.
If you do this, you’ll develop a sense of when you should use alternate picking and when it’s best to use a different picking style.
Practice applying alternate picking in enough songs and you won’t ever need to rely on a TAB or video telling you which picking direction to use.
Combine Exercises
As explained in Exercise 17, a lot of ‘hard’ exercises you’ll find online merely combine the fundamental skills covered in the exercises in this lesson.
Practice combining exercises in different ways to push your skills further.
For example, you could combine a three-note per string pattern and a two-note per string pattern. Here’s what it might look like:

You can see that I started with three notes on one string, then played two notes on another string, then instead of repeating the pattern I switched it up to play a two-note pattern, then a three-note pattern.
Simply combining a three-note pattern and a two-note pattern creates a five-note pattern that can be used in very interesting ways. Most scales exercises are based on this idea.
The fretted version simply takes notes from a scale and applies them to the string pattern. You end up with a very common and popular scale run pattern that started with a simple idea of combining different note groupings.
Hopefully this simple example makes it clear how useful coming up with your own exercises can be. A lot of great solos and riffs were created using this exact method.
Practice coming up with combinations of exercises and eventually, you’ll find that it’s just as easy to write riffs and licks using the same method.
A great way to come up with your own exercises is to write them out in Guitar Pro. Guitar Pro is how I created all of the exercises in this lesson. Learn how to create your own exercises in Guitar Pro here
Learn Some Scales
The reason so many guitar teachers focus on scales when teaching alternate picking is because alternate picking is the go-to picking method used in a lot of lead parts.
If you want to push your alternate picking skills further, spend some time working on some scales.
Learn how to practice scales in this lesson to get started. The guide goes in-depth into how to effectively learn scales in different ways.
Work on Other Picking Styles
All of the exercises in this lesson have focused on developing a strict alternate picking skill. But the best guitarists know how to combine alternate picking with other picking styles when needed.
Learn about other picking styles here and practice incorporating them into your playing.
Developing a strong alternate picking technique is great to learn, but you’ll become a far better guitarist when you’re able to choose from a range of different picking styles in your playing.
Tip: bookmark or favorite this page to quickly return to it whenever you want to work on your alternate picking technique.