
Over the years as a guitar teacher, I have collected and created many guitar finger exercises to help my students. This guide will give you an extensive list of effective guitar exercises you can practice to work on a range of skills. Pick and choose the exercises that suit you and work on them every day for a few minutes.
Each exercise is shown in Guitar TAB and Standard Notation (click the links to learn how to read either format). I’ll explain each exercise in detail, why it’s worth practicing, and some extra tips to get the most out of them.
Note: I’ll be adding more and more exercises to this guide over time, so I recommend adding this page to your favorites/bookmarks so you can return to it in the future.
Any time you want to work on a different skill, come back and you’re likely to find an exercise that can help you.
Here are some other useful lessons and guides to help you develop your guitar skills:
- 6 Hammer-On Exercises to Practice Daily
- How to Plan a Guitar Practice Routine
- How Long to Practice Guitar
- How to Practice Guitar Quietly
- Can You Practice Guitar Too Much?
How Guitar Finger Exercises Develop Your Skills
Think about a time you have seen an advanced guitarist play something complicated, but they made it look effortless. For a beginner or intermediate guitarist, it can be frustrating seeing somebody play complicated solos or riffs with such ease.
You’re not alone if you ever feel defeated seeing somebody else’s amazing guitar abilities. But never let that feeling take over and stop your progress. You can also develop great guitar skills with the right amount and type of practice.
Advanced guitarists can achieve a high level of skill thanks to muscle memory. “Muscle Memory” is a bit of a misleading term. It doesn’t literally mean your muscles have a memory. It’s just a name given for what happens when you repeatedly make the same finger movements over and over. When you practice a riff over and over again a thousand times, your brain basically locks that riff into memory.
Eventually, you’re able to play that riff on auto-pilot and not need to think about it at all. This is how advanced guitarists can master long and complicated solos. By practicing it over and over, they eventually lock those licks and phrases into muscle memory.
When you see a guitarist play an incredibly complicated or fast riff or solo and make it look effortless, that’s a sign that they’ve poured countless hours into developing their technique.
These guitar finger exercises are all designed to help you develop different areas of muscle memory. Most of these exercises will develop your fingers’ dexterity and independence, which can impact so many different skills and techniques.
Think of each of these exercises as a way to develop muscle memory for different skills and techniques.
Getting the most out of these exercises takes practice, but the good news is that these exercises can completely level up your playing.
When you start to learn a new song, the work you’ve put in with these exercises will give you an advantage in mastering that song.
Regularly practicing these exercises will help you learn songs faster, master complicated riffs or solos, and improve your confidence with the guitar.
How to Practice These Exercises
Think about each repetition you make of one of these exercises as a bicep curl. Imagine going to the gym, picking up a dumbbell, doing one bicep curl, then going home. You wouldn’t expect to see any muscle growth in your bicep after that pitiful workout.
It’s the same with these exercises. If you only play these exercises once or twice, it’s like doing a bicep curl and never picking up a weight again. You won’t get anything out of it.
To really get the most out of these exercises, you need to repeat them over and over, then practice them daily for at least a few weeks.
Important: the more you practice these exercises, the stronger the muscle memory you will develop.
Many guitarists run through 5-10 of these exercises as a warm-up every time they sit down to practice guitar. Other guitarists dedicate 10-15 minutes purely working on these exercises in every practice session.
Whatever you do, make sure you regularly practice these exercises and repeat them over and over. Build up your “reps” for each exercise in the same way a bodybuilder builds up reps for each exercise.
Don’t just play each exercise once, that’s like doing one rep on every machine in the gym. If you only play an exercise once, you’re wasting your time. Even if it feels easy the first time you play it, spend time with each exercise and truly master it.
Using a Metronome to Develop Each Exercise
A metronome is a crucial practice tool for most of these exercises. A metronome forces you to be exact with the timing of each note you play.
While you can practice these exercises without a metronome, you will get far more out of each exercise if you use a metronome. You’ll also develop a stronger sense of timing and rhythm when you use a metronome.
If you don’t already have a metronome, you can download one of the many free metronome apps for your smartphone or tablet. Just search for “metronome” in your phone’s app store and grab one of the free ones.
If you want a physical metronome, there are plenty of options to choose from. Check out the BOSS DB-90 for an example of a feature-packed physical metronome:

There are two methods you can use when using a metronome with these exercises:
1. Build up speed
With this method, we perform the exercises along with a metronome and gradually increase the tempo over time. The goal is to gradually raise the upper limit of what you’re capable of playing.
Developing speed is easy if you have patience and practice consistently. If you rush, you will sound sloppy.
The method is simple: start by playing the exercise along with a comfortable tempo. Let’s say that tempo is 100 bpm. Play the exercise at least 10 times along with that tempo and aim to perform the exercise perfectly 10 times in a row.
If you can effortlessly play the exercise 10 times in a row without any mistakes, gradually increase the tempo (eg: 105 or 110 bpm). It should be such a small change in tempo that you don’t really notice the change when you play.
Perform the exercise again at the higher tempo and count out 10 perfect repetitions. If you can do it effortlessly, gently raise the tempo again (eg: 115 bpm). Practice the exercise over and over at the higher tempo and count out 10 perfect repetitions.
You continue to gradually raise the tempo until you start to struggle, mistakes start creeping in, or you feel like you’re rushing or straining. Take note of the tempo when this starts to happen.
Let’s say you start to notice small mistakes while playing at 130 bpm. You would take note of that tempo for your next practice session. 130 bpm is your current upper limit. Over time if you continue to practice you’ll eventually master this tempo and it will feel as effortless as 100 bpm feels.
The next time you practice, start the tempo as something comfortable (eg: 115 bpm may be your starting point this time), then repeat the process.
When you get to 130 bpm, you may notice it feels a little bit easier. If you can perform 10 perfect repetitions, gently raise the tempo to 135 bpm. Practice the exercise over and over and aim for 10 perfect repetitions. If you can’t get 10 perfect reps, don’t increase the tempo. Leave it for the next day.
This might sound like a slow process, but it only takes a couple of minutes per day. Eventually, you’ll be playing the exercise flawlessly at 200+ bpm without breaking a sweat.
This method is incredibly powerful and it’s how guitarists are able to perform such high speed and technical solos.
Even if you don’t have a goal of building up your speed, it’s still worth using this method. Speed isn’t just about being flashy or showing off – it’s more about control. If you can accurately play these exercises at a high tempo and stay in time, it means your fingers have mastered the exercise.
Guitarists who can perform these exercises at high tempos have more control over their technique than guitarists who can’t play at high tempos. So even if you don’t want to be a fast player, see this as a way you can improve your control.
Imagine you had to perform a solo at 140 bpm. By practicing the solo at 150 or 160+ bpm and mastering it at that tempo, imagine how effortless it will feel when you slow it back down to 140 bpm.
It doesn’t matter how long it takes you to build up your speed, it only matters that you work on it. If it takes 3 months to build up your skills, do it anyway. In 3 months’ time, you’ll be far better off if you practice. Don’t skip an exercise because it feels too hard. Work on it until it feels easy!
2. Slow it down
The first method is the most common way of using a metronome because it’s such an effective way to improve your skills. But there’s another way we can use a metronome and it’s a method not many guitarists take advantage of.
Playing something at a high tempo can be challenging, but playing something at an incredibly low tempo can be just as challenging. Keeping perfect time can be difficult at very low tempos as we’re not used to slow things down so much.
A quick way to understand what I’m talking about is to try and clap along with a metronome set to 20 bpm.
Set your metronome (you can download a free metronome app for your smartphone if you don’t already have one) to 20 bpm, close your eyes, then try to clap along with the beat.
Your goal is for every clap to perfectly line up with the clicking of the metronome.
Unless you’ve spent a lot of time practicing this, you’ll find that it becomes extremely difficult to try and perfectly time when the next click will be. Most guitarists (even some advanced guitarists) will find this frustratingly difficult to do.
Text
Now imagine instead of doing something as simple as clapping, you do the same thing with a riff or solo. Imagine slowing a song down to 20 bpm and trying to keep perfect timing. It’s a lot harder than most people think!
The purpose of this type of practice is to help you dial in your playing and really master every note. By slowing it down so much, you have plenty of time to think about every note. You’re able to think about how long each note should go for, which finger to use, how to precisely move to the next note, etc.
If you’ve ever learned a riff or solo but it didn’t sound quite right when compared to the original song, practicing using this method is a great way to find out what needs to change.
For each of the exercises in this guide, try to play it as slow as possible while keeping steady timing. It’s a great way to learn the exercises and work on your timing skills at the same time.
For most guitarists, I recommend spending 70% of your time working on the first method (building up speed) and 30% of your time working on slowing things down.
Finger Dexterity and Independence Exercises
Think of these exercises as the building blocks for your guitar skills. Being able to independently move your fingers freely across the fretboard is crucial for accuracy and speed.
These exercises are designed to build up muscle memory in your fingers so you can move across the fretboard without any awkward feelings or pressing down with the wrong fingers. Some of these exercises are like tongue-twisters for your fingers.
You have probably seen many of these exercises from different guitarist interviews and in guitar magazines. They’re so common because they can have a massive impact on your playing skills.
Many advanced guitarists regularly use these exercises as warm-ups before performing live. Joe Satriani is known to play many of these to warm his fingers up before every show.
Even if these exercises feel easy the first time you try them, you should still add them to your practice routine.
Classic 1234 Exercise
The chances are you’ve seen this exercise before and there’s a good reason why it’s so common. The ‘1234’ exercise is a great way to warm up your fingers, helps build picking and fretting control and is an insanely easy exercise to build up your speed.
If you haven’t already added this exercise to your practice routine, add it now. Many guitarists use this exercise as their go-to warm-up before performing.
Here’s the ascending version of the exercise:
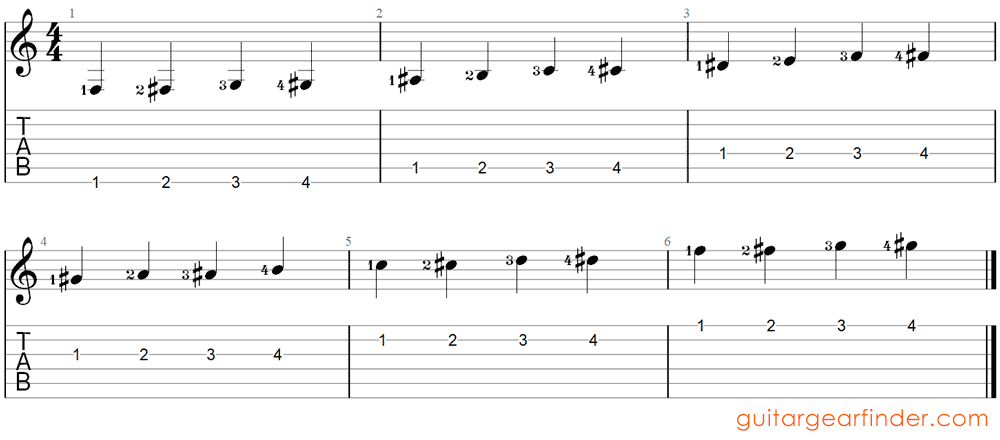
This exercise looks simple, but it does wonders for your finger control. Beginners may even find it an excellent way to stretch the fingers out.
The basic idea is that you use all four fingers to play the four notes on each string. So you use your first finger (index) to play the first fret note, your second finger (middle) to play the 2nd fret note, third finger (ring) to play the 3rd fret note, and your fourth finger (pinky) to play the fourth fret note.
This is important because it forces your hand to stretch out. If you were to lift your fingers off after playing each note, you’ll develop bad habits and you won’t stretch your hand out. Take a look at any advanced guitarist play fast legato runs and you’ll notice how closely they hold their fingers in position against the strings. This exercise helps build that habit.
As a guitar teacher, I often see this when students have trouble stretching. Instead of trying to stretch the fingers out, they ‘cheat’ by lifting their fingers off of the fretboard. Keep your fingers pressed against the string as you move to the next note.
If you have trouble stretching your fingers out over the first four frets, you can shift this exercise up the fretboard. Start with your first finger on the 7th fret. This turns the 1-2-3-4 exercise into 7-8-9-10. You’ll find it much easier to position your fingers the higher up the fretboard you move.
Over time, you can gradually work your way down the fretboard until you reach the 1-2-3-4 position.
Picking patterns
I recommend practicing this exercise most of the time using alternate picking. This means play down-up-down-up etc. Continue the down-up picking pattern across all strings. As you build up your speed, you’ll find this exercise much easier to perform with a good alternate picking technique.
You can use other picking methods with this exercise (eg: all-down, all-up, economy), but try to spend the most time using alternate picking.
Using a metronome
This exercise is a perfect example of how a metronome can be useful in developing your skill and speed. Many advanced guitarists use this exercise to build up their speed.
To play this exercise along with a metronome, you simply need to play one note per metronome click. Start at a slow tempo (eg: 60 bpm). If it feels easy to play in perfect time, gradually raise the tempo. As explained earlier, gradually raise the tempo until you start to slip with your timing or you start making mistakes.
Over time you’ll be able to raise the tempo to 200 bpm and beyond. All it takes is consistent practice.
1234 Exercise Variations
The classic 1234 exercise is a great starting point for developing your finger control. But it doesn’t take long to get comfortable with the pattern it uses. Fortunately, it’s easy to take the exercise and use a different finger pattern.
Using different patterns will help you develop finger independence and dexterity. Learning how to smoothly move from your fourth to your second finger without your other two fingers flailing in the air takes some time to develop.
Here is an example of a variation of the simple 1234 exercise:
All you need to do is change the order of the notes you play. Just like the 1234 exercise, play this pattern across all six strings.
Here is a different variation:

After you try these variations, try to come up with as many different variations as possible (eg: 4123, 2431, etc.). The idea is that each variation gives you good practice at different finger combinations.
Every time you practice a new combination, you’re training your fingers to move independently from each other. With consistent practice, it doesn’t take long before your fingers feel confident with any combination.
Tip: If you find that you struggle with a certain finger combination, spend more time working on that combination. Work on it until it stops being a weak area of your playing. That way if the combination shows up in a song, you’re not going to struggle with it.
1234 Descending Exercise
All of the above exercises focus on ascending across the six strings. It’s important to practice any exercise across all six strings so you feel comfortable in any position. It’s also important to practice this exercise going backward.
If you’re a beginner or intermediate guitarist, you’ll find ascending far easier than descending. There’s something about moving backward across the strings that slow guitarists down slightly.
If you find it harder to play this exercise descending, spend time on it until it feels just as easy as the ascending exercise.
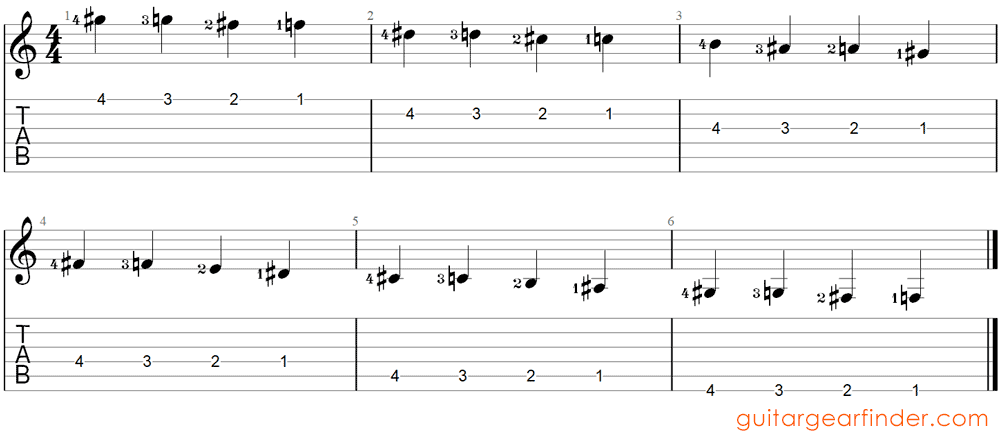
This time you start with all four fingers pressed against the string in position. Line all four fingers up along each fret so all you need to do is gradually remove one at a time as you play.
When you move to the next string, place all four fingers into position before you play the first note. This will slow you down at first, but it will eventually feel so natural that you don’t notice you’re doing it.
Use alternate picking and focus on keeping perfect timing along with a metronome. Make sure every single note rings out clearly. If there is any fret buzzing or muted notes, stop and repeat the string.
Don’t rush through the strings thinking you’re making progress. Play the exercise as slow as you need to play it perfect. If it’s not perfect, slow down and fix your mistakes.
Descending variations
Just like before, you can use any variations you want from this 4321 descending pattern. You can even use the same patterns you came up with for the ascending pattern (eg: 1234, 1324, etc.).
Try to find the patterns that cause you the most discomfort and work on them until they feel easy. The goal here is to become completely competent with any variation.
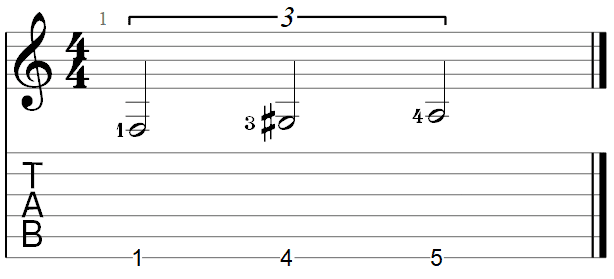
Wide Stretching Exercise
If the classic 1234 exercise didn’t feel like it stretched your fingers out at all, this exercise will do the job. Even some advanced guitarists may struggle with this one so be careful and don’t strain your fingers.
If this exercise seems impossible, just shift it up the fretboard into a more comfortable position. Over time you can gradually shift back down until you’re able to stretch out in the lowest position without any issues.
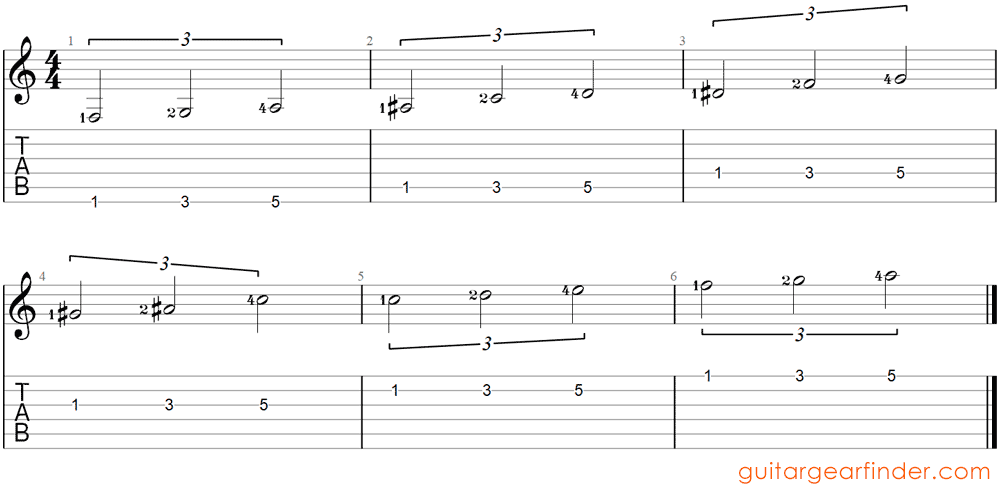
With this exercise, we’re playing three notes per string. Just like the 1234 exercise, the idea here is that you hold down each finger as you play. So by the end of the bar, you should have three fingers held down into position.
If you haven’t tried this exercise before, you’ll definitely feel your fingers stretch as you reach for the fifth fret. Make sure you continue to hold your first finger into position against the first fret. This exercise doesn’t work if you lift your first finger or you let it slide across the string.
In the above exercise, the finger numbers are labeled 1, 2, and 4 (notice the numbers next to the note symbols on the staff). This means you play the first fret with your first finger (index), the third fret with your second finger (middle), and the fifth fret with your fourth finger (pinky).
Some guitarists may find this too hard when they use their second finger on the third fret. If you struggle with this pattern, try using your third finger instead on the third fret.
Just like you shouldn’t try to over-stretch before exercising or playing sport, don’t over-stretch during guitar finger exercises. If this exercise hurts in any way, shift it up the fretboard to a more comfortable position.
Start at the 7th fret so the exercise becomes 7-9-11 instead of 1-3-5. If that still feels too hard, move up higher. If it feels easy, move down. Gradually work your way down to the lowest position, but don’t force yourself. Be patient.
It’s fine if you feel some slight discomfort in your fingers, but there should never be pain.
Feel free to use any picking pattern you want for this exercise. Experiment with strict alternate picking, economy picking, all-down, all-up, and anything else you want.
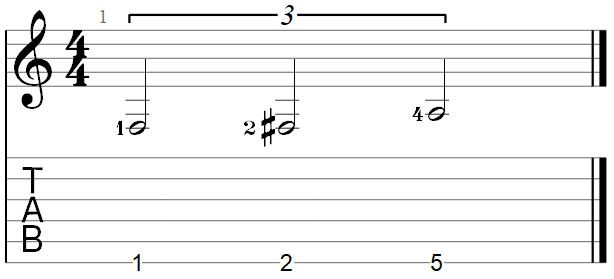
Wide Stretching Variations
Just like the classic 1234 exercise, we can easily come up with different patterns for this exercise that stretches your fingers in different ways.
The important stretch is from 1-5, so as long as you keep those two notes, you can play around with anything in between.
Here is a great variation worth practicing:
The reason this is a great stretching exercise is that it works your third and fourth fingers. Many guitarists will struggle with this pattern, so if you have trouble with it, shift the exercise up the fretboard and gradually work your way down again.
Here is another variation:
This variation focuses on stretching between your second and fourth fingers. Remember to focus on any variation that you find challenging. So if you find this variation difficult, spend time with it until it feels easy.
Chord Finger Exercises
All of the above exercises focus on developing your finger independence and dexterity for playing scales, riffs, and licks. They’re sequential exercises which means they focus on how your fingers move from one note to another.
When we play chords, sequential exercises won’t help us because we need to move all of our fingers at once. This takes a different kind of skill and a different kind of exercise to develop.
The below exercises are designed to help you develop your finger control when moving between chords. If you have trouble moving quickly into chord shapes accurately, or your chord changes are slow, add these exercises to your practice routine.
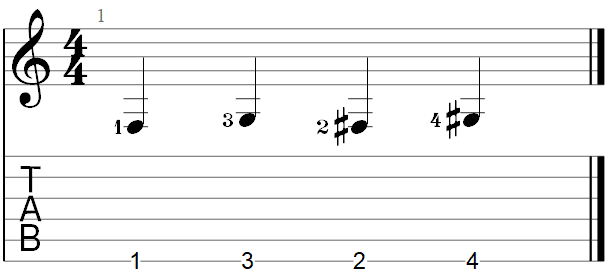
Chord Flipping Exercise
The idea behind this exercise is simple: line up your fingers in a 1-2-3-4 pattern across the bottom four strings. Play these notes as a chord then flip the pattern to 4-3-2-1. Continue to flip back and forth between the two chord shapes focusing on accuracy and speed.
Here is the exercise:
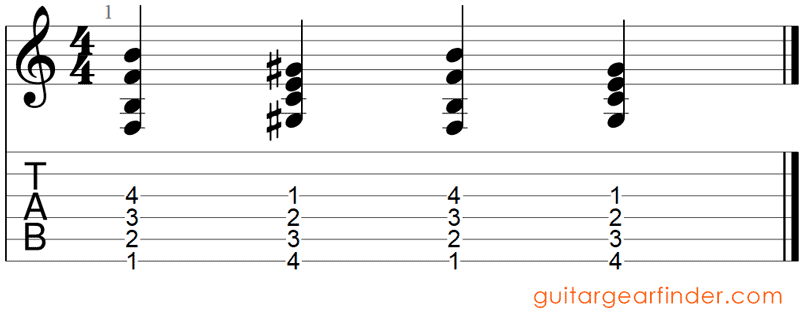
While this exercise sounds terrible due to the weird chord shapes, it does wonders for your muscle memory.
The diagonal shape your fingers make against the fretboard makes this an easy exercise to check if you’re lining your fingers up properly. You should instantly notice if a finger is out of position before you strum the chord.
The goal is to be able to place all four fingers into position at the same exact time. Beginners are likely to start by placing one finger down at a time. Learning to place all fingers down into a chord shape at the same time dramatically speeds up your chord changes.
Once you feel comfortable with the two chord shapes, use a metronome to force yourself to stick to a strict rhythm. Gradually build up the tempo until you’re accurately flipping between the two shapes at a rapid pace.
Extra tip: if you have trouble stretching your fingers out to reach all of these notes, shift the entire chord shape higher up the fretboard. Just like the 1234 exercise from before, shifting the exercise up the fretboard is an easy way to feel comfortable before you try to work back down and stretch your fingers out.
Advanced Chord Flipping Exercise
The above exercise becomes easy after a while due to the simple way the fingers move back and forth between chord shapes. All four fingers move in the same direction, which is easy to figure out as you play.
This exercise complicates things by making your fingers move in different directions. This works wonders on your finger independence and dexterity.
If you have trouble with the above exercise, keep working on it before you try this one out.
Here’s the exercise:
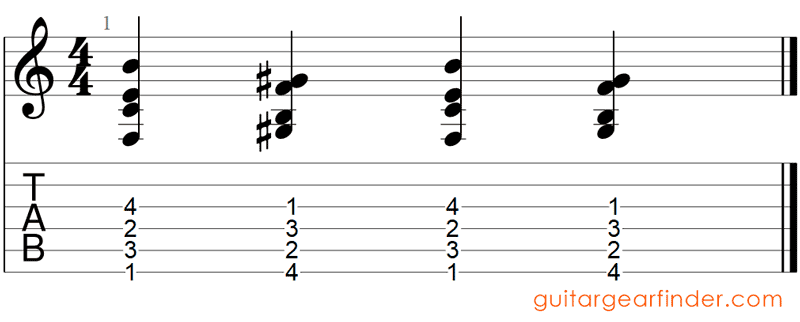
As you can see, the exercise uses the same basic idea as the previous one, but the chord shapes are slightly different.
This time your fingers don’t make a nice diagonal line across the strings. The middle two notes are flipped. When you change to the second chord shape, you’ll notice that the middle two fingers move in the opposite direction compared to the first and fourth fingers.
Beginners will find this extremely challenging. Even intermediate guitarists can get tripped up by these chord shapes – especially if you’re not used to moving all of your fingers at once into chord shapes.
Concentrate on the positions you need to move your fingers into before you start to move. Visualize in your head what the chord should look like. It might sound strange to do, but it helps you figure out what to do.
Accuracy is crucial to this exercise. There’s no benefit in playing this exercise fast if you’re not accurate with the chord shapes. Focus on accuracy before you try to speed the metronome up.
If you struggle to move all four fingers into position at the same time, stop the metronome and work on it as slow as you need to until you can get it right. Don’t let yourself ‘cheat’ by moving one finger into position at a time. All four need to move at the same time for you to get the most out of this exercise.
Note: more exercises will be added to this list over time. Bookmark/Favourite this page to come back to it and work on new exercises. Subscribe for email updates for more lessons, guides and gear reviews.
Here are some other useful lessons and guides to help you develop your guitar skills:
- 6 Hammer-On Exercises to Practice Daily
- How to Plan a Guitar Practice Routine
- How Long to Practice Guitar
- How to Practice Guitar Quietly
- Can You Practice Guitar Too Much?