
Guitar tapping is a fun technique that can take your guitar playing in new directions. From blistering-fast solos to super-wide arpeggios, tapping is used in a wide range of styles and ways.
This lesson will give you a variety of tapping patterns and exercises to work on so you can develop a solid tapping technique.
Learn the basics of tapping in this lesson, then learn some popular tapping solos here.
2-Note Tapping Patterns
2-note tapping patterns are a quick and easy way to get started learning how to tap. You only need to alternate back and forth between two notes, so these exercises are quick to learn and easy to master.
Remember that none of the notes in these exercises are picked. Focus on keeping the string vibrating by using good tapping technique as explained in detail in this tapping lesson.
Exercise 1
This tapping exercise simply asks you to alternate between tapping a note on the 12th fret and fretting a note on the 7th fret.
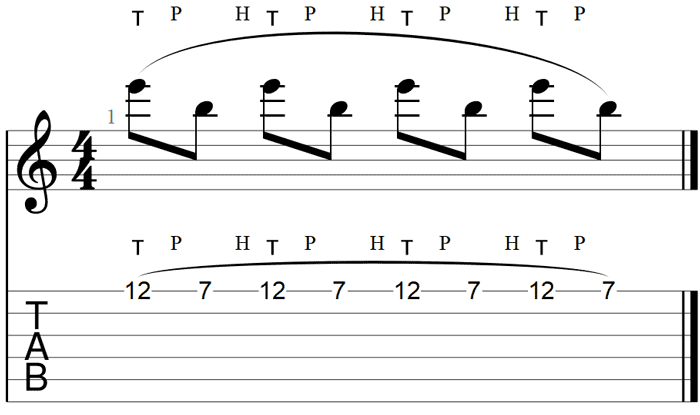
You can use any finger you want to play the 7th fret note. Keep that finger held down the entire time as there is no reason to lift it off of the string.
Use the rest of your fretting hand to keep the other strings muted.
Now you can focus your attention completely on your tapping technique. Aim to be as accurate as possible when tapping the 12th fret and try to give the string a little flick as you pull-off to the 7th fret.
Once you can play this exercise effortlessly without any mistakes, repeat it on the other strings. Play the same pattern on the B string, then gradually work through all six strings. Get used to how each string feels and how you need to adjust your hand position.
Keep practicing this exercise until you feel completely comfortable playing it on any string on your guitar.
Extra tip: once you master this exercise, pick two different fret positions for the two notes (eg: tap the 9th fret and fret the 5th fret). Get used to playing this two-note pattern using any two positions on the fretboard.
Exercise 2
This exercise builds on top of exercise 1 and asks you to get used to moving your tapping finger back and forth between two positions.
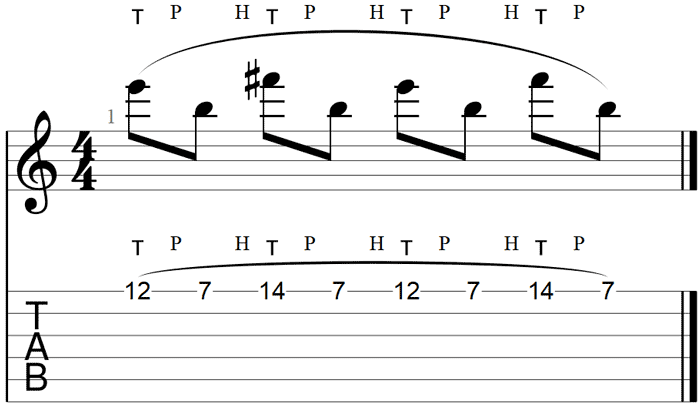
With this exercise, you can either move your tapping finger back and forth between the 12th and 14th frets, or you can use two different fingers to play the two tapped notes.
I recommend practicing this exercise both ways:
- Practice it using one finger jumping back and forth between the two tapped notes. Get used to moving your tapping hand up and down the fretboard and accurately tapping each note
- Practice using two different fingers to play the two tapped notes. You might use your middle finger to play the 12th fret, then your ring finger to play the 14th fret. Try different finger combinations to figure out what feels best to you.
This is a simple exercise and will help you feel more comfortable with moving your tapping hand around the fretboard.
Just like in exercise 1, practice this exercise across all six strings. Get used to shifting your tapping hand around the fretboard.
3-Note Tapping Patterns
It is very common for guitarists to play three notes per string, so spending some extra time working on these exercises will prepare you for a lot of tapping licks and solos.
Keep in mind that the below exercises use triplets. This means you play three notes per beat instead of two.
Triplets make it easy to practice along with a metronome as you repeat each three-note pattern after every click. In these exercises, you should tap each note in time with the metronome click.
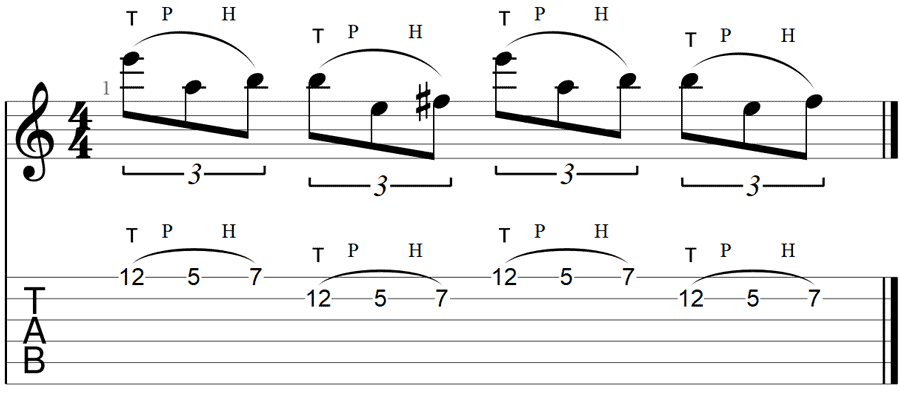
Tapping Exercise 3
This is one of the most common tapping patterns you will see, so practice it until it feels completely natural.
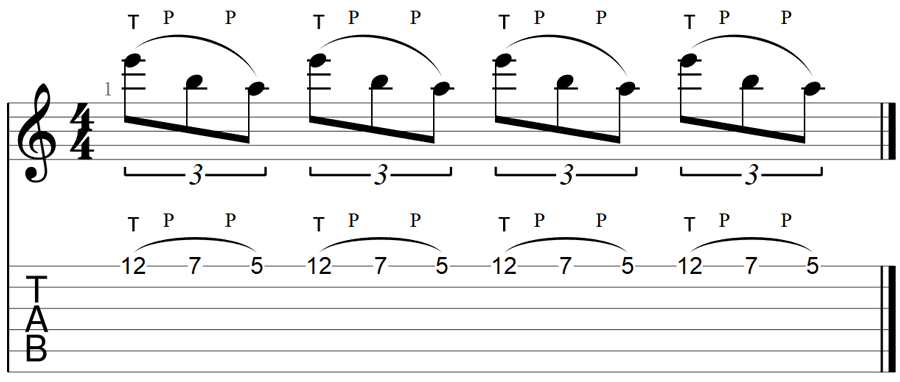
Keep your first finger from your fretting hand holding down on the 5th fret, then use your third finger to play the pull-offs from the 7th fret.
Build up the speed gradually. If you start making mistakes or your fingers lose coordination, slow down and spend more time practicing at a comfortable tempo.
After you feel comfortable playing the above example, try moving the three notes around to different positions. You can play any three notes from a scale or try and figure out how to play an arpeggio as a tapping pattern.
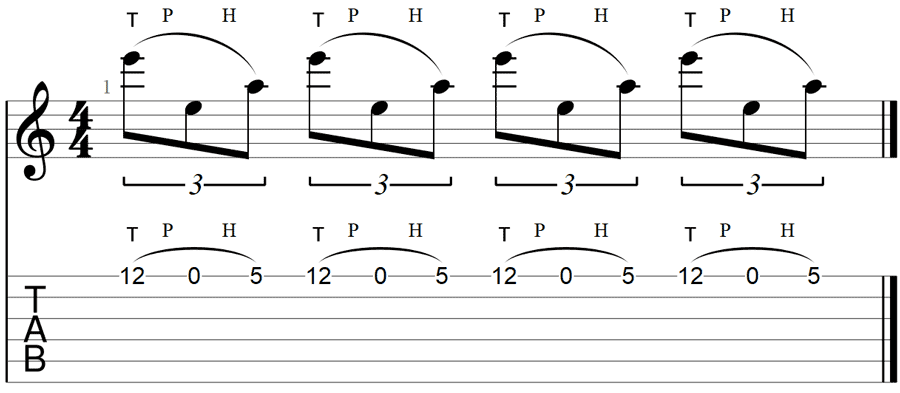
Tapping Exercise 4
If you compare this exercise with Exercise 3, you’ll see that the only difference is that the 7th fret has been replaced with an open string.
This exercise will feel very different to play as you’ll be playing a hammer-on to the 5th fret instead of a pull-off from the last exercise. The open string will also feel different.
It is fairly common to use open strings in tapping licks. As long as you use proper tapping technique, the open string should ring out clearly.
If you have trouble getting the open string to ring out, give the string a slight flick with your tapping finger as you pull off from the tapped note.
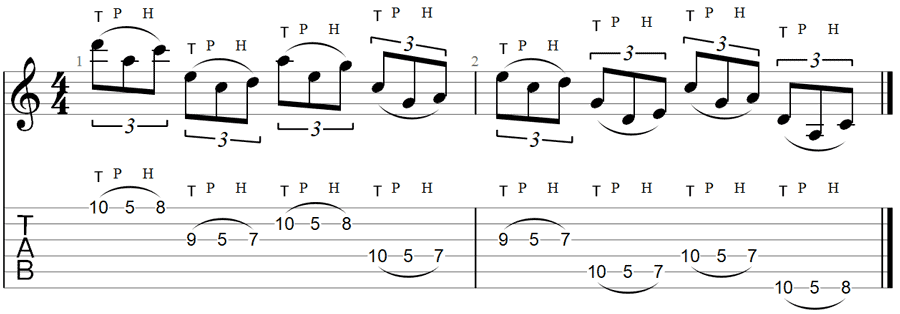
Tapping Exercise 5
The goal of this exercise is to simply get you used to moving back and forth between different strings while tapping.
This exercise will test out how well you can keep the string vibrating when you tap the string. If you’re not tapping the string with accuracy, the string may not vibrate enough for the tapped note to ring out.
Once you can play this exercise, try to continue shifting down the strings all the way to the 6th string. Keep the other strings muted with your fretting hand to avoid any unwanted string noise.
Then you can try taking any of the other exercises in this lesson and try shifting them to different strings. You can even try combining different exercises across different strings for an extra challenge.
4-Note Tapping Patterns
While 3-note tapping patterns are the most common, you can get some interesting sounds out of 4-note tapping patterns.
The below exercises use 16th notes, which means that the 4-note pattern repeats at every beat. So you need to play the tapped notes with every click of the metronome.
Tapping Exercise 6
This exercise should be quick and easy to learn if you have spent enough time practicing the 3-note tapping exercises shown above.
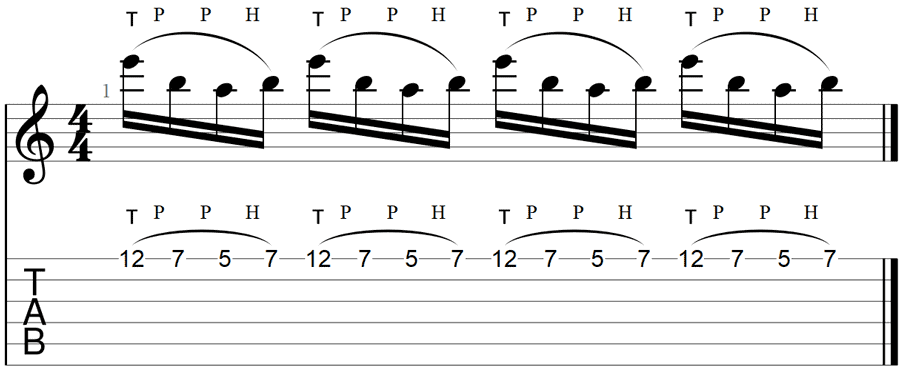
Keep your first finger from your fretting hand held down on the 5th fret. There is no reason to move it, so keeping it in place.
Generally speaking, the less motion you need to do with your hand when playing guitar, the better your licks will sound and feel.
This exercise combines hammer-ons and pull-offs, so make sure that each note rings out for the exact same length of time. Beginners often find hammer-ons easier to play compared to pull-offs, so they tend to play them faster. Make sure you play everything consistently.
Tapping Exercise 7
This exercise will give you practice in changing the tapping pattern as you move to different strings. Both hands need to adjust position when changing to the B string, so take your time getting used to the changes.
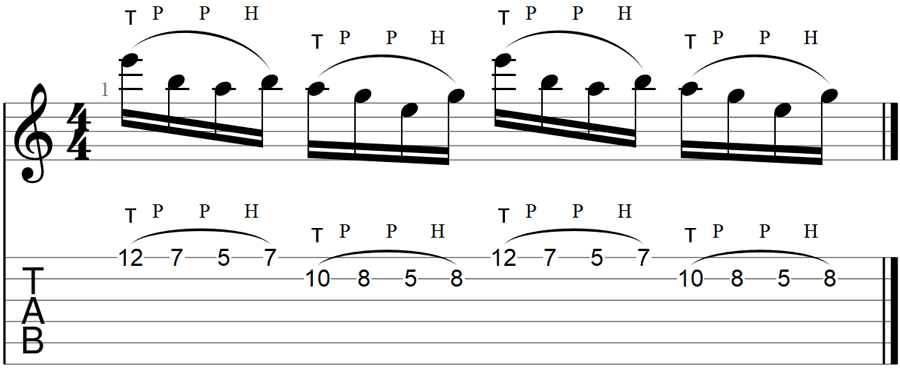
Think carefully about how you position your tapping hand and how you will move back and forth so you can properly tap the two notes.
If you have trouble with this exercise, try taking Exercise 6 and play it back and forth across the high E and B strings. Once that feels easy, you can try this exercise again.
Tip: once you master all of the above tapping exercises, you can start combining the patterns to form 5, 6, or 7 note patterns. For example, you can combine a 3-note pattern and a 4-note pattern to get a 7-note pattern.
String Skipping Tapping Patterns
Some tapping licks will jump around the fretboard to play wide arpeggios or scale runs.
When practicing your string skipping with tapping, be very careful about keeping the other strings muted and quiet. An open string accidentally ringing out can completely ruin a well-performed tapping lick.
Tapping Exercise 8
This exercise keeps the tapping patterns the same across all of the strings so you can focus completely on your string skipping technique.
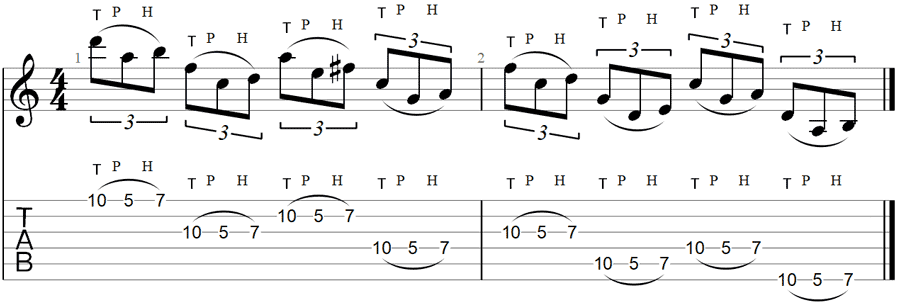
You can use any of the 3-note patterns instead of the above example if you want. The main focus should be on keeping the fretboard quiet as you jump around the strings.
Tapping Exercise 9
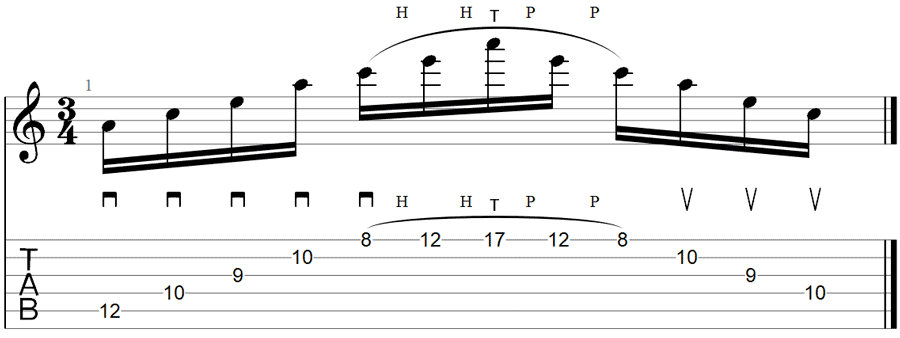
This exercise takes the string skipping pattern from Exercise 8 and uses the A Minor Pentatonic Scale to show you how you can use tapping in a descending scale run.
Once you feel comfortable playing the above exercise, try reversing the direction to turn it into an ascending scale run. Then you can practice up and down the fretboard in a continuous loop.
If you like the sound of this tapping exercise (it sounds great when played fast), I highly recommend you practice coming up with your own scale run licks.
Learn more about the Pentatonic Scale here and practice coming up with your own tapping licks using the fretboard diagrams. You simply need to pick three notes per string from the fretboard diagram, then use the above string skipping pattern.
Shifting Tapping Patterns
All of the above exercises stick to the same area of the fretboard. If you want to move up and down the fretboard during your tapping solos, there are a few ways you can do it.
The challenge with the below exercises is with shifting your tapping hand into the correct position in time for the next tapped note. Review the tips covered in this guide about positioning your tapping hand if you’re having trouble.
Tapping Exercise 10
This exercise shows how you can use slides to shift up and down the fretboard. Because slides are a legato technique, you don’t need to pick the string as you shift positions.
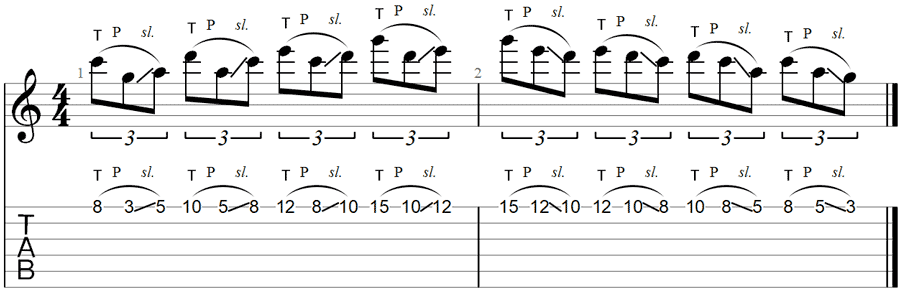
This exercise will probably feel awkward at first because you need to shift both your fretting hand and your tapping hand.
Practice each bar separately so you can focus on the pattern before you combine the ascending and descending licks.
Try coming up with your own licks that slide up or down the fretboard. You don’t need to slide in each 3-note pattern, this is just an exercise to help you feel confident in sliding.
Tapping Exercise 11
This exercise demonstrates how you can use tapping as a way of moving up and down the fretboard. As you tap a note, it gives your fretting hand time to shift up or down to a new position.
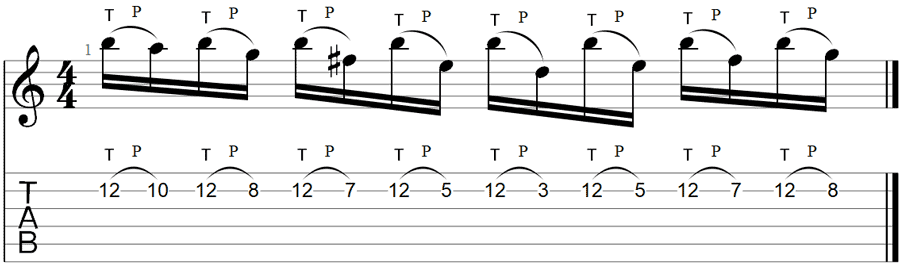
You can see that you can easily cover a wide area of the fretboard with tapping. At any point, you could also change the position of the tapped note to move up or down the fretboard.
The above tapping example is common in neoclassical style music and are known as Pedal Point or Pedal Tone licks. The great thing about tapping is that you can take almost any Pedal Point lick and easily change it into a tapping lick.
Tapping Arpeggio Exercises
While tapping is fun to play with repeated patterns or scale runs, they really shine when you use them with wide arpeggios.
Here are a few exercises demonstrating different ways you can use tapping with arpeggios.
Tapping Exercise 12
This tapping exercise shows how you can combine tapping and string skipping to create some very wide arpeggios.
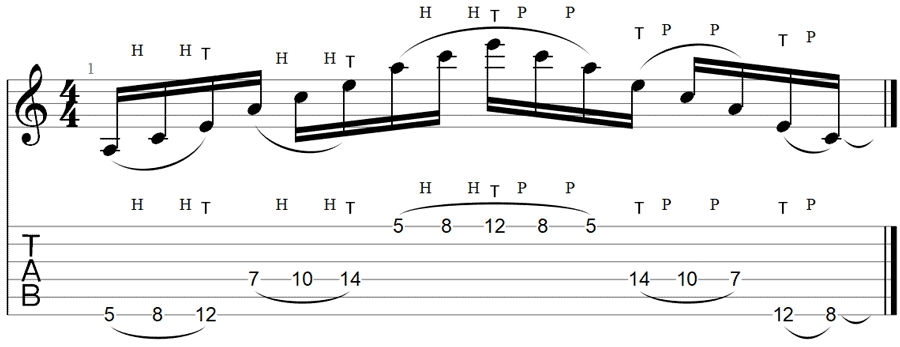
This exercise will be challenging compared to the rest of the exercises in this lesson because it doesn’t start the patterns with a tapped note.
You’ll notice that the first notes during the ascending part are played with the fretting hand.
These notes are played with ‘hammer-ons from nowhere’. This means you do not pick the string. Instead, you firmly tap the note using your fretting hand finger to make it ring out.
With practice, licks like this will feel easy and a lot of fun to play.
The above exercise is an Am7 arpeggio. To come up with arpeggios like this on your own, take an arpeggio and have a look at a fretboard diagram to figure out possible positions. Then you can figure out comfortable positions and notes to tap.
Tapping Exercise 13
This tapping exercise is very common with guitarists who play a lot of sweep-picked arpeggios. At the very peak of a sweep-picked arpeggio, the guitarist will often tap a higher note to extend the arpeggio.
If you haven’t practiced sweep picking before, this exercise will seem awkward. But if you already know how to sweep pick, you will find it easy to add in a tapped note.
Learn how to sweep pick in 14 exercises in this lesson.
For an extra challenge, try sliding the tapped note to an even higher note to further extend an arpeggio.
Learn Some Tapping Solos
The above exercises are more than enough to prepare you for most of the tapping solos and licks you’re likely to see. Once you can comfortably play most of the above exercises, you’ll be ready to tackle a lot of tapping songs.
Check out these 6 impressive tapping solos to learn some great tapping licks and songs.
If you have any trouble with the exercises covered in this lesson, read this Guide to Guitar Tapping to work on your tapping technique and hand positioning.