Recording guitar in Ableton Live 10 is different compared to other DAWs. Ableton Live was designed more like a performance tool compared to a traditional DAW, so recording guitar is different.
In this guide, I will show step-by-step how to record electric or acoustic guitar in Ableton Live.
After you read this guide, check out this Ultimate Guide to Recording Guitar at Home for an in-depth look at recording and other DAWs you may want to consider using.
Step 1: Connect Audio Interface or Microphone
You can record guitar in Ableton Live 10 using an audio interface or a USB microphone. I don’t recommend trying to use your computer’s line in or microphone jacks.
If you don’t have a microphone or audio interface, learn about the different recording options in this guide.
In this example, I’m using an iRig HD 2 (check out my review to see why I highly recommend it for electric guitar) and plugging it into my PC’s USB port.
One of the most popular audio interfaces I recommend if you want to record acoustic or electric guitar (or vocals and other instruments) is the Focusrite Scarlett range (link to Amazon for details and different options).
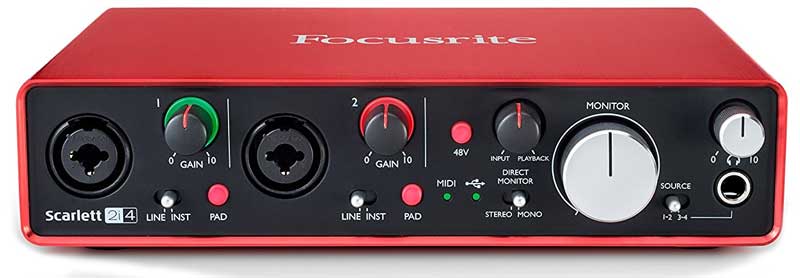
To record guitar using a Focusrite audio interface, simply plug it into your USB port before you open Ableton Live.
An audio interface like the Focusrite Scarlett is the ideal option if you want to record an acoustic guitar using a microphone.
Alternatively, if you want to record your guitar (or guitar amp) with a microphone, you can buy a USB microphone like this one.
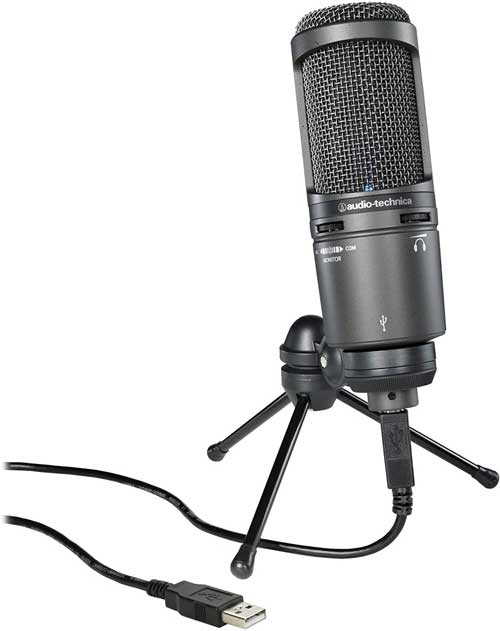
When I’m recording vocals, instead of using an audio interface, I simply plug in my iRig Mic Studio (link to review). A USB microphone like this gives you a simple way to record vocals or acoustic guitar.
For most people, I highly recommend using an audio interface as it gives you far more flexibility. You can plug any microphone or multiple microphones into an audio interface.
Once you have connected your audio interface or USB microphone to your computer, you can open Ableton Live and move on to the next step.
Step 2: Set Up Ableton
The first thing to do when you open Ableton is to set up your audio device so Ableton knows what inputs you want to record from.
Press Ctrl , (comma) or go to the Options > Preferences menu and click the Audio tab to bring up the audio settings.
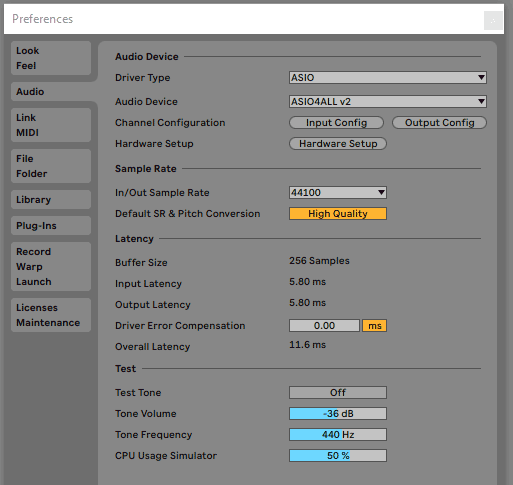
This is where you set up Ableton to use your audio interface.
Under Driver Type, select Core Audio if you use a Mac and ASIO if you use a PC. ASIO will be the best option, but if you have issues you may need to use MME/DirectX.
Under the ‘Audio Device’ drop-down menu, look for an option displaying your audio interface.
For example, if you have a Focusrite audio interface plugged in, you should see ‘Focusrite USB ASIO’ as one of the options. That option should give you the best results.
If you don’t see your audio interface on the list of audio devices, it doesn’t mean your interface doesn’t work with Ableton. All it means is there isn’t a dedicated driver for it.
Using ASIO4ALL
If your audio interface doesn’t appear in the drop-down menu, I recommend using ASIO4ALL, which is a handy audio driver that works with any DAW.
Download and install ASIO4ALL from this website. Re-open Ableton after installing and select it from the drop-down menu.
Click the Hardware Setup button to bring up the ASIO4ALL settings view.
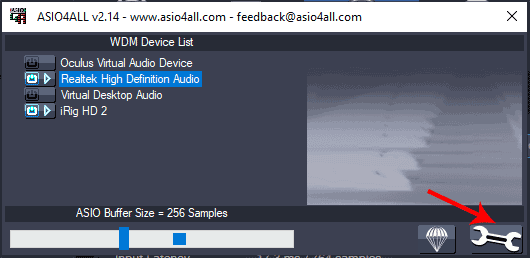
Click the spanner icon on the far right to access more options:
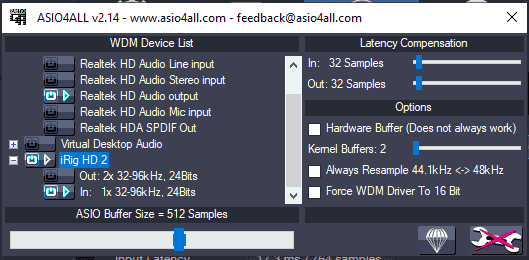
From here you can enable and disable any device you like.
Simply click the blue power icons next to any device to enable or disable them.
In the above screenshot, you can see that I’ve enabled my iRig’s input and my computer speaker’s output.
This means I can record with my iRig and listen to the playback through my normal computer speakers.
This makes ASIO4ALL a powerful way to control multiple inputs and outputs. You can route your signals in any way you want.
Set Up Inputs
Once you have set up your audio interface, click the Input Config button in Ableton.
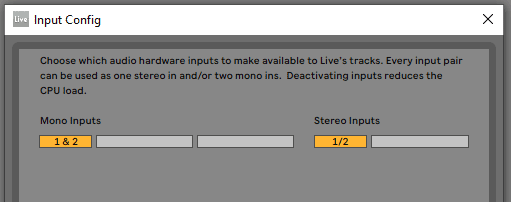
This is where you let Ableton know which inputs from your audio interface you want to use.
My iRig HD 2 only has two inputs, so it has already highlighted both as potential inputs.
If your audio interface has more than two inputs, you can decide to select all of them or only some of them. I recommend selecting all inputs to make it easier later on.
Sample Rate
The sample rate you set needs to be compatible with your audio interface. You can see in the below screenshot that you can choose from a lot of different options that may or may not be compatible with your audio interface.
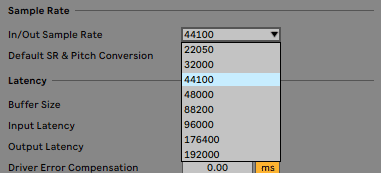
Most audio interfaces and USB microphones are compatible with either 44.1kHz or 48kHz and either one will be fine. Newer audio interfaces may support higher sample rates such as 96kHz.
For most guitarists, 48kHz is perfectly fine to use and higher sample rates don’t necessarily give you better quality recordings.
Buffer and Latency
The buffer length will control how much latency (delay) you hear during recording. The larger the buffer, the higher the latency.
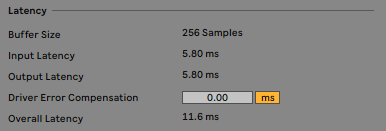
Trying to record guitar with high latency is awkward, so your goal is to have the lowest latency possible.
You control the latency by adjusting the buffer length. If the buffer is too low, you may hear glitches, so aim to set your buffer as low as possible without causing problems.
In the above screenshot, you can see that a buffer size of 256 samples gives me an overall latency of 11.6ms.
As I’m using ASIO4ALL, I can adjust the buffer size in ASIO4ALL’s settings to try and change the latency or avoid any glitches.
Step 3: Set Up a Track to Record
Now that your audio interface has been set up in Ableton, let’s look at how to prepare a track for recording.
When you first open Ableton, you will likely see the ‘Session’ view as shown below:
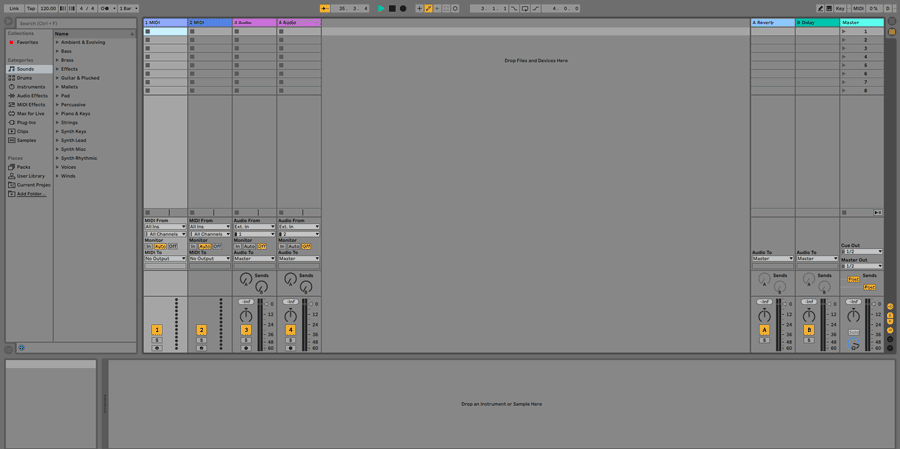
The session view is designed more for live performances than recording. We need to change to a more suitable view for recording.
Press Tab on your keyboard or go View > Toggle Arrangement / Session View to change to the arrangement view.
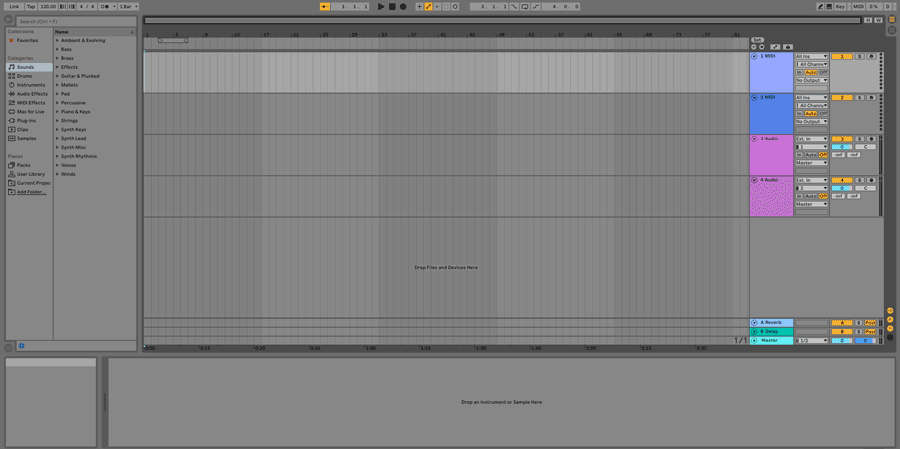
This view takes us to a more traditional DAW view with rows of tracks.
You can see that Ableton starts with four tracks set up for you with different colors for each track. By default, you will see two MIDI tracks and two Audio tracks.
To record guitar, bass, drums, or vocals, we will be using audio tracks.
Let’s delete the MIDI tracks by right-clicking and selecting delete.
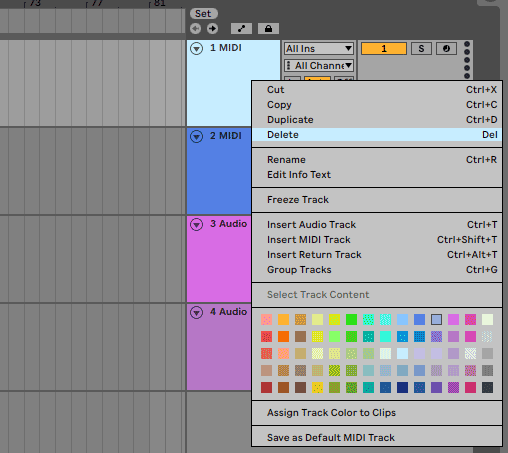
You can see that right-clicking a track brings up other useful options such as renaming the track, selecting a color, or inserting new audio or MIDI tracks.
Select Audio Input
You should now have two audio tracks as shown below:
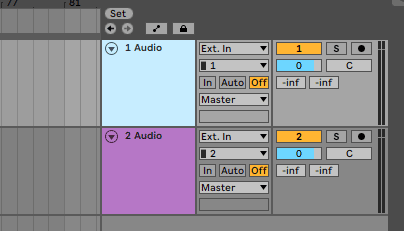
When you click on a track, it turns light blue as you can see in the above screenshot.
Now we need to set up a track to use the correct input from your audio interface.
Click the drop-down menu to the right of the track as shown below to see the list of audio inputs:
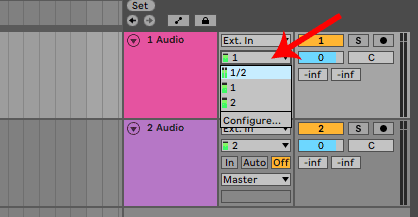
As my iRig only has two inputs, there are only three options to choose from. The first option ‘1/2’ is to record stereo. The other two options ‘1’ and ‘2’ record mono from each channel.
You may have more options on this list depending on how many inputs your audio interface uses.
If you have your guitar plugged in or microphone turned on, you will see a green bar appear to show the level of the inputs.
As I have my guitar plugged in, you can see green bars on all three options. I’ll keep the selection as ‘1’ to record my guitar in mono.
Select the channel you want to record.
Enable Monitoring
While you may see a green bar indicating that Ableton can hear your guitar or microphone, you won’t hear anything through your speakers.
To hear your guitar through Ableton, you need to enable monitoring.
Press the In button on the track and you will hear your guitar through Ableton.
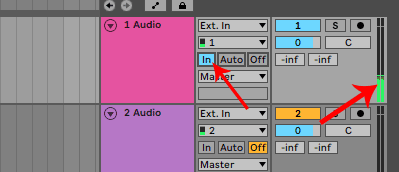
You will also start seeing the audio level appear on the far right of the track. This lets you know that Ableton is playing back the audio from your input device.
Arm for Recording
Now that you have selected an input device on a track and enabled monitoring, you can arm the track for recording.
Click the recording button on the right of the track to arm it for recording.
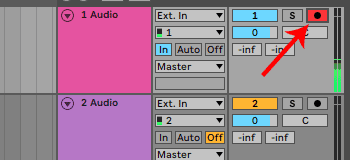
You can move on to the next step if you can hear your guitar and the track is armed for recording.
Step 4: Check Audio Levels
Before you start recording, you need to make sure the audio levels are set properly.
Having poorly set up audio levels can ruin a recording.
As soon as you press the ‘In’ button on the track, you should be able to hear your guitar through Ableton.
The meter on the right of the track gives you an indication of the signal strength.
If the green bar ever turns red as shown below, it means the signal strength is too high.
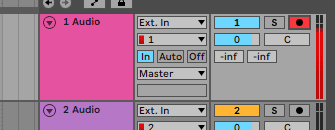
Recording a track that reaches this level will introduce clipping (unwanted distortion) to your recordings.
Use your audio interface’s controls to turn your signal down so it never turns red in Ableton.
At the same time, you don’t want the signal strength to be too low. Aim for the green bar to fill around 3/4 of the meter for a good signal.
Step 5: Record Your Guitar
If you have properly set up your audio device and track in Ableton, you can start recording your guitar.
Press the record button on the top of the screen or press F9 on your keyboard to start recording.

Ableton will start recording audio from where the vertical time line shows in the arrangement view.
You’ll see the armed track turn red and a waveform start appearing as you record as shown below:

To stop recording, press the stop button or space bar.
Hearing Playback
If you hit the play button after a recording, you won’t hear your recording.
To be able to hear your recordings, you need to turn audio monitoring off.
Press the off button on the track to disable audio monitoring. You will now be able to hear your recordings when you press the play button.
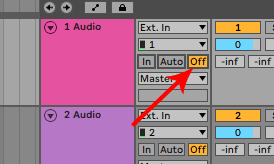
Alternatively, you can press the ‘Auto’ button, which automatically toggles back and forth between audio monitoring and playback.
Auto mode will mute your guitar while a clip is playing, so if you want to play along with your recordings, I recommend moving the recordings to a different track so you can hear both at once.
Here are some tips on what you can do with a recording in Ableton:
- Move the clip around by clicking and dragging the text above the waveform
- Right-click to rename the clip or to assign it a different color
- You can drag clips back and forth between different tracks
- Fade clips in and out by clicking the corner squares on the clip
Experiment with a few recordings so you can get a feel for how Ableton works. Ableton is very different than other DAWs, so it may take some time to get used to.
Ableton Guitar Effects and Plugins
Ableton comes with a wide range of effects and plugins that you can use with your guitar recordings.
You can also use third-party plugins in Ableton such as AmpliTube, BIAS FX, Line 6 Helix Native, and others.
Find out everything you need to know about plugins including the best options in my Ultimate Guide to Guitar Plugins here.
Ableton Native Effects
To see the effects included in Ableton, click the Audio Effects option in the left panel:
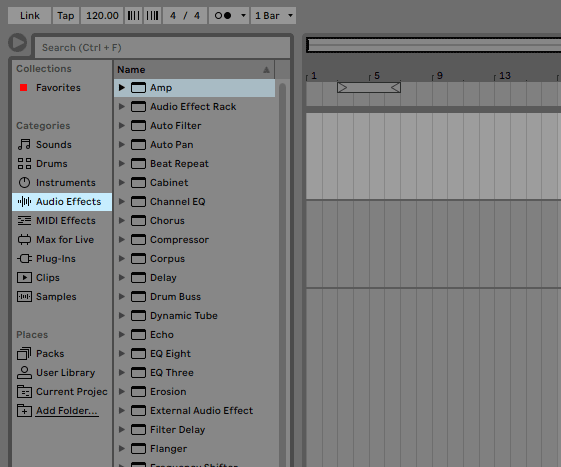
You can click any of these effects to see different presets.
To apply any effect to a track, simply drag it over the track or to the bottom of the screen, which has a panel labeled ‘Drop Audio Effects Here’.
Let’s drag the ‘Amp’ plugin to the track. You will see it appear in the bottom panel as shown below:
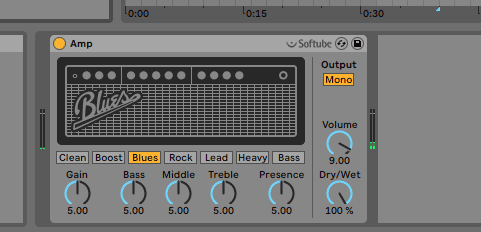
At any time, you can drag any of the presets on top of the plugin and it will overwrite your settings.
Toggle the plugins and effects on or off by clicking the orange circle on the top of the plugin.
Third-Party Plugins in Ableton
If you click the ‘Plug-Ins’ option on the left panel, you may see an empty screen as shown below:
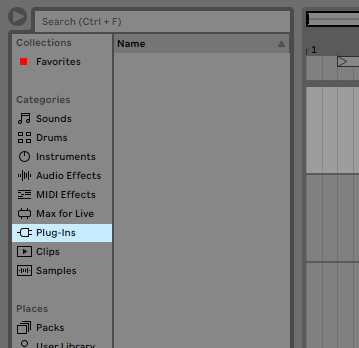
If you already have plugins installed on your computer, you simply need to tell Ableton to use that location.
Go to the preferences menu by pressing Ctrl , (comma) or Options > Preferences and click ‘Plug-Ins’.
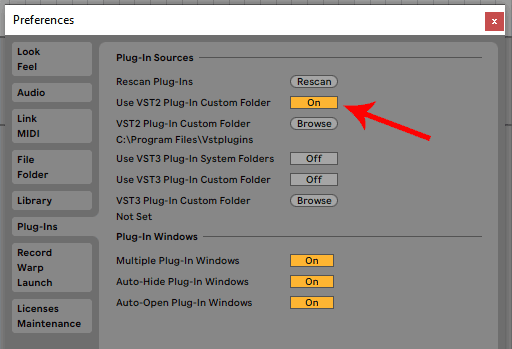
Select the folder you use for your plugins and click the button next to ‘Use VST2 Plug-In Custom Folder’.
Ableton will scan for plugins and update the left panel.
You can now drag any plugin to a track just like the native Ableton effects.
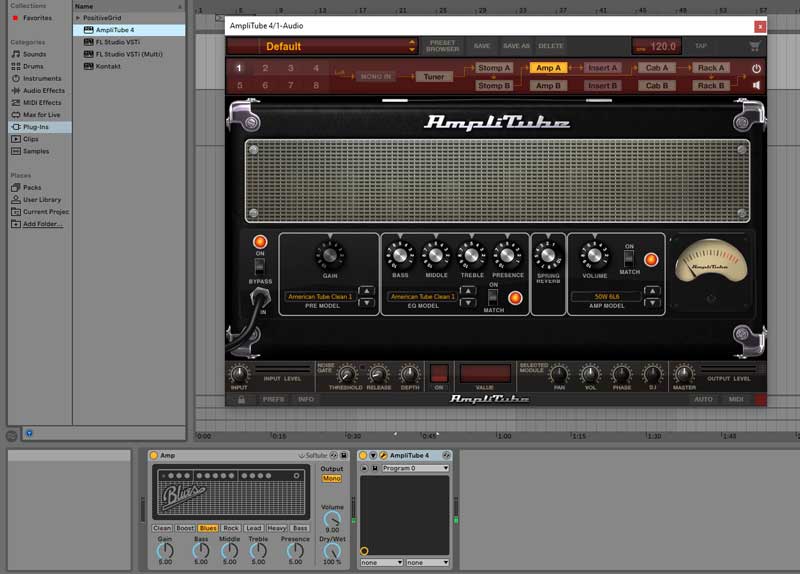
In the above screenshot, you can see that AmpliTube appears just like it does in other DAWs.
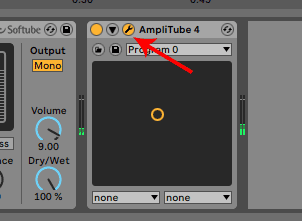
If you close the window for the plugin, you can re-open it at any time by pressing the wrench icon for the plugin:
You can apply plugins and effects to any track. Click on each track to see at the bottom of the screen what plugins have been applied.
Check out the best guitar plugins in this guide.
How to Record Two Instruments at Once in Ableton
There may be times when you want to record more than one track at a time.
You may want to record multiple microphones at once on a guitar amp, acoustic guitar, or drum kit. Or record two musicians at once such as vocals and an acoustic guitar.
To record more than one track at the same time, you first need to set up Ableton to allow you to arm more than one track at a time.
If you try to arm a second track for recording, you’ll notice that it turns the first track off.
To change this, right-click the arm button and uncheck ‘Arm Exclusive (Pref)’.
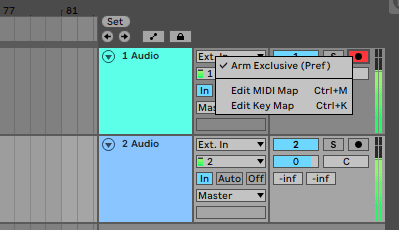
This setting allows you to arm multiple tracks at once.
Now you can arm the second track and the first track will remain armed. You can enable audio monitoring on both tracks if you want, or you can turn monitoring off if you like.
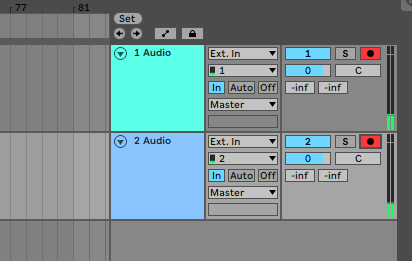
On the second track, make sure you select the correct input channel. In the above screenshot, you can see that I have the first channel on my iRig for track 1 and the second channel for track 2.
Keep an eye on the audio meters to make sure you have selected the right channels for each track.
Once you have both tracks armed for recording, you can hit record at any time and you’ll see two recordings appear as shown below:
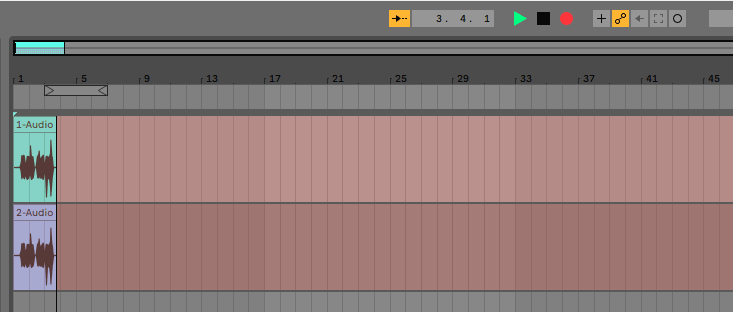
You can easily add as many tracks to record as you like (depending on how many inputs are available on your audio interface).
How to Overdub a Track in Ableton
Being able to overdub or record over the top of another track is incredibly easy to do in Ableton.
Once you have recorded a track in Ableton, you have two options if you want to record over the top of that track.
The first option is to drag the recorded clip to another track, then continue to record using the first track.
A better method is to set up a second track for recording.
Disarm the first track, then arm the second track. You don’t want the first track to remain armed, as you already have your track recorded.
Turn off audio monitoring on the first track and turn it on for the second track. Make sure you select the correct input channel for this track.
Your track settings should look similar to the below screenshot:
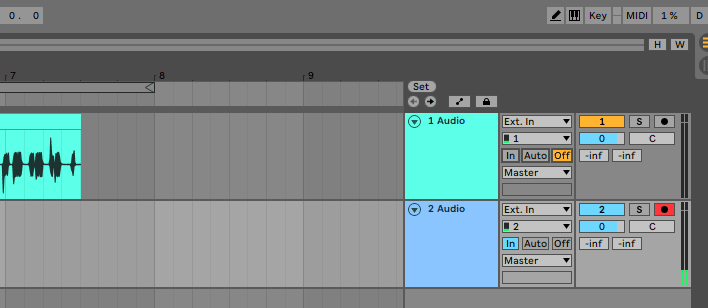
This setup allows you to record in the second track while hearing the first track play while you record. If you don’t hear the first track when you hit record, check your audio monitoring settings for the first track.
Once the second track is set up to record, hit record and you’ll start hearing playback of the first track.
You’ll also see your new track start appearing as you play:

You can continue to use this method to record more tracks at the same time. Simply create a new track, arm it for recording, set up the correct inputs and audio monitoring, then hit record.
Extra Ableton Live Tips
Here are two tips to help you get the most out of Ableton. Ableton shines the best when you incorporate these tips into your studio.
Use a DAW Controller
Ableton Live was designed with live performance in mind. While you can use it just like a regular DAW, you’ll be missing out if you don’t at least experiment with some of Ableton’s performance features.
The best way to use Ableton in this way is with a DAW Controller. DAW Controllers and Ableton go hand-in-hand.
A DAW Controller is a piece of hardware you can plug into your computer and control any DAW including Ableton. The basic idea with these controllers is that instead of only using your keyboard and mouse, you can also use buttons, knobs, sliders, pads, keys, and wheels to change settings, tweak your effects, record virtual instrument parts, and more.
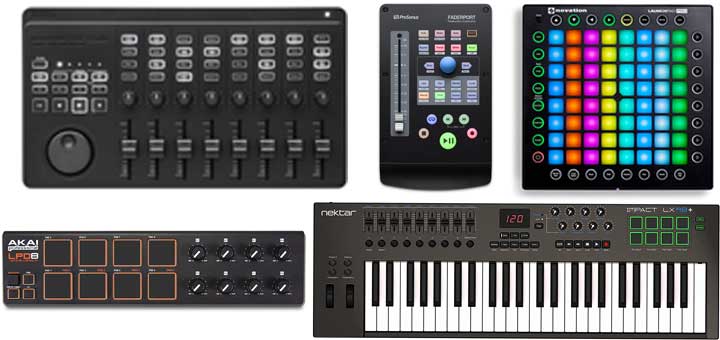
The above controllers give you an idea of the wide range of controllers out there. The right type of controller for you depends on how you want to use your DAW.
There are even controllers designed specifically to be used with Ableton (the top right controller in the above photo is a popular option). These controllers integrate into Ableton and once you learn how to use them, it becomes clear why Ableton is so popular for live performance.
The guide explains the wide range of controllers you might be interested in using as well as controllers designed specifically for use with Ableton.
Try Some Plugins
Third-party plugins allow you to extend Ableton and access a wide range of sounds, virtual instruments, and recording tools. Ableton does come with a nice range of plugins (depending on the version you buy), third-party plugins are a must when using a DAW.
As a guitarist, you will likely want to try out a guitar amp and effects plugin such as AmpliTube, BIAS FX, or Guitar Rig.
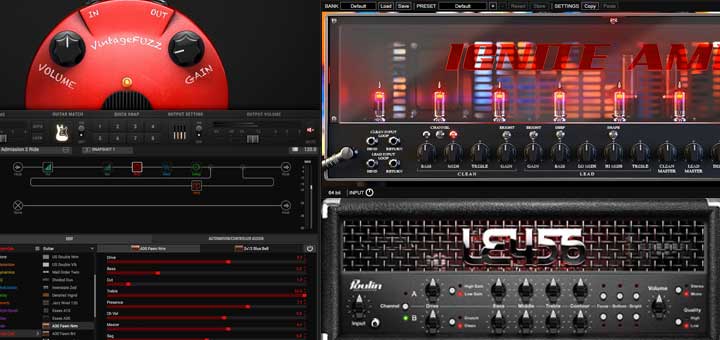
Check out some popular Guitar Plugins in this detailed guide.
Guitar amp and effects plugins are useful, but they’re only a starting point.
The next type of plugins I suggest trying out are virtual instrument plugins that allow you to create realistic-sounding instruments for your recordings or backing tracks.
You could use a drum plugin to create drum tracks, a piano plugin for piano parts, or even a plugin that gives you an entire orchestra at your fingertips.
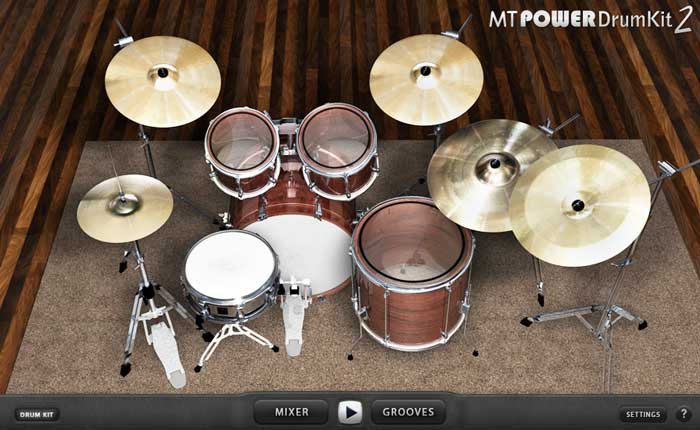
A good way to get started with virtual instrument plugins is with drum plugins. Learn how easy it is to create drum tracks for your recordings in this tutorial.
While nothing may beat a real drummer in a professional recording studio, drum plugins can get you surprisingly close.
Check out some free and paid drum plugins in this guide.
Once you learn how to create drum tracks using plugins, you can get some plugins for any other instrument you want. The range of realistic-sounding virtual instrument plugins available today is incredible and worth looking into.
Recording Guitar in Ableton Video Tutorial
Here is a step-by-step video tutorial on how to record guitar in Ableton:
If you can’t see the above video, watch it on YouTube here. Subscribe to my YouTube channel for more helpful tutorials and lessons like this one.Recording Guitar in Ableton Live FAQ
Here are some common questions you may have about recording guitar in Ableton Live 10.
Is Ableton Good for Recording Guitar?
Ableton Live can be used for recording guitar, but it’s far better when used as a performance tool. Some guitarists do use Ableton for recording, but it isn’t as good as other DAWs for recording guitar-based music.
The above steps should give you an idea why Ableton isn’t as straightforward for recording guitar compared to other DAWs.
How Do I Connect My Guitar to Ableton?
You can connect your guitar to Ableton using either an audio interface or a USB microphone. Once you connect an audio interface, you need to set it up in Ableton’s settings area.
Find out more about the different ways you can connect your guitar to a PC in this guide.
Does Ableton Have Guitar Amps?
Ableton has an audio effects plugin called ‘Amp’ that offers basic guitar amp tones. This is a basic effect that gives you seven different guitar amp tones.
If you really want to use guitar amp models in Ableton, I recommend using a plugin such as AmpliTube, BIAS FX, or Line 6 Helix Native.
Why is Ableton Not Recording Audio?
If Ableton isn’t recording audio, check your settings to make sure your audio interface or microphone is set up properly. Then check the track to make sure it has the correct input selected. Finally, check that the track is armed for recording.
Follow the earlier steps to properly record audio in Ableton.
Why Can’t I Hear Guitar in Ableton?
If you can’t hear your guitar in Ableton, first check that audio monitoring is turned on. If it is, check that the correct input channel is selected on the track. Finally, check that the volume on your audio interface is turned up.
Follow the earlier steps to make sure everything is set up properly.
Why Do I Hear Crackling or Glitches While Playing Guitar?
If you hear any crackling, buzzing, static, or glitches while you play guitar in Ableton, it’s a sign that the audio settings aren’t set up properly for your interface. Your CPU is struggling to keep up, so you end up hearing glitches or crackling. Try changing the buffer and sample rate settings and you should hear a change in crackling or glitches.
Cracking or glitches happen when your CPU can’t keep up with the buffer. Increasing the buffer size will reduce the load on your CPU. Every system is different, so the right settings for you may be completely different than what another person needs with the same interface.
The same buffer and sample rate settings can also produce different results in different DAWs. So if you hear issues in Ableton you may not hear the same issues with other recording programs such as Audacity.
Check out these guides to continue learning about recording guitar at home:
- Ultimate Guide to Recording Guitar at Home
- How to Record Guitar Videos for YouTube
- How to Connect Your Guitar to a PC/Laptop
- How to Record Guitar in Studio One (I recommend reading this to see how other DAWs compare to Ableton)
- Ultimate Guide to Guitar Plugins
