
In this guide, you will learn how to record guitar in Pro Tools by Avid. I’ll be demonstrating how to record guitar in the free version of Pro Tools (called Pro Tools First), but you can follow the same steps on any version.
After you read this guide, check out this Ultimate Guide to Recording Guitar at Home for an in-depth look at recording guitar. The guide covers advice on equipment, software, plugins, and more.
Step 1: Connect Audio Interface or Microphone
You can record guitar in Pro Tools using an audio interface or a microphone.
If you don’t have a microphone or audio interface, learn about the different recording options in this guide and which one is right for you.
In this example, I’m using an iRig HD 2 (check out my review to see why I recommend it for electric guitar) and plugging it into my PC’s USB port.
One of the most popular audio interfaces I recommend if you want to record acoustic or electric guitar (or vocals and other instruments) is the Focusrite Scarlett range (link to Amazon for details and different options).
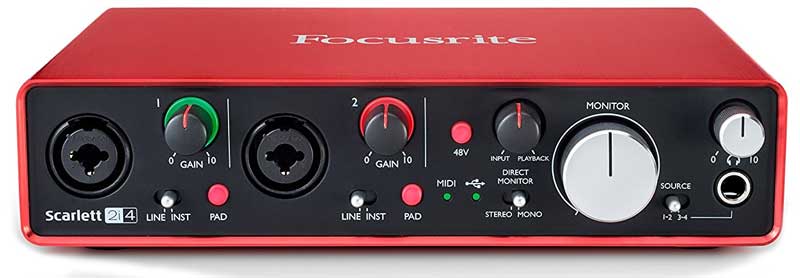
To record guitar using a Focusrite audio interface, simply plug it into your USB port before you open Studio One.
An audio interface like the Focusrite Scarlett is the ideal option if you want to record an acoustic guitar using a microphone.
Alternatively, if you want to record anything with a microphone, you can buy a USB microphone like this one.

The best practice is to plug a microphone into an audio interface, but USB microphones can be handy in some situations.
For example, when I’m recording vocals, instead of using an audio interface, I simply plug in my iRig Mic Studio (link to review). A USB microphone like this provides a simple setup.
But for most people, I highly recommend using an audio interface as it gives you far more flexibility. You can plug any microphone or multiple microphones into an audio interface, while a USB microphone gives you zero flexibility.
Step 2: Set Up Pro Tools
Once you have your microphone or audio interface connected to your computer, open Pro Tools.
Any version of Pro Tools will be able to record guitar, so it doesn’t matter if you have Pro Tools First (free version), or the Pro Tools or Pro Tools Ultimate versions.
Set Up a Project
When you open Pro Tools, you will be asked to open or create a project.
The templates can be handy and I suggest trying a few out so you can get ideas on structuring your own projects.
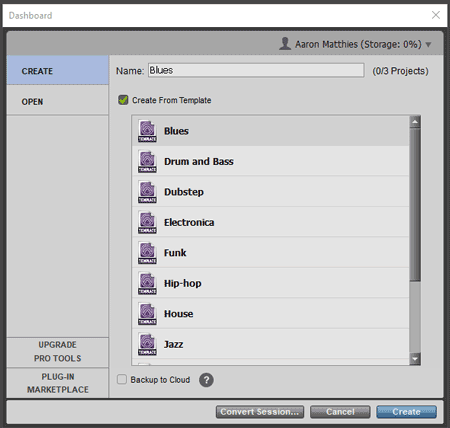
In this tutorial, I’ll create a blank project without using a template (simply uncheck the ‘Create from Template’ option) so you can see how to set everything up from scratch. I suggest doing this to follow along.
You should see something like this when you create your blank project without using one of the templates:
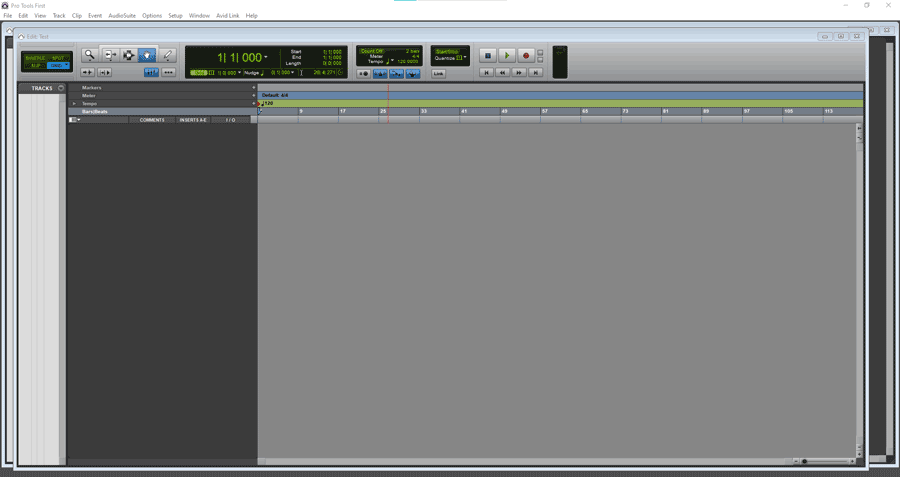
Pro Tools uses windows, so you can drag and arrange the two default windows (Edit and Mixer) any way you like.
Go to the Window > Arrange menu and play around with the different options for ideas on how you might like to set up your view.
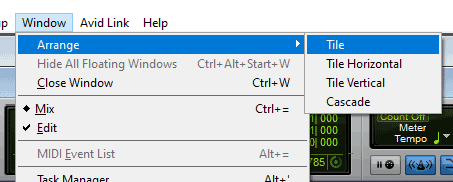
Most other modern DAWs have moved away from using windows, so if you don’t like the idea of juggling different windows, you might want to check out some other options as covered in my Best DAWs for Guitar Guide. I personally can’t stand using windows like this, but every person has different preferences, so play around with it to see if you like it or not.
Set Up Audio Interface or Microphone
Before you start recording, you need to tell Pro Tools what hardware you’ll be using for your input and output.
Go to the Setup > Playback Engine menu option to see your options:
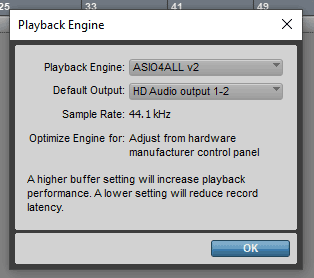
Here you can select what audio driver you’ll use and your output signal options. While Pro Tools will ask you to set this up the first time you open it, you will need to change your options here if you unplug or plug different hardware in.
Select the Playback Engine dropdown menu to see your options. Here are the options showing for me:
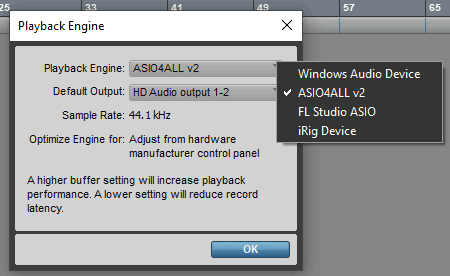
If you have plugged your interface or USB microphone in before opening Pro Tools, you should see something that matches your device on this list. If you don’t see your device on this list, read the advice in the ‘Alternative Audio Driver’ section below.
For example, you might see ‘Focusrite USB’ as an option if you use a Focusrite Scarlett audio interface. As I’m using an iRig HD 2 audio interface, I’ll select the ‘iRig Device’ option.
Pro Tools may save and close your project if it needs to switch to a different playback engine.
It will then ask you whether you want to optimize the engine for playback or recording. As this is a tutorial on recording guitar, I suggest selecting ‘Record’. This should help reduce latency (covered later).
You can always switch to optimize the engine for playback later on when you want to edit and mix your songs instead of recording parts.
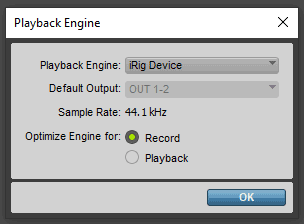
Select OK then re-open your project if Pro Tools closed it.
You can now go to the Setup > Hardware menu to choose the input and output channels you want to use.
The options you see here depend on what type of device you have plugged into your computer. You may not need to change anything or you may need to enable different inputs and outputs. If you get stuck, check the device’s website for details.
Alternative Audio Driver
If you don’t see an option in the Playback Engine dropdown that matches your audio interface or USB microphone, that doesn’t mean that it isn’t compatible with Pro Tools.
All it means is that there isn’t an ASIO driver installed for your hardware.
Check the website for your device to see if they have an ASIO driver you can install. If they do, install it and re-open Pro Tools.
If your device doesn’t have an ASIO driver you can install, I recommend using ASIO4ALL.
ASIO4ALL is a free audio driver that gives you far greater control over your interface compared to many standard audio drivers.
First, download and install ASIO4ALL from this website.
Once ASIO4ALL is installed, re-open Pro Tools and select the ASIO4ALL option in the Playback Engine screen.
Click OK, then go to Setup > Hardware. The screen that appears will let you choose between all the different inputs and outputs you have connected to your computer.
Click the wrench icon on the bottom right to bring up the advanced options:
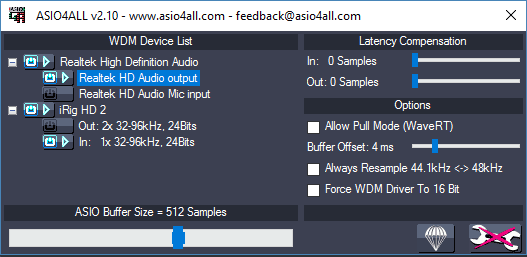
One of the reasons I like using ASIO4ALL is that you can set the output signal to go to your computer speakers while using your audio interface’s input. This is something you can’t do when you use any other ASIO driver.
Dealing With Latency
Latency is the delay between when you play a note on your guitar (or speak into a microphone) and when you hear that note on your speakers or headphones.
The higher the latency, the longer the delay between when you play something and when you hear it.
The goal is to reduce latency to as low as possible so you don’t notice any delay. There will always be some latency as your computer needs to process the signal, but you should be able to reduce latency low enough that you don’t notice it.
High latency makes it extremely difficult to record parts as the output signal will be out of sync to your playing.
You control latency by adjusting the buffer settings. The buffer is how much time your computer takes up processing your signal.
Reducing the buffer size or length will reduce latency.
You can change buffer settings by going to the Setup > Hardware menu. Remember that this menu option brings up your device’s control panel, so it will look different depending on what device you use.
Here is what the buffer settings screen looks like for my iRig device:
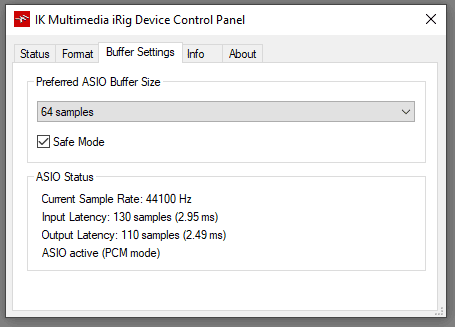
You can see that the current output latency is 2.49 ms, which is low enough to not notice any delay at all. If I increase the buffer size, the latency will increase.
Keep in mind that the lower the buffer size, the harder your computer’s CPU needs to work. If you lower the buffer size too much, your computer will start creating audible glitches and static noise.
Play around with the settings to find out the lowest size you can use without it causing problems.
Step 3: Set Up Audio Tracks
To record guitar in Pro Tools, you need to set up an audio track.
Go to the Track > New menu option and you will see the options for setting up a new track:

If you want to record guitar, select mono and audio track from the first two dropdown menus.
You can rename the track now or later on. You can even create multiple tracks at once if you know that you’ll need a few.
Once you click ‘Create’, you’ll see your new track on the Edit window:
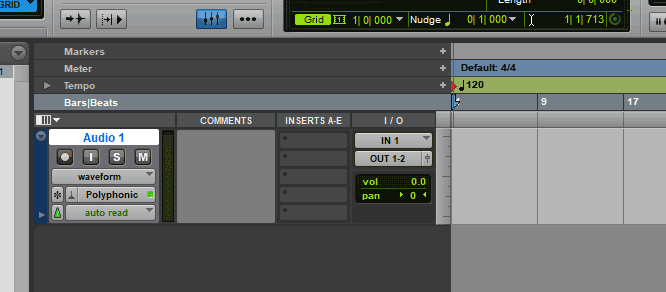
Before you record your guitar, you need to set the track up to use the correct inputs and outputs.
Look at the I/O section of the track to see the current inputs and outputs chosen. Depending on your settings, it may already have some channels selected and ready to go.
Click the two buttons under the I/O heading to select the input and output channels you want to use:
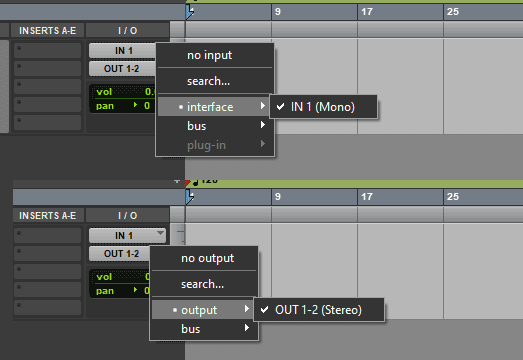
If you don’t see the right inputs or outputs here, check your audio settings under the Setup > Hardware menu.
Once you have selected the right input and output channels, you can arm the track for recording.
Click the circle icon on the track to arm it for recording:
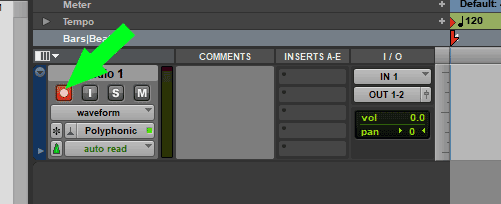
The icon will flash red to let you know it is ready to record.
You should be able to play your guitar and hear it through your speakers now. You will also see the track meter light up to match the level of your input signal as shown below:
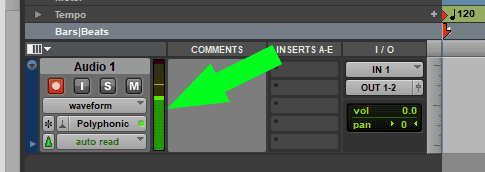
If you don’t hear your guitar or you don’t see the meter light up, check your audio hardware settings.
Step 4: Check Audio Levels
Before you hit record, it’s a good idea to check your audio levels.
If your audio levels are too low or too high, you’ll end up with a sub-par recording. Yes, you can raise or lower the volume of any recorded tracks later on, but you can’t fix a recording with clipping.
Pay close attention to the audio meter on the track. If a red bar ever appears as shown below, it means the signal is too high and it is clipping.
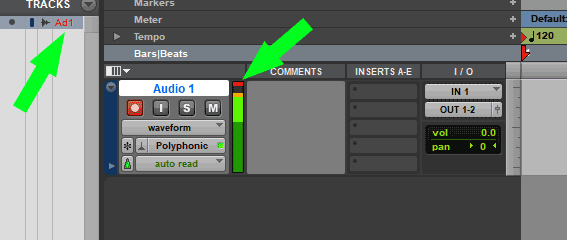
Pro Tools will also show red text in the track list on the left on any tracks that clip. This is a good way to check to make sure you’re not pushing anything too high.
Play your guitar and keep an eye on the audio level. It’s okay if it reaches the orange section when you hit the strings hard, but you don’t want it to ever reach red.
Adjust your audio level using your audio interface’s controls. Do not use the volume controls in Pro Tools at this stage. That’s for later on when you mix tracks together.
To get a good input level, you need to adjust the volume or gain knobs on your interface. Aim for a loud, but not clipping signal.
Once you’re happy with your audio levels, you’re ready to record.
Step 5: Record Your Guitar
With your audio track armed with good audio levels, you’re now ready to record.
Press the record icon on the top right of the screen. It will constantly flash red to let you know that Pro Tools is ready to record.
Press the space bar or the play button and Pro Tools will start recording.
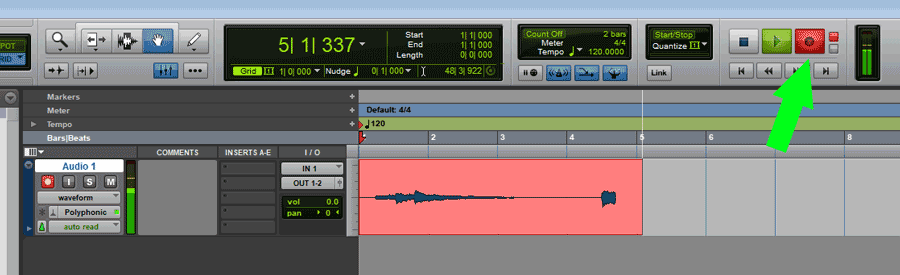
You will see your audio clip appear on the timeline as shown above.
When you’re finished, press the space bar again to stop recording. Pro Tools will switch back into playback mode, so if you want to record again, you need to press the record icon again before pressing play.
You can now move your audio clip around the timeline, edit it, or apply effects as you like.
If you want to record another track, add another track to the timeline, arm it (disarm the other track), then record. Play around with recording multiple tracks to get comfortable with using Pro Tools.
Adding Effects and Plugins
Any time before or after you record, you can add effects or plugins to a track.
For example, you might want to use a plugin such as AmpliTube, BIAS FX, or Guitar Rig to set up your guitar tone before you record anything.
To add a plugin or effect to a track, click the blank panels under the ‘Inserts A-E’ section.
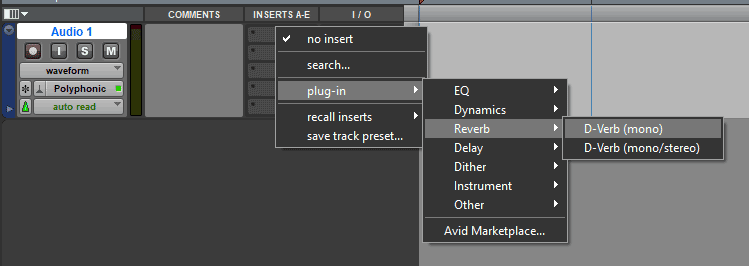
Select any effect from this menu to add it to the track. Once you select an effect, the effect window will appear and you can set it up as you like.
You can add multiple effects to a track in the same way. Just click a blank panel and select an effect:
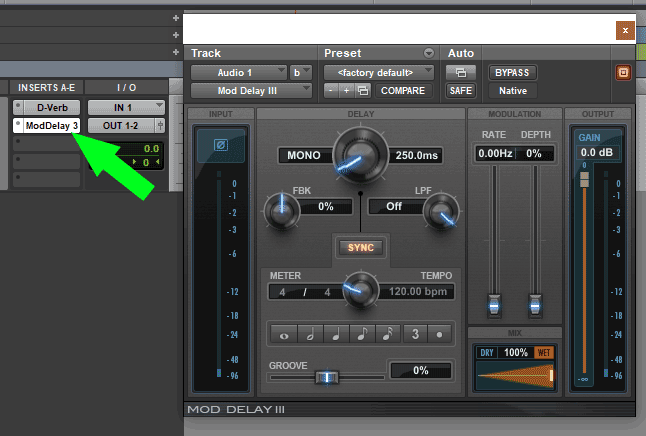
At any time you can close the effects window and open it again by clicking on the effect button (green arrow as shown above).
The reason the label ‘Inserts A-E’ is used is that this view only shows the first five effects you add to a track (A, B, C, D, E).
This doesn’t mean you can only add five effects to a track. It’s just the way Pro Tools organizes effects and plugins.
Right-click the track headings and you can see the different options you have for each track:
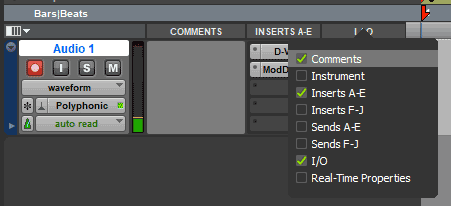
At the moment, I have the Comments, Inserts A-E, and I/O options selected. If you wanted to add more than five effects or plugins to a track, you could simply check the ‘Inserts F-J’ option to bring up another five spots for plugins.
Using Third-Party Plugins
If you want to use third-party plugins in Pro Tools, keep in mind that Pro Tools doesn’t use VST plugins.
Pro Tools use AAX format plugins, so check to make sure the plugins you use also allow you to install that format.
Many popular plugins ask you when you install them whether you want to install VST or AAX versions. If you have already installed a plugin and it doesn’t show up in Pro Tools, you may need to reinstall it and make sure the AAX option is selected.
How to Record Guitar in Pro Tools Summary
Recording guitar in Pro Tools is easy if you properly set up your audio hardware and set your buffer settings to a suitable level.
Here is a summary of how to record guitar in Pro Tools:
- Plug in your audio interface or USB microphone
- Choose your audio interface in Pro Tools ‘Playback Engine’ settings
- Set up an audio track
- Select the correct input and output devices on the track
- Arm the track and hit record
Pro Tools is capable of far more than what has been covered in this simple tutorial. Once you get used to recording guitar tracks in Pro Tools, you can gradually explore the other features and editing/mixing tools.
Extra Pro Tools Tips
Here are a couple of tips to help you get the most out of Pro Tools and extend your home recording studio further.
Use a DAW Controller
While you can use your keyboard and mouse to quickly access a massive range of shortcuts and commands, it does take some time to memorize important keys and combinations.
One way to learn Pro Tools faster and get used to the shortcuts you already have available at your fingertips is to use a custom Pro Tools keyboard:

These custom Pro Tools keyboards are available for PC and for Mac (links to Amazon) and give you an easy visual way to remember all of Pro Tool’s important shortcuts and commands.
You’ll often see these keyboards used in recording studios and if you’re new to Pro Tools, you’ll find that it drastically cuts down your learning curve.
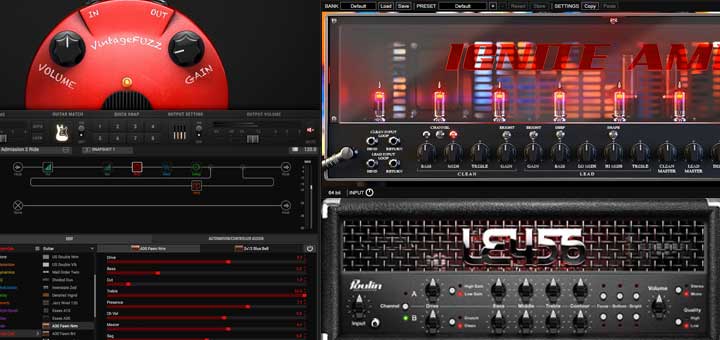
The other options I recommend for most people is to buy a DAW controller. The below photos show a few different controllers to give you an idea of the wide range of features you can choose from.

A DAW controller is a piece of hardware you plug into your computer that can be used to control a wide range of shortcuts and features in any DAW.
You can use DAW controllers for shortcuts, to edit and mix your tracks, or to record virtual instrument parts using pads and keys.
If you’ve never used a DAW controller before, it’s hard to emphasize how much of a difference they make to your experience with any DAW. Being able to use sliders, knobs, and buttons to control your tracks instead of using a keyboard and mouse feels more natural and can be significantly faster.
Try Some Plugins
Depending on the version of Pro Tools you buy, it will come bundled with some plugins. But the bundled plugins only scratch the surface of what is possible.
Third-party plugins can extend the range of sounds, effects, and virtual instruments in very surprising ways.
As a guitarist, you will likely want to try out a guitar amp and effects plugin such as AmpliTube, BIAS FX, or Guitar Rig.
Check out some popular Guitar Plugins in this detailed guide.
Guitar amp and effects plugins are useful, but they’re only a starting point.
The next type of plugins I suggest trying out are virtual instrument plugins that allow you to create realistic-sounding instruments for your recordings or backing tracks.
You could use a drum plugin to create drum tracks, a piano plugin for piano parts, or even a plugin that gives you an entire orchestra at your fingertips.
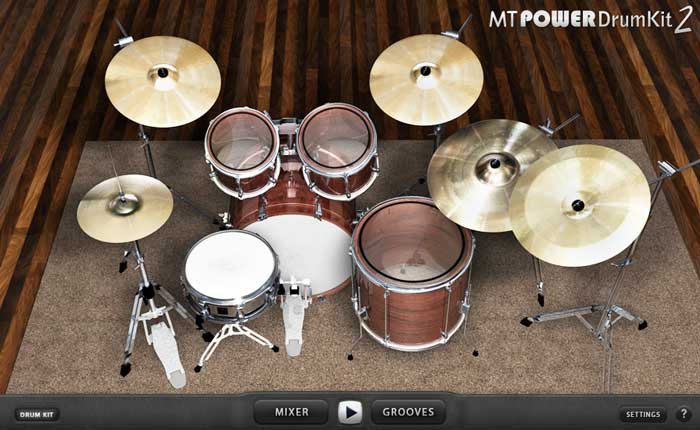
A good way to get started with virtual instrument plugins is with drum plugins. Learn how easy it is to create drum tracks for your recordings in this tutorial.
While nothing may beat a real drummer in a professional recording studio, drum plugins can get you surprisingly close.
Check out some free and paid drum plugins in this guide.
Once you learn how to create drum tracks using plugins, you can get some plugins for any other instrument you want. The range of realistic-sounding virtual instrument plugins available today is incredible and worth looking into.
Recording Guitar in Pro Tools FAQ
Here are some common questions you might have about recording guitar in Pro Tools.
Why is Pro Tools not Recording?
There can be many reasons why Pro Tools may not record properly. Check your input and output channels on the track and make sure they match your audio interface. Check the hardware options in the Setup > Hardware menu. Also make sure that the track is armed and you see an audio signal on the meter.
Changing to a different audio driver such as ASIO4ALL might be a good way to check if the issue is with the audio driver or something else.
Which Version of Pro Tools Should I Get?
I recommend starting with the Pro Tools ‘First’ version as a way to check whether you like using Pro Tools or not. The First version is free and doesn’t expire, so it’s a great way to test out Pro Tools.
If you like using the First version, check the Pro Tools website to see whether the extra features in the two paid versions would be worthwhile to you or whether you should stick to the free version.
Why Can’t I Hear Audio in Pro Tools?
If you can’t hear any audio before or after recording, check that Pro Tools is set to use the correct audio output channels (Setup > Playback Engine). If you are using an audio interface, make sure you have speakers or headphones plugged into the correct output jacks and those channels are enabled in Pro Tools.
Also check to make sure your input channels are selected properly.
How Much RAM Do I Need for Pro Tools?
16GB is recommended as a minimum for Pro Tools. While you might be able to run Pro Tools on less RAM, you should expect issues. If you will be running intense projects with many tracks, instruments, and plugins, you may require more RAM.
Do You Recommend Pro Tools for Recording Guitar?
I don’t personally recommend Pro Tools for recording guitar. Other DAWs such as Studio One or Reaper use better-designed interfaces and are more intuitive for guitarists to learn to use. Pro Tools feels ancient when compared side-by-side against other DAWs.
I encountered multiple crashes and errors in Pro Tools while writing this tutorial. The fact that Pro Tools now requires an online subscription makes this worse. If you lose your internet connection, you will get immediately kicked out of Pro Tools (which happened to me while working on this tutorial as shown below).
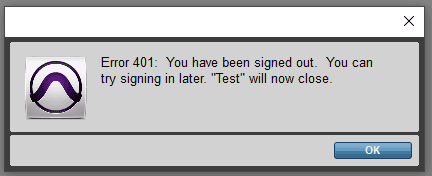
Not only did Pro Tools instantly close my project because my internet connection temporarily went down, but it also didn’t save my project. Luckily it was a basic project. A quick search on Google reveals a lot of issues Pro Tools users have of not being able to log in or losing their work.
While Pro Tools is still considered the gold standard by many audio engineers and studios, it may not be the best choice for you. I personally feel Pro Tools is overpriced and obsolete (many engineers will disagree with this view). You can buy Reaper for a fraction of what Pro Tools would cost you over a year and Reaper provides updates for free.
While Pro Tools may have been the best option by far in the past, it doesn’t feel like that anymore. I’ve always felt that everybody has different needs and different DAWs suit different people. But I have a hard time recommending Pro Tools to anyone. If you want to work for a studio that will be using Pro Tools then you definitely need to use it, but if you’re a home guitarist just wanting to record some songs, there are better options.
Check out how Pro Tools compares against other popular DAWs in this guide and you may find a better option.
Other Recording Guides and Tutorials
Check out these tutorials and guides to learn more about recording guitar or to see how Pro Tools compares against other DAWs:
- Ultimate Guide to Recording Guitar at Home
- How to Record Guitar Videos for YouTube
- How to Connect Your Guitar to a PC/Laptop
- Ultimate Guide to Guitar Plugins
- Best DAWs for Guitar