If you’re a beginner and thinking about what guitar pedals to buy to build your own rig, you will have noticed that there’s a massive number of choices available.
In this guide, I will go through my recommendations on a beginner guitar pedal setup that gives you a range of different effects while staying simple. Think of this as the starting point for building your own unique guitar rig.
With the pedals I cover in this guide, you will have a good foundation for your pedalboard. Then as you grow as a guitarist you can decide what extra pedals you want to add in or which pedals you want to swap around.
Stompboxes vs Multi-effects
There are two main types of pedals you can buy: stompboxes and multi-effects pedals.
Stompboxes tend to be smaller in size and tend to focus on one or two effects. Multi-effects pedals usually let you build an entire virtual rig all in one unit and include a large number of effects and models.
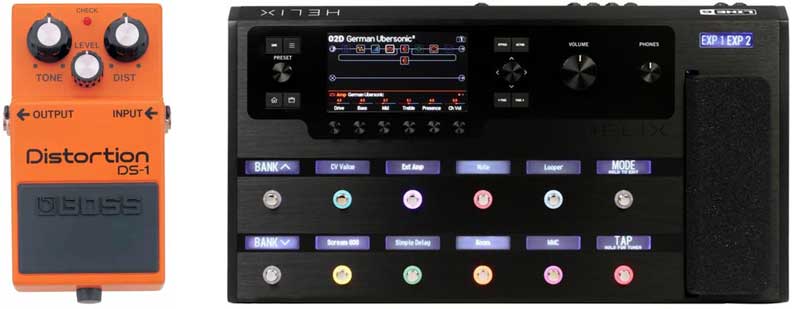
The above photo shows a typical stompbox (left) and a multi-effects unit (right).
The left stompbox can only add distortion to your tone, while the multi-effects pedal has hundreds of effects and amp models.
If you want an easy way to build a complete rig that you can easily change and add new effects all in one unit, get a multi-effects pedal. Check out this guide comparing the different Line 6 multi-effects pedals to get an idea of which may suit you.
This guide will focus on building a beginner guitar rig using stompboxes. If you like the idea of picking individual pedals for certain effects and customizing your pedalboard exactly the way you like it, this guide will help you do that.
Many guitarists like to build pedalboards using stompboxes because you can pick and choose the perfect pedal for each type of effect you want to use. You can craft a pedalboard that perfectly matches your tone tastes and preferences.
Types of Guitar Pedals
If you want to learn about guitar effects, how each type works and how to use them, check out this Guitar Effects Course.
The course will walk you through each type of effect in action as well as how to use them properly.
In this guide, we’ll go through the absolute basics of different types of effects. If you want to learn more and hear examples, check out the course.
Guitar pedals can be split up into a few broad categories:
- Tuners
- Wahs
- Dynamics (eg: compression or noise gates)
- Distortion & Overdrive
- Pitch Shifting
- Modulation
- Delay & Reverb
Let’s have a quick look at each category so you can decide whether you want to have a pedal from that category or not.
Tuners
Most guitarists will have a tuner pedal in their rig. When you consider that you can easily get an app on your smartphone for a tuner, it might not seem that important to have a tuner pedal.

There are two main reasons for having a tuner pedal.
First, it’s convenient to simply hit the footswitch and be able to tune your guitar. If you’re at band practice or at a gig, you definitely don’t want to be messing around with an app or a separate tuner.
The second reason is that it’s a quick and easy way to mute your guitar. When a tuner pedal is activated it mutes your signal. This is useful when playing live and makes you look far more professional. The audience shouldn’t have to hear you tune your guitar.
Wahs
Guitarists from a wide range of genres have fallen in love with the wah ever since Jimi Hendrix popularized it back in the 60s.
If you play rock, blues, metal, funk, or similar styles, you have probably heard quite a few solos using the wah.
It’s a versatile effect that gives you a lot of control over your tone. It’s one of the most expressive effects you can use which is why it’s so common on pedalboards. If you have never used a wah before, I highly recommend trying one out.
I created a lesson on how to use the Wah pedal so if you have never used one before, use the lesson to get started.
Dynamics
Dynamics pedals aren’t effect pedals in the normal sense. Think of dynamics pedals as a way to control your sound.
Compression pedals basically even out your volume so soft and loud parts are a bit more consistent. Some guitarists love them and others hate them.
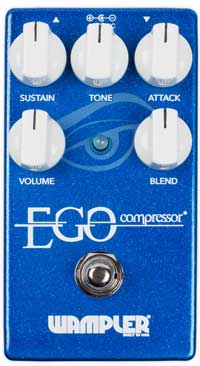
I won’t include dynamics pedals in the basic rig as beginners will get very little benefit out of them. Later on as you improve as a guitarist, you might want to look into one.
Read this guide if you’re interested in learning about compressors.
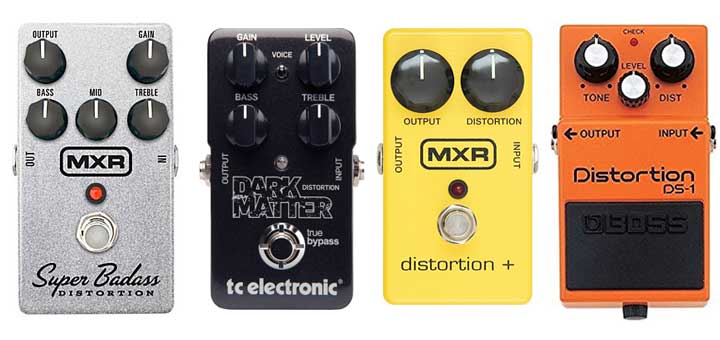
Distortion & Overdrive
A distortion or overdrive pedal is one of the first effects pedals guitarists tend to buy.
While you can usually use your amp instead of a pedal to get a distorted tone, there’s something special and personal about distortion and overdrive pedals.
Your decision to get a distortion or overdrive pedal should look at the amp you use and whether you like the drive options it gives you.
The other way to think about it is that you’re likely to move through different amps over time so having the same distortion or overdrive pedal will make sure you get to keep the drive sounds you like.
Distortion and overdrive are two different types of gain effects (compared in detail in the effects course).
Pitch Shifting
Pitch shifters such as DigiTech’s Whammy takes your guitar signal and raises or lowers the pitch (or both at the same time). Tom Morello uses it to come up with some creative solos and riffs while other guitarists use it to play harmonies.
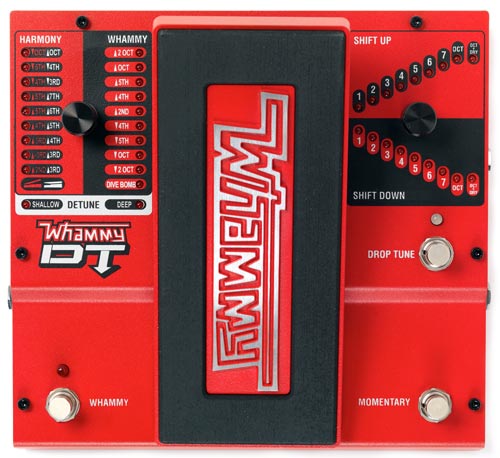
There are many different pitch-shifting pedals out there that achieve different results.
For a beginner, I would only suggest buying a pitch-shifting pedal if you notice that the bands and guitarists you listen to use one regularly.
So unless you’re a Rage Against the Machine fan or you know a lot of songs that use pitch effects, I recommend skipping a pitch pedal for now.
Modulation
Modulation covers a few different types of effects such as chorus, flanger, phaser, tremolo, Uni-vibe, Vibrato, and a lot of wacky sounding effects such as ring modulators.
When a lot of people think of ‘guitar effects’, they’re often imagining some sort of modulation effect.
Modulation is great to come up with creative riffs or ideas and Jimi Hendrix was well known to experiment with modulation pedals.
You can even use modulation in more subtle ways. For example, a bit of chorus can add a lot of life to your clean tone. It can take a dry and lifeless tone into something a bit more warm and full.
Some guitarists love the way modulation pedals can add color to your tone while others prefer an uncolored tone.
Delay & Reverb
Delay and reverb are lumped together here because they both add something to your tone rather than change your tone.
A delay pedal will repeat what you play based on its settings while a reverb pedal will create a sound trail to simulate what you hear when you play in an open room or large hall.
I highly recommend every beginner buy a versatile delay pedal because they’re so commonly used in essentially every music style you can think of.
Almost every guitarist has at least one delay pedal in their rig.
Some guitarists have multiple delay pedals so they can access a range of different delay effects or combine them as they want. Delay is such an important effect because it’s so versatile. You can use it with essentially any guitar tone with great results.
Recommended Guitar Tuner Pedal
There are countless guitar tuner pedals available today and for years the most popular option was a BOSS TU-2, then the TU-3.
The most popular tuner pedal that I recommend is the PolyTune 3 Mini by TC Electronic.
There are two main reasons I recommend the PolyTune 3 Mini:
- You can strum all of your guitar strings and instantly find out which strings are out of tune
- It’s a tiny pedal that doesn’t hog space on your pedalboard
There are other reasons why the PolyTune 3 Mini is such a great tuner pedal and I cover them in my review of the earlier PolyTune 2 Mini here. Even if you have a tuner built into your amp or you have a physical tuner, I highly recommend getting a stompbox tuner.
Recommended Wah Pedal
There are quite a few different wah pedals available today with a range of different features. There are also plenty of signature wahs out there from well-known wah players.
Check out the best wah pedals in this guide.
The goal of this guide is to give you a list of pedals that you’re not going to grow out of. For that reason, I’m not going to suggest any signature wahs because your tastes may change over time.
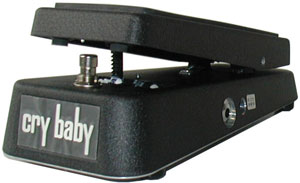
The wah I’m recommending here has stood the test of time and is favored by a significant number of guitarists: the Dunlop Original Crybaby.
The Original Crybaby gives you the classic wah sound in a simple package. You won’t need to worry about tweaking different knobs – you simply plug it in and you’re good to go.
You can find out more on the Original Crybaby in my review here as well as alternatives if you feel you need something with more features and flexibility.
Recommended Distortion/Overdrive Pedal
Distortion and overdrive are very personal effects for guitarists. Every guitarist will want something different. As you develop as a guitarist, your preferences for distortion or overdrive will likely change.
This makes it difficult to recommend a single pedal – each guitarist will likely prefer different distortion or overdrive pedals. You can spend hours comparing different drive pedals.
For this guide, I’ll recommend an incredibly popular and versatile overdrive pedal – the Ibanez Tubescreamer TS9. The Ibanez Tubescreamer TS808 is also a popular alternative.
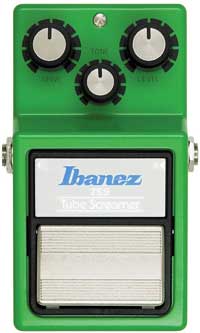
The Tubescreamer TS9 has been popular for decades, which means you can easily find cheap secondhand pedals. If you decide in the future to swap to a different drive pedal, you’ll easily be able to sell it.
There are countless clones and variations of the Tubescreamer from other manufacturers and many guitars prefer them over the original. But to keep things simple, I’m recommending the Ibanez Tubescreamer TS9.
Recommended Modulation Pedal
It’s hard to recommend a modulation pedal because modulation covers a few different effects. Modulation is also a very personal thing and not everyone wants or needs modulation in their rig.
You can easily find people arguing on forums over which chorus/phaser pedal is the best because every guitarist has different tastes and preferences.
Modulation is a wide category and you’ll only learn which modulation effects you like by experimenting with them.
An easy way to learn about different modulation effects is to buy a multi-modulation pedal. Multi-modulation pedals pack in a few different modulation effects into a stompbox.
Check out my review of the FLAMMA FS05 Multi Modulation for an in-depth look at a budget multi-modulation pedal.
For this guide, I’m recommending the MOOER MOD Factory MKII:
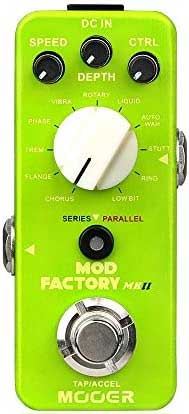
This tiny pedal gives you an easy way to access 11 different modulation effects including:
- Chorus
- Flanger
- Tremolo
- Phaser
- Vibrato
- Rotary
- Liquid
- Auto-wah
- Stutter
- Ring Modulator
- Low Bit
The first five in the above list are the most popular and useful as a guitarist.
If you want to learn a bit more about some of the most common modulation effects, check out these guides:
If you spend enough time with a multi-modulation pedal like the MOD Factory, you’ll learn which modulation effects work best in different songs and styles of music.
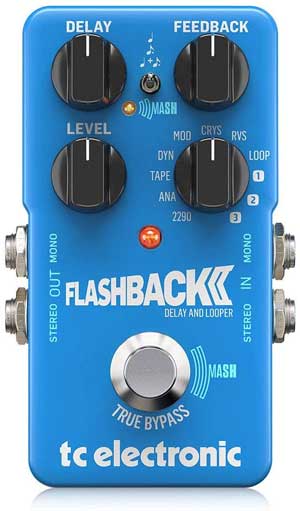
Recommended Delay Pedal
Getting a good-quality delay pedal should be one of your first purchases. It’s far more important than a modulation pedal or a wah. The majority of guitarists use delay because it’s such a flexible and useful effect. You can use it with essentially any tone with any combination of effects and expect great results.
The chances are a lot of songs you listen to will use delay. There are quite a few different types of delay and being able to easily switch between different delay types is important. For this reason, I’m not going to recommend a pedal that only gives you one type of delay.
Check out the best delay pedals and what features to look for in this guide.
It’s frustrating when you buy a delay pedal and then realize that you can’t get the right settings for half of the songs you like. So the priority here is flexibility. If you have a flexible delay pedal with a range of different delay options, you’re going to be able to replicate more delay effects you hear in songs.
The delay pedal I recommend is the Flashback 2 Delay by TC Electronic.
There are two reasons why I recommend this pedal. The first reason is that it gives you access to a wide range of useful delay types. The TonePrint feature allows you to dial in the exact settings you want. This is really important for delay because a lot of songs will require a specific delay setting down to the correct millisecond.
The second reason I recommend the Flashback is because it has a simple built-in looper. While you could buy a separate looper pedal such as the very popular Ditto Looper, having one built into a delay pedal simply means you can try out a looper without needing to buy a separate pedal.
If you find that you like playing with the looper feature, you can look into buying a proper looper.
As a guitar teacher, I highly recommend every beginner have a looper pedal. But I’ll leave it out of this rig to keep things basic. Learn about looper pedals in this guide.
Recommended Reverb Pedal (Optional)
This is an optional pedal for guitarists who like using clean tones. If you only plan on playing music with distorted guitar, you can skip a reverb pedal.
The reason I recommend a reverb pedal if you like playing with clean tones is the way reverb can affect the mood and feel of what you’re playing.
This video is a perfect example of how reverb can take your tones to new places:
Notice how the vibe and feeling of the guitar parts instantly change based on the type of reverb used.
If you like the tones used in the above video, I recommend adding a reverb pedal to your rig.
My Ultimate Guide to Reverb Pedals walks through the different types of reverb along with the best reverb pedals at different budget levels.
Check out the guide if you’re interested in getting a reverb pedal.
For this guide, I’ll recommend one of the most popular reverb pedals at a reasonable price, the TC Electronic Hall of Fame 2:
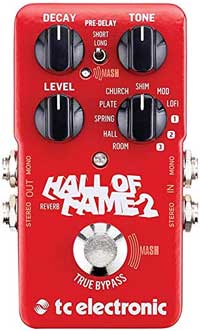
This pedal packs in every popular type of reverb as well as three positions for your own custom presets.
Essential Pedals Summary
So if you build your pedalboard based on all of my recommendations, you will have:
- PolyTune 2 Mini by TC Electronic as your guitar tuner
- Original Crybaby by Dunlop as your wah
- Ibanez Tubescreamer TS9 as your overdrive
- MOOER MOD Factory MKII as your modulation
- Flashback 2 Delay by TC Electronic as your delay
- Hall of Fame 2 Reverb by TC Electronic as your reverb
There are a few pedals by TC Electronic here and that’s mainly because their pedals focus on flexibility at a decent price – something that’s really important for beginners.
There are plenty of great alternatives to all of the above pedals, but this rig focuses on pedals that will work great for beginners. As you grow as a guitarist, you’ll easily be able to change and add to your rig.
Important Accessories for Your Pedalboard
Once you buy your pedals, you will need to think about accessories such as a power supply, patch cables, and a pedalboard to mount your pedals. I’ll go through these options so you know what to get:
Power supply
Most pedals come with a power supply which is great if you only have a couple of pedals, but when you have more than a couple the individual power supplies become a pain.
There are two main options to consider when powering pedals: daisy-chaining power or a dedicated power supply.
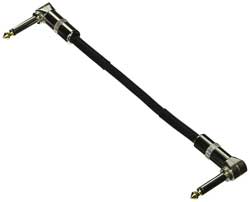
A daisy chain is when you use one power supply and use a daisy chain power lead to connect multiple pedals together to the same supply:
This works when you only have a few pedals to power. Learn how to daisy chain pedals together in this guide.
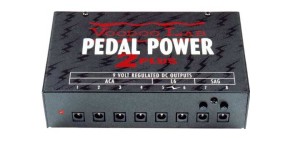
If you choose to buy a dedicated power supply, the most popular choice is the Voodoo Lab Pedal Power 2 Plus (link to Amazon for price and details).
It’s a well-built unit that will power an entire rig as well as have room for more pedals you might add in the future. Check out my review of the Pedal Power 2 Plus here to find out why it’s worth considering.
Note: if you buy the pedalboard suggested later, you won’t need to buy a power supply.
Learn everything you need to know about powering your pedals in this guide.
Cabling
Connecting a few pedals together can be a mess if you’re using standard instrument cables.
Buying a few ‘patch’ cables as they’re called will help keep your pedalboard neat and tidy. Patch cables are usually around 6 inches long so keep this in mind when you arrange your pedalboard. I recommend ChromaCast Pro Series Cables (4-Pack) as they have great reviews.
They come in a four-pack so make sure you count how many cables you need for your rig. For this rig, you will need 5 patch cables for mono and 6 for stereo. I recommend starting with your rig in mono for simplicity.
In total, for a mono rig, you will need 5 patch cables and two longer instrument cables (one to connect your guitar to the pedalboard and one to connect the pedalboard to your amp). For a stereo rig, you will need 6 patch cables and three longer instrument cables.
Setting up a Professional Pedalboard
While you can simply lay your pedals out on the floor, if you want a more professional-looking pedalboard I recommend getting a pedalboard.
A pedalboard is a frame for your pedals to mount to using velcro. Pedalboard are essential for live performances or band practice if you have more than one or two pedals.
These pedalboards will allow you to velcro your pedals onto a board which is handy if you ever join a band and need to transport your gear for gigs or practice sessions.
A popular brand of pedalboards is Pedaltrain. The pedalboard that works with this rig is the Pedaltrain Metro 24 (or anything larger). This size pedalboard will easily fit all pedals with room for more pedals in the future.
The pedalboard I recommend for this rig is the Vangoa VPPD-S Pedalboard (link to my review):
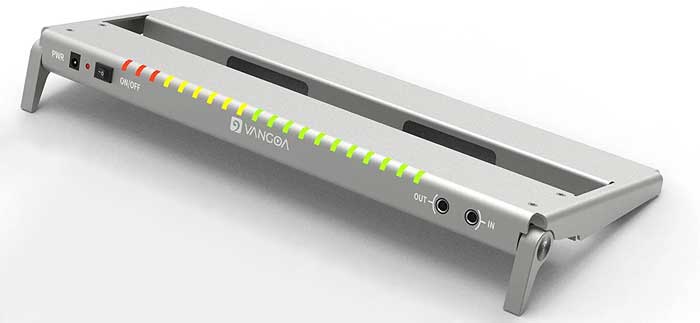
The main reason I recommend this pedalboard is that it has a built-in power supply with 8 power outlet points (power leads included). This means you don’t need to worry about daisy chaining your pedals or buying a dedicated power supply.
Most pedalboards don’t have an inbuilt power supply and need to be purchased and mounted separately, so this is an easy option to consider at a good price.
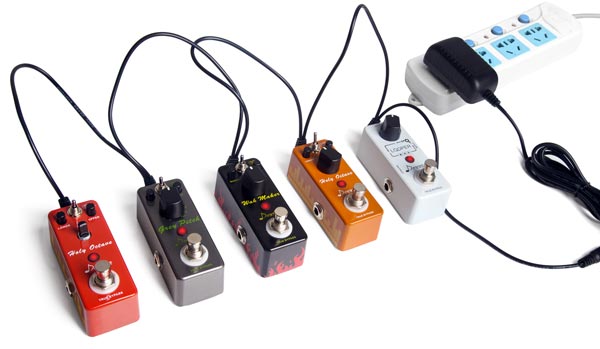
Here are the pedals arranged on the Vangoa VPPD-S Pedalboard so you can get an idea of the size of the pedals and the pedalboard:
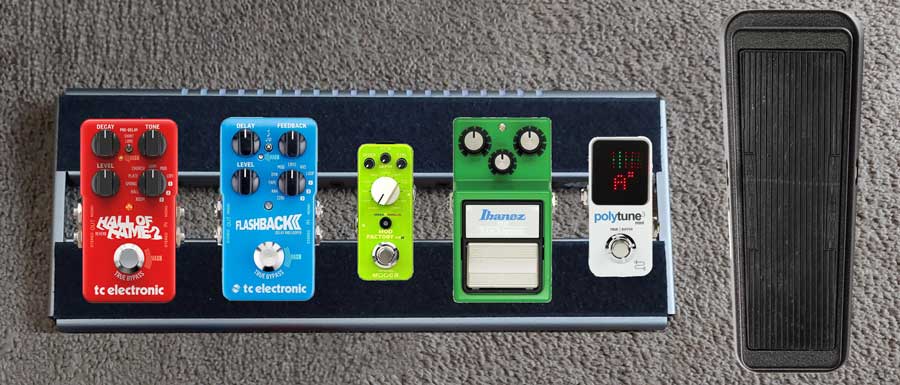
While you could buy a larger pedalboard to fit the wah on the frame, many guitarists prefer having the wah separately on the floor.
When traveling, all you need to do is disconnect the wah pedal and the rest of your pedalboard will fit in the included padded travel bag (see my review for more details).
If you choose to skip buying a reverb pedal, this pedalboard will give you plenty of space to add one or two mini pedals to your rig in the future.
Chaining Your Pedals Together
In 2014, Steve Vai gave an hour-long webinar titled ‘Perfect Pedal Order’ (you can watch it on YouTube here).
While it contains a lot of great information and advice for beginners, the video can be summed up in one short sentence: there is no perfect pedal order.
While there are general rules guitarists tend to follow when it comes to the order of their pedals, breaking those rules can lead to interesting effects and inspiration.
In this guide, I will suggest a pedal order for this rig, but you should experiment with switching the order of pedals so you can hear how it changes your tone. You might find that breaking the rules produces a better tone.
In my Guitar Effects Course, I walk you through every type of effect and how changing the position of the pedal can change the tone. If you’re serious about building a pedalboard with multiple effects pedals, it’s worth learning how each type of effect works and how they all interact. In the course, you’ll learn how to set up the right rig for you.
As a simple example, most guitarists place the wah before any distortion pedal. The idea is that the wah should receive a dry signal from your guitar. But placing the wah behind a distortion pedal can produce some dramatic and creative results. Some people will love it and some will hate it. The point is that you will only find out what you prefer by experimenting.
I highly recommend starting with the order I suggest, then experiment to find the order you prefer. There is no perfect pedal order.
Here is the order I suggest for this rig:
Guitar > Crybaby Wah > PolyTune > Tubescreamer > MOD Factory > Flashback > Hall of Fame > Amp
Each > symbol indicates a connection between your pedals. If you want to run your pedalboard in stereo, you will need two patch cables between each stereo pedal as well as to your amps.
Here is the pedalboard diagram again with arrows to show how the pedals are connected together:
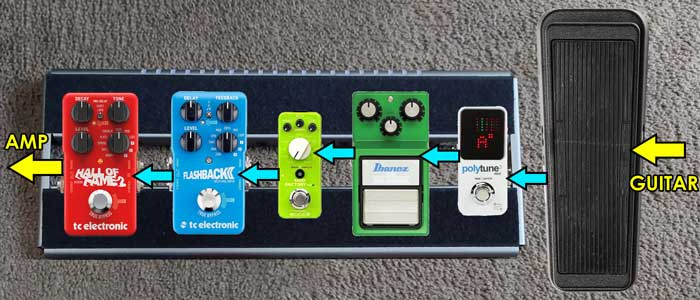
The yellow arrows indicate long instrument cables and the blue arrows indicate short patch cables.
Note: typically the tuner is the first pedal in the chain, but in this example, it makes more sense to connect the guitar to the wah pedal first.
4 cable method
As this rig is intended for beginners, I have suggested the simplest wiring possible. But it’s worth noting that there are other ways you can connect your pedalboard together.
One option is to use something called the ‘four cable method’. This can only be used if your amp has an ‘effects loop’. It involves basically splitting up your pedalboard.
Some pedals will connect to the front of your amp while other pedals will connect to your amp’s effects loop.
Using the 4 cable method is messier and a bit more complicated than the above setup. The advantage to using the 4 cable method is that it can produce a better quality tone. I recommend using the setup described above if you’re a beginner. It will still sound great and will be far easier to set up and use.
If you’re interested in using the 4 cable method, read my guide on it here.
Getting The Most Out Of Your New Rig
Your new rig gives you access to a wide range of effects and can be tweaked and customized to produce a lot of different tones.
Here is how I recommend starting out with this rig:
- Get used to the layout and learn how to tell which pedals are active at any time based on the LEDs you see lit up. This might sound basic, but it’s a good idea to instantly know which pedals are active without having to play something. For example, if you don’t know that the tuner is active, you’ll be scratching your head wondering why there’s no sound.
- Practice tuning your guitar using the PolyTune. Strum all of your strings and get used to the display showing you which strings are out of tune.
- Focus on one pedal at a time and learn how to use it. Play around with each individual pedal and adjust the control knobs to learn how it impacts your tone.
- Look up songs that use each effect and try to replicate what you hear as closely as possible. This will help tune your ears to different effects.
- Start combining more than one pedal at a time. Start with something basic such as drive and delay or wah and chorus. Experiment with two pedal combinations.
- Go all out and activate all pedals. Experiment and come up with as many different crazy sounds as you can. Learn what works and what doesn’t.
- Go through all the effects on the MOD Factory to learn what type of modulation effects you enjoy using. Start combining those effects with your other pedals.
If you follow the above steps, you will quickly become a pro at controlling your rig. The beginners who actually follow these steps end up with better results because they learn how to tweak and refine their effects. It’s worth spending the time to learn how to do that.
If you follow my advice, you will end up with a very powerful and flexible rig. Of course, every guitarist has different needs and you might find that over time your rig will change. This rig isn’t perfect because there’s no such thing as a perfect rig. The right rig for you will be different from everybody else.
This rig will give you a great starting point and you should feel free to customize it as you like. Feel free to read through my reviews of other pedals and substitute any pedals in and out of this rig as you want. You could have a total of three pedals in your rig or you could have over ten.
If you do create a rig, I’d love to see what you create. Send me a message here and include a photo (using a photo sharing website such as tinypic.com or imgur.com).
Extra Resources
If you’re serious about guitar effects and want to learn more, the Guitar Effects Course is the best learning resource I’ve created on the topic. Check it out to find out how to get the most out of every single pedal you buy.
Here are a couple of related resources to help you learn how to use some of the effects used in this rig:
- How to use a wah pedal
- How to use a looper
- How to use slapback delay
- How to use guitar pedals
- Guide to guitar amp settings
I’ll be adding more lessons over time so join my mailing list for new lessons and guides. If you’re looking for more recommendations for your pedalboard, check out the Essential Guitar Pedals Recommended by Top Guitar Bloggers. There are some great pedals in those recommendations so if you want to take your pedalboard further, it’s a great place to start.
Found this guide useful? Please share it on social media to help support this site (if you use Pinterest, please pin the below photo).