
This guide covers everything you need to know about Uni-Vi. You’ll learn what a Uni-Vibe pedal is, how modern Uni-Vibe pedals compare against the original Uni-Vibe, best Uni-Vibe pedals for different needs, and how to use a Uni-Vibe.
By the end of this guide, you’ll have a solid understanding of Uni-Vibe pedals, you will be able to choose the right Uni-Vibe for you, and you’ll be able to start using one effectively in your rig.
What is a Uni-Vibe Pedal
A Uni-Vibe pedal is a modulation effect and can produce sounds similar to a chorus or phaser pedal. The original Uni-Vibe was created to try and emulate a Leslie speaker. It did a poor job at emulating that sound but created something special instead.
Here’s what the original Shin-Ei Uni-Vibe looks like:
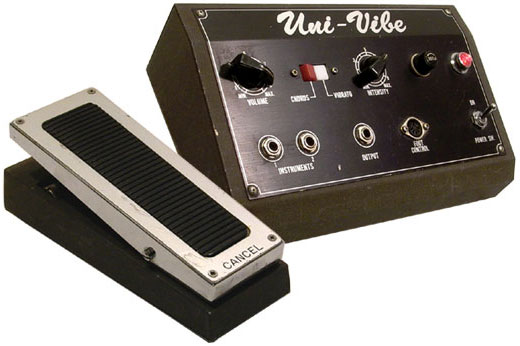
The original Uni-Vibe, as shown above, had an expression pedal to control the speed of the effect. Most modern Uni-Vibe pedals don’t have an expression pedal, but you’re unlikely to miss having one.
If you look closely at the above photo, you’ll see that there’s a switch to choose between Chorus and Vibrato modes. In my Guitar Effects Course, you can hear examples of both modes as well as how each control affects the sound.
While the vibrato mode can be heard on some recordings, most people think of the chorus mode when they think of Uni-Vibe. Some modern Uni-Vibe pedals only replicate the chorus mode as it’s far more popular than the vibrato mode.
Where to Put a Uni-Vibe Pedal
The placement of your Uni-Vibe pedal plays a big role in the quality of the effect. Shifting the placement of a Uni-Vibe can dramatically change what you hear for better or worse.
In my Guitar Effects Course, I explain how to think about pedal placement and give plenty of audio clips for you to hear how shifting the position changes what you hear. While there are ‘rules’ on the order to place pedals, those rules are often best ignored.
The approach I recommend with a Uni-Vibe placement is to take a page from Hendrix’s book. Experiment with your Uni-Vibe pedal and move it around your rig in every possible position.
If you have an overdrive pedal, listen how the Uni-Vibe sounds before the overdrive, then compare that to how it sounds after the overdrive pedal. If your ears tell you to place it before the overdrive pedal, do it.
Don’t blindly follow ‘rules’ because you’ll often miss out on better results.

You can see Hendrix use the original Uni-Vibe in the above photo (labeled ‘E’) during his famous Woodstock performance. He used it extensively during the performance and it’s a great example of how a Uni-Vibe can color your tone. Check out my guide to Jimi Hendrix to learn about his rig and how he incorporated a Uni-Vibe.
Uni-Vibe vs Chorus vs Phaser
While the Uni-Vibe effect can be very distinctive, it’s often mistaken for a chorus or phaser pedal. That’s because Uni-Vibe, Chorus, and Phaser are all modulation effects that manipulate your guitar signal in a similar way.
What usually gives Uni-Vibe away is the distinctive ‘throbbing’ sound it can produce when turned up enough. The swirling and throbbing sound smashes the original guitar signal in a very 60s psychedelic way. While it’s possible to achieve some extreme sounds with a chorus or phaser pedal, they’re usually far more subtle.
When you hear songs like Machine Gun by Jimi Hendrix or Breathe by Pink Floyd, you’re hearing a Uni-Vibe in action. While some chorus or phaser pedals might get you close to that sound, it’s not going to get close enough.
In my Guitar Effects Course, I explain the technical details of each type of modulation effect along with audio examples of each effect in action. If you want to develop your ears and learn how to identify these effects, check the course out.
Choosing the Best Uni-Vibe Pedal For You
Uni-Vibe is a popular effect and there is a wide range of pedals available. From cheap and compact Uni-Vibe pedals all the way to full-on replicas of the original Shin-Ei Uni-Vibe, you have plenty of options to consider.
Here is a shortlist of the best Uni-Vibe pedals covered in this guide:
- Moen Shaky Jimi Vibe
- MXR M68 Univibe
- Dunlop JHM7 Univibe
- TC Electronic Viscous Vibe
- EHX Good Vibes
- Fulltone Custom Shop MDV-3
- EarthQuaker Devices The Depths
I’ll go through each pedal so you can find the one that suits your needs.
Best Budget Uni-Vibe
The Moen Shaky Jimi Vibe is possibly the most popular budget Uni-Vibe out there today. It’s a basic pedal, but it does a fantastic job at producing a great Uni-Vibe sound.
There are a lot of guitarists who prefer the Shaky Jimi Vibe’s sound over other Uni-Vibe pedals three times the price. While more expensive pedals can give you more features (eg: stereo, expression pedal input), for a lot of guitarists the Shaky Jimi Vibe does the job.
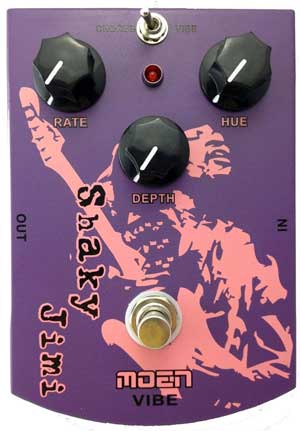
As you can see from the above photo, the Shaky Jimi Vibe has three knobs to control the sound (Rate, Hue, Depth) and a toggle switch to choose between Chorus and Vibrato modes.
The controls on this pedal are a little different than the rest of the pedals in this guide. While rate and depth are common on Uni-Vibe pedals, Hue is an odd control to have. The best way to think about the Hue control is it’s like a Tone control. It changes the ‘color’ of the effect.
The downside of the Shaky Jimi Vibe is there is no level or mix control. This means you’re unable to dial in the perfect level of effect and need to accept the level the pedal gives you. While this is perfectly fine for a lot of guitarists, you may prefer that extra level of control.
Having a level/mix knob allows you to change anywhere from a barely-noticeable vibe to a full-on hypnotic swirly tone. If you like the idea of being able to adjust the level of the effect, you may want to consider one of the other vibe pedals below.
The pedal offers mono input and output and gives you the option of powering it with a 9V battery or external power source. It’s a True Bypass pedal, which is surprising for such a low priced pedal.
Who is the Shaky Jimi for: if you’re unsure how often you’re going to be using a Uni-Vibe or you just want to experiment with it, I highly recommend the Shaky Jimi Vibe. There’s no point paying more than double for one of the other pedals if you only need something basic to play around with.
If you’re an at-home guitarist and looking for a way to add some hypnotic sounds to your playing, the Shaky Jimi Vibe is a cheap and easy way to get started.
Check out the price and full details of the Moen Shaky Jimi Vibe here.
Best Mid-Range Uni-Vibe Pedal
The MXR M68 Univibe is possibly the most popular Uni-Vibe pedal available today. You’ll see it on countless pedalboards for a good reason: it’s an excellent quality pedal with an authentic vibe sound.
The M68 is a basic pedal with three knobs, mono input/output, a ‘vibe’ button, and True Bypass.
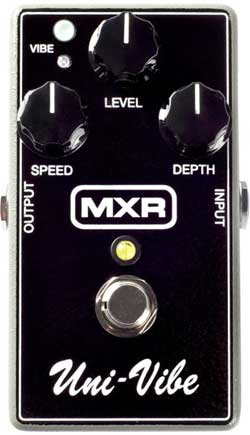
The three knobs are easy to understand and control the parameters you would expect from a Uni-Vibe: Speed, Level, Depth.
Unlike the Shaky Jimi which doesn’t have a level knob, the M68 allows you to adjust the effect level as you see fit. You can set it to a low level for subtle swirling effects, or crank it up as you like.
The button changes between the chorus mode (when the button is off) and the ‘vibe’ mode. When this button is activated, it removes your dry signal and only passes through the pitch-shifted signal. You end up with a 100% wet signal full of classic Uni-Vibe.
Who is the MXR M68 for: the M68 is double the price of the Shaky Jimi, so for some guitarists, it’s going to be a stretch to consider the M68. What the M68 offers over the Shaky Jimi is better control over the sound and a better quality build. If you plan on performing live with a Uni-Vibe, this is a solid choice.
MXR produce solid pedals and if you’re a live performer, you’re going to feel a lot more confident with the M68 under your feet. If you only need a basic Uni-Vibe pedal with the essential controls, the M68 does the job.
Check out the MXR M68 Univibe here for price and details.
If you’re a Jimi Hendrix fan, you may choose to get the Dunlop JHM7 Univibe instead of the M68. Dunlop originally released this pedal then when they saw how popular it was, they released the MXR M68. I don’t know if there are any internal differences between the two, but they’re essentially the same.
Check out the Dunlop JHM7 Jimi Hendrix Univibe here for price and details.
Best Stereo Uni-Vibe Pedal
If you run a stereo rig, you might prefer a Uni-Vibe pedal that supports stereo inputs and outputs. Uni-Vibe was originally a mono effect, but it sounds amazing in stereo.
It’s easy to understand how a swirling and throbbing psychedelic effect like the Uni-Vibe could benefit from running in stereo.
The Viscous Vibe by TC Electronic is possibly the most flexible Uni-Vibe pedals available today. I dig into the details on the Viscous Vibe in my review here, so check it out for the full picture. I’ll stick to the basics in this guide.
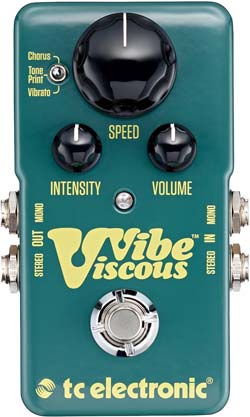
The main benefit the Viscous Vibe offers over other Uni-Vibe pedals is TonePrint. If you don’t know what TonePrint is, it’s an app/editor you can use to set up and tweak the effect with incredible control. You can dial in the exact sound you want and save it to your pedal.
To give you an idea how much extra control TonePrint gives you, here are some of the parameters you can control: speed, attack, release, depth, mix, feedback, hicut frequency, drive, boost. You can even change what the knobs on the pedal are assigned to and the way the range of the knob changes the parameter.
While the pedal may only have three knobs and a mode selection switch (to toggle between Chorus, TonePrint, and Vibrato modes), this pedal gives you complete control over the effect like no other Uni-Vibe pedal out there.
If the large speed knob looks odd on this pedal, it’s designed like that for a reason. The original Uni-Vibe had an expression pedal to dynamically change the speed. The large knob on this pedal allows you to adjust the speed with your foot.
While it’s not the same as an expression pedal, it gives you enough control without having to bend down and change it by hand.
Who is the Viscous Vibe for: if you want to dial in the perfect setting for your Uni-Vibe, it’s hard to look past the Viscous Vibe. This pedal gives you far more control over the effect than any other pedal in this guide.
If you want a stereo pedal with complete flexibility in how you set it up, go for the Viscous Vibe.
Check out the price of the Viscous Vibe here.
Best Uni-Vibe With Expression Pedal
None of the above pedals has the ability to connect an expression pedal like the original Shin-Ei Uni-Vibe. For most guitarists, that’s fine. You may not have any use for an expression pedal at all.
Other pedals such as the Viscous Vibe and the Fulltone Mini Deja Vibe get around not having an expression pedal by creating a large knob you can turn with your foot. Works perfectly fine for the times when you want to change the speed on-the-fly.
But if you really want to have an expression pedal with your Uni-Vibe, there are a few options to check out.
EHX Good Vibes
The EHX Good Vibes is a mid-range pedal that offers the typical Uni-Vibe features. The three knobs give the standard level of control you would expect in a Uni-Vibe pedal: Volume, Intensity, and Speed.
The left toggle switch allows you to choose between Chorus and Vibrato modes. Pretty standard stuff for a Uni-Vibe and covers all the main features found in other Uni-Vibe pedals.
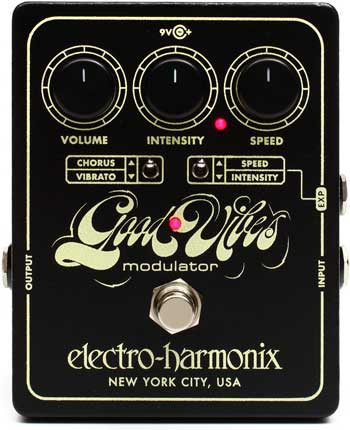
The extra feature this pedal offers is the ability to connect an external expression pedal such as an EHX Expression Pedal, BOSS FV-500L, Moog EP-3, or M-Audio EX-P.
While adding an expression pedal does take up extra floor space, if you want to dynamically control your Uni-Vibe while playing, it’s the best way to do it. The large speed knobs on the Viscous Vibe or Mini Deja Vibe may work fine, but when performing live an expression pedal will always feel better.
The advantage the Good Vibes offers over the next pedal I’ll cover is that it has a dedicated toggle switch for the expression pedal. You can set the pedal to control Speed or Intensity. While the common use of an expression pedal is to control speed, you may find controlling intensity to be more useful.
Who is the Good Vibes for: if you want a simple pedal that closely matches the controls of the original Shin-Ei Uni-Vibe, this is a close match. You can connect an expression pedal and control your Uni-Vibe exactly like the original.
While there may be other pedals that are higher rated than the Good Vibes, if you really want that dedicated expression pedal, it does the job.
Check out the price and full details of the EHX Good Vibes here.
Fulltone Custom Shop MDV-3 Mini Deja Vibe
While the EHX Good Vibes requires you to buy a separate expression pedal, the Fulltone MDV-3 is built like a typical expression pedal.
This saves space on your pedalboard while giving you the ability to dynamically control your effect as needed.
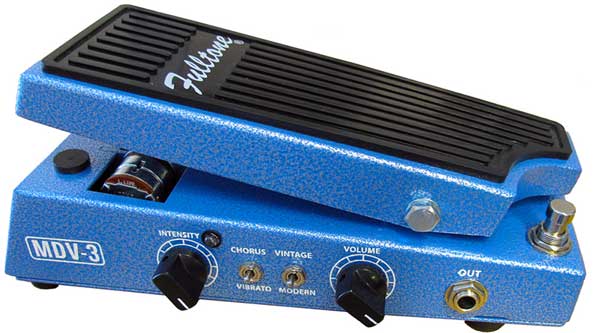
What I love about this pedal is the footswitch near the heel of the pedal. Instead of needing to push the toe down to activate the effect (like a typical wah pedal), you have an easily accessible footswitch.
This design means you can set the expression pedal to any position you want and hit the footswitch to engage/disengage the effect. It’s a great design that other pedal manufacturers should take note of.
To understand why this is such a great design, imagine a Uni-Vibe pedal that required you to push the toe all the way down to activate the effect (like the Dunlop JD4S). As soon as the effect turns on, you have the expression pedal in the maximum position, which means you’ve set the speed to maximum. Too bad if you wanted a slow and subtle swirling sound any time you turn the pedal on.
With the MDV-3, you can set the speed control to what you want and leave it as you turn the effect on or off. Simple.
On the side of the pedal, you have two knobs to control Intensity and Volume, as well as two toggle switches. One switch toggles between the standard Chorus and Vibrato modes.
The other toggle changes between Vintage and Modern modes. While Uni-Vibe is typically thought of as a vintage effect, it’s great to see pedals like this one give players options.
The MDV-3 requires 18V power, so make sure you use the supplied power pack instead of a regular 9V supply.
Who is the Mini Deja Vibe for: if you want an expression pedal but don’t want to spend more money to buy one, this is a great option. It’s a far better design than needing a separate expression pedal and the separate footswitch is far more practical than a toe-switch found in the Dunlop JD4S.
Check out the price of the Fulltone MDV-3 here.
Best Boutique Uni-Vibe Pedal
There are a lot of Uni-Vibe boutique pedals out there today. Many offer interesting features not found on a typical Uni-Vibe pedal. While it’s hard to even suggest a ‘best’ boutique pedal, my vote would go to EarthQuaker Devices The Depths.
What I like about The Depths is the controls it offers over the effect. In addition to the three standard controls you’ll find on most Uni-Vibe pedals (Intensity, Level, Rate), you have two extra controls: Voice and Throb.
Throb is that low-end pulse you hear that makes Uni-Vibe such a distinctive effect. Being able to adjust this sound helps you dial in the right tone for your needs. When used in combination with the Voice knob, you can achieve some really warm low-end tones.
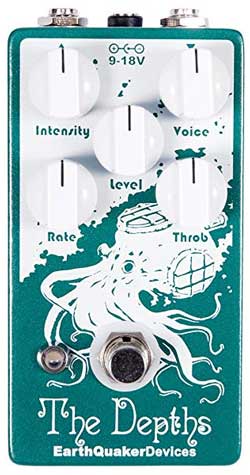
If you want to experiment with different tones, The Depths can accept power input 9-18v. 9v is meant to produce a warmer tone, while cranking the voltage up to 18v is meant to produce more sparkle.
An easy way to experiment with this is if you use something like the Voodoo Labs Pedal Power 2 Plus (reviewed here). You can get 18v by using a twin cable and connecting it to two 9v inputs. If you want to get a voltage in-between 9 and 18v, you can use the ‘SAG’ control on outputs 7 and 8. This let’s you dip the output below 9v. Using both SAG outputs lets you get anywhere between 8-18v.
Who is The Depths for: if you want a bit more control over your Uni-Vibe than the typical pedal offers, The Depths might suit your needs. It’s a well-made pedal and offers some really useful ways to dial in the perfect Uni-Vibe sound. It’s reasonably priced for what it offers, so you may prefer it over mid-range pedals such as the M68.
Check out the price of The Depths here.
How to Use a Uni-Vibe Pedal
A Uni-Vibe pedal can be very flexible and there are quite a few ways you can use it in your playing. Let’s look at how to get started with a Uni-Vibe pedal and how to use it in different situations.
Psychedelic effect
The first thing you will probably do when you plug your Uni-Vibe in is to crank it up and play around with some trippy sounds. Most Uni-Vibe pedals can produce some extreme sounds when you crank the depth/intensity and rate knobs.
Depending on which pedal you get, try to explore the full range of sounds you can produce. For example, if you get a Uni-Vibe with an expression pedal, experiment with adjusting the speed up and down as you play. Load up a backing track and jam along while using the expression pedal.
Or if you have a basic three-knob pedal, test out the extremes of each knob. Crank the intensity all the way and think about when you would use such a full-on sound. Crank the speed and try coming up with riffs and licks that suit that sound.
Try to write riffs and licks with any extreme sound you get out of the pedal. Not only will this help you develop your creativity, it will also help you learn to get the most out of your pedal.
Rhythmic pulse
When you crank the intensity/depth knob, you’ll hear that classic Uni-Vibe ‘throbbing’ sound. After you play around with your pedal for a while, have a go turning that throbbing sound into something that fits with music.
Load a backing track and adjust the rate knob until the throbbing sound matches the beat of the song. Now you can adjust the intensity/depth knob and the level knob to a position that suits you.
Having the rate set to the same tempo as the song can dramatically change the way you play. You’ll find that as you jam along with the backing track, you’ll be far more conscious of the pulse of the song and you’ll adjust your playing to suit.
Saturate a drive tone
This is the most common way to use a Uni-Vibe pedal. The idea is simple: add Uni-Vibe to your drive tone to add a slow and swirling sound to your rhythm or lead parts. Jimi Hendrix used this approach in his Woodstock performance.
Imagine how dry The Star Spangled Banner (listen to his version below) would have sounded if he turned the Uni-Vibe off.
When you use Uni-Vibe to saturate your drive tone, keep the level and intensity subtle. It might be tempting to crank it up, but you will lose a lot of definition in your playing.
Try playing riffs and licks from different songs and find the perfect pedal settings for each part. Some parts may sound great when you turn the speed and intensity up, while other parts will sound best with a very slow and subtle swirling. Try as many riffs and licks as possible and you’ll quickly learn how to dial in the best sound out of your Uni-Vibe for any song.
To add ‘color’ to a clean tone
While Uni-Vibe is often used on drive tones, it sounds amazing on a clean tone. Breathe by Pink Floyd is a great example (listen from around 1:15 in the video below) of how a Uni-Vibe can add atmosphere to your clean tone.
Imagine hearing that song without the Uni-Vibe: the guitar would sound thin and the track would lose a lot of character.
Adding a subtle Uni-Vibe to a clean tone is a great way for live guitarists to turn a dry and dull clean tone into something that fills the venue with a warm and thick tone.
Adding a Uni-Vibe won’t suit all songs, but you’ll be surprised with how many songs can sound create when a Uni-Vibe is added at a subtle level.
Learn how to combine Uni-Vibe with other effects
Uni-Vibe can quickly become an overpowering effect, but at the right level it works very well with other effects. If you already have other effect pedals in your rig, learn how to make them work with your Uni-Vibe.
Some types of pedals (eg: fuzz) work perfectly with Uni-Vibe and instantly create incredible sounds. Other types of pedals might take some experimenting to figure out what works and what doesn’t.
You should also experiment with the placement of your Uni-Vibe pedal in your rig. While other sites might tell you ‘rules’ to follow with pedal placement, I believe you’re far better off letting your ears tell you what works and what doesn’t. Try placing your Uni-Vibe in different positions in your pedalboard to hear how it interacts with the rest of the chain.
With this approach, you might find the best place for your Uni-Vibe is the complete opposite of what the rules say you should do.
To learn more about how Uni-Vibe pedals work, along with every other type of effect guitarists use, check out my Guitar Effects Course.