
With so many different types of guitar pedals available today, it can feel overwhelming when you decide to get your first guitar pedal. Not knowing the basics of guitar pedals can not only cause you headaches but can give you a bad tone.
There are three important points to remember with guitar pedals:
- The order of your pedals greatly impacts your tone
- Always use the correct power source for the pedal
- How you use your guitar pedals matters
In this short guide, I’ll explain everything you need to know to get started with your first guitar pedals. You’ll learn how to plug in your first guitar pedals, use the correct power supplies to avoid damaging your pedals, and different ways you can use your pedals.
How to Plug in a Guitar Pedal
When you buy your first pedal, your first job is to correctly plug it into your guitar and amp. This is incredibly easy but requires a few things. Normally, we plug our guitars directly into the input jack on the amp. When we add a guitar pedal to the rig, we need to change the way we plug in our guitars.
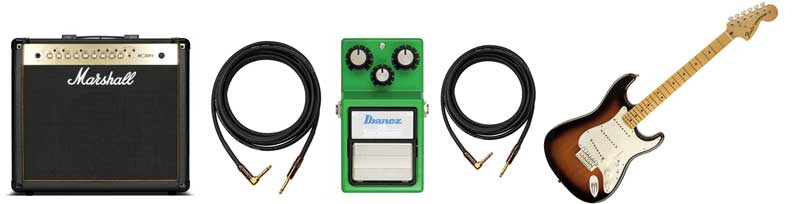
You need two guitar cables for each pedal you buy. One cable to plug into the input of the pedal and another cable to plug into the output of the pedal. Most pedals will label the input and output jacks, but the standard is for the input to be on the right side of the pedal and the output on the left side. If you only have one pedal, you’ll only need two cables for your entire rig.
Tip: learn all about guitar cables and other types of cables you’ll encounter as a guitarist here. Includes recommendations on guitar cables and patch cables.
Plug your guitar into the ‘input’ jack of your pedal. Then plug the other cable into the output jack of the pedal. This cable then connects to the input on your guitar amp. Most amps have the guitar input on the front, while others have the input on the top or back.
I recommend you buy long cables for both the input and output cables for the pedals (eg: minimum 10ft / 3m). Longer cables mean you can position your pedal away from your amp if you want. For example, if you plan on performing on stage, you can have your pedal at the front of the stage while your amp is at the back of the stage. It doesn’t hurt to have an extra long cable spare just in case you want a bit more room to move.
How to connect guitar pedals to each other
If you have more than one guitar pedal, you’ll need more cables. For example, if you have two guitar pedals, you’ll need three cables: one to connect the guitar, one to connect the two pedals together, then a third cable to connect to the amp.
When connecting guitar pedals together, you can buy something called ‘patch cables’. Patch cables are very short cables designed to connect pedals together. These short cables keep your pedalboard nice and tidy. The more pedals you buy, the more important it is to keep your pedalboard tidy. Check out recommendations for patch cables here.

As you can see in the above image, you need three cables to connect two pedals to your rig. Two long cables, and one short patch cable in the middle to connect the two pedals together. If you ever plan on adding another pedal to your rig, you simply need to buy another patch cable for each additional pedal (they usually come in packs of 4-6 cables).
How to connect stereo guitar pedals
Most pedals will have one input and one output. These pedals are mono and most guitar rigs run in mono. But some pedals can be run in either mono or stereo. The Flashback Delay pedal shown below has four jacks:
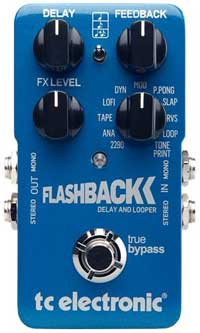
There are two inputs on the right side of the pedal labeled ‘Mono’ and ‘Stereo’. If you plugged this pedal into a normal mono rig, you would simply plug one cable into the Mono input, then another cable into the Mono output. But if you wanted to run a stereo rig, you would plug either one or two inputs in (depending on your other pedals) and two output cables.
What is a stereo guitar rig? A stereo rig is when you use a stereo guitar amp or two amps at the same time. At some point, your guitar signal is split into two paths. You can run the two signals into stereo guitar pedals or into two amps to mix together two different amp sounds. The key point with a stereo rig is you need either a stereo amp or two amps.
If you’re just starting out with pedals, keep things simple and run your pedals in mono. Stereo pedals work perfectly fine in normal guitar rigs. In the future, you may decide to experiment with stereo rigs and these pedals can be very handy.
Powering your Guitar Pedals
After you plug your pedals into your guitar and your amp, you should think about how you will power your pedals. There are two ways guitar pedals receive power. Almost all guitar pedals accept external power from a power supply. Some pedals use an internal battery to power the pedal. A lot of pedals offer both options. Let’s look at each option so you know what to expect from any pedal you might buy.
If you want a complete guide on how to power your pedals and the different options available to you, read this guide.
Battery Power
Many guitar pedals allow you to power the pedal with an internal battery. Most pedals use a single 9V battery but there are some pedals that will require more. Batteries can work well if you only have a couple of pedals and you don’t play all the time. For example, if you perform live regularly, I wouldn’t recommend relying on batteries. Having a battery die in the middle of a song isn’t something you want to deal with.
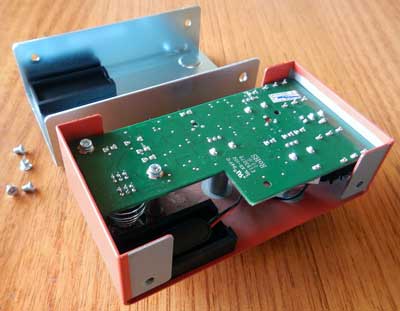
In the photo above, you can see that the back of the pedal opens up to insert the battery. Some pedals open easily, while others require you to open them with a screwdriver. The above pedal had to be opened with a screwdriver to access the battery compartment.
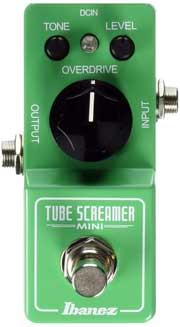
A lot of compact pedals are so small they can’t fit a battery, so if you like the idea of using batteries to power your pedals, watch out for these compact pedals. The below pedal is an example of a compact pedal that doesn’t have room for a battery. If you buy compact pedals like these, keep in mind you will only be able to use them with external power (explained below).
If you want to use batteries to power your pedals, you can choose between normal batteries or rechargeable batteries. If you find that normal batteries die too often, rechargeable batteries may suit you better. Check out these rechargeable 9V batteries and charger (link to Amazon for price) for an example of what to get.
External Power
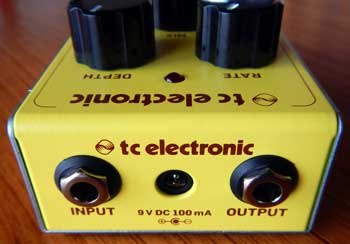
In the photo below, you can see a small power jack at the back of the pedal where a power supply can be connected to power the pedal.
Powering your guitar pedals with an external power supply means you won’t need to worry about batteries dying while you play. The downside is you will need to have another wire running along the floor to connect the pedal to a power supply.
You have two choices when it comes to external power supplies. The first option is to use a power supply that connects directly into your wall socket. This works well if you will only be using one or two guitar pedals. The photo below shows what these power supplies look like:
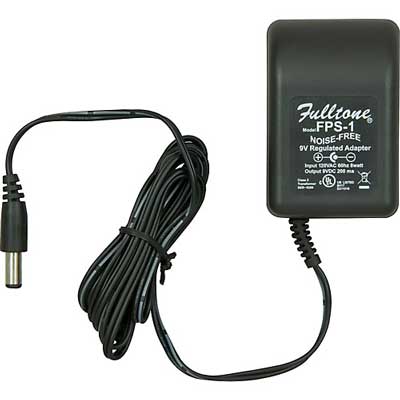
Many guitar pedals come with these power supplies, so you might not need to buy anything extra to power your pedal. If your pedal doesn’t come with one of these power supplies, you can easily buy one. Make sure the power supply you buy matches the power requirements of the pedal.
These power supplies take in the AC (alternating current) power from your wall and convert it into DC (direct current).
Most pedals require 9V and less than 100mA. You’ll find these details next to the power jack on the pedal. There are three things to look for:
- The voltage (in V). Most pedals are 9V, but some larger pedals can be 18V
- The current draw (in mA). This is how much current the pedal draws (in milliamps). You need to make sure the power supply you buy has a number higher than what the pedal draws
- The center pin polarity. In the power jack, there is a center pin. This can either be positive or negative. In the below photo, the diagram tells us the center pin is negative. We need to make sure the power supply we get matches this (check out the above power supply and you’ll see it has the exact same diagram)
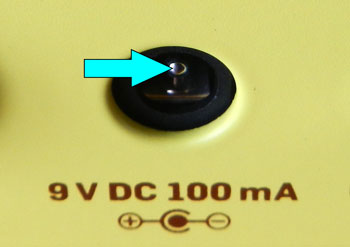
The above pedal requires 9V, has a current draw of 100mA, and uses a negative center pin. The power supply shown earlier is rated to 200mA at 9V with a negative center pin, so it will work.
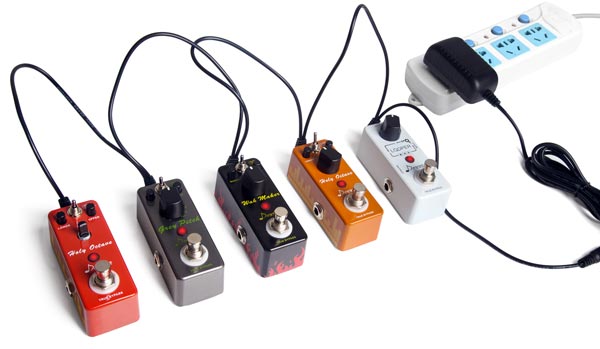
If you have more than one pedal, you can either use multiple power supplies or chain your pedals together with one power supply. Read through this guide to learn about daisy chaining your pedals together. The below photo shows an example of daisy chaining pedals together with one power supply:
The other option with external power supplies is to buy a dedicated power supply that can power your entire pedalboard. Even if you only have one or two pedals now, if you plan on building a large pedalboard, these power supplies are incredibly handy. The Voodoo Labs Pedal Power 2 Plus (as shown below) is the most popular option and it can be found on many famous guitarists’ pedalboards.
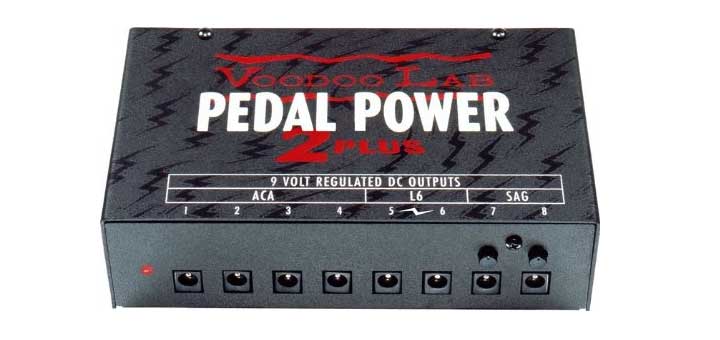
These power supplies allow you to connect many pedals to the one power supply. As some pedals have different power requirements, you’re able to match the pedal’s needs with the correct power supply.
If you want to learn more about powering your guitar pedals, read this guide.
First Guitar Pedals to Get
If you’re considering buying your first guitar pedal, you might be unsure what to start with. There are hundreds of amazing pedals to choose from, but every guitarist has different tastes and preferences for pedals. Read through this guide to find out what guitar pedals are best to start out with.
The pedals suggested in that guide are likely to last you a lifetime. As you develop as a guitarist, your tastes and preferences will change. It’s common for guitarists to go through many different pedals over the years as they find different effects and pedals that suit them better. Don’t feel you need to buy the perfect pedals straight away.
If you’re looking at some suggestions for essential effects pedals, here are some guides to help you out:
- Must have guitar pedals chosen by top guitar bloggers – plenty of great suggestions here as well as advice on how to think about essential guitar pedals
- Best Delay Pedals – delay is one of the most enjoyable effects you can get. Almost every guitarist will enjoy owning a delay pedal
- Must Have Pedals for Beginners – more advice on essential pedals to get started with
If you know what type of pedal you want to get, but need some suggestions, check out my list of Best Guitar Pedals here.
How to Arrange Multiple Pedals
If you get more than one guitar pedal, the order you place your pedals in matters. You’ll see a lot of ‘rules’ online on what order your pedals should go in. While these rules can sometimes be helpful, they often lead to worse results. I’ve seen rules from different websites contradict each other, so how should you know what rules to follow and what rules to ignore?
The reason I created the Guitar Effects Course is to teach guitarists to develop their ears and learn what order works best for their pedals. Instead of relying on ‘rules’ that somebody thinks you should follow, you’ll learn how to arrange your pedals in the perfect order for your needs. If you go through my course, you’ll hear what happens when we place a wah pedal in front of a distortion pedal, then what happens when we switch the positions. You’ll learn why certain pedals need to be placed early in the chain, and why some pedals need to go towards the end.
If you only have two or three pedals, I recommend experimenting with every combination you can think of. You’ll quickly figure out which order works best for your pedals. Even if the order you come up with breaks the ‘rules’ you see on other websites, stick to what your ears tell you is right.
If you have a lot of pedals, check out my Guitar Effects Course to learn about each effect, how to combine them, and how to arrange them properly.
Using the Four Cable Method
If you’re a beginner, I recommend starting out by keeping things simple. Plug all your pedals into the main input of your guitar amp. But there is a more advanced way of connecting pedals to some amps. The 4 Cable Method is a way of getting the best results out of your pedals by taking advantage of an amp’s effects loop. Not all amps have an effects loop, so if you have a basic combo practice amp, you won’t be able to use this method.
The basic idea behind the 4 Cable Method is that some pedals sound better plugged into the main input of your amp, while other pedals sound better plugged into an effects loop. If you’re just getting started with guitar pedals, keep this in mind for the future when you want to build a big pedalboard and make it sound amazing.
Read through this guide to learn more about the 4 Cable Method.
How to Use Guitar Pedals While Playing
Once you have your pedals connected and arranged in a way that sounds good to you, you can start looking at how to use them while playing. There are two main ways you can use guitar pedals, so let’s look at each way in detail.
Effects on demand
The first way to use guitar pedals is the most common way. Think of the pedals as effects-on-demand. You turn them on and off while playing depending on what sounds you want to hear. For example, a lot of guitarists turn a wah pedal on during a solo, then turn it off again after the end of the solo. In this example, you’re using the wah pedal as an ‘on-demand’ effect. It colors your guitar tone while it’s active, then you turn it off to go back to your ‘normal’ guitar tone.
When you buy pedals such as a wah, whammy, phaser, booster, or a tuner, these are most likely to be used as on-demand effects. The way to think about this is you have your ‘normal’ tone, and your ‘effects’ tone.
A good example of a guitarist who uses effects on-demand is Tom Morello from Rage Against The Machine (find out about his pedals here). His solos combine effect pedals to create wacky and bizarre sounds. For the rest of the song, his ‘normal’ tone doesn’t use any pedals at all.
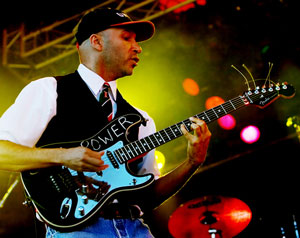
As an example, in the solo for the Rage Against the Machine song, Killing in the Name, Tom turns on a whammy pedal and a delay pedal. When the solo is over, both of those pedals are turned off again. It’s a perfect example of effects on-demand and how they can add something interesting to your playing.
Always-on pedals
The second way you can use a guitar pedal is often overlooked by guitarists. The common way to think about guitar pedals is to think of them as effects you can turn on and off during a song. But the other way is to always have the pedal on. With this approach, you’re using a pedal to enhance your ‘normal’ guitar tone. This is a great way to build a unique tone that wouldn’t be possible with only a normal guitar amp.
For example, maybe you play surf-rock and like the big sound a spring reverb can give you. By adding a reverb pedal to your rig and keeping it on all the time, that reverb now becomes a normal part of your guitar tone. You can turn it off at any time, but keeping it on adds character to your tone.
As another example, a lot of guitarists keep a compressor pedal on all the time. A compressor pedal evens out the signal in your tone which can give a more consistent volume level. A compressor can even be used to enhance your tone. By keeping the compressor on all the time, it becomes a normal part of your unique tone.
Eddie Van Halen’s ‘brown sound’ is a good example of using effects to enhance your tone. Always-on guitar pedals give you a way of creating your own unique brown sound.
More Guides to Get The Most Out of Your Pedals
With the above information, you can start plugging your guitar pedals in and experimenting with them. Play around with on-demand effects as well as always-on effects to explore what your pedals are capable of. Here are some more guides to help you get started with guitar pedals:
Beginner Guitar Pedalboard: this guide provides you with suggestions on pedals to get first, as well as how to mount your pedals on a pedalboard. If you don’t know what pedals to get, this guide will give you plenty of options.
Beginner Guitar Accessories: if you’re just getting started with electric guitar, check out these recommendations for accessories. Many of these accessories are considered essential, so check them out to see what you’re missing.
A Guide to Cables: if you’re looking for recommendations on what guitar cables to get, this guide has it all. You’ll also learn about all the other types of cables you’ll come across as a guitarist. Spend a few minutes reading through this guide and you’ll know more about cables than most experienced guitarists.
Setting Up an Ideal Practice Space: check out this guide for advice on setting up a practice space so you can get the most out of each practice session. It also includes examples of different practice spaces, so you can see what other guitarists do.
Guitar Effects Course: if you’re interested in adding pedals to your rig, this course covers every type of effect. You’ll learn how to identify effects by ear, how each type of effect works, how to combine different effects, and more. This is the most comprehensive online course on guitar effects, so if you’re interested in effect pedals, this course is for you.