
This review will look at Vangoa’s second powered guitar pedalboard, the PD-M. The PD-M is a medium-large pedalboard that has an inbuilt power supply suitable for around 12 pedals.
If you’re looking for a small-sized pedalboard on a budget with a built-in power supply, check out their smaller VPPD-S Pedalboard here (link to my review).
Vangoa PD-M Pedalboard Features
Here are the main features of the Vangoa PD-M Pedalboard:
- Aluminum alloy pedalboard frame
- Built-in 9V power supply
- 10x isolated 9V 300mA power outlets
- 1x isolated 12V 500mA power outlet
- 1x isolated 18V 500mA power outlet
- LED audio level indicator strip
- Foldable legs
- Large padded backpack carry case
- 4x velcro strips
- 1.5kg (3.4lbs) total weight
- 457 x 343 mm (18″ x 13.5″) pedal surface area
Here are the pedalboard and accessories that come with the Vangoa PD-M:
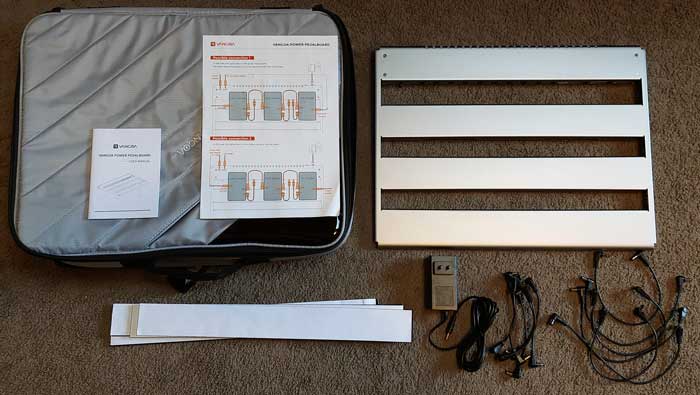
The pedalboard comes with 4x hook and loop velcro strips, 6x long DC cables, 6x short DC cables, a US power supply, a manual, and suggested wiring diagrams.
Note: I live in Australia and the pedalboard came with a US power supply. So I had to buy a suitable power supply (18V with inside(+) connector and 1A minimum). If you buy this pedalboard outside of the US, you will need to buy a suitable power supply.
Check out the PD-M Pedalboard on Amazon US here (or Amazon UK).
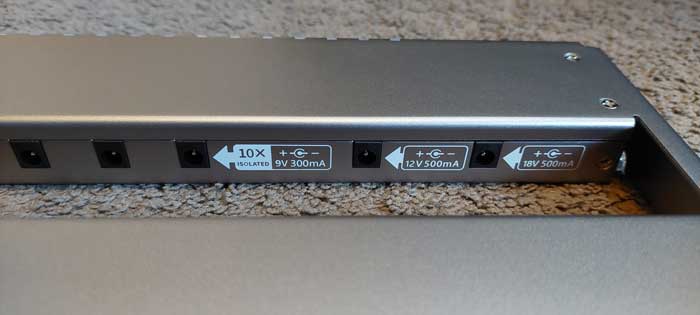
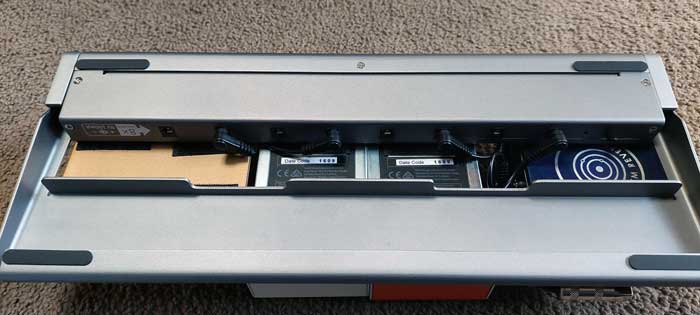
Built-in 9V Isolated Power Supply
The best feature of this pedalboard is the built-in power supply.
The inbuilt power supply gives you 12 isolated outputs at various voltages:
- 10x 9V 300mA outputs
- 1x 12V 500mA output
- 1x 18V 500mA output
If you’re new to guitar pedals, read this guide to learn all about powering guitar pedals. The guide explains the above terms as well as other ways to power guitar pedals. It’s a good idea to learn the basics of guitar pedal power requirements to prevent accidentally damaging your gear.
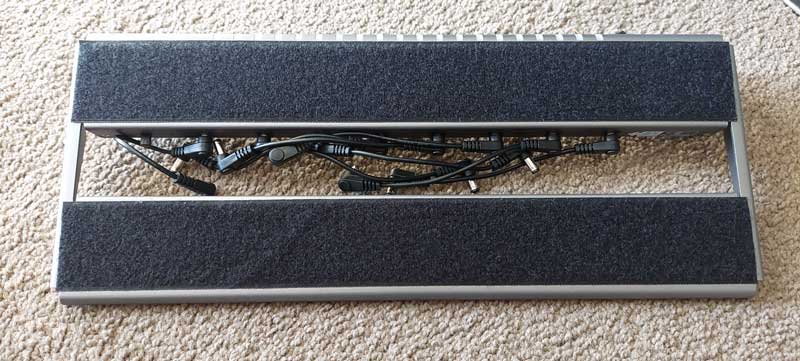
The inbuilt 12 outputs are mounted at the bottom of the top row and the different types of outputs are clearly labeled as shown below:
The pedalboard comes with 6 short (6″ or 15cm) and 6 long (11.5″ or 29cm) power cables. The long cables are long enough to easily reach any pedals you mount towards the bottom of the pedalboard.
If you pack the pedalboard with pedals, you may want to buy longer cables or buy some daisy chain cables.
In the below photo, you can see that there’s plenty of space underneath the pedalboard for different routing options. You should be able to easily route any output to a pedal without needing to buy any extra-long cables.
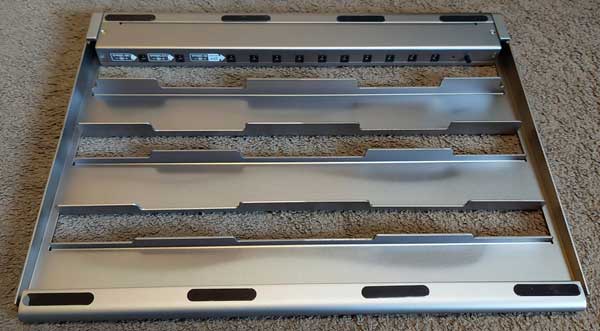
Being able to easily route the power cables and the patch cables underneath the pedalboard helps keep your pedalboard tidy.
What I like about this power supply is that each 9V output can handle up to 300mA of current.
This is a nice upgrade from Vangoa’s previous powered pedalboard, the VPPD-S, which is rated at 100mA per output.
There were a few of my pedals that I couldn’t use on the VPPD-S as they needed far more than 100mA, so I’m very happy to see the PD-M offer 300mA per output.
Keep in mind that the majority of guitar pedals use far less than 100mA, but always check your pedal’s power requirements before you connect it to a different power supply.
Each of the 12x outputs is isolated, which is important as some pedals can introduce unwanted noise into your signal. Find out why isolated power is important in my review of the Voodoo Labs Pedal Power 2 Plus power supply here.
Pedalboard Size
The PD-M is significantly larger than Vangoa’s previous pedalboard as shown below:
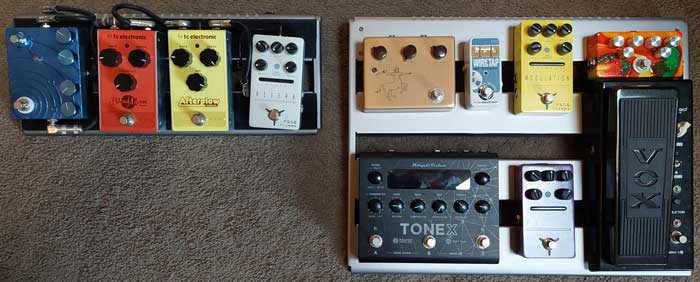
The pedalboard area measures 457 x 343 mm (18″ x 13.5″).
You can cram in far more pedals than what I’ve shown above and it can easily accommodate larger pedals such as wahs or multi-effects units.
If you use nano, mini, or standard guitar pedal sizes, you may find that you can easily fit more than 12 pedals on your board.
While there are only 10x 9V outputs, that doesn’t mean you can only use 10 pedals. You can safely daisy chain more pedals together by following this tutorial. The 300mA per 9V output is more than enough to power multiple pedals (depending on each pedal’s requirements).
You’ll likely run out of room for more pedals long before you max out the power supply.
As a side note, the TONEX Pedal shown above requires far more current than what the pedalboard can provide, so there may be times when you need to route another power supply to one or more of your pedals (eg: many multi-effects pedals require high current).
PD-M pedalboard has two foldable legs to switch back and forth between leaving the pedalboard flat or tilted.
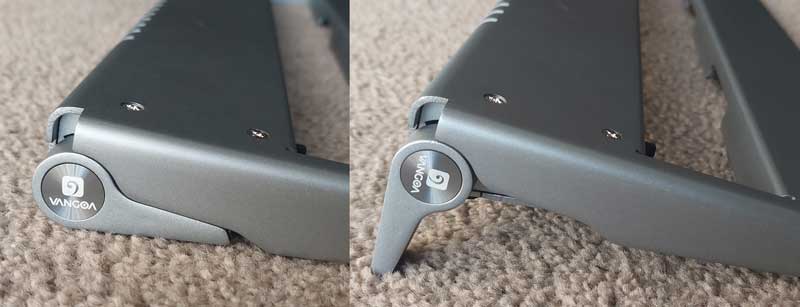
The tilted position is still very flat due to the large pedalboard size, but I found it comfortable to use when pressing down on the pedals.
The legs may look thin in the above photos, but they feel solid and fit firmly in place when folded out.
While I’m not going to try and jump up and down on the pedalboard to test their limits, they feel sturdy.
Rubber pads across the base of the pedalboard help keep it from sliding around.
LED Strip
A unique feature found on Vangoa’s pedalboards is an LED strip across the far edge. This LED strip is an audio-level indicator that will rise and fall as you play.
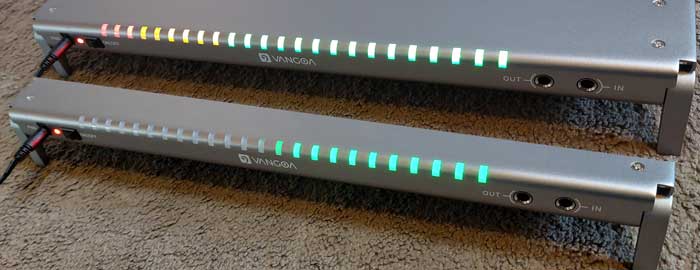
Note: the above photos don’t quite show the right colors of the LEDs. They look far more vibrant than what is shown above.
The LEDs react to the audio level in two ways: in-built microphone, or from the signal path connection.
So if you don’t plug into the IN and OUT jacks (see above right photo), the LED strip will use the in-built microphone to detect the audio level.
If you pass your signal through the IN and OUT jacks, the LEDs will react to your signal strength instead of using the microphone.
You can adjust the sensitivity of the LEDs by adjusting the small potentiometer shown below:
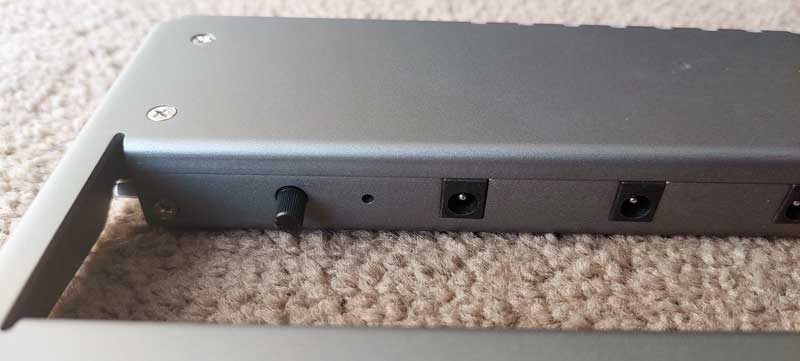
This is a refinement over the previous pedalboard, which was only able to adjust the LED sensitivity when the pedalboard was connected. This pedalboard can adjust the LED sensitivity for both the microphone input and when it’s connected to your signal chain.
The LEDs are bright and have a vivid color. They’re not blindingly bright like many pedal LEDs but they’re bright enough to look nice on stage or at home at night.
Carry Bag
The pedalboard arrived in a padded bag with a built-in carry handle, rubber protection pads, and shoulder straps to be used as a backpack:
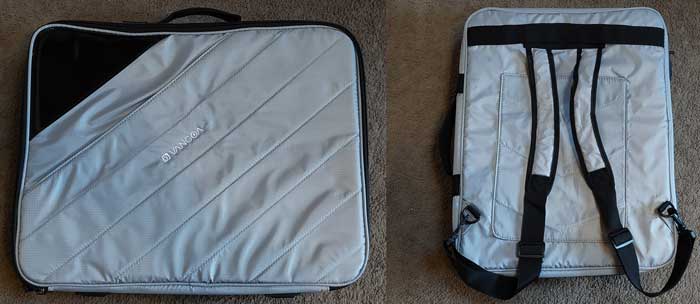
The pedalboard has a great fit inside the bag without feeling too tight. The bag is deep enough to fit your mounted pedals and easily fit my bulky wah pedal.
Two large internal straps can be used to wrap around the pedalboard and keep it in place during travel.
How to Set Up a Pedalboard
If you haven’t set up a pedalboard before, here is a quick walkthrough of the basic steps and tips to set it up correctly.
Note: to keep things simple, I’m using the smaller VPPD-S pedalboard in the below photos, but the exact same process is used for the larger PD-M.
You can follow the same steps whether you want to install 16 pedals on your pedalboard or 4 pedals.
Step 1: Prepare the Pedalboard
Before you add pedals to your board, attach the velcro strip to the surface of the pedalboard.
The PD-M pedalboard arrives with four velcro strips pre-cut to fit the length of the pedalboard. You can decide whether to use them or not but it’s generally a good idea to use velcro to hold your pedals in position.
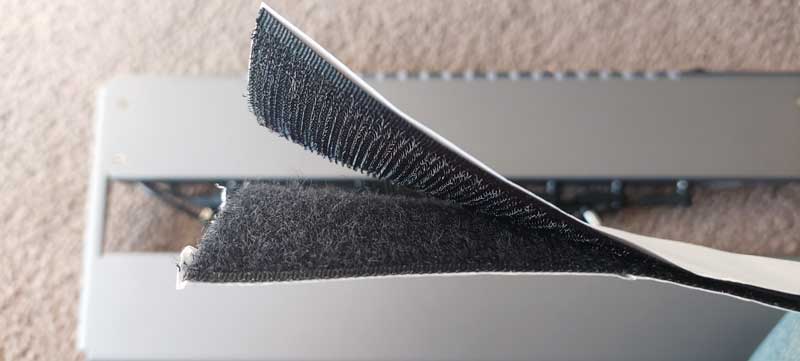
The two hook and loop strips are more than enough to completely cover the pedalboard as well as the back of your pedals and have enough spare for one or two spare pedals.
As you will see, the width fits the pedalboard perfectly (2″ or 5cm).
Which side of velcro goes on guitar pedals?
While you can use either side of the velcro on guitar pedals, the most common method is to use the fuzzy side on the pedalboard and the hooks side on the back of your guitar pedals.
As with every guitar topic, there’s always debate on what is the right answer. Some guitarists prefer to have the hooks on the pedalboard while others prefer the fuzzy side.
The reason I set up my pedalboard with the fuzzy side on the pedalboard is that it’s more common, so you’re more likely to find second-hand pedals with the hooks side already attached to the pedals.
Another benefit of using the hooks side on the back of your guitar pedals is if you play at home on carpet. You can sit extra pedals on the floor and the hooks will help keep the pedals in place on the carpet.
Even if you won’t be using the entire space for your pedals, I recommend covering the entire pedalboard surface in velcro. If you add more pedals in the future, you won’t need to worry about adding more velcro.
Step 2: Arrange Pedals
Now you can plan out the arrangement of your pedals.
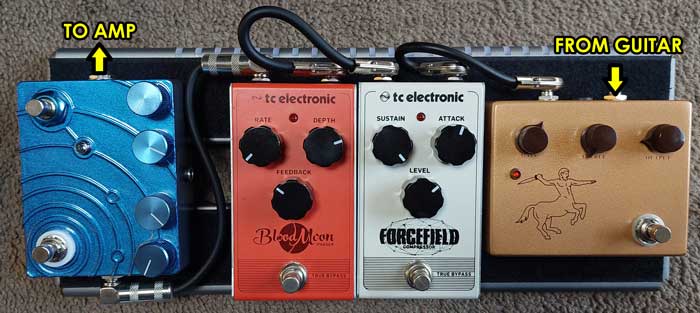
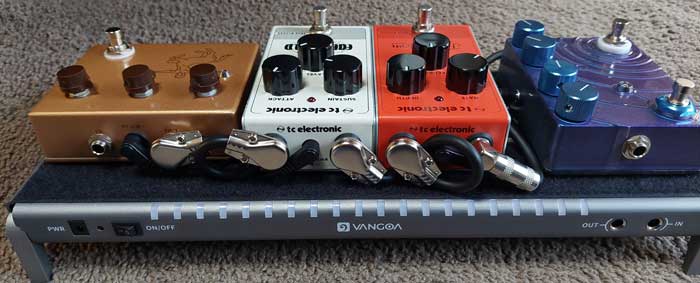
First, line up the pedals in order of signal path. Keep in mind that pedal signals normally go from right to left (inputs on the right of the pedal, outputs on the left).
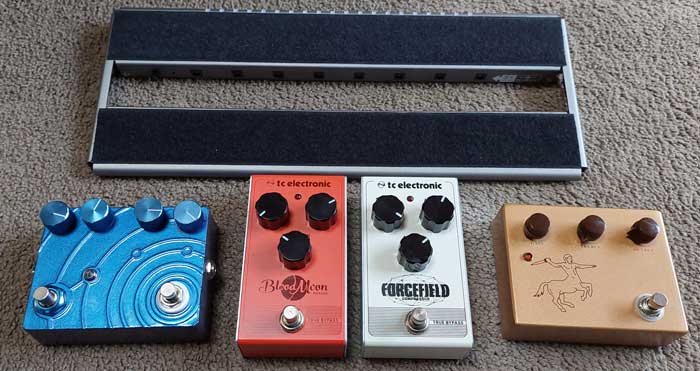
If you’re interested in what pedals I’m using in this example, they are (from right to left):
- Klon Centaur clone (built from a kit as explained in this guide)
- TC Electronic Forcefield Compressor
- TC Electronic Blood Moon Phaser
- DIY built reverb (learn about building your own pedals here)
The drive pedal is first in the chain, followed by the compressor, then the phaser, then the reverb.
To learn more about finding the best order for your pedals, check out my Guitar Effects Course. It walks you through all common effects types using audio examples and explains how to get your pedals to work together.
Once you figure out the order of your pedals, you can figure out the best arrangement on the pedalboard.
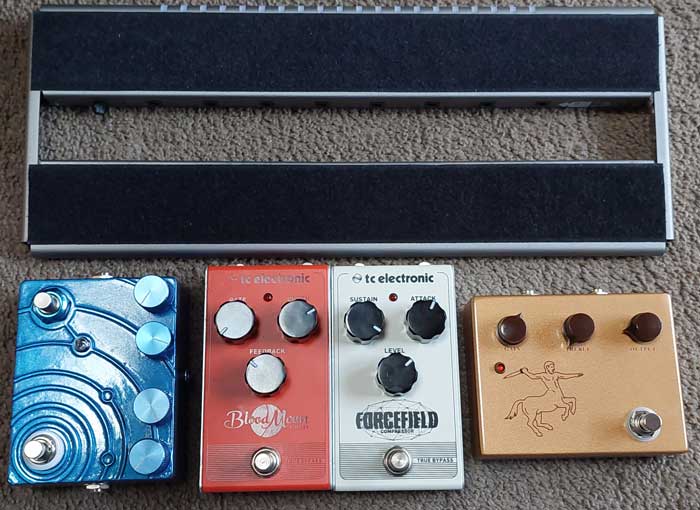
In this example build, you can see that all I needed to do to fit all the pedals was to rotate the reverb pedal by 90 degrees. As that pedal has two footswitches, it worked out well having it at the edge of the board.
As you might expect, the PD-M pedalboard can fit far more than four pedals, but you may still need to rotate some pedals around if you really fill the pedalboard up.
Pay attention to the positions of the power jacks and input/output jacks.
Step 3: Add Patch Cables
Once you are happy with the order of your pedals and how they will roughly sit on the pedalboard, you can add your patch cables.
Patch cables are short guitar cables used to connect pedals together. Check out the different lengths and types of patch cables here (link to Amazon).
The patch cables are only used to connect pedals together. The input jack on your first pedal and the output jack on your last pedal will remain empty as shown above.
You can see in the above photo that I’m using two different types of patch cables as they have different lengths.
It’s a good idea to buy a few different lengths so you can swap cables in and out as needed for the best fit.
Step 4: Connect Power Supply
Now you can add the power cables to connect to each pedal.
The Vangoa pedalboard comes with 8 power cables and 8 points to connect to. This should make it easy to connect to any arrangement of pedals you need.
By flipping the pedalboard over, it was easy to figure out which connection points to use to fit with each pedal.
Now you can maneuver the patch cables and power cables to try and fit everything as neatly as possible.
You may need to slightly adjust your pedal positions to get the best fit. Try to avoid having cables stick over the edge if you plan on using the carry bag.
You can also decide whether you want to use the IN and OUT jacks on the back of the pedalboard:
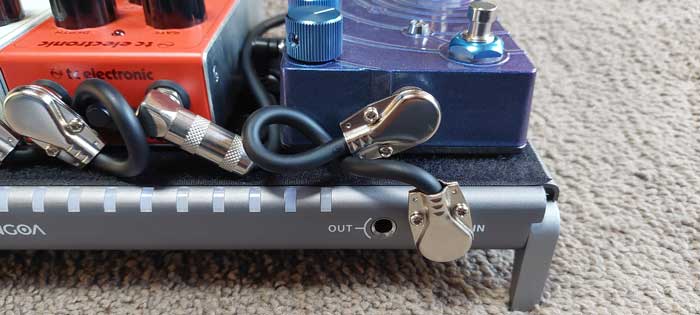
The main benefit of using these jacks is convenience. When setting up your rig in a performance, you know you simply need to connect a cable from the OUT jack to your guitar amp.
If something happened and the cable was tugged, instead of it potentially damaging your pedal’s jack, it would only tug on the pedalboard.
Of course, if you use a stereo rig, these jacks won’t be of any benefit to you.
The pedalboard comes with a few different diagrams for routing options, so check it out to decide which method suits you best.
Overall Impression of the Vangoa PD-M Pedalboard
The size and build quality of the Vangoa PD-M pedalboard make this an easy option for guitarists who want a decent size pedalboard that gives you room to grow your pedal collection.
The built-in power supply is a fantastic feature and having 10x 9V outputs will suit most pedal collections.
Being able to daisy chain your pedals thanks to the 300mA per output as well as the extra 12V and 18V outputs adds flexibility that some guitarists may find useful.
While I really liked Vangoa’s previous pedalboard, the VPPD-S, the extra size of the PD-M is far more useful when you have more than a few pedals.
Check out the PD-M Pedalboard on Amazon here.
Vangoa PD-M Pedalboard Pros
- Built-in isolated 9V (10 x 300mA) power supply
- 12x power connection points
- Great build quality
- LED strip looks great when sensitivity is adjusted properly
- Good carry case and accessories
Vangoa PD-M Pedalboard Cons
- Only ships with US power supply
If you like this pedalboard’s features but want something smaller, check out my review of the Vangoa VPPD-S here.
Useful Resources
Check out these guides to help you get more out of your pedals and pedalboard:
- How to Use Guitar Pedals
- Guitar Effects Course
- Beginner Guitar Pedal Rig: Setup and Recommendations
- How to Power Guitar Pedals
- How to Daisy Chain Guitar Pedals
Related Guides and Lessons:
Klowra Verdict Poly Octaver Pedal Review
ALABS Timeslip Delay Pedal Review
KYRO DULO 830 Guitar Pedalboard Amp Review
How to Use Guitar Pedals: Complete Guide for Beginners
Ultimate Guide to John Mayer: Tone, Gear, Effects (John Mayer's Guitar Rig)
How to Build a Fuzz Factory Clone (DIY Guitar Pedal Kit)

