
Building your own guitar pedals is such a rewarding thing to do and can be a great way to develop your own unique guitar voice.
DIY guitar pedals may seem intimidating if you’ve never dealt with electronics before, but in this guide, you’ll learn everything you need to know to get started.
In this guide, you will learn:
- Why you might want to build your own guitar pedals
- Equipment you need
- The different ways you can build guitar pedals
- PCBs, components, enclosures, and kits explained simply
- Different ways to paint or style your pedals
- Easy types of guitar effect pedals to build
- Where to buy kits and parts
By the end of this guide, you’ll know enough to buy a DIY guitar pedal kit and start building your own pedals.
Want to learn about different types of effects? Check out my Guitar Effects Course here to learn about all types of effects pedals.
Why Build Your Own Guitar Pedals
Building your own guitar pedals requires you to buy some equipment and to learn new skills. So why would you want to build pedals when you can easily buy them in stores?
Here are a few common reasons why so many guitarists love to build their own pedals and why you might want to as well.
Build Iconic Effects
A great reason you might want to build your own pedals is to access iconic effects and tones from vintage or classic pedals.
There are so many guitar pedal schematics and kits available that allow you to build guitar pedals that aren’t available in stores.
For example, a real Klon Centaur like the one shown below (read all about the Klon Centaur here) often sells secondhand for well over $2,000 US.
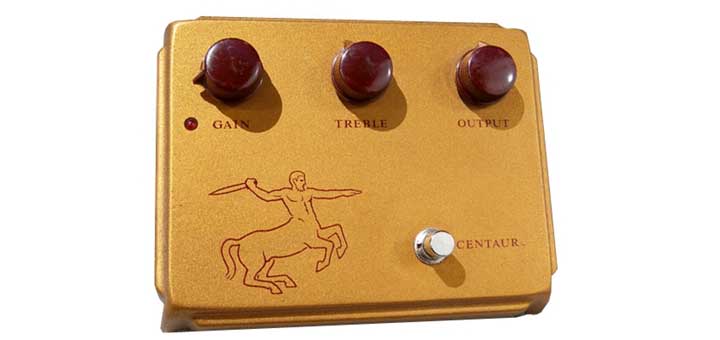
While you might not want to pay $2,000+ to buy the real thing, you can easily build your own ‘clone’ for a fraction of the price.
You can see how I built a Klon Centaur clone from a kit step-by-step in this tutorial. For about $50 for the kit, I now have a great sounding pedal in my rig based on an iconic effect.
It’s the same with so many other iconic pedals. If there’s a pedal you like the sound of, the chances are you can build an exact copy of that pedal on your own.
Modify and Tweak Your Effects
The most common reason guitarists get into DIY guitar pedals is that it allows you to tinker and modify your effects to suit you.
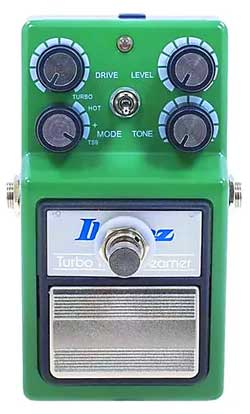
You may have heard about mods you can add to existing pedals such as the Tubescreamer. By changing components or adding extra circuitry, you’re able to enhance or change the tone a pedal produces.
Building your own pedal from a kit or from scratch allows you to craft effects that you can’t find in a store-bought pedal.
Experienced guitar pedal builders are able to swap components in and out and tweak the circuitry to perfectly match the tones they want.
If you’re just getting started with building guitar pedals, this is useful to keep in mind for later on. Start simple and you’ll quickly see how fun it can be to tweak and change pedals.
It’s a Fun Hobby
Even if the thought of soldering a guitar pedal circuit together is daunting to you right now, you might be surprised by how fun it can be once you learn the basic skills.
There are guitar forums and sites filled with guitarists who love building custom pedals.
I’ve only recently got into building pedals and I can tell you that it’s an incredible feeling to power up the newly soldered circuit and hear the effect come to life.
Taking a handful of components and turning them into part of your guitar tone is ridiculously fun.
Equipment You Need to Build Guitar Pedals
The good news is that you can get into building your own pedals without needing too much equipment.
The absolute minimum equipment you need to build a guitar pedal is a soldering iron, solder, wire cutters, and a multimeter.
There are other tools and equipment to make your job easier, but you can still build guitar pedals with very few tools.
Let’s go through the basic equipment you will need or may want to buy.
Soldering Iron
Building a guitar pedal requires you to use a soldering iron.
If you’ve never used a soldering iron before, don’t be intimidated by the thought of using one. It’s a simple skill to use and easy to practice.
Any soldering iron rated above 30W will work fine when building your guitar pedals.
You can buy pretty much any cheap soldering iron and it should work fine.
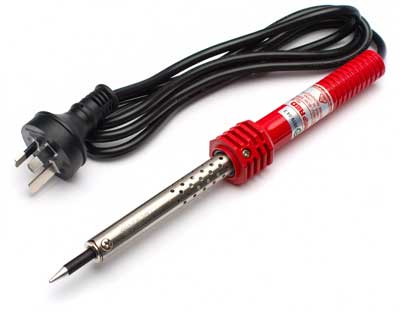
I used a soldering iron like the above photo for a long time on many projects including changing the pickups in my guitar.
If you want to make your life easier, I recommend buying a soldering iron station with temperature control as shown below:
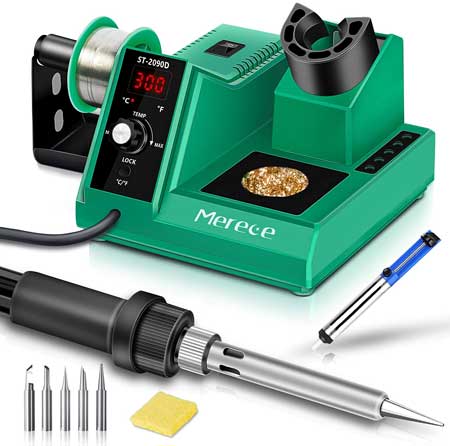
Check out this soldering iron kit for more details (link to Amazon).
I recently upgraded my cheap soldering iron to a station like this one with temperature control and it did make things much easier. Having a holder for the solder and a place to clean the tip all built into the station was surprisingly useful.
Being able to adjust the temperature will allow you to dial in the perfect setting so you don’t overheat components.
Recommendation: any cheap soldering iron above 30W will be fine.
If you want to go all out, I regularly see glowing endorsements of the Hakko soldering station.
The Hakko is expensive compared to a cheaper soldering station like this one, but if you plan on using it often, it might be worth it.
Solder (Required)
Along with a soldering iron, you’ll need solder to wire up your guitar pedals.
There are two main types of solder you will see for sale: lead-based solder and lead-free solder.
The main difference between the two to keep in mind is the melting temperature. Lead-based solder has a lower melting temperature, so it is easier to work with.
Typical lead-based solder is sold with a ratio such as 50/50 or 60/40. The first number is the tin in the solder and the second number is the lead. So 60/40 solder contains 60% tin and 40% lead.
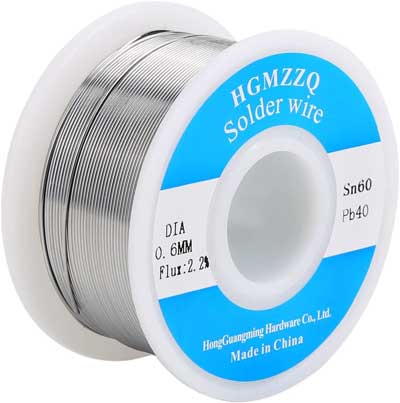
I suggest using a 60/40 lead-based solder like the one shown above in a well-ventilated area for the best results.
Recommendation: Buy 60/40 lead-based solder like this one. The small diameter and rosin core make it easy to work with when building guitar pedals.
Wire Cutters / Wire Stripper (Required)
If you think of soldering your guitar pedal as half the job, the other half is cutting and preparing wires.
A decent set of wire cutters and a wire stripper makes this job simple.
The below photo shows a few different options on the types of tools you can buy for this job.
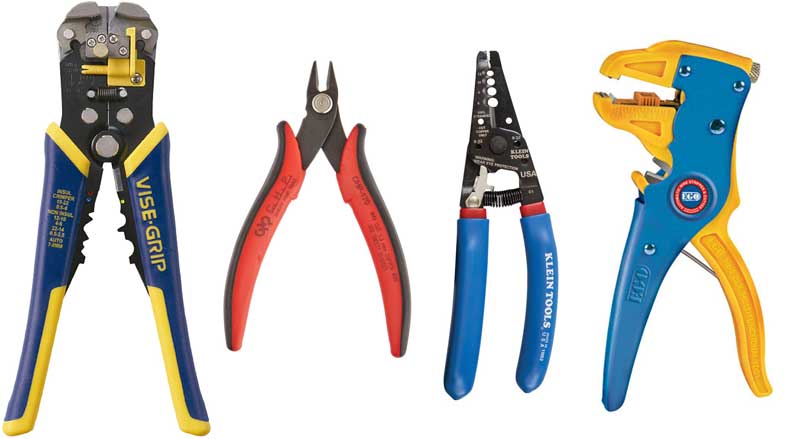
Whenever you need to solder wires to a PCB (explained later), you need some of the wire exposed.
A simple wire cutter can be used to strip wires, but it takes some practice. Using a wire stripper is much easier.
I suggest getting a set of wire cutters as well as a separate tool to strip the ends of the wires. The below shows what I mean when I say strip the ends of the wires:
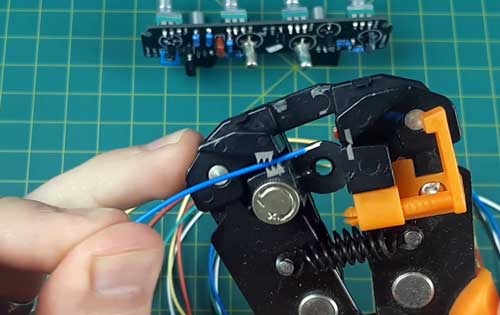
You can see that the wire stripper I use grabs the wire and removes the plastic to the exact length I want.
This wire stripper is very similar to the one I use and I highly recommend one like this. It doesn’t tug on the wires like other types of wire strippers, so you’re less likely to damage the wire or your other components.
Recommendation: buy any small wire cutter and a wire stripper like this one.
Multimeter (Required)
While you can technically build a guitar pedal without a multimeter, you’ll quickly run into headaches if you don’t have one.
A multimeter is a small device you can use to test your guitar circuit, find mistakes, and make sure everything is wired up properly.
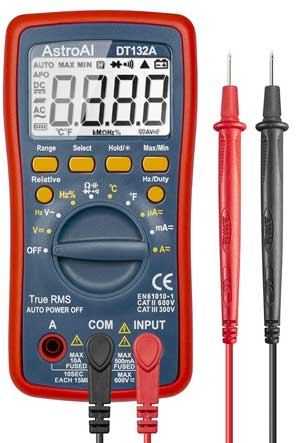
Once I learned how to use a multimeter, I found that I could use it for a lot of guitar and non-guitar projects.
The good news is that they’re cheap and they all work more or less the same.
I explain how to use multimeters in my step-by-step guitar building tutorials. So don’t worry if it looks intimidating, you’ll quickly learn how easy they are to use.
Recommendation: buy an auto-ranging multimeter like this one.
Needle Nose Pliers (Recommended)
As you might expect, things can get pretty cramped in a small guitar pedal as you pack everything in.
Wiring up the footswitch and input/output jacks can be awkward if you’re trying to use your fingers to push the wires through the holes.
Using a set of needle-nose pliers makes this job a breeze.

They give you more control than your fingers in threading wires into holes or holding things in place.
Recommendation: buy a kit with a few different pliers like this one.
Alligator Clips (Nice to Have)
Testing your pedal before you pack it into a guitar pedal enclosure is an important step.
While it’s possible to test everything using only wires and some tape, a set of electronics alligator clips make the job nice and easy.
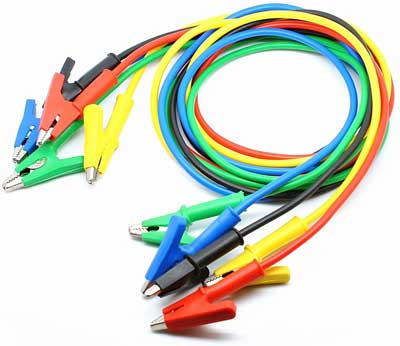
With alligator clips, you can easily test components or your entire pedal circuit without having to solder everything together.
You can also clip them onto your multimeter probes for some hands-free testing.
Recommendation: buy a set of alligator clips like these ones.
Third Hand (Nice to Have)
One of the first things you’ll realize when you get into building pedals is that you wish you had extra hands.
It can be awkward to hold the soldering iron in one hand, hold the solder wire in your other hand, then try and keep the component or wire in position on the board.
There are plenty of ways you can try to keep everything in position such as using tape or Blu Tack.
A better option I found is to use what is called a ‘third hand’ as shown below:
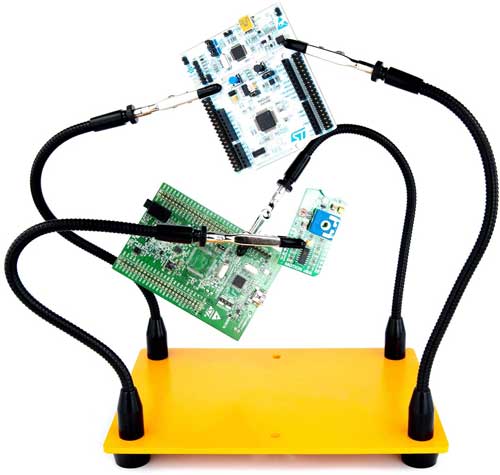
The basic idea is that you use these flexible arms to hold your components, wires, or board in position while you solder them.
There are third arm kits you can buy that includes a magnifying glass, but there are better options if you had poor eyesight (covered next).
Recommendation: buy a third hand with multiple flexible arms like this one.
Magnifying Headset (Nice to Have)
If you have good eyesight, you can instantly skip this one.
If your eyesight isn’t the best for small or up-close things, a magnifying headset like the below photo might be worth considering. My eyesight is decent, but I do find that I’m usually struggling to see clearly what I’m soldering.
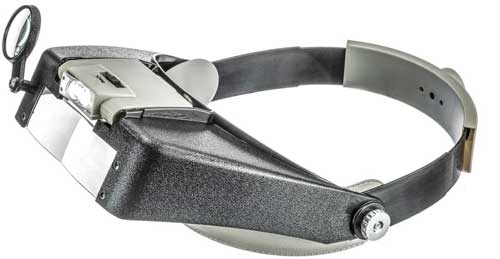
While you will look completely ridiculous to anybody else seeing you wear this, they can make the job of soldering tiny components and wires together less of a strain.
Recommendation: if you struggle with seeing small items, grab yourself a cheap magnifying headset like this one.
Small Fan (Nice to Have)
As mentioned earlier, lead-based solder is the easiest to work with, but it produces toxic fumes.
An easy way to solder anywhere you want while still having good ventilation is to use a small desktop fan.
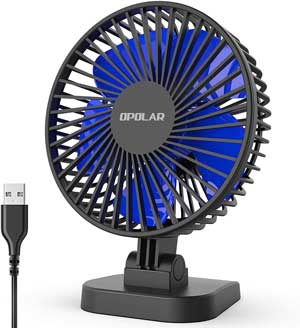
Position the fan so it will blow the fumes away so you don’t end up with a face full of smoke.
A handy tip is to face the fan in the opposite direction of what you’re working on to pull the smoke away from your work.
Recommendation: a small USB-powered fan like this one is cheap and handy to have.
Different Levels of Building Guitar Pedals
The good news about building your own guitar pedals is that there are easy ways you can get started without any electronics or soldering experience.
Before you dive into building full pedalboards worth of DIY pedals, let’s have a quick look at some different ways you can build pedals.
You might be perfectly happy building simple kit pedals, or you may want to work your way through the levels until you can design and build custom guitar pedals from scratch.
Here’s a quick look at what is involved at each level:
Level 0: Mod Existing Pedals
I call modifying existing pedals ‘level 0’ because you’re not quite building your own pedal, but you will use many of the same skills and equipment.
Many guitarists get started building guitar pedals by first modifying their existing pedals. You can find mods online for a wide range of pedals.
From replacing LEDs, adding tone knobs, upgrading components, or adding extra features, there are a lot of ways you can modify pedals.
Skill level: Beginner. Only requires basic soldering and following instructions. As you learn more about pedals, schematics, and circuits, you can modify almost any pedal.
Level 1: DIY Guitar Pedal Kits
This is where most guitarists should get started with building pedals. Buying a guitar pedal kit gives you the proper experience of building a complete pedal.
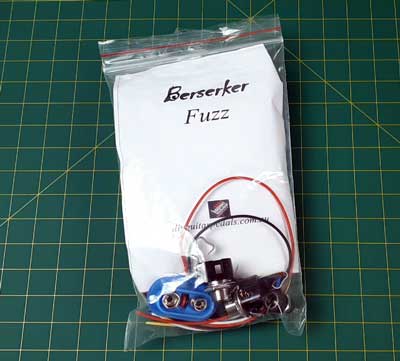
Think of this as building a lego set. You start out with a bag full of components, an instruction sheet, and you need to put it all together.
The great thing about building guitar pedal kits is that it makes the process as simple as possible. You don’t need to figure out what components to buy. You get everything you need in the kit.
Keep in mind kits can come in a variety of difficulties depending on the circuit. A fuzz pedal kit with 7 components is quicker and easier to build than a Klon clone kit with 30+ components.
Skill level: Beginner. Once you get the hang of soldering, you’ll be able to buy pretty much any kit and put it together. Some kits are easier than others, but everybody can learn to build kits.
See this level in action: I have built a few guitar pedal kits and documented each one. See how I built a Fuzz Factory clone from a kit in this guide.
If you’re hesitatnt about whether building guitar pedals will be too hard, check out one of the easiest pedals you can build in my 7-minute Fuzz Pedal Tutorial here.
Level 2: Buy a PCB
The next step up from buying a kit is to buy the PCB (Printed Circuit Board) and put your own kit together.
While building the pedal isn’t any harder compared to building a kit pedal, it does require more time and effort. Once you find a PCB for a pedal you want to build, you need to source all of the correct components separately.
The good news is that there are many electronics and DIY guitar pedal websites where you can easily source all the components you need in one place.
Once you build a couple of kits, I suggest giving this level a try.
If you can learn to put your own kit together after buying a PCB, you’ll be able to build a massive range of pedals. There are great websites that sell guitar PCBs, so you’ll have an endless range of pedals to choose from.
You can either buy a premade PCB, or order one from a layout somebody has created.
Skill level: Intermediate. You need to have a basic understanding of electronics components to build a pedal at this level. But it’s worth the effort to build some truly unique pedals.
Level 3: Etch Your Own PCB
The next step up from buying a pre-made PCB is to create your own PCB.
While this might seem extreme, a lot of people regularly do this instead of ordering premade PCBs.
There are two ways you can create your own custom PCBs. You can either etch them yourself at home or get a company to manufacture them for you.
At this level, you can either design the PCB layout yourself (covered in the next level), or download a PCB layout somebody else has made.
Skill level: Advanced. Etching your own PCB can be difficult if you don’t have the right equipment. Once you know how to etch PCBs, you suddenly have a lot more freedom in what type of guitar pedals you can create. Instead of relying on buying kits or premade PCBs, you can create your own.
See this level in action: I’m still trying to figure out a foolproof method to etching PCBs. I have ordered a PCB to be manufactured from China for a reverb pedal and I’m waiting for it to arrive. If you’re interested in seeing what is involved in manufacturing PCBs or building a pedal from one, subscribe to email updates to be notified on future build guides.
Level 4: Design Your Own Pedal Circuits
The ultimate level of building guitar pedals is to build one completely from scratch. Starting with a breadboard (a prototype board), you build up and tweak your circuit design and work your way to your own custom guitar pedal.
At this level, you can get the schematics for any pedal and tweak and change things as you like.
Many big-name guitar pedals were created this way. Once you learn how each component in a guitar pedal circuit impacts the effect, you can start designing your own custom pedal circuits.
Skill level: Advanced. Being able to design your own pedal from scratch requires a good understanding of circuit design. This is a skill that everybody can learn, so if you’re interested in designing your own pedals, work your way through the other levels first.
Guitar Pedal Hardware Explained
Building your own guitar pedals can seem daunting if you’re unfamiliar with all the different types of components and hardware used to build a pedal.
Once you learn the basics of all the hardware and components you’ll be using, you’ll feel far more confident. Read through this section to learn about all the main components and parts used to build guitar pedals.
Pedal Enclosures
The pedal enclosure is the casing you’ll mount the pedal circuitry to. Most pedal enclosures are made out of aluminum, but some DIY makers use alternate enclosures such as tins, plastic, or even wood.
There are a number of different guitar pedal enclosure sizes to suit different pedal projects. Some pedals use simple circuits that can be squeezed into tiny enclosures, while others use larger PCBs or have more knobs that require larger enclosures.
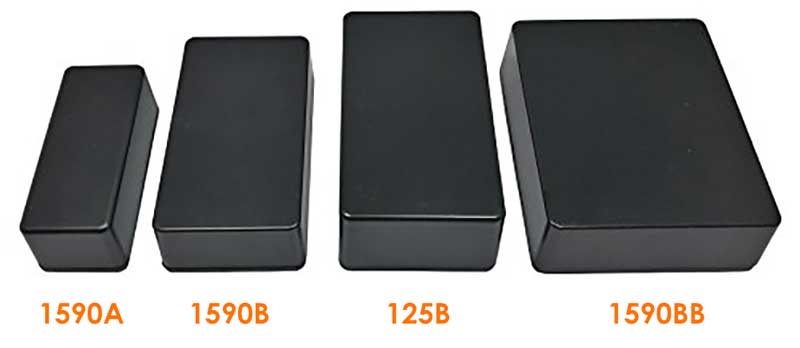
Here are the dimensions of the most common guitar pedal enclosure sizes:
- 1590A: 3.64 x 1.52 x 1.06″ (92 x 39 x 27 mm)
- 1590B: 4.4 x 2.38 x 1.06″ (112 x 60 x 27 mm)
- 125B: 4.77 x 2.6 x 1.39″
(121 x 66 x 35 mm) - 1590BB: 4.67 x 3.68 x 1.18″ (119 x 93 x 30 mm)
If you plan on using a battery to power your pedal, make sure the enclosure provides enough room for the circuitry as well as the battery (eg: a battery will not fit in a 1590A enclosure).
Footswitches
Footswitches allow you to turn your pedals on or off, or to select different modes or settings.
There are two types of footswitches to be aware of: momentary and latching.
Momentary footswitches enable part of the circuit only when you hold the switch down. Latching footswitches toggle between two states every time you press them.
Most guitar pedals will use latching footswitches. So if a DIY pedal kit doesn’t mention that it requires a momentary footswitch, you can assume it uses a latching footswitch.
While there are a few different types of wiring used in footswitches, the most common is called ‘3PDT’.
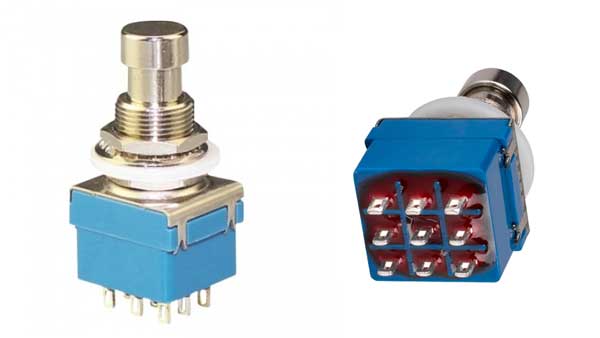
A 3PDT – Three Pole Double Throw – footswitch has a 3×3 grid on the back as shown above.
While this might look intimidating at first, there are plenty of diagrams that explain how to wire these up for any pedal you build.
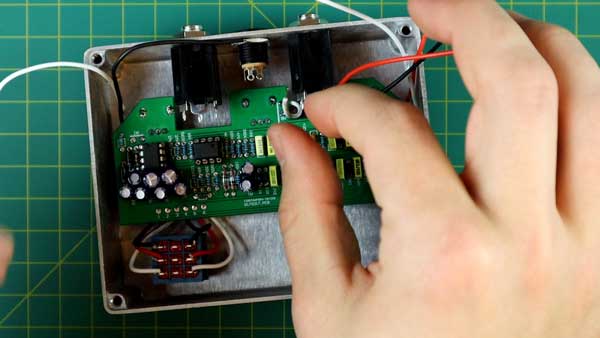
PCBs
A PCB is a Printed Circuit Board and is the most common way to wire up a guitar pedal circuit.
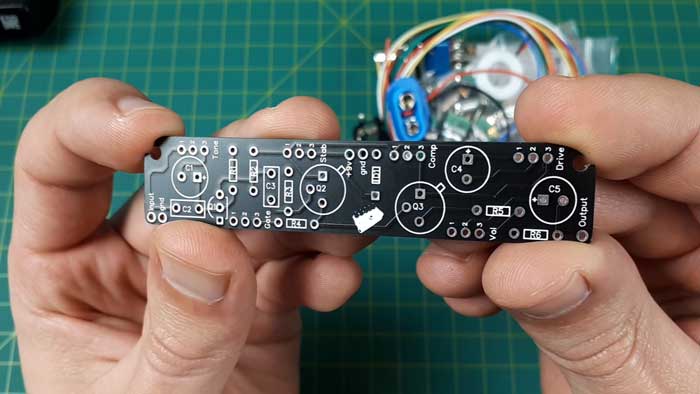
The above photo shows the PCB for a Fuzz Factory clone I built as covered here. Most PCBs clearly label where all the components go (as this one did), while others don’t.
The big advantage of using a PCB is that it makes building your pedal simple. It’s easy to figure out where everything goes and the PCBs make soldering easier.
You can even design and manufacture your own PCBs if you really get into this hobby.
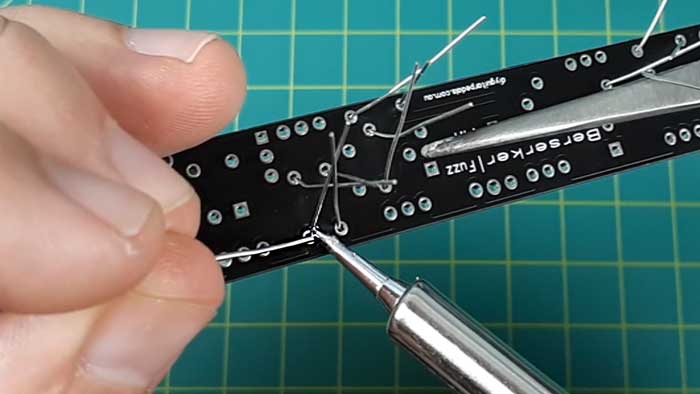
Some DIY pedal makers use veroboard or perfboard instead of a PCB.
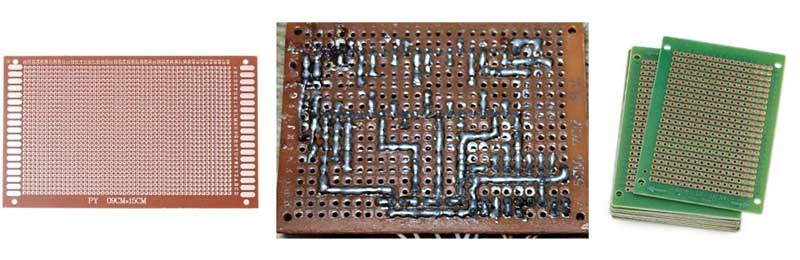
The advantage of using one of these boards is that you don’t need to rely on buying somebody else’s PCB. Some websites provide layouts on how to build a pedal using perfboard.
The disadvantage of using veroboard or perfboard is that it can be confusing at first and you’re more likely to experience issues with incorrect soldering or wiring.
You can see in the above photo that building a guitar pedal using perfboard requires accurate soldering.
I recommend sticking to using PCBs for your first few builds and only try using perfboard once you feel comfortable with building pedals.
Components
The wide range of components you’ll see in guitar pedal circuitry can seem overwhelming at first.
The good news is that there are only a few main types of components you need to learn to build pedals.
Here is a simple diagram showing the most common components you’ll be using:
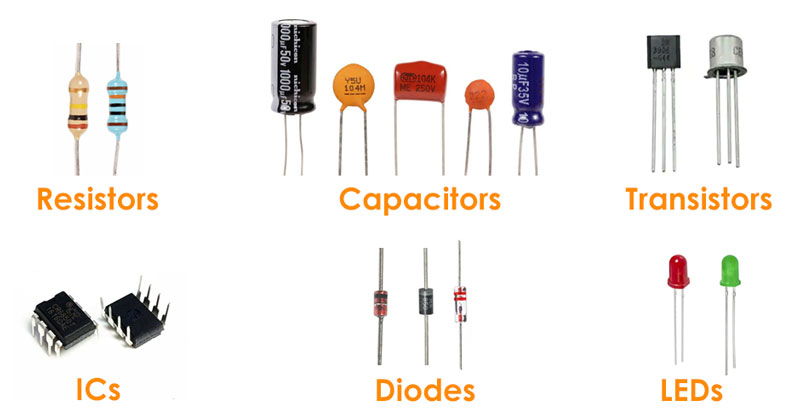
Here’s a brief description of the most common components:
- Resistors: usually either a cream or blue color and have four or five colored lines to describe the value (use a chart to read them)
- Capacitors: come in a few different shapes and sizes from small ceramic discs to large cylinders
- Transistors: three-legged and uses either black (silicon) or metal (germanium) casing
- Integrated Circuits (IC): black chips with six or more legs/pins
- Diodes: plastic or glass casing with a line on one side
- LEDs: typically used to indicate if a pedal is switched on or not
In my build guides, I go into more detail on these components as they are used in each build.
Guitar Pedal Finishing Options
There are a lot of ways you can paint or style your guitar pedals. From keeping a raw casing to printing custom graphics, you can create some impressive looking guitar pedals.
Here are some examples of different methods you can use to finish your guitar pedals:

Here’s a brief description of the most common ways to design or paint your guitar pedals:
- Raw: just leave the enclosure as is
- Polished: use fine sandpaper and polish to create a smooth and reflective pedal
- Etching: create a 3D effect on the pedal by etching a design into the metal
- Paint: many different colors and finishes are possible with spray cans
- Hand-painted: create custom artwork using paint or pens
- Hydro dip: create unique swirling patterns on your pedals (check out this Hydro Dipping tutorial)
- Waterslide decals: print off your own graphics or text to add to your pedal
- Screen printing: professional-looking artwork applied directly to your pedal
- Powdercoating: very high-quality finish
- Stickers: vinyl stickers can be cut with almost any design
- UV laser: print professional artwork directly on your pedal
Some of these methods are easier than others, so I intend to cover every single method in future tutorials.
Types of Guitar Pedals to Build
There is a massive range of different types of effects you can build in your own guitar pedal.
The type of guitar pedals you can build include fuzz, boosters, overdrive, tremolo, phasers, reverb, delay, chorus, and more. You can easily find DIY kits for all of these effects.
Many effects use ridiculously simple circuits that are perfect for anybody wanting to build their first guitar pedal. For example, here’s the inside of the classic Fuzz Face:
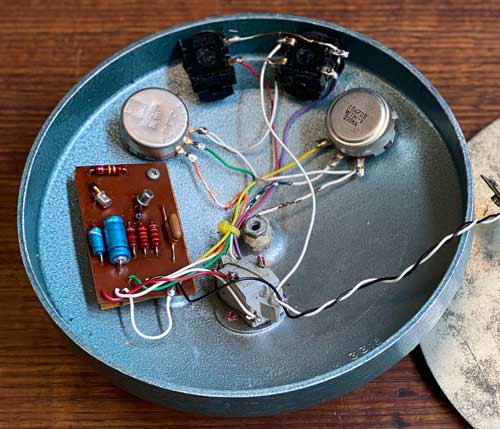
Pretty simple, right? With only nine components on that board, this is a pedal anybody could build.
If you’re new to building guitar pedals, I recommend starting off with a simple circuit such as a fuzz, a boost, or a simple drive pedal.
Once you get the hang of soldering, testing, and mounting your guitar pedal, you can move on to more complex circuits and different types of effects.
Most Popular Guitar Pedals to Clone
Many guitarists first get into building pedals to build a clone of iconic effects.
Building a clone can often be significantly cheaper than buying the real pedal, but it also gives you an opportunity to learn about the effect or modify it.
Here are some of the most popular guitar pedals to clone:
- Tubescreamer
- Big Muff Pi
- Fuzz Face
- Klon Centaur
- ProCo Rat
- BOSS DS-1 Distortion
- BOSS BD-2 Blues Driver
- Electro-Harmonix Small Stone
- MXR Dist+
- Tone Bender
You can see that most of these are drive pedals and they all use fairly simple circuits.
There are DIY kits available for all of these pedals and you can easily find kits and schematics for many more iconic guitar pedals.
If you’re interested in building a clone, one of the above pedals is a good starting point. Not only are there a lot of kits readily available for these popular effects, but there will be a lot of forum posts and advice online on how to build them or troubleshoot problems.
See my Fuzz Factory clone build guide, my Klon Centaur build guide or my 7-minute-fuzz build guide for examples of building a clone from a kit.
DIY Guitar Pedal Resources
There are a lot of websites dedicated to selling guitar pedal kits and parts.
Here are some popular sites worth checking out for kits and parts:
- Build Your Own Clone (BYOC)
- Madbean Pedals
- MOD Kits DIY
- Guitar PCB
- DIY Guitar Pedals
- General Guitar Gadgets
I recommend starting with a kit that includes everything you need, then you can try the next level and buy PCBs separately.
Here are some sites to check out for guitar pedal schematics and PCB layouts:
Even if you buy a kit, I recommend reading up on the pedal and learn about the schematics.
Learning to read schematics helps during troubleshooting and finding problems. It also teaches you how the pedal works, which is handy if you want to modify pedals or design your own circuits.
DIY Guitar Pedal Kit Tutorials
The easiest way to get started with building your own guitar pedals is to start by building a few kits.
Here are some detailed step-by-step tutorials that show how to build different guitar pedal kits:
Here are some other DIY Guitar Pedal guides to check out:
- How to Build a Klon Centaur Clone from a Kit
- 7-Minute Fuzz Pedal Tutorial
- How to Build a Fuzz Factory Clone from a Kit
Even if you don’t intend on building these exact pedals, I recommend reading through these tutorials as I explain the components, steps, and best practices in detail.
Reading the above tutorials is a great way to learn how to build pedals before you even get your hands on a kit.
DIY Guitar Pedal FAQs
Here are some common questions you might have about building your own guitar pedals.
What is the Easiest Guitar Pedal to Build?
The easiest guitar pedal to build is a fuzz or boost. A simple fuzz or boost pedal can have less than 10 components and is very easy to build.
I built this 7-Minute Fuzz Kit for an upcoming guide to show how easy building guitar pedals can be.
How Do You Make a Guitar Pedal From Scratch?
To make a guitar pedal from scratch, you need to have a good understanding of circuits and how other guitar effects work. Start by building a clone of a popular effect. Then try a few mods to learn how they change the effect. Then you can move on to breadboarding your own effects.
Once you learn how most guitar pedals work, you can start to design your own circuits.
How Do You Read a Pedal Schematic?
A guitar pedal schematic is no different from any other electronics schematic. To learn how to read a schematic, read a book on basic electronics, or watch a video explaining schematics.
Once you learn the basic symbols used, you’ll be able to read any guitar pedal schematic.
How Do I Start a Guitar Pedal Company?
If you want to start a guitar pedal company, start by building pedals for friends. Once you build a few pedals, you can look at selling your pedals locally using social media or a website. If people like your pedals, you can start trying to sell to a wider audience.
Focus on selling a few pedals before you try to grow your business. Anybody can start a guitar pedal company, but growing one to a large size takes time, effort, and sales.
How Do I Troubleshoot a Guitar Pedal?
If your guitar pedal isn’t working, there can be a lot of possible causes. Here are some steps to troubleshoot a guitar pedal that isn’t working:
- Check your input/output jacks are wired the right way
- Try a different power source and check the wiring polarity
- Look over your circuit for any bridges or bad connections
- Use a multimeter to check that the circuit is getting power
- Use a multimeter to make sure everything that should be connecting to ground has proper connections
- Reflow any suspicious-looking solder joints
- Use an audio probe to find problem areas in your circuit
Most problems with guitar pedals are due to bad solder joints or bridges. Most of my mistakes were found using an audio probe.
Can I Sell Guitar Pedals I Build?
You can sell the guitar pedals you build. If your pedal works as it should and looks good, people will want to buy it. If your pedal is a clone of another pedal, mention it when selling it.
There is some debate over the ethics of selling clones of guitar pedals. To avoid issues, be transparent over what your pedal is, and don’t try to sell it as if it is the real thing (eg: don’t pretend your Klon clone is a real Klon).
This is one guide in a long series of guides, tutorials, and videos I am working on to help you build your own guitar pedals.
Subscribe to email updates here to stay up-to-date on new DIY guitar pedal guides.
Here are some other DIY Guitar Pedal guides to check out: