
This guide will cover everything you need to know to build your own guitar amp speaker cabinet.
Here’s what you will learn in this detailed guide:
- How to plan your guitar cabinet build
- Tools and supplies you need
- Step-by-step build process
- Advice on cabinet plans
- Guitar speaker wiring diagrams
- Tips for your first cabinet build
- FAQs
This is an extremely thorough guide, so if you’re planning on building your own guitar cabinet, you might want to favorite/bookmark this page for easy access.
How to Plan Your Guitar Cabinet Build
Before you dive into building a guitar speaker cabinet, there are a few choices you need to make.
Let’s go through the main choices you need to make when building your guitar amp cab.
Type of Wood
The type of wood you should use for a guitar cabinet is plywood or hardwood.
Plywood is the most common choice if you want to cover your cabinet in Tolex. You won’t see the wood underneath the Tolex, so plywood is a great option.

Good quality plywood will be straight and won’t warp over time. Most guitar cabinets you can buy are built using plywood.
Most guitar cabinets are built with plywood around 15-18mm thick (approx 5/8 to 3/4″).
If you want to have a cabinet where you can see the wood (with stain or varnish), a nice hardwood is the best choice.
Hardwood cabinets can look stunning when you use an interesting wood and are careful with the building process.
Maple, walnut, and mahogany are three very popular choices that can look great with a good finish applied.
While you can technically build a guitar cab out of MPF or particle board, it’s not recommended. MDF can easily warp due to moisture and degrade over time.
Cheap cabinets are often made out of MDF or particleboard, so if you’re going to put the time and effort into building your own cabinet, you may as well produce a good quality one using good materials.
Key point: use plywood for a Tolex cabinet or hardwood for a wood-finished cabinet.
Open Back or Closed Back
Guitar amp cabinets can be built with a closed back, an open back, or a partially open back.
Having the back of the cabinet open or closed can drastically change your sound.
An open-back guitar cabinet projects sound from the front as well as the back. This can fill a room up with space far more than a closed back cabinet.
Open-back cabinets are useful during band practice or live performances. The cabinet will spread the sound around which helps other band members hear your guitar.
A closed-back cabinet can only project the sound from the front, which results in a more focused and punchy tone. The bass response is tighter compared to open-back cabinets.
Having a closed-back cabinet during a live performance or band practice can be difficult as the sound only projects clearly directly in front of the cabinet. If a drummer sits behind your closed back cabinet, they may not hear your guitar.
At the same time, a closed-back cabinet is easier for the sound engineer as there will be no spillage onto other instruments (eg: drum microphones).
Features of open-back cabinets:
- Can fill a room with sound
- A more natural and even tone
- More higher frequencies and looser bass
Features of closed-back cabinets:
- Tight and punchy bass and mid frequencies
- No sound spillage
- Directional sound projection
If you’re unsure whether you want a closed-back or open-back cabinet, consider building a cabinet with a removable back panel (shown below). You can add and remove panels as you like to get the best of both worlds.

Key point: having an open or closed back cabinet changes your tone in different situations, so think about how you plan on using your cabinet.
Type of Guitar Speakers
There are a lot of different types of guitar speakers you can buy for your cabinet.
Different guitar speakers will suit different styles of music and can have a significant impact on your tone.
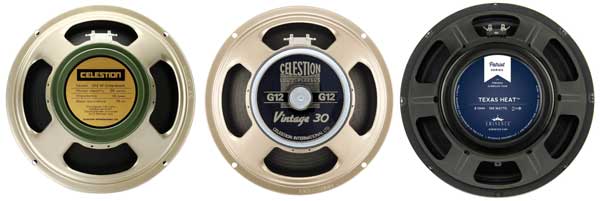
Here are some of the most popular guitar speakers:
- Celestion Greenback
- Celestion Creamback
- Celestion Vintage 30
- Eminence Texas Heat
- Eminence George Alessandro
- Jensen MOD
- WGS Veteran 30
I reached out to a few speaker-selling websites to find out what their best-selling speakers were and the above list shows the most popular models.
You might notice that a lot of popular guitar speaker models are inspired by or a direct result of vintage amps. But just because a speaker is based on vintage hardware, it doesn’t mean it’s only for vintage-style guitar tones.
For example, the Celestion Vintage 30 is popular with metal guitarists. When used in a modern metal rig, it definitely doesn’t produce a vintage tone.
So while you will see a lot of advice saying something like “use X speaker for vintage blues”, there are no clear rules on which speakers work best with different styles of music.
I recommend watching videos on YouTube that directly compare different speaker tones.
Listening to the different models in a back-to-back comparison is a far better way to decide which speaker to buy compared to reading a specifications list.
The above YouTube channel (Zilla Cabs) creates excellent comparisons of different speakers. You can hear the subtle (and sometimes not subtle) differences between different speakers in these videos.
Key point: there are many great guitar speakers to choose from and there’s no easy answer for which one to buy. Listen to some comparison videos to get a better idea of the characteristics of each model.
Number of Guitar Speakers
When you plan your cabinet, you need to decide whether you want to use a single speaker or multiple speakers.
The most common guitar cabinets use one, two, or four speakers.

Having a single speaker in a cabinet creates a focused sound, while multiple speakers spread the sound out and blend the soundwaves between the speakers.
If you use multiple speakers, you can choose whether to use the same speaker models in the cabinet or mix different models. Some guitarists like to mix different types of speakers in a cabinet to achieve a blend of different tones.
If you plan on using multiple speakers in a cabinet, you will need to think about wiring them in series or parallel. Read the ‘Guitar Speaker Wiring Diagrams’ section later in this guide to learn how to properly wire up multiple speakers in a cabinet.
It’s also a good idea to think about the overall weight of your guitar cabinet. The more speakers you want, the bigger and heavier your cabinet will be.
Taking a 1×12 cabinet to band practice is much easier than dragging a massive 4×12, so keep weight in mind when planning your build.
Key point: having multiple speakers changes the spread of the sound, overall volume, and weight of the cabinet.
Size of Guitar Speakers
The most common guitar speaker sizes are 8″, 10″, and 12″.
8″ speakers are common in small combo amps, while 10″ and 12″ speakers are far more common in standalone cabinets.

The number in the speaker model usually tells you the size of the speaker. For example, the ‘G12’ in Celestion models are for 12″ speakers and the Jensen MOD 10 is for a 10″ speaker.
The size of the speaker changes the tone you end up with. A small speaker will produce less bass and more high-end frequencies compared to a larger speaker.
If you listen to the tone from a small 8″ combo amp and compare it to a cabinet with a 12″ speaker, it will be obvious why the most popular speaker sizes are 10″ and 12″.
If you want to build a cabinet with a single speaker, I recommend using a 12″ speaker (called a 1×12 cabinet).
If you want to build a cabinet with multiple speakers, I recommend using either 10″ or 12″ speakers (eg: 2×10, 2×12, 4×12).
It’s also worth mentioning that the size of the speaker makes a big difference in the overall weight of the cabinet. Larger speakers weigh more than you would expect based on the size difference.
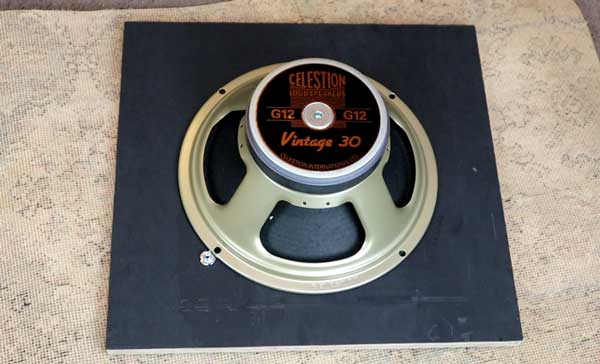
For example, take a look at the size of the magnet on the back of the speakers in the earlier photo. The weight of the magnet in the 12″ speaker is 1.4kg (50oz) while the magnet in the 8″ speaker only weighs 0.4kg (13oz). The 12″ speaker magnet is 3.5x heavier than the 8″ speaker magnet.
Key point: build your cabinet with either 10″ or 12″ speakers.
Speaker Impedance
The impedance of your speaker is crucial to get right. If you use the wrong speaker impedance with an amp that doesn’t support it, you can cause serious damage to your gear.
Guitar speakers can have an impedance of 4 ohms, 8 ohms, or 16 ohms.

If you’re building a cabinet with a single speaker, ensure the speaker impedance matches the impedance of your amp.
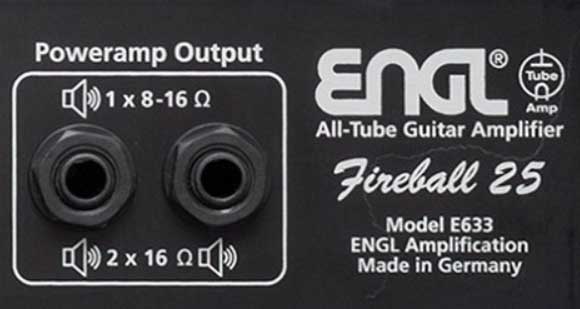
For example, the above photo shows the speaker outputs from my ENGL Fireball 25.
You can see that you can plug in a single 8-ohm or 16-ohm speaker, or two 16-ohm speakers. The speaker I used for my build is 16 ohms, so it can safely be used with this amp. Plus, if I want to connect another cabinet in the future, I can plug in another 16-ohm speaker. If I bought an 8-ohm speaker, I’d still be able to use it, but I wouldn’t be able to plug in another cabinet in the future if I wanted to.
If you plan on building a cabinet with multiple speakers, you need to wire them up in a way that will work with your amp.
Read the ‘Guitar Speaker Wiring Diagrams’ section later in this guide to learn how to properly wire up speakers of different impedances.
Key point: make sure the speaker impedance is compatible with your amp and wired properly.
Speaker Power Rating
Guitar speakers all have a power rating measured in watts (eg: 60W is 60 watts).
The power rating of the speaker you buy depends on the amp head you plan on using.

Make sure your speaker has a power rating that exceeds the power rating of your guitar amp.
For example, if you use a 100-watt guitar amp and you plan on using a single 60-watt speaker, the amp can easily overpower the speaker and blow it.
If you use a 30-watt guitar amp with a 60-watt speaker, your speaker will be completely fine. Even if you crank your amp to full power, the speaker’s higher power rating will keep it safe.
In my build, I’m using a 60-watt speaker with a 25-watt guitar amp. This means I can safely crank the amp to full and it won’t overpower the speaker.
If you plan on using multiple speakers, make sure the total power rating of the speakers exceeds the power output of the amp.
Key point: use a speaker with a higher power rating than the amp you want to use.
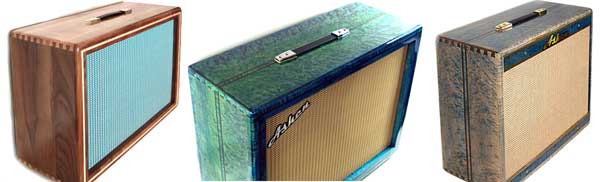
Wood Finish or Tolex
Guitar cabinets can have a number of different finishes and coverings. It’s your cabinet build, so you can finish your cabinet in any way you want.
The most common finishes are Tolex, Tweed cloth, or a natural wood look:
Tolex is a type of vinyl material used to wrap around your cabinet. You can buy Tolex and Tweed cloth sheets in a range of colors, textures, and patterns as shown below:

This gives you plenty of ways to personalize your cabinet build and add your own personality to your gear.
I explain the process of wrapping a guitar amp in Tolex later in this guide.
Another option is to paint, stain, or varnish your cabinet. Staining or varnishing the wood is a great option if you like the idea of seeing the wood:
If you’re confident in your woodworking skills, you might consider a wood finish to show off your craftsmanship. It’s a great way to give your cabinet a boutique look and add your own personality to it.
Check out these custom amps by Ashen for some inspiration on what you can do with wood finishes.
Any mistakes you make during the build will be visible with a stain or varnish but can be hidden when using paint or Tolex.
Key point: choose a cabinet finish that you like the look of and feel confident building.
Type of Wood Joints
It’s important your guitar cabinet is built with strong and square joints.
There are a number of different types of wood joints you can use to build your cabinet such as butt, rabbet, box, and dovetail.

The most common type of joint used for guitar cabinets is the box joint. Box joints are extremely strong and easier to build compared to dovetail joints, but can be difficult if you don’t have the right tools.
You can buy jigs to help you cut box joints and they’re easy to cut with a table saw.

Box joints look great if you want to have a wood-finished cabinet.
If you’re not confident with making box joints, other types of joints can be used and still produce extremely strong joints.
I don’t have a table saw or a box joint jig and I wanted my build to use the least amount of tools possible, so I built my cabinet with basic butt joints.
Orange amp cabinets are built using basic butt joints (as shown above), so as long as you do a good job a basic butt joint will be strong and square.
So even if you have limited woodworking skills, you can still produce a good quality cabinet with basic joints.
Key point: build your cabinet using a type of joint you feel confident in making with your tools and skills.
Tools Needed to Build a Guitar Amp Cabinet
Building a guitar cabinet is a fairly simple task if you have the right tools.
Some tools are essential to building a cabinet while other tools are optional.
For example, a table saw makes it quick and easy to cut wood straight and square, but if you don’t have one you can still achieve a good quality build with a circular saw or a hand saw.
Here’s a quick rundown on the tools you’ll need to build a guitar speaker cabinet.
Saw
A table saw is the best option as it allows you to easily cut straight and square parts for your cabinet.
I wish I had a table saw for my build, so if you have access to one make the most of it.
If you don’t have access to a table saw, you can use a circular saw or a hand saw.
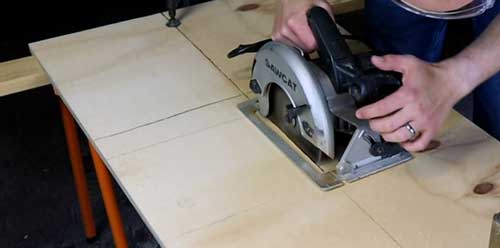
A circular saw will be significantly easier to use than a hand saw. You won’t be able to achieve perfectly straight and square cuts with these options compared to a table saw, but it’s perfectly possible to create a great cabinet with these tools.
Router
While it’s possible to build a guitar cabinet without a router, they make the job easier and help you achieve a more professional finish.
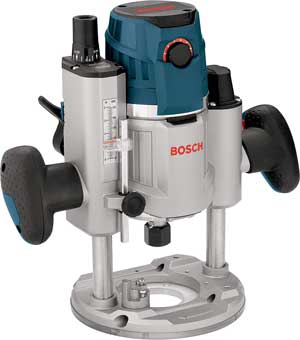
A router is used to create the round edges found on essentially every guitar amp and cabinet.

This is done using a roundover bit. Running this router bit along the edge of your cabinet creates a perfectly straight and smooth curve along the edge.

Check out these sets of router roundover bits to find one for your project (make sure to buy the shank size that fits your router).
If you don’t have a router, you can still achieve a nice curved edge by filing and sanding, but don’t expect to achieve a perfectly machined finish.
You can also use a router to cut the circular hole in the front baffle for the speakers.
You can either use a router or a jigsaw to cut the speaker hole. The advantage of using a router is that you can achieve a perfect circle when using a circle jig.
Jigsaw
A jigsaw is an optional tool that can be used to cut the circular speaker hole in the front baffle if you don’t have a router.
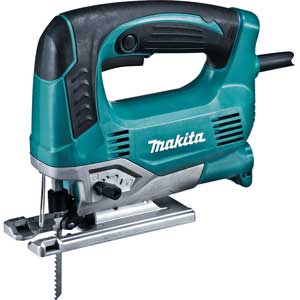
You won’t be able to achieve a perfect circle with a jigsaw even with a steady hand. But if you’re using grill cloth you won’t see any imperfections anyway.
It’s possible to use a jigsaw to cut your cabinet panels, but I highly recommend using a table saw or circular saw instead for better results.
Drill
A drill is used to screw panels together, attach the baffles, and mount the hardware (eg: corner pieces, speaker, handle).

Any drill will work fine and have a set of various drill bits ready.
Sandpaper
If you want to have a cabinet where you see the wood, you’ll want to use sandpaper to achieve a smooth finish.

Powered sanding tools will achieve the job faster than sanding by hand with a block, but any method will work.
If you plan on covering your cabinet in Tolex, sanding isn’t as important but still a good idea to clean up the edges and any imperfections.
The edges of your wood panels and baffles may be rough depending on the tools you use, so sanding is essential to cleaning them up.
Glue
Good quality wood glue is essential to creating a strong cabinet.
Titebond seems to be the go-to option, but there are other brands and options that will work perfectly fine.
To glue the Tolex to your cabinet, you can either use contact adhesive or spray adhesive.
Contact adhesive is the better and recommended option as it will create a stronger bond that won’t lift over time.
Clamps
When gluing your cabinet together, you’ll want to use clamps to apply pressure to the joints.
As you can see in the above photo, I bought a cheap pack of clamps of various sizes. They were incredibly handy when working with the Tolex and speaker grill.
It’s possible to glue your cabinet together without using clamps (by using screws), but clamps are highly recommended.
There are a few different types of clamps you can buy for different situations.
One type of clamp I found incredibly useful is a corner clamp like this set:
Corner clamps give you an easy way of clamping two pieces together at a nice square angle.
I used these clamps when gluing the cabinet walls as well as making the frame for the grill cloth.
As I was using butt joints for my cabinet, these clamps helped me ensure the joints were square.
If you’re building a cabinet with box joints or dovetails, you may find that you don’t need to use a corner clamp as the joint will settle at the correct angle.
Wiring Supplies
When you wire up your speaker to the speaker jack, you’ll either need to use a soldering iron to solder the wires or a crimping tool to crimp the wire to connectors.
If you already know how to solder, it’s a quick and easy job.
The downside of soldering is if you ever decide to change the speaker to something else in your cabinet. Removing the solder from the speaker connectors isn’t a big deal, but it’s more work than using crimp connectors.
I chose to solder my cabinet as I don’t plan on changing speakers in the future.
The other option is to use a crimping tool to crimp the wires to connectors that slide on the speaker terminals.

So you’ll need to choose between using a soldering iron and solder, or a crimping tool and crimp connectors.
Note: if you buy a soldering iron, you might be interested in building your own guitar pedals.
Staple Gun
A staple gun is used on the inside edges of the Tolex to keep it tight.
A staple gun is also used to mount the speaker cloth to the frame.
Guitar Cabinet Hardware
There are a few different hardware choices you can make to personalize the look and function of your cabinet.
Here are the main hardware parts you will need.
Corners
Not all guitar cabinet use corners, but they are a great way to make your cabinet look professional.
Metal or plastic corners will hide the seams in your Tolex as well as protect them.

Be aware that there are different corners for the back due to the thinner border and back panel.
Handles
There are plenty of different styles of handles you can use for your guitar cabinet. The main choice is between a top handle and side handles.

Top handles are easy to install and are perfectly fine for smaller cabinets.
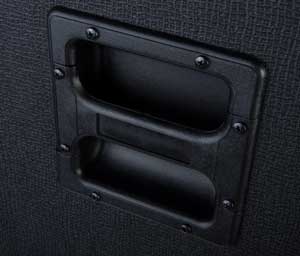
Side handles are ideal for larger cabinets. A heavy cabinet is much easier to carry with side handles.
I installed side handles on my 1×12 cabinet, which is overkill but I like the look of them.
Grill Cloth
The speaker grill is another way you can add your own personality to your cabinet.

There are a lot of options so plenty of ways to combine different Tolex and grill cloth options to give your cabinet a different look.
The great thing about making your own cabinet is you can style it any way you want.
Speaker Cable Jack Plate
You’ll need to install a jack plate and a jack to your cabinet to connect it to an amp head.
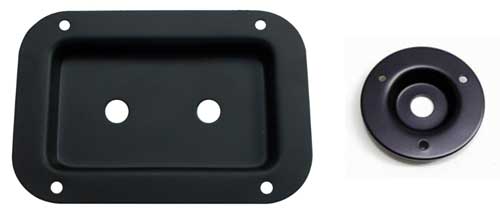
Depending on how many speakers you use and how you wire them up, you can have a single jack or multiple jacks for individual speakers.
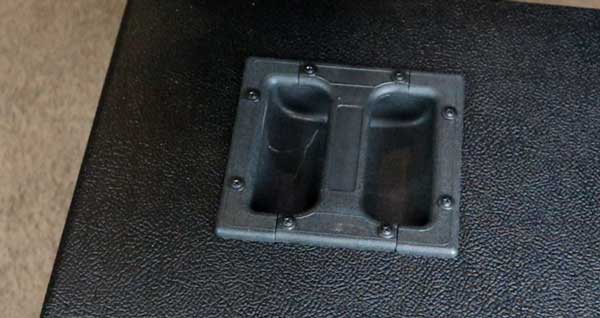
A few people liked the 3D-printed recessed jack plate I designed for my cabinet. While deep recessed jack plates are available to buy, I wanted a deeper one, so I designed and printed one myself (you can see it in my video – shown later in this guide).

If you have a 3D printer, you can download the stl file for my jack plate here.
Piping
Plastic piping is wedged between the speaker cloth frame and the cabinet to give the cabinet a nice border.
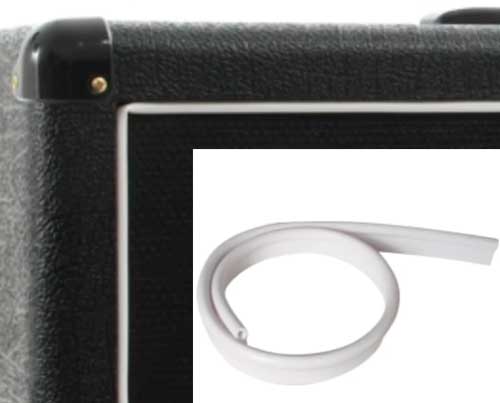
White, gold, silver, and black are the most common piping colors.
Feet or Castors
While you could just sit your cabinet on the floor, it’s better to install either feet or castors.
Feet or wheels will keep the bottom of your cabinet protected from the ground.

Rubber feet are the best option for smaller cabinets and castors make large cabinets easier to move around.
T-nuts
While you can mount your speaker to the baffle using screws, a better option is to use T-nuts.

T-nuts are drilled and bashed into the front side of the baffle. A bolt is passed through from the other side to attach the speaker.
How to Build a Guitar Amp Cabinet Step-by-Step
While there are a lot of different cabinet configurations you can build, the main steps are the same for every build.
Let’s walk through the step-by-step process I used to build my 1×12 cabinet.
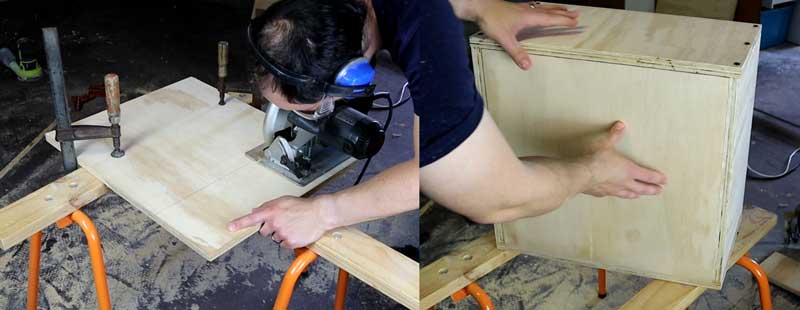
Step 1: Measure and Cut Cabinet Sheets
The first step is to measure and cut the sheets for the outer frame. Check the section later in this guide for advice on cabinet plans.
For this build, I’m using 18mm thick plywood. I sketched up some rough plans to follow when measuring my cuts and I recommend having your plans printed out on hand.
Here’s a scan of the rough plans I used for my build (all measurements in mm):
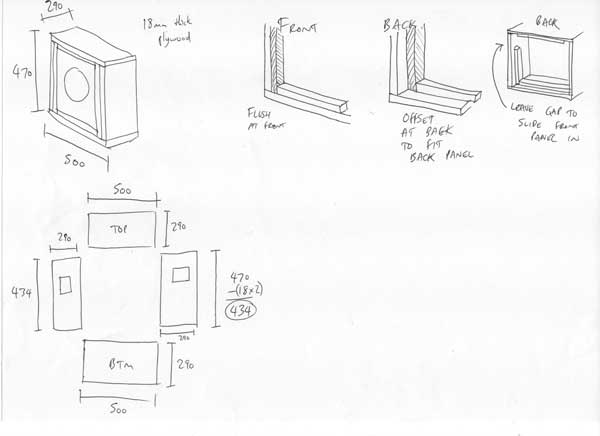
As you can see, you don’t need super-detailed plans.
My plans were basically the measurements I figured out for the outer walls, then a couple of diagrams to remind me of the differences between the front panels and back panels.
Once you have built the outer frame, you can easily measure to figure out the dimensions of the inner panels and baffles.
Only cut when you are sure you’ve measured everything properly. I also recommend writing on each part what they are (eg: top, bottom, left, right) so you don’t get confused at any stage.

If you have a table saw, this step should be quick and easy.
If you’re using a circular saw, jigsaw, or hand saw, be extra careful that your measurements are square.
I cut my panels with a circular saw, so I spent extra time double-checking the marks I made before cutting.
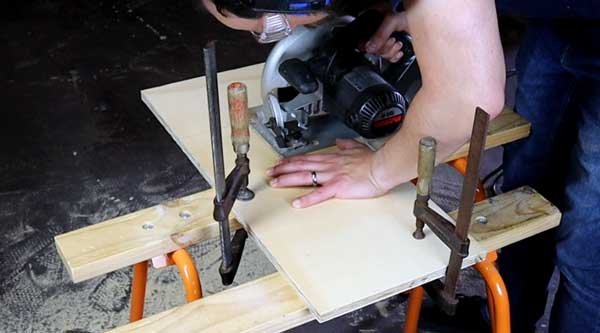
If you take your time to properly measure, mark, and cut your panels, you should end up with four panels for the outer frame.
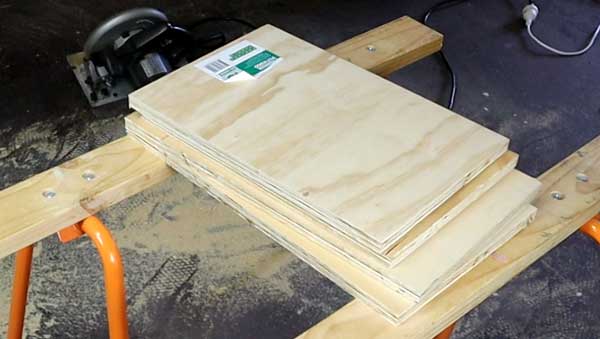
If there are any rough edges, use sandpaper or a file to clean them up before moving to the next step.
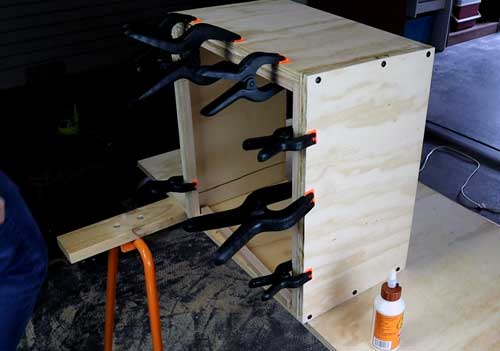
Step 2: Build Outside Frame
The second step is to build the outer frame of the cabinet.
This is when you need to decide which type of joint to use. If you will be using a box joint or dovetails, use your rig to cut the joints as needed.
I’m using butt joints as I don’t have the right tools to do a good job at box joints or dovetails.
Corner clamps are handy at this stage to ensure a square frame.
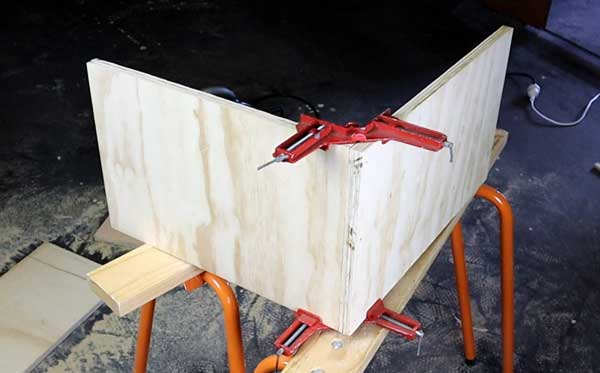
If you will be using butt joints, double-check the way you join the panels together. If you join them the wrong way around, your cabinet will end up too tall or too wide (compared to your plans).
For example, in my build the top and bottom panels sit on top of the right and left panels (shown below).

You can use screws to assist when gluing the panels together. This isn’t necessary if you’re using box joints or dovetails, but it can help with butt joints.
But it’s important to remember that you need to remove the screws before you round the edges.
Another option is to add dowel rods for extra strength and stability.
Once you glue and clamp the frame together, give the glue plenty of time to completely cure (usually 24 hours).
Step 3: Build Inside Frame
The next step is to measure and cut the wood for the front and back inside frames.
Different styles of cabinets do this in different ways. The way I describe below is the typical method for cabinets covered in Tolex.
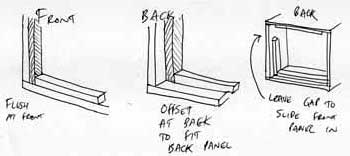
The front frame will be flush against the outer wall, while the back frame will be offset for the back panel to mount to.

The above photos show the difference between the front (left photo) and back (right photo) inside frames.
Notice the gap in the back frame. This is done to make room to slide in the front baffle.
Start by measuring the inside distance and cut the wood panels to size.
Don’t rely on any measurements from plans as they won’t account for any imperfections in your measurements and cutting of the outer frame. Measuring the inside distance after you have glued the frame together will ensure you cut the inside frame to the right size.
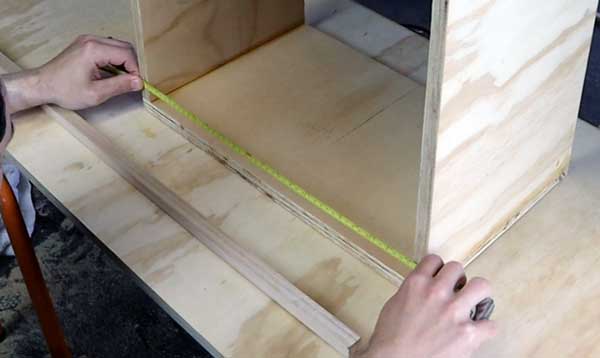
I used 18mm thick beams for the inner frame to match the thickness of the outer plywood.
You can use thinner or thicker wood to change the appearance of the front of the cabinet. If you want the speaker grill to have a thick border, use thicker wood. This is an easy way to personalize your cabinet.
Having a lot of small clamps is handy at this stage to glue and hold the inside frame in place.

Once the front frame is flush against the outer frame, you can nail them in place. Keep the clamps on overnight for the best results.
The back frame needs to be offset from the edge to give space for the back panel.
Offset the back frame by the thickness of the back panel. In my build, I mounted the inside frame 20mm from the edge to leave room for the 18mm back panel with a bit extra to allow for the Tolex.
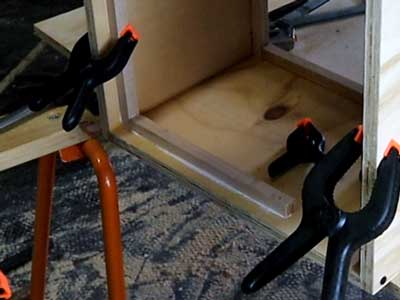
If done right, your back panel should sit flush with the outer frame when resting against the back inside frame.
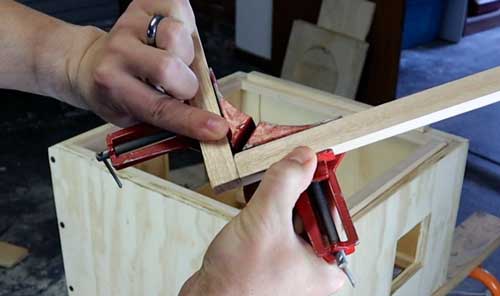
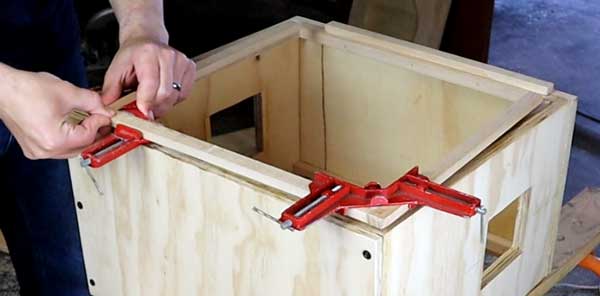
Once you have installed the inside frame, you can measure and cut the frame for the speaker cloth.

Measure the inside edge of the front frame and allow extra room for the piping, Tolex, and speaker cloth.
Once you measure and cut the wood for the frame, join them together using your choice of wood joints.
Step 4: Cut Baffles
The next step is to measure and cut the front and back baffles.
The front baffle will be used to mount the speaker(s) and the back baffle is for the back panel.
Measure the inside dimensions and cut the sheets to size. The back baffle should be slightly smaller to allow clearance for the Tolex. It’s also a good idea to do the same for the front panel so it can easily slide in from the back.
Tolex might seem thin, but if you don’t leave enough clearance, your back panel won’t fit.
The 5mm gap I allowed for wasn’t enough and my back panel didn’t fit after applying the Tolex.
If you positioned the inside frame at the correct offset, the back panel should sit flush against the outer frame.
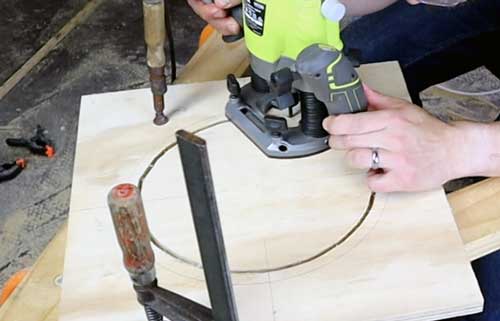
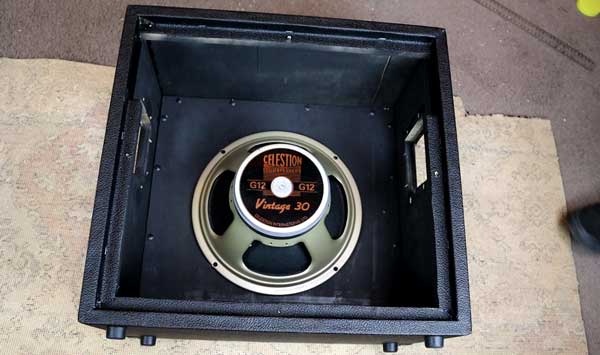
Once you cut the front baffle, plan the position of the speaker holes.
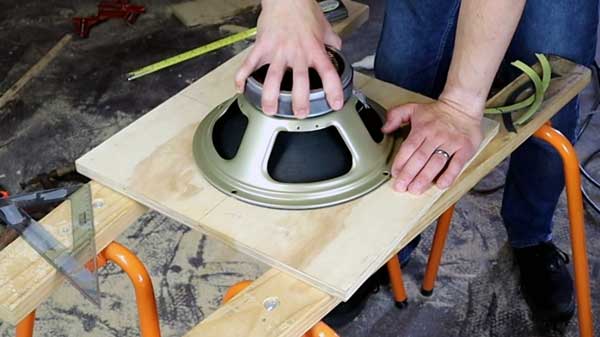
As I’m building a 1×12 cabinet, I chose to mount the speaker in the center of the baffle.
Once you measure and mark the positions of the speakers, you can cut out a hole for each speaker.
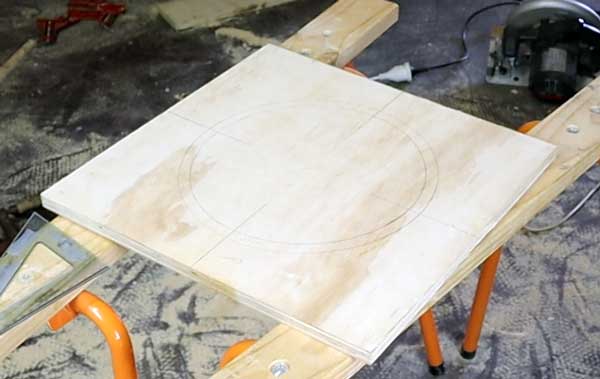
I traced the outside edge of the speaker, then measured a smaller inside circle which will be cut out. This smaller circle will be used to mount the speaker, so don’t forget to add it!
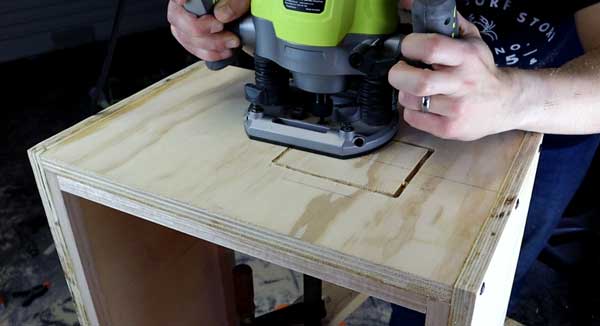
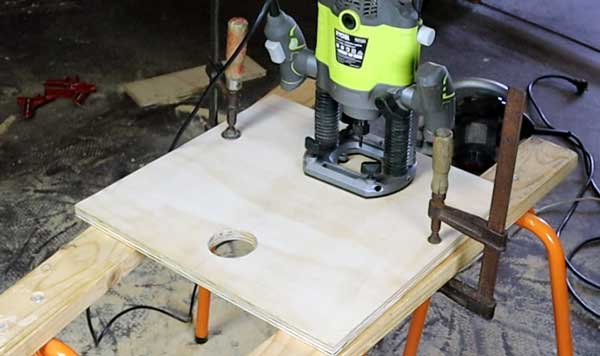
If you have a router, you can either make a circle-cutting rig or one may come with your router.
I chose to freely cut mine with a router instead of using a jig but I recommend using a circle jig if you have one.
The speaker grill cloth will hide any imperfections, so don’t stress too much if you don’t get a completely perfect circle. Mine was far from perfect but you can’t see it thanks to the black cloth used.
Set the baffles aside for now as they will be installed later.
For my build, I wanted to install side handles, so I measured and routed holes in the sides of the cabinet.
Then you can route a hole in the back panel for the speaker jack.
Step 5: Prepare Cabinet Surfaces
The next step is to run a roundover bit over the edges of the cabinet with a router.
If you used screws on your cabinet, remove them or make sure they’re clear from the path of the router.

If you don’t have a roundover bit for your router, it’s worth getting one. This was the best part of the build for me and it was surprising how much the look of the cabinet improved after running the router over the edges.
Having smooth edges gives your cabinet a more professional look. It might be possible to do this by hand, but a router makes this a quick and easy job.
Once you have run the router over all of the edges, use sandpaper or a powered sander to give the entire cabinet a smooth finish.
If you’re using plywood, you might have small rough, or damaged sections at the edges of the board. You can use wood filler to fill in and smooth these imperfections out.
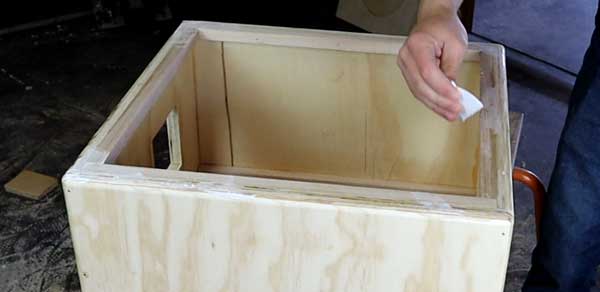
The Tolex will hide almost any imperfections, so this step isn’t essential. But if you want to remove any chance of bumps and pits showing up after you apply the Tolex, adding wood filler is worth it.
If you removed any screws at this stage, you can use wood filler to fill in the holes. If you did a good job gluing and clamping your cabinet, it will be strong enough without adding screws back in.
Step 6: Paint Inside of Cabinet
The next step is to paint any areas of the cabinet that won’t be covered by the Tolex.
As a minimum, you’ll need to paint the front baffle and the frame for the speaker cloth so you won’t see the wood grain behind the speaker cloth (unless you want to see it).
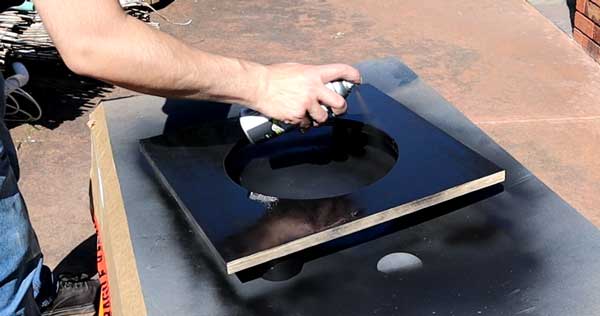
I decided to go all out and paint the entire inside of the cabinet. You don’t see it when the cabinet is closed, but it does make it look more professional when you open the cabinet up. If you’re building an open-back cabinet, painting the entire inside is a good idea.

Spray multiple light coats rather than a heavy coat to avoid any runs in your paint.
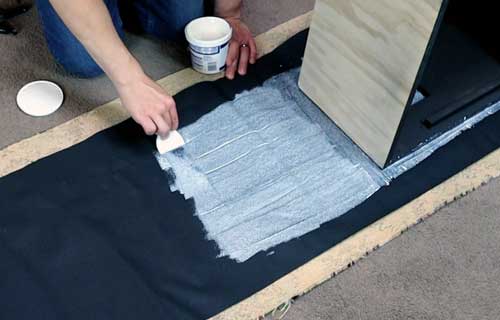
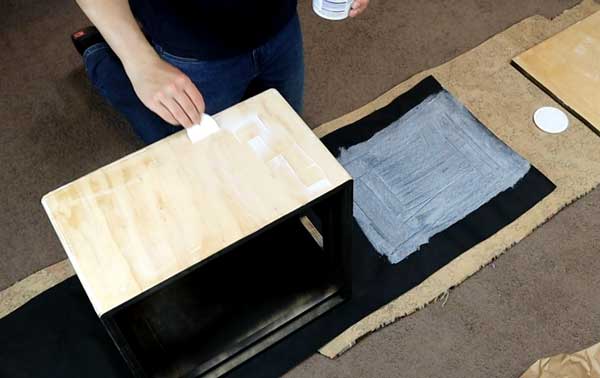
Step 7: Apply Tolex or Wood Finish
Once you have prepared the surface of your cabinet and painted the inside, you’re ready to apply the Tolex or stain/varnish/paint the outside of your cabinet.
Start by planning out how you will apply the Tolex and where the seam will be.
I decided to first apply the Tolex to the back panel for practice before applying it to the cabinet.
That way, if I messed up (which I did) it would only waste a small amount of Tolex (compared to the amount applied to the cabinet).

Once you cut the Tolex to size (leave plenty of overhang), you can apply the contact adhesive or spray adhesive to both the Tolex and the wood.
If you’re using contact adhesive (the recommended option), let it dry until it becomes tacky. You should be able to touch it and the glue doesn’t come off on your finger, but it still feels sticky.
Once the contact adhesive is at the right stage, you can apply the Tolex to the wood and use a roller to apply pressure.

I used a kitchen rolling pin to apply pressure and remove any air bubbles. This also helps the contact adhesive to stick properly.
Be careful when lining up the Tolex to make sure it remains straight as you apply it around the entire cabinet. If you line it up crooked, you may find that you can’t make it all the way around before it runs off the side.
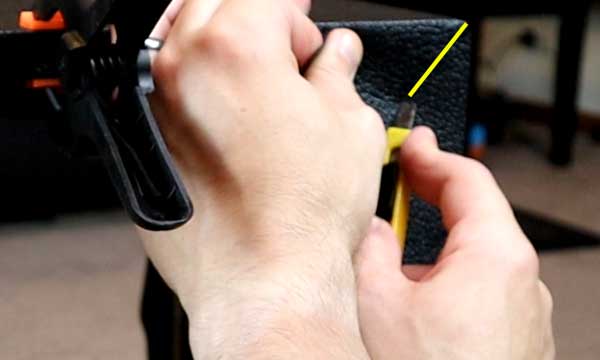
Once the cabinet is completely covered in Tolex, it’s time to sort out the corners and edges.
It’s tricky to get neat corners on your first attempt, but the good news is that your corner pieces will hide any imperfections.
To finish the bottom seam, make sure you overlap the ends. Then use a knife to cut straight through both Tolex ends.
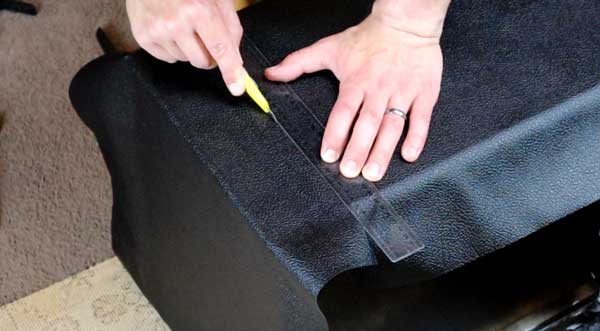
Peel the Tolex back and remove the offcut. Press the Tolex back down and you’ll end up with a perfect seam where both ends meet at the same straight line.
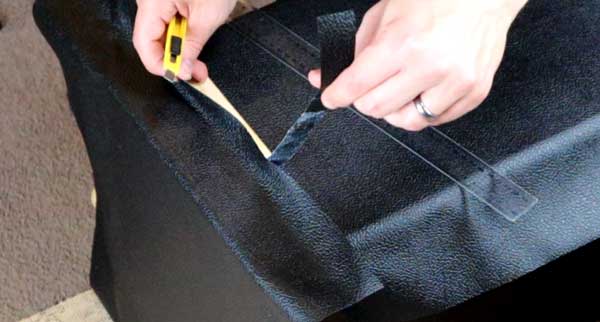
The same idea is used to create neat corners.
After applying contact adhesive and waiting for it to become tacky, wrap it around the edges and use clamps to hold it in position.
Now you can cut a 45 degree line through the corner edge.
Pull the first edge of the Tolex back and staple it to the wood. Now you can repeat this with the other edge to create a perfect seam.
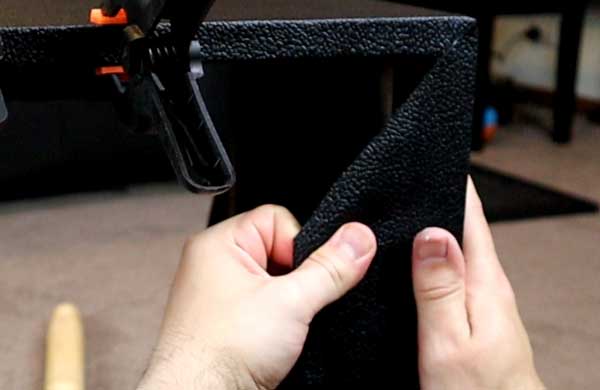
I recommend starting with the back corners as they won’t be as noticeable if you make any big mistakes.
On the back edge, you’ll need to use clamps to press the Tolex all the way to the corner of the inside frame.
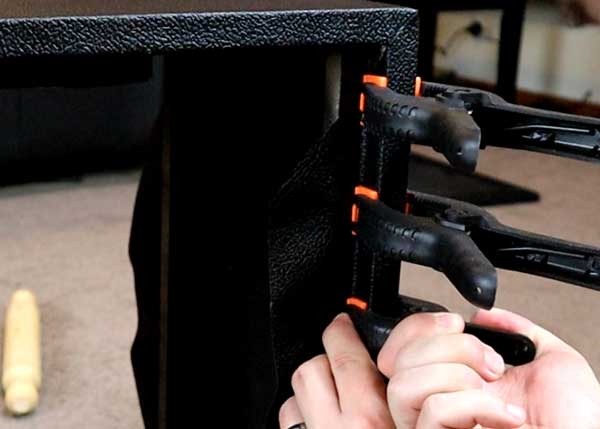
You want to push the Tolex as hard as possible into this corner so the back panel can fit.
It’s a lot of work to work the Tolex properly. Take your time and don’t worry if you make a few mistakes. Most mistakes will be hidden by the back panel and the corner pieces.
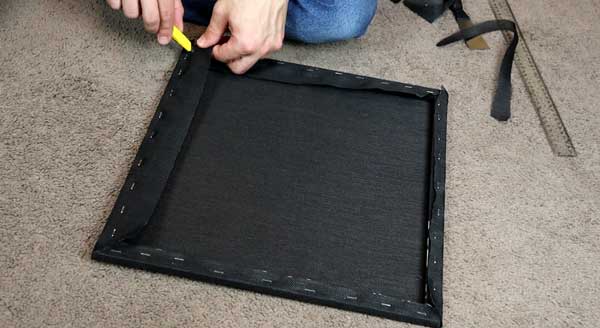
Step 8: Add Grille to Frame or Baffle
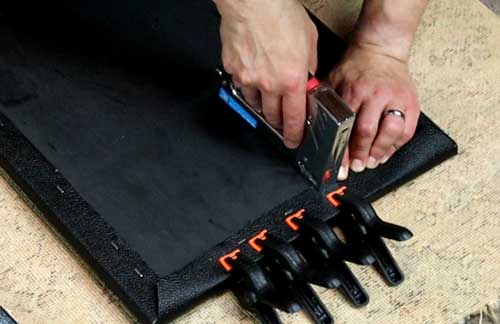
Start by cutting the speaker cloth to size and allow plenty of overhang. You can easily trim the excess later once you staple the cloth to the frame.
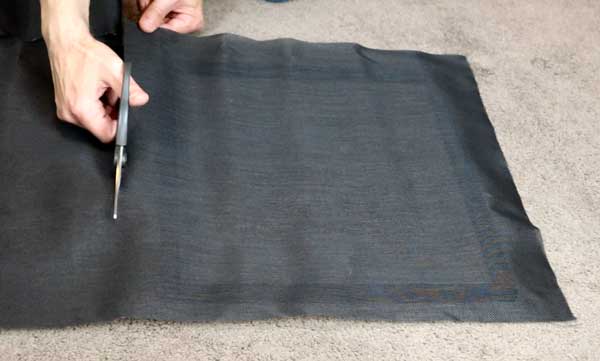
It’s important that when you staple the cloth to the frame that it is pulled tight.
I started by stapling the middle of the frame and pulling the opposite side tight. You should end up with a tight cross across the middle.

From here, it’s a simple job of working from the middle, pulling the cloth tight and stapling it into position.

Once you reach the corners, you can trim the excess cloth.
Step 9: Final Assembly
With the Tolex and the speaker cloth installed, you’re ready to assemble everything together.
You can assemble your cabinet in any way you want. Let’s start by mounting the speaker on the baffle.
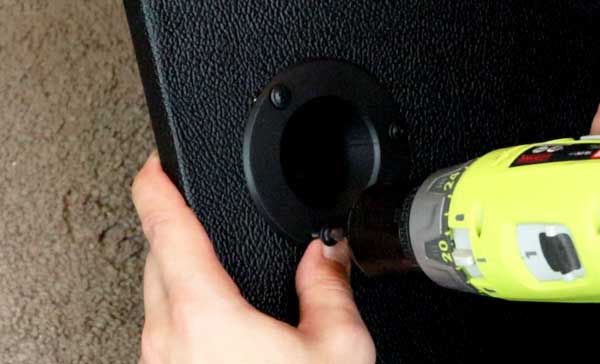
You can either use screws or T-nuts to mount the speaker.
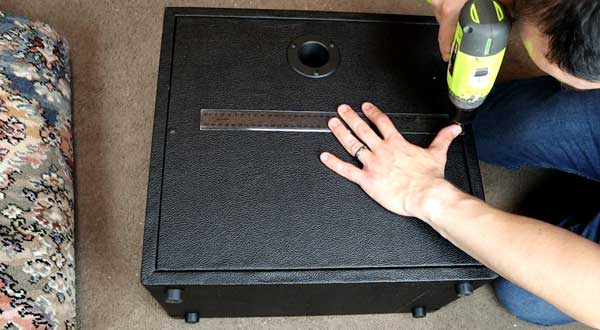
To install T-nuts, you’ll need to drill a hole and then bash the T-nut into position with a hammer.
Screw the jack plate to the back and install the jack.
Note: I’m using a custom 3D-printed recessed jack plate as I wanted to be able to rest the cabinet against a wall. You can buy replacement Marshall recessed jack plates if you like this style or download the file to 3D print the one I designed here.
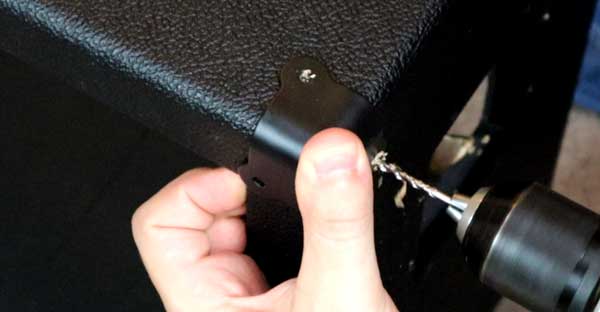
Install the cabinet feet or castors and make sure you position them far enough from the edge to leave room for the corner pieces.
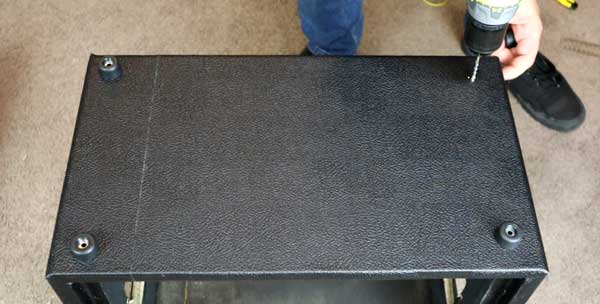
Position and screw in the handle.
Position and screw in the corner pieces. It’s a good idea to drill pilot holes for the screws to avoid splitting the wood.
Now you can safely install the speaker baffle by sliding it in from the back.
With the speaker baffle installed, you can install the grill frame.

With the frame in position, you can work the piping into position.
If you allowed the right size gap between the inner frame and the outer frame, this step should be easy.
I decided I didn’t like the look of the white piping so removed it and used black wedges instead to hold the cloth frame in position.
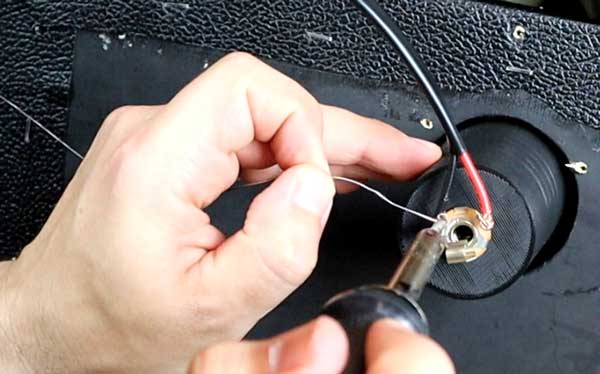
Step 10: Wire Up Speaker
With the speaker installed, you can wire it up by following one of the wiring diagrams from the wiring section later in this guide.
As mentioned earlier, you can either solder the wires to the speaker and jack terminals, or you can use a crimp connector to connect the wires.
Make sure you follow the wiring diagrams or you risk damaging your speaker and amp head.
With the speaker wired up, you can screw the back plate into position.
If you reach this stage, congratulations! It’s a lot of work, but you now have your own custom guitar cabinet built to your own specifications and style.
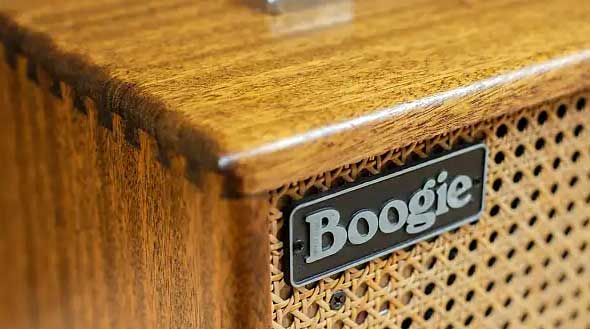
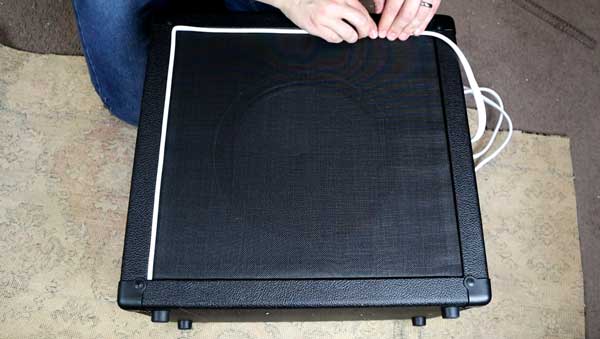
If you want to add an extra personal touch to your cabinet, consider adding a badge or nameplate to the speaker cloth.
I 3D printed my surname in Marshall-style font and mounted it to the speaker cloth.
![]()
If you have access to a 3D printer or somebody with a laser cutter/engraver, consider designing and making some sort of badge. It really adds to the professional look of your cab.
![]()
Here’s the final result of my build:

You can see that I chose to remove the white piping and have a borderless finish around the speaker cloth.
This is a good example of how it’s okay to change your mind as you go and make changes to your cabinet. The cabinet you end up building may not be the same as what you initially planned and that’s okay.
If you build an amp following this guide, let me know how you went here.
Building a 1×12 Guitar Cabinet Video
The below video gives you a complete overview of the build process of my 1×12 cabinet build.
If you’re interested in building your own guitar amp cabinet, check out the video to see what is involved:
Subscribe to my YouTube channel here to be notified of future guitar-related videos.
Guitar Amp Cabinet Plans
There are so many different cabinet configurations you can choose from and every manufacturer offers something slightly different.
This is great when you’re looking for inspiration for your build, but it means there isn’t a “standard” plan you can follow for your build.
Let’s go through the steps to figure out the perfect plan for your guitar cabinet.
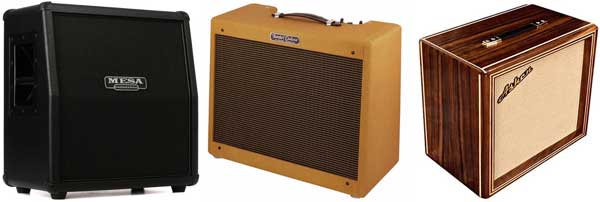
Step 1: Find Reference Designs
The easiest way to make your own cabinet plans is to use an existing guitar cabinet as a reference.
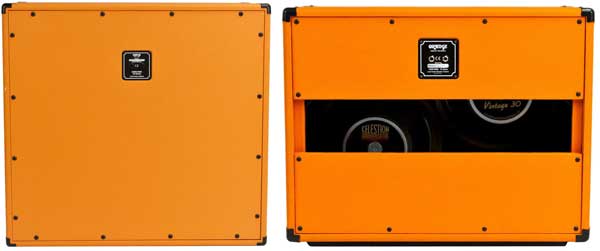
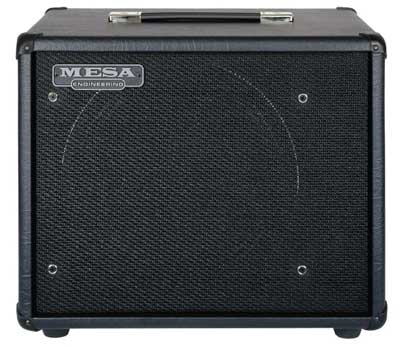
For example, I wanted to build a 1×12 cab, so I started by researching 1×12 cabinets by various brands. Here are some examples from the major brands:
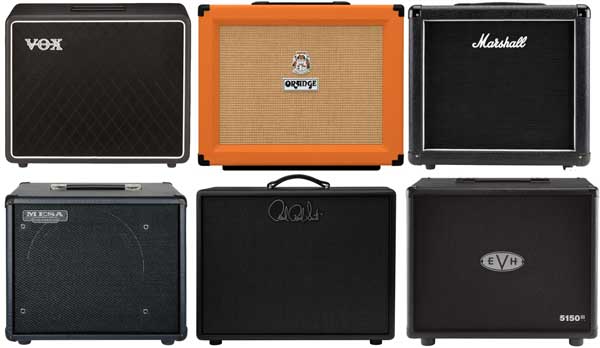
Spend some time looking at different models online for your chosen speaker size and configuration. If you can go into a guitar store to check out the cabinets in person, that’s great as you’ll get a better idea of what dimensions look the best to you.
You don’t need to copy any of the styles you see, but some of the models you find might inspire you and help you get a better idea of the dimensions you need for your build.
The size and style I wanted to base my build on is the Marshall MX112. So I looked that model up and found the dimensions on the Marshall website:
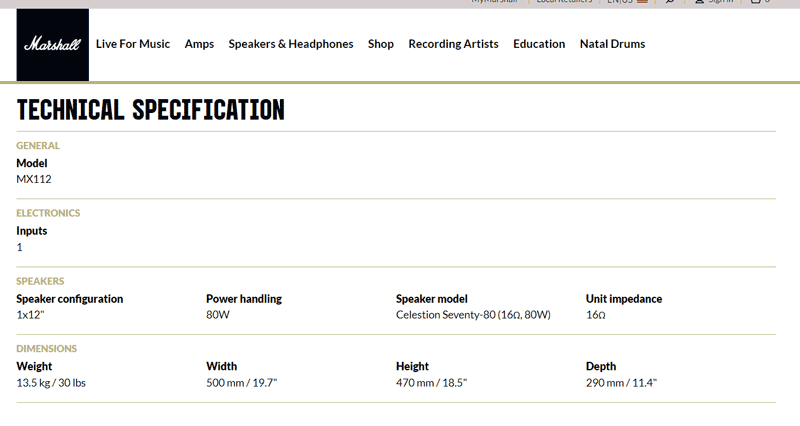
You can find almost any cabinet’s dimensions either on the manufacturer’s website or on a retail site.
Once you have those dimensions, you can decide whether you want to follow them exactly or change them.
For example, you may decide you want a slightly wider cabinet so your amp head looks better when sitting on it. You can make any changes you want to the dimensions to suit your own preferences.
For my build, I used the exact dimensions of the Marshall MX112 (500 x 470 x 290 mm).
Step 2: Decide on Wood Joints
The dimensions you come up with from Step 1 are the outside dimensions. What size you should cut the wood panels depends on the type of wood joints you use.
Take a look at the below photos and how each panel sits against each other:
You should notice that both panels for box joints and dovetails reach all the way to the corner, while butt and rabbet joints don’t. This means the dimensions of your outer wall panels may need adjusting based on the wood joints you use.
If you use box joints or dovetails, you can cut all four panels (top, bottom, left, right) to the exact dimensions from Step 1.
You can do this because box joints and dovetails join at the corner and use the full length of each board.
If you use butt or rabbet joints, one panel will sit on top of the other panel, so you need to make some modifications to your dimensions to take this into account.
As I explain in Step 3, if you use butt joints, you need to subtract the wood thickness for each joint on two of the outside panels. Otherwise, your cabinet will be slightly bigger than you planned.
If you use rabbet joints, you need to measure how deep the rabbet joint cut will be and take that into account for the length of the other panel.
Step 3: Outside Frame Plan
Once you have some reference dimensions and you know what type of wood joint you will be using, you can plan out the size of the boards for the outer walls.
As mentioned in Step 2, if you are using box joints or dovetails you can use the exact dimensions to measure your boards.
If you are using butt or rabbet joints, you need to make some adjustments on two of the boards.
Here’s a photo of my plans and how I adjusted the side panels to take the butt joints into account:
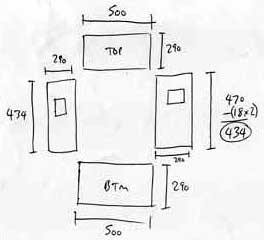
On the right, you can see that I started with my reference dimension (470mm for the height) and subtracted 2x the wood thickness (18mm). This is because the side panels will sit on the inside of the butt joints.
Use a piece of paper and sketch out your own version of the above plan. Being able to visualize each wood panel will make it easy to follow when you start cutting the wood.
Step 4: Inside Frame Plan
The dimensions of the inside frame depend on how accurately you cut and join the outer frame together.
For this reason, I recommend only planning out your inner frame after you have cut and joined the outer walls together.
Once you have the outer walls constructed, you can easily measure the inside dimensions and plan any internal bracing.
At this stage, you have a few decisions to make:
- How thick do you want the front border to be?
- How deep do you want the speaker baffle to sit inside the cabinet?
- Do you want an open or closed back (or removable panels)?
Here’s the sketch I used to help me plan my internal frame:
As you can see, you don’t need elaborate plans at this stage. All you need is a few reminders of the differences between the front or back frames and how you will be joining the frame together.
If you’re building a slant 4×12 cabinet, you will also need to plan out the transition from straight to slant on the front frame. A slant cabinet is not recommended if you have limited woodworking skills as it can be challenging to line everything up and build a suitable speaker cloth frame.
Should You Use Thiele Small Parameters?
If you do some research on cabinet plans and sizes, you’ll eventually see mentions of Thiele Small parameters.
Thiele Small parameters are a way of adjusting a ported cabinet’s internal volume and dimensions to target specific frequency responses.
Here is a 1×12 guitar cabinet designed by Mesa Boogie to follow Thiele Small parameters:
Notice the speaker is mounted off-center to allow room for a port on the right side. Thiele Small cabinets look very different than a typical guitar cabinet.
There are plenty of articles and forum threads discussing Thiele Small parameters and whether they’re useful for building guitar cabinets.
My recommendation is to not bother with Thiele Small parameters for your build.
This post by Celestion explains a few reasons why designing a guitar cabinet using Thiele Small parameters is unnecessary and won’t give you better results.
Guitar cabinets are different than typical hi-fi speakers and what makes a typical loudspeaker cabinet sound good can make a guitar cabinet sound terrible.
Key point: don’t worry about Thiele Small parameters for your build.
Guitar Speaker Wiring Diagrams
Wiring a guitar speaker is simple if you follow the appropriate diagrams. But it’s crucial that you choose the correct wiring diagram for your build or you risk damaging your amp head and speaker.
Note: You risk damaging your guitar amp and speaker if you improperly wire your speaker. Please read the sections “Speaker Impedance” and “Speaker Power” earlier in this guide before you wire up your cabinet.
Single Speaker Wiring Diagram
The easiest option for wiring your speaker is when you only have one speaker in the cabinet.
You won’t need to worry about series or parallel wiring as you only need to connect the speaker terminals to the speaker jack.
Here is the wiring diagram for a single guitar speaker:
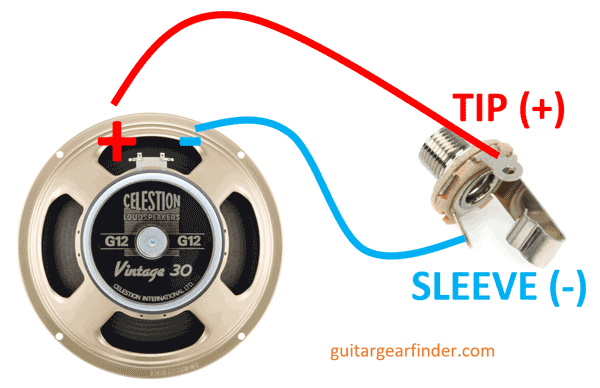
The negative terminal on the speaker connects to the jack’s sleeve.
The positive terminal on the speaker connects to the jack’s tip.
Important points to remember with single-speaker wiring:
- The speaker’s impedance rating is what load the amp will receive (eg: 8-ohm speaker produces an 8-ohm load on the amp)
- The speaker’s power rating should be above the power rating of the guitar amp (eg: 100W speaker with 50W amp is good)
- The speaker jack’s tip is positive and the sleeve is negative
Two Speakers in Series Wiring Diagram
There are three important points to remember when wiring two guitar speakers in series.
The first point is that you need to use two speakers of the same impedance (eg: two 8-ohm speakers).
The second point is that the ohm load on the amp is double the ohm rating of the speakers:
- 2 x 4-ohm speakers = 8-ohm load on the amp
- 2 x 8-ohm speakers = 16-ohm load on the amp
- 2 x 16-ohm speakers = 32-ohm load on the amp
So if your amp is only rated for 16-ohms, you should use two 8-ohm speakers.
The third point is that the power rating of the speakers are added together to work out the total power rating (eg: 2 x 50W speakers = 100W).
So if you have a 100W guitar amp, using two 30W speakers could easily overpower and damage them. Make sure the total power rating of both speakers combined exceeds the power rating of your amp.
Here is the wiring diagram for two guitar speakers in series:
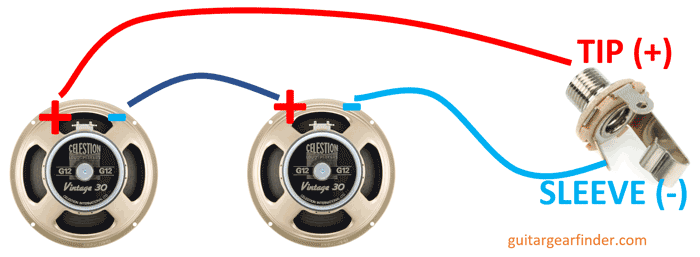
Think of wiring in series as creating a big loop. You should be able to trace one big line from the positive end of the jack (tip) through the two speakers and back to the negative end of the jack (sleeve).
Important points to remember with wiring two guitar speakers in series:
- The two speakers must have the same impedance
- The impedance load on the amp is double the speaker impedance (eg: 2 x 8-ohm speakers produce a 16-ohm load on the amp)
- The speaker rating of the two speakers are added together and the total should be above the power rating of the amp
Two Speakers in Parallel Wiring Diagram
Another way to wire two speakers in a cabinet is in parallel. Whether you choose series or parallel depends on the power and impedance rating of your amp and speakers.
There are three important points to remember when wiring two guitar speakers in parallel.
The first point is that you need to use two speakers of the same impedance (eg: two 8-ohm speakers).
The second point is that the ohm load on the amp is half the ohm rating of the speakers:
- 2 x 4-ohm speakers = 2-ohm load on the amp
- 2 x 8-ohm speakers = 4-ohm load on the amp
- 2 x 16-ohm speakers = 8-ohm load on the amp
So if your amp is only rated for 8-ohms, you should use two 16-ohm speakers in parallel.
The third point is that the power rating of the speakers are added together to work out the total power rating (eg: 2 x 50W speakers = 100W).
So if you have a 100W guitar amp, using two 30W speakers could easily overpower and damage them. Make sure the total power rating of both speakers combined exceeds the power rating of your amp.
Here is the wiring diagram for two guitar speakers in parallel:
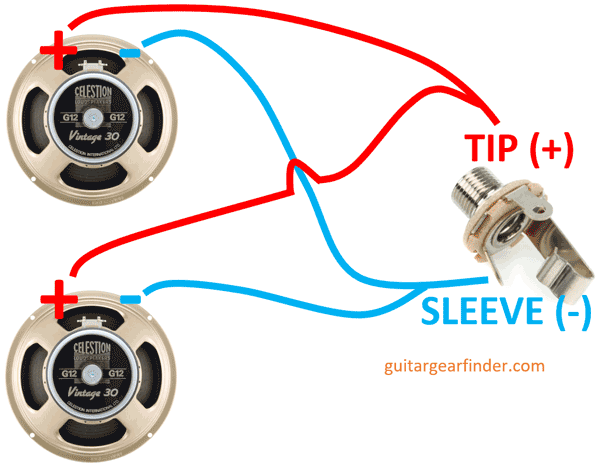
As you can see, both speakers are connected to the negative and positive terminals of the jack. So you will end up with four wires in your cabinet, two from each speaker to the jack.
Important points to remember with wiring two guitar speakers in parallel:
- The two speakers must have the same impedance
- The impedance load on the amp is half the speaker impedance (eg: 2 x 16-ohm speakers produce an 8-ohm load on the amp)
- The speaker power rating of the two speakers are added together and the total should be above the power rating of the amp
Four Speakers in Series/Parallel Wiring Diagram
There are two common ways of wiring 4×12 or 4×10 cabinets: series/parallel or parallel/series. These are complicated wiring options, so I’ll keep things as simple as possible here. You might want to continue your research across other sites if you’re interested in these wiring options.
The most popular option is series/parallel as it adds some safety into the wiring in case one speaker fails which can cause serious problems when using parallel/series wiring.
Series/parallel wiring combines both series and parallel wiring to manage the impedance across all four speakers.
There are three important points to remember when wiring four guitar speakers in series/parallel.
The first point is that you need to use four speakers of the same impedance (eg: four 16-ohm speakers). It is possible to mix different impedances with this wiring, but I won’t cover that here as it’s complicated.
The second point is that the ohm load on the amp is equal to the ohm rating of the speakers:
- 4 x 4-ohm speakers = 4-ohm load on the amp
- 4 x 8-ohm speakers = 8-ohm load on the amp
- 4 x 16-ohm speakers = 16-ohm load on the amp
So if your amp is only rated for 8-ohms, you should use four 8-ohm speakers.
The third point is that the power rating of the speakers are added together to work out the total power rating (eg: 4 x 30W speakers = 120W).
As a general rule, it’s useful to think of the possible power being delivered to one speaker as a quarter of the amp’s total power. So if you have a 100W amp, each speaker could possibly receive 25W of power.
So you want to make sure that each speaker is well above 1/4 of the amp’s power rating. If you have a 100W amp, using 50W speakers (or higher) is recommended.
Here is the wiring diagram for series/parallel for a 4×12 or 4×10 guitar cabinet:

This wiring diagram may look confusing at first, but if you compare the left speakers with the right speakers, you can see that the two speaker columns are in series, then wired together in parallel.
Tips for Your First Guitar Cabinet Build
Here are some tips to help you get started building your first guitar speaker cabinet:
Start Simple
Unless you’re an experienced woodworker, it’s a good idea to keep your first build nice and simple.
You might like the idea of building a slanted 4×12 cabinet with box joints, but if you’ve never picked up a saw before, you might quickly become overwhelmed.
A simple 1×12 cabinet is a good way to learn the skills involved in building a cabinet without being too complicated.
Painting, staining, or varnishing your cabinet is easier than using Tolex but requires careful handling of the wood during your build (eg: you don’t want dents to show up in your finished build).
If you’re not confident with certain tools or steps in the build, use some scrap wood and practice.
Think about your woodworking skills and plan your cabinet to fit within your skill level.
What Tools Do You Have
Plan your build based on the tools you have available.
If you have access to a table saw or a router table, you can easily produce great-looking box joints.
If you only have a hand saw and a drill, you’ll need to work slowly and carefully to keep everything straight and square.
Read through my build (covered earlier) to see an example of a build using minimal tools.
Leave Gaps for Tolex and Piping
If you plan on wrapping your cabinet in Tolex or cloth, keep in mind that you need to allow clearance for the Tolex in the front and back panels.
The Tolex sheet may look thin, but I found out the hard way that you need to allow a lot of clearance when cutting the back panel and front grill frame.
If you will be using piping around the grill cloth, take the thickness of the piping into account when measuring and cutting the grill frame.
Aim for a Strong and Square Build
If you know how to create box joints or dovetails, you can easily make a strong cabinet.
If you’re using minimal tools and have limited woodworking experience, you can also create a strong and square cabinet. Just take your time and use all the resources you have to help you keep the build straight and strong.
How to Build a Guitar Amp Cabinet FAQs
Here are some common questions about building your own guitar amp cabinet:
What is the best wood for guitar speaker cabinets?
The best wood for guitar amp speaker cabinets is plywood or good-quality hardwood. Plywood is the most common choice when using cloth or tolex finishes, while hardwood is popular for wood finishes. MDF is generally not recommended for guitar amp cabinets.
Is MDF or plywood better for guitar speaker cabinets?
Plywood is better for building guitar speaker cabinets. The problem with MDF is it can warp and expand over time due to moisture.
What is the best guitar cabinet?
There is no best guitar cabinet size or type. Different guitarists prefer different cabinets. Some guitarists prefer the sound of a small 1×12 cabinet, while others prefer other sizes such as 2×10, 2×12, or 4×12.
How can I make my guitar cab sound better?
An easy experiment to try and make your guitar cabinet sound better is to try adding some internal insulation. Another option is to swap the speaker for a different type.
You can also experiment with open-back or closed-back panels.
Remember that sound quality is subjective, so some changes may sound better or worse to you depending on your tone preferences.
What is a guitar extension cabinet?
A guitar extension cabinet is a standalone speaker cabinet that can be connected to an amplifier. If your amp supports more than one speaker output, you may be able to use an extension cabinet to spread your sound over a larger area or achieve a higher volume.
How big is a 4×12 cabinet?
The size of a 4×12 cabinet can vary between models and manufacturers. For example, a Marshall 4×12 is 760mm (30″) high, 760mm (30″) wide, and 360mm (14″) deep.
Do guitar cabinets make a difference?
The type of guitar cabinet you use makes a big difference in your tone. Plugging into a 1×12 cabinet will sound very different than a 2×10 or 4×12 cabinet. Not only will the volume levels be different between different cabinets, but the tone will completely change.
Different types of speakers will also make a big difference in the tone you get from any cabinet.
Which Celestion speaker is the best?
The best guitar speaker is down to personal preference. The most popular Celestion speakers include the Vintage 30, the G12M Greenback, and the G12M Creamback.
Why are guitar amps open in the back?
Some guitar amps are open in the back to help with ventilation and heat dissipation. Having an open back also changes the tone and helps smaller amps fill the room with sound.
Can I use an 8-ohm amp with a 16-ohm speaker?
You can use an 8-ohm amp with a 16-ohm speaker. This is called ‘safe mismatch’ because the impedance of the speaker is higher than the amp. If the speaker was 4-ohm, it would not be suitable for an 8-ohm amp.
The downside of using a 16-ohm speaker with an 8-ohm amp is the power output will be reduced. If the 8-ohm amp is 100W, it will only be able to send 50W of power to a 16-ohm speaker.
Note: read up on impedance mismatch in detail from your amp’s manual or website before considering connecting a speaker with a different impedance rating.
What is the difference between an amp head and cabinet?
The amp head is where you find the amp’s controls, inputs and outputs, and power connection. The cabinet is where the speaker is housed. The amp head takes your guitar input and sends the output signal to the cabinet’s speaker.
Some guitar amps combine the head and cabinet into one unit called a ‘combo’ amp.
Is a 4×12 louder than a 2×12?
Generally speaking, a 4×12 cabinet will be louder than a 2×12. But this depends on the speakers used in the cabinets and the amp running the cabinet. Cabinets are powered by an amp, so the total volume depends heavily on the amp used.
Does speaker size matter for cabinets?
Yes. Speaker size matters a great deal for guitar cabinets. A small 8″ speaker will produce a very different tone compared to a 12″ speaker. Larger diameter speakers push more air and generally have better bass response.
What does 1×12 mean?
When naming guitar cabinet sizes, the first number tells you how many speakers are in the cabinet. The second number tells you the size of the speakers in inches.
1×12 means a guitar cabinet with one 12-inch speaker. 2×10 means two 10″ speakers. 4×12 means a cabinet with four 12″ speakers.
If you enjoyed building your own guitar cabinet and want to try another guitar DIY project, check out this guide to building your own guitar pedals.