
Learning to improvise on guitar is an incredibly fun way to play with other musicians, jam with backing tracks, or write your own music.
While improvising is fun, it can be difficult to learn. It feels strange at first to try and come up with licks and ideas on the spot.
In this lesson series, you will be able to walk through an effective approach to learning improvisation on guitar.
Instead of memorizing scales and licks, you’ll learn how to think about improvisation and learn to truly be creative on guitar.
Getting Started With Improvising
Improvising when you’re a beginner or intermediate guitar can feel incredibly intimidating.
You’ve probably seen videos of guitarists come up with mind-blowing solos and lead parts and wondered how you could ever do something like that.

Maybe you’ve even watched a few lessons on YouTube on how to improvise on the guitar and were overwhelmed by the number of scale exercises they ask you to go through.
Playing scale exercises up and down the neck is not fun and doesn’t help you learn to be creative.
The exercises in this lesson series will aim to avoid scales and memorizing licks as much as possible. Memorizing a bunch of licks and randomly playing them over a backing track is not improvisation.
True improvisation is being able to come up with interesting ideas from scratch. It might sound impossible now, but after you get through a few of these lessons, the pieces will start coming together.
This lesson was written for beginners who have no experience with improvisation.
If you’re an intermediate guitarist, you can still learn from this lesson. If you’ve tried improvising before and got stuck, or you feel like you’re always playing the same things over and over, I highly recommend following the exercises in this lesson.
Even if the exercises feel too easy for your skill level, there is a lot you can learn from practicing them.
If you’re an intermediate guitarist and you feel like your stuck in a rut, you’re not alone. A lot of guitarists become trapped after following lesson on how to improvise using the Pentatonic Scale.
These lessons are designed to avoid the same issue I see so many guitarists fall into.
If you already know how to jam with the Pentatonic scale but you feel stuck in a rut, check out this guide on How to Break Out of the Pentatonic Box.
Your First Improvisation Exercises
In this first lesson, the main goal is to simply learn to play in time with the backing instruments.
You’re not expected to be able to come up with amazing sounding solos or creative licks. If you expect to be able to fly over the fretboard like Steve Vai or rip into some soulful licks like B.B. King after these exercises, that’s expecting too much. Don’t put pressure on yourself at this stage.
All you need to do at this stage is learn to play a few notes in time with the drums, bass, and guitar you hear. Building confidence and timing is more than enough to focus on for now. We’ll get to the impressive stuff eventually, but the groundwork needs to be in place first.
For all of the exercises in this lesson, we’re only going to use four notes.
The reason we’re only using four notes is so you don’t need to worry about memorizing a lot of notes and positions.
You only have four notes to choose from, so you can keep your focus on playing in time with the backing track.
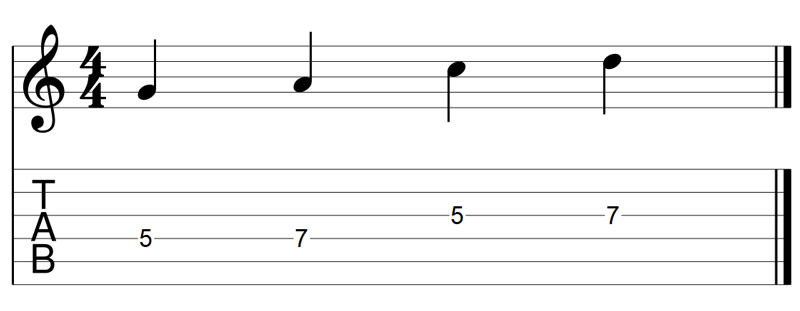
The four notes to use in this lesson are the fifth and seventh frets on the D and G strings as shown below:

Here is the Guitar TAB for the four notes you can play in these exercises:
Pick up your guitar and get used to these four notes.
Play them in order as shown in the above Guitar TAB, play them backward, and jump around the notes to get used to how they sound.
I recommend using your index finger on the fifth fret and ring finger on the seventh fret when playing these notes.
Improvisation Exercise 1
This first exercise asks you to improvise over a mid-tempo rock-based backing track.
Remember – you don’t need to try and come up with anything impressive, all you need to do is learn to play along with the rhythm.
This is a confidence-building exercise, so don’t pressure yourself.
Here is a short example of the type of improvisation you will be aiming for in this first exercise:
Note: if you don’t see the above video, it may be due to issues with browser extensions such as ad-blockers.Not very impressive sounding, right?
That’s fine. At this stage, you shouldn’t expect to come up with anything amazing.
This exercise is all about getting confident in making something up. It doesn’t matter whether what you come up with sounds good or not, as long as you’re trying to play in time with the other instruments.
In my demonstration, you could hear that I was freely moving around the four notes and focused on picking the notes to be in time with the drums.
You don’t have to try and copy what I did and it’s okay if you need to take your time and play fewer notes.
Listen to the below backing track the first time without playing anything, then play the video again and try and play along using the four notes shown in the diagram.
Here’s the backing track for Exercise 1:
How did that feel?It’s okay if it felt weird or you felt stuck at any point. The more you practice this, the more confident you will get.
Once you build your confidence playing simple parts like this, we can then start turning those basic parts into something more interesting.
Here are some tips to try out before you move to the next exercise:
- Don’t jump in straight away. Listen to the backing track for a bit to get used to the timing and rhythm before you start jamming
- Don’t rush. Rushing creates sloppy technique. Take your time and don’t worry if you have long pauses. Focus on playing notes in time with the other instruments
- Use a suitable guitar tone. A driven tone works great for this type of backing track
Have a listen to my earlier demonstration if you feel stuck for ideas and try to copy what you hear.
Once you have played over the first exercise backing track a few times, continue to Exercise 2.
Improvisation Exercise 2
This exercise is the same as the first exercise, only with a different style backing track.
You have the same goals with this exercise. Just get used to playing in time with the other instruments and build your confidence.
Use the same four notes as before.
Here is an example of what you could try to play over exercise 2:
You may notice that this backing track has a higher tempo compared to exercise 1.While the track is faster, you don’t have to play faster. Only play notes that you feel confident playing.
Don’t rush to try and play fast – just play good quality notes in time with the other instruments.
Here is exercise 2:
It’s okay if you felt this one was harder than the other one.The point of practicing with different rhythms, tempos, and styles is to build your confidence so eventually, you can play along with anything.
Listen to my example if you felt stuck and try to copy what I did.
Once you have played over the backing track a few times, you can move on to Exercise 3.
Improvisation Exercise 3
In this exercise, there are no drums or bass. All you have to play with is an acoustic guitar.
This can feel hard at first because the rhythm may not be as obvious as it was in the other exercises.
The goal here is to listen closely to the guitar and build a sense of the underlying beat in your head.
This may take some practice if you’re not used to it, but it’s a great skill to develop.
Here is an example of what you could play over this exercise:
You may notice that because the acoustic guitar has a softer and slower feel, I’ve adjusted my playing slightly to match the style.Try to do the same. You might also want to switch to a clean guitar tone if you’re playing electric guitar.
Try playing longer notes and think about when you should change to the next note.
You only have four notes to choose from, so think about whether you want the next note to be higher or lower than the one you’re playing.
Thinking like this during these exercises will help you develop your sense of melody and will help you in later lessons.
Here is the backing track for Exercise 3:
You may find this exercise easier than the other two, or you may find it harder.I recommend you keep practicing all of these exercises, so you can build your confidence in playing along with any style backing track.
Try jamming with the above backing track a few times before moving on to the last exercise in this lesson.
Improvisation Exercise 4
The last exercise in this lesson takes everything you have practiced in the first three exercises and mixes it up.
The first half of the backing track has a up-beat rock rhythm. Then it quickly switches to a more half-time feeling.
The style and feel of the track changes halfway through, so your goal is to try and change your playing style to match the change.
You could start out playing fast and jumping around the notes, then when the backing track changes, you could switch to a slower style of playing.
Or you could do the complete opposite.
Learning to change your playing style to match what the other instruments are doing is a crucial part of becoming a great improvisational guitarist.
Here is a basic example of how you could play over this exercise:
As you can hear, this exercise isn’t any harder than the other three exercises.The only difference is that I changed the way I played when the backing track changed.
Try to do something similar when you play over the backing track.
Here is the backing track for Exercise 4:
It might take you a few attempts before you get used to the sudden change in the backing track.Take your time and get used to all four of the backing tracks.
Lesson 1 Practice Plan
It might feel weird or awkward at first, but these exercises will help you build foundational skills and will speed up your progress later on.
Whether you found these exercises easy or hard, I recommend you practice them every day for at least a week before looking at moving on to the next exercise.
Spend 10 – 20 minutes every day playing through all of these exercises to get the most out of them.
Even if you only play each exercise once per day, that’s still enough to start making progress.
Full Lesson on YouTube
While the above lesson contains everything you need to know to start practicing the exercises, this video walks you through the basics.
I’ve you’ve read this lesson in full, you won’t need to watch the video. But it’s a handy summary if you need it.
Next Steps
The next step after you feel comfortable with the above exercises is to do the exact same thing with a scale such as the Pentatonic Scale.
Improvising with the Pentatonic Scale might sound intimidating, but once you learn how to do it, you’ll discover that countless songs use it for solos and lead sections.
Learn everything you need to know about the Pentatonic Scale in this guide.
Once you learn the basic Pentatonic Scale positions, repeat the above exercises using those shapes and positions. You’ll quickly learn that it isn’t hard to put the scale into practice.
Here are some more resources to help you feel more confident with improvising over the entire fretboard:
- How to Practice Guitar Scales: Exercises, Charts, PDFs
- Guitar Scales Explained Simple
- How to Get Better at Guitar Scales
- What Guitar Scales and Modes Should You Learn?
- How to Break Out of the Pentatonic Box
- How to Memorize the Fretboard