
In this lesson I will show you how to use a looper pedal if you have never used one before. As a guitar teacher I highly recommend every guitarist own a looper pedal. You may have seen guitarists use looper pedals in live performances or you might have seen a looper pedal elsewhere and wondered what you can use it for. There are many different uses for a looper pedal and I will eventually cover all potential uses in lessons and guides (subscribe to our newsletter to stay up to date). In this lesson we will look at how to get started with a looper pedal and build up some basic skills.
A looper pedal is a great way to develop your sense of timing as well as an excellent tool to help you work on skills. Let’s look at how to use a looper pedal as a practicing tool.
Looper Pedal Features
There are many different looper pedals available with a wide range of features. This lesson will focus on basic features to make sure you can use any looper pedal available. To give you an idea of the most basic type of loop pedals available, to the right is an image of the Ditto by TC Electronics. It’s an incredibly simple looper pedal (read my review of the Ditto here).
You can see that it only has one footswitch which is used to control the loop functions. Other looper pedals may have more footswitches and controls for different functions (eg: overdub, undo/redo, play/stop).
In future lessons we will look at more complicated loops and functions so for now, all you need is the ability to record and playback which is possible in every looper pedal.
Keep in mind that many delay pedals offer built in loopers such as the Flashback X4 so even if you don’t want to buy a standalone loop pedal, you can still achieve the same function with many delay pedals. At the end of this lesson I’ll link to relevant delay pedals.
A note about quantization:
Some pedals offer the ability to Quantize your loop which would avoid timing issues – but for this lesson we will assume your looper pedal cannot quantize. Being able to set up a loop without having to rely on a quantize function is an important skill everybody should learn. Think of quantization as auto-tune for a guitarist’s rhythm – it fixes any problems but a good guitarist shouldn’t rely on it. If your loop pedal has a quantize function, I recommend turning it off for these exercises.
Exercise 1: Basic Loop
This exercise will get you used to opening and closing the loop. You will start thinking about timing without having to stress about complicated rhythms. If you’re a beginner and just getting used to counting the beat while playing, this is a great exercise to start with.
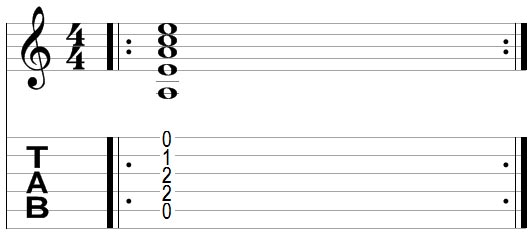
In this basic loop we want the chord (choose any chord you feel comfortable with) to ring out for four beats then end the loop so it starts the chord again on beat 1.
To create this loop, you need to hit the looper footswitch, strum the chord, count out the four beats, then hit the footswitch again at the very end of the bar.
Here are the steps if you count the beats out in your head: (Hit footswitch) 1(chord) + 2 + 3 + 4 + (hit footswitch)
Listen to this exercise and you will see how simple it is to create this loop:
For this exercise, simply practice counting the beat out in your head or out loud. We’re not looking at accuracy yet so don’t worry too much about hitting the end of the loop too early or late. Practice this until you can easily count the beat out while playing and hit the footswitch at the right time.
Exercise 2: Basic Strumming
In this exercise we simply pick a chord (in this example A minor), then strum it eight times to give up two full bars in the loop. At the end of the second bar, we hit the looper footswitch to end the loop.
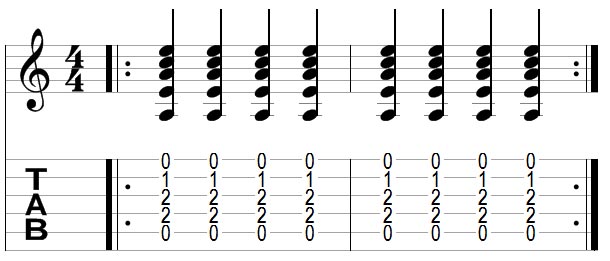
Here’s a breakdown of how you will play this using a looper pedal:
- Hit the looper footswitch
- Immediately start playing the exercise
- After the last chord and before the next beat, hit the footswitch again to close the loop
If you time your footswitch hits properly, you will end up with a smooth loop as can be heard below:
Notice that the space between the last chord and the first repeat is seamless? That’s what you’re aiming for here. You want your loop to end just in time so it starts right back on the first beat.
Practice this exercise until you can confidently play the part and hit the end of the loop at the exact time so the rhythm continues seamlessly.
What a bad loop sounds like
The most important part of creating a loop is to make sure the loop finishes at the right point.
A loop pedal requires you to push a footswitch at the start of the loop, then again when you want the loop to finish. Your job is to time it so the end of the loop is at the right position. Listen to the below example to hear what it sounds like when a loop doesn’t end properly:
You can hear that the end of the loop wasn’t timed properly and the loop jumps back to the start too early.
Exercise 3: 4 Bar Blues
Let’s move on to something a bit more musical and useful. Being able to keep a steady rhythm is important for a loop and timing the end point of the loop is crucial. Fortunately with a bit of practice you will be able to easily time your loop perfectly without the need for quantizing. In this exercise we will take a standard blues shuffle and create a longer loop you can use to improvise over.
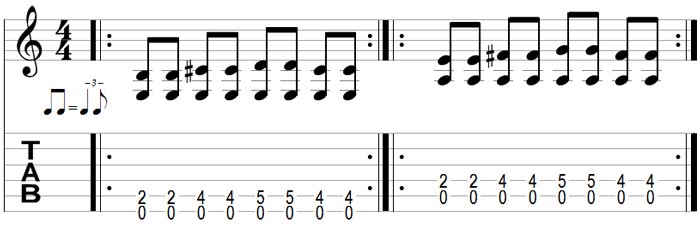
This is played with a shuffle rhythm so listen to the audio clip later on if you’re unsure what this should sound like. The end point of the loop is after the second repeat of the A groove. This means you will end up with four bars in the loop – two bars in E and two bars in A. Most looper pedals will have a long enough loop time to allow this.
Just like the previous exercise, try to time the end point of the loop so the rhythm continues without any pauses or skips.
Once you have your loop set up and the rhythm continues seamlessly on each repeat, you can then experiment with improvising over the top of the loop. Experiment with different scales and jam along with the loop just like you would a backing track.
Exercise 4: Overdubbing
Once you feel confident in creating a basic loop and timing the end point so the rhythm continues seamlessly, you can start to experiment with overdubbing. Once you have a loop set up, you can hit the record or overdub footswitch again to record over the top of the loop. This is a great function that lets you build up very rich loops. Live guitarists often use this feature to build up complicated backing tracks all recorded one part at a time on the loop.
Before we look at this exercise, let’s look at how to overdub on a few different loop pedals. Don’t worry if your loop pedal isn’t listed as most pedals have similar functions so you will find yours will be more or less the same.
How to overdub your loop on the Flashback X4:
If you own a delay pedal that offers a loop function (read my review of the Flashback X4 here), you may or may not be able to overdub. You can definitely overdub on the X4 so let’s look at how to use it as a looper.
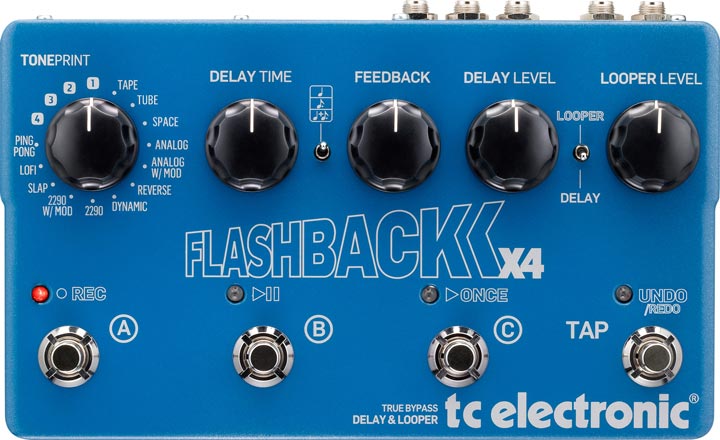
Once the unit is set to Looper mode (the toggle switch top right), the four footswitches control different loop functions. You can see they are labelled above each footswitch. To set the initial loop, you would simply hit the far left footswitch labelled ‘Rec’ and play your loop. At the end of the loop to end it and start the overdub, hit the ‘Rec’ footswitch again.
Then you can control playback with the second footswitch (labelled with a play/pause symbol). If you make a mistake in your overdub, simply hit the far right footswitch labelled ‘Undo/Redo’.
How to overdub your loop on the Line 6 POD HD500X:
If you own a multi-effects pedal (read my review of the HD500X here), you will most likely have a loop function available. Most new multi-effects pedals offer loop functions similar to what the HD500X offers.
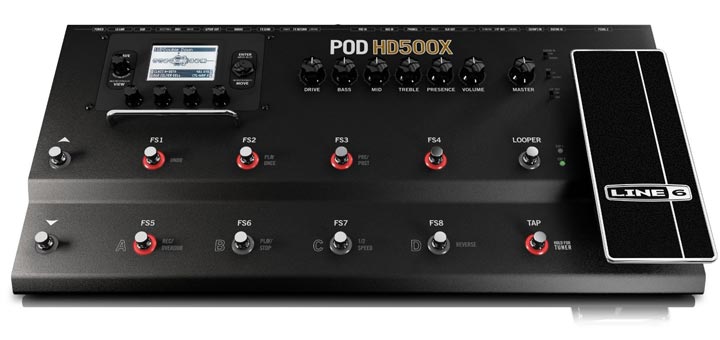
On the HD500X, there are seven footswitches to control different loop functions which gives you incredible control over your loop. You can also see there is a dedicated footswitch to enable the looper on the top right. After you enable the looper by hitting the top right footswitch, the seven labelled footswitches will allows you to control your loop. The ‘REC/OVERDUB’ footswitch allows you to start recording and overdub on your loop. Hit it to start your loop, then if you want to immediately overdub over the top, hit it again. Otherwise you simply hit the ‘PLAY/STOP’ footswitch to leave the loop in playback mode. If you make a mistake, hit the ‘UNDO’ footswitch and it will erase your last overdub.
How to overdub on the BOSS RC30:
Overdubbing on the BOSS RC-30 (read my review of the BOSS RC-30 here) is easy thanks to the LEDs that indicate whether you’re in playback or recording mode.
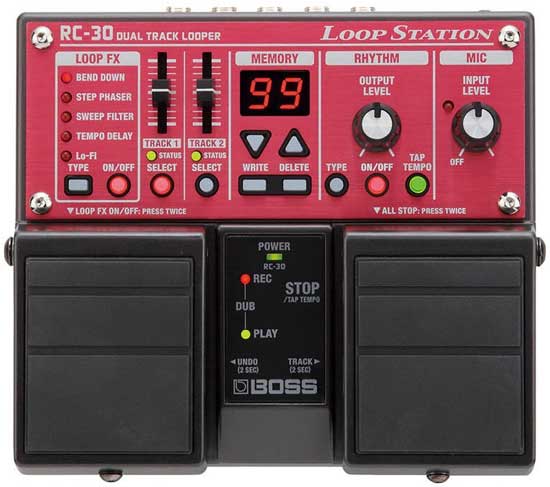
Now it is possible to change the way the RC-30 enters overdub mode as explained in my review. So for now I’ll assume you have it set to default options. Read my review to learn how to change settings.
To start your loop, hit the left pedal. To end the loop you hit the left pedal again. This will automatically start playback as well as enter the pedal into overdub mode. To enter playback mode, you hit the left pedal again (so three times in total to enter playback mode only). Keep this in mind because as soon as you complete your first loop, you automatically enter overdub mode. So if you’re not prepared and you make a mistake, hold the left pedal down for two seconds to undo the overdub.
How to overdub your loop on the Ditto:
If your looper is like the Ditto (read my review of the Ditto here) and only has one footswitch, overdubbing will still be possible, but it is controlled differently.
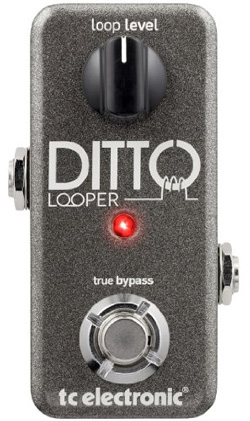
To record your first layer of the loop, hit the footswitch once. Once you reach the end of your loop, hit the footswitch again. This will switch it to playback mode and your loop will repeat on it’s own.
To now add an overdub, you simply hit the footswitch again. To finish your overdub, hit the footswitch again. So any time you want to switch between playback and overdub mode, simply hit the footswitch.
To undo your last overdub, hold the footswitch down for just over a second during playback. Keep in mind that you can only undo your last overdub. To stop playback, hit the footswitch twice in a row.
Back to the exercise:
Remember that if you make a mistake, use your pedal’s undo function to remove the mistake. If your looper pedal doesn’t have an undo feature, if you make a mistake it means you have to start again from scratch. This exercise will get you used to creating simple overdubs over the top of Exercise 3.
Start by recording Exercise 3.
Next, practice playing the following over the top of the loop (don’t record it yet):
If you recorded Exercise 3 properly, you will be able to match up the two chords here with the rhythm. The idea here is to thicken up the rhythm by having the blues shuffle and the chords ringing out together.
When you feel confident with your timing, hit the overdub function on your pedal and time the chords along with your loop. After you record both chords, make sure you turn off the overdub function or else whatever you play will continue to be recorded.
If you record the overdub properly, it should sound something like this:
Delete the entire loop and practice recreating it again from scratch. The goal here is to get used to laying down a loop then overdubbing over the top of it. Use your Undo function if you make a mistake but practice creating this loop from scratch a few times.
Exercise 5: Your Own Rhythm
Now that you have practiced recording and looping some basic patterns and rhythms, it’s now time to try to come up with your own rhythm to loop. Even if you’re a beginner you will find it easy to come up with a basic pattern and loop it now that you can set the end point of your loop properly.
Here are a few ideas for different simple things you can practice looping:
- Simple chord progression
- Arpeggiated chords
- A riff from a song
- A full 12 bar blues shuffle (check to make sure your loop pedal allows a long enough loop time)
Come up with a simple riff or pattern to record for your loop and practice recording it until you can easily set up the loop perfectly without any skips or gaps at the end of each repeat.
Once you have your basic loop set up, jam over the top of it and try to come up with ideas for what you could overdub over the top of the loop.
Here are some ideas for what you could overdub over the top of your loop:
- Add another rhythm on top of the existing rhythm
- Use volume swells to create a violin-like backing
- Play a single note melody
- Harmonize over the top of the riff or chord progression
- Use effect pedals to build up a lush sound effect
Overdub over your loop then sit back and try to think about what else you could overdub over the top. If you overdubbed a melody over your loop, work out how to harmonize the melody and overdub the harmony.
Come up with 3-5 more overdubs and think about what works well and what doesn’t. The goal here is to practice thinking creatively and listening to the results. There are no right or wrong parts – only what you enjoy listening to. So practice recording different ideas to figure out what works and what doesn’t.
Download a Printable PDF of This Lesson
The above exercises are quick and easy to learn, but you might like a reference sheet to help you learn them. The below PDF will give you a handy overview of all exercises in this lesson including an extra bonus exercise.
Click here to download the PDF for this lesson.
If you liked this lesson, consider subscribing to email updates to support the site and receive more guides, lessons, and reviews in the future.
How to use a Loop Pedal: Summary
The key to a good loop is timing the start and end points properly. If your loop pedal has a quantize function, you will find it easy to create well-timed loops. But as explained earlier, think of quantizing in a similar way to auto-tune: it’s a useful tool, but it shouldn’t be used to overcome poor skills. This lesson taught you how to develop your timing skills so you can create a perfect loop every time. The exercises were designed to be easy so you could focus on timing your loop.
If you don’t already own a loop pedal or a delay pedal with a decent loop function, I highly recommend buying one. If you’re interested in getting one, my Ultimate Guide to Looper Pedals will give you a thorough look at loopers and how to choose the best looper pedal for you.
Here are a few pedals I’ve reviewed that offer looper functions:
- TC Electronic Flashback X4 (this is a delay pedal with a very good inbuilt looper)
- TC Electronic Ditto (this is an affordable and tiny looper with basic features)
- BOSS RC-30 (a more expensive option with plenty of features)
- Line 6 POD HD500X (this is a multi-effects unit with an excellent inbuilt looper)
- Line 6 DL4 (this is a delay pedal with a decent looper)
- Zoom G5 (this is a multi-effects unit with a decent inbuilt looper)
There are far more looper pedals available and I will be reviewing as many as I can over time. I recommend practicing with basic loops like the exercises above and experimenting with the different features your loop pedal offers. Learn how to use the Undo function, play around with any inbuilt effects and experiment with the Play/Pause function if yours has one.
I will be writing more looper based lessons so subscribe to my newsletter for updates on new lessons, guides and reviews.