Guitar compressor pedals can have a dramatic effect on your tone and can give you access to a wide range of tones.
Unfortunately, there are quite a few articles and guides online that give wrong information on how compressors work so I’ve written this guide to give you correct and useful information.
When used properly compression can give your tone new life and solve a lot of problems. When used incorrectly it can create a mess.
If you’re thinking about getting a compression pedal or are unsure how to use yours properly, this guide is for you.
In this guide you will learn:
- What is a guitar compressor
- How does a guitar compressor pedal work
- Best guitar compressor pedals
- How to get the most out of a guitar compressor
By the end of this guide, you will have a better understanding of compressors than most guitarists, you will know how to use a compressor and you will be able to use one to improve your tone in an intelligent way.
If you want to learn how to use compression along with other guitar effects, check out my Guitar Effects Course here. It includes countless audio examples to hear all of the effects such as compression in action.
What is a Compressor
The simplest way of thinking about a compressor is that it evens out the volume of a signal.
The compressor will take your signal and any loud parts will be reduced so the overall volume is a bit more consistent.
A really basic explanation is that a compressor makes loud sounds softer.
To really understand how a compressor works and what it does, we need to understand a few terms:
- dB: Decibel. This is a measure of the loudness of a sound
- Threshold: the sound level where the compressor begins to apply to the signal
- Ratio: how much the compressor will reduce the volume of sounds above the threshold
- Make-Up Gain: raising the volume after the compressor is applied to make up for the reduction in overall volume
- Headroom: the dynamic range of your signal. Think of it as how much of a difference there is between the softest and loudest sounds you can produce
- Attack: how quickly the compressor kicks in after the threshold is hit. Applied in milliseconds (ms)
- Release: how quickly the compressor stops after the signal comes back below the threshold. Applied in milliseconds (ms)
- Soft Knee: the compressor gradually applies as the signal rises above the threshold
- Hard Knee: the compressor applies in full when the signal rises above the threshold
Now that you have a basic understanding of what these terms mean, let’s have a proper look at what a compressor does.
When a signal rises above a certain volume level (the threshold), it will reduce the volume based on the ratio. So if the ratio is 5:1, that means for every 5dB the signal is above the threshold, the compressor will only allow 1dB to come out. So the overall effect is the signal is reduced by 4dB.
If the ratio is 20:1 this means for every 20dB the signal is above the threshold, only 1dB will be heard above the threshold. So the higher the threshold, the more the compressor will reduce the volume above the threshold.
The two main controls you have with a compressor are the threshold and the ratio. Reducing the threshold means that the compressor will be applied to more and more of your tone. If you have a high threshold, it will only apply to the very loud parts of your signal (eg: when you pick the strings hard).
The ratio allows you to control how much the volume is reduced above the threshold. The higher the ratio, the more the compressor will compress your signal.
Because the compressor lowers the volume of your signal above the threshold, the overall volume drops when you use a compressor. So a make-up gain is often used to compensate for the decrease in volume.
One more point worth mentioning is that a compressor doesn’t make softer sounds louder as mistakenly mentioned on countless websites. It only makes louder parts softer.
The softer parts sound louder because of the way the compressor squashes your tone – there’s less of a volume difference between the loudest and softest parts so the softer parts appear to be louder. It’s a minor technicality and won’t help you in any way, but at least you now know how it really works.
The below image shows what a compressor does to audio. The bottom waveform is the uncompressed signal. You can see there’s quite a lot of spikes and variation in the amplitude (volume).

This means you can hear big differences between the soft and loud parts. When a compressor is applied, anything above a certain threshold is reduced based on the ratio. The top waveform is the compressed version.
You can see that there aren’t any more spikes in volume and everything is evened out. There are still some quieter parts but there’s less of a difference between the soft and loud parts.
Later on, you will see examples of extreme compression and how too much compression can be bad.
Guitar Compressor Pedal Jargon
Now that you understand the jargon used with compressors, you might be surprised to find that most guitar compressor pedals don’t mention many of those terms.
You don’t see pedals with a Threshold or Ratio knob or a switch between Soft Knee and Hard Knee.
Instead, you see knobs labeled ‘Sustain’ or ‘Sensitivity’. The main reason I guess guitar pedals change the jargon is that not many guitarists know what threshold or ratio mean, but everybody knows what sustain means.
Many guitar compressor pedals are actually renamed as ‘sustain’ pedals simply because so many guitarists want more sustain.
Keep this in mind when you compare different compressor pedals. If you see a pedal with a sustain knob, now you know what that really means and won’t be tricked into thinking it’s something else completely – it’s just a threshold or ratio knob dressed up to sound more appealing to guitarists.
Too Much Compression is Bad
While compression can be an excellent tool and a way to transform your tone, it is often abused. You might have heard about the ‘Loudness Wars’ in music.
The Loudness Wars refer to the trend where compressors are applied to recordings as a way to squeeze out as much volume as possible.
This is done because a louder signal tends to sound higher quality (a well-known trick a salesperson will use to sell you an overpriced hi-fi stereo system or guitar amp).
So artists try to push the volume higher and higher to the point where most modern music today is incredibly compressed. Compare a song from the 70s to a song today and you will hear a massive difference in volume.
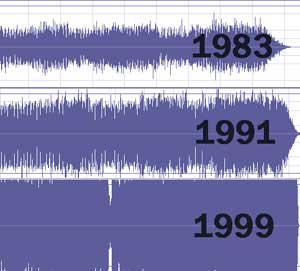
In the above image, you can see the waveform of songs over the years. The one in 1983 has plenty of differences between quieter and louder sections (called headroom). Looking at the 1999 song you can see everything is basically the same volume the entire song.
There are no softer or louder parts, everything is at max. One reason why people tend to prefer listening to vinyl recordings rather than MP3s is that MP3s can be compressed where the vinyl versions can have more headroom.
The compressor basically squashes the signal so there’s very little difference between soft and loud parts. Then a make-up gain is applied to crank the volume as much as possible.
The end result is a song that has no dynamics – it always stays at the same volume without any soft or loud parts.
A good example of how this was taken too far can be heard on Metallica’s album Death Magnetic. That album’s tracks were compressed to the point that you can actually hear clipping and distortion due to the over-the-top compression.
When songs from the album were included in the game Guitar Hero, people found out that the Guitar Hero versions weren’t overly compressed as you can see below:

The CD version is squashed to the point where everything is the same volume. The Guitar Hero version has plenty of headroom and you can hear the dynamics throughout the song.
Some compression is still used, but not to the extreme like the CD version.
For your own use as a guitarist, it might be tempting to crank a compressor pedal up to give you on-tap sustain. But too much compression can ruin your tone.
Later on in this guide, we will look at how to use a compressor properly.
Best Guitar Compressor Pedals
There are quite a few guitar compressor pedals available today and while there’s no one best pedal, there are a few popular ones worth looking at.
MXR Dyna Comp
The Dyna Comp is possibly the most famous guitar compressor pedal available. It’s also been the most popular for quite a few decades and is instantly recognizable by anybody who knows a bit about compressors.
In my David Gilmour Guide, you can see that he uses the Dyna Comp in his rig along with countless other guitarists.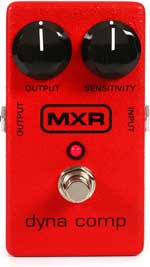
The Dyna Comp has been so successful because it’s simple. You may have read the section on how a compressor works and felt a bit overwhelmed with the jargon and complexity.
The Dyna Comp is possibly the easiest compressor pedal you could find as it only uses two controls: Level and Sensitivity.
The Level knob sets the compressed output level and as most guitar pedals have level knobs, you’re probably already familiar with how to use it properly. The Sensitivity knob basically sets the entire compressor level.
You don’t have individual knobs to set the threshold, ratio, attack, release or knee – it’s all in one knob.
The actual function of the Sensitivity knob is up for debate. One part of the official manual says it sets the threshold while another part says it sets the ratio.
The advantage of only having one knob to control the compression is that it’s easy to use and you won’t have to worry about finding the right settings. You simply adjust the sensitivity and you’re done.
The disadvantage of only having one knob is that you cannot tweak the compressor like you can with other pedals. You cannot set a slow attack or change the knee – all of those settings are out of your control.
For most guitarists, that’s not a problem because the Dyna Comp sounds great, but if you like to tweak your effects to find the perfect setting, the Dyna Comp may not suit you.
Check out the full details and price of the MXR Dyna Comp here.
Pros: incredibly quick and easy to use. It’s the lowest price pedal in this list
Cons: doesn’t give you much control or flexibility
Xotic SP Compressor
Check out my review of the Xotic SP Compressor to get a thorough look at its unique features as well as sound clips. The Xotic has two control knobs, one three-way switch and four internal dip switches to control the effect. So compared to the Dyna Comp, the SP gives you far more flexibility.
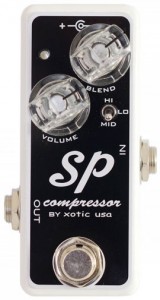
The way the SP Compressor works is different from most compressor pedals. Instead of using a knob or multiple knobs to set the threshold and ratio, it uses a three-way switch to choose between three different presets (high, mid and low).
This is handy as you don’t need to worry about trying to tweak the threshold and ratio levels and you’re likely to find one of the three presets works for you.
At the same time, it’s a bit limiting as you don’t have a full range to experiment with like you would with a knob.
The internal dip switches allow you to change the attack and release as well as a high filter cut and an input pad. These are nice features to include that help the SP play nice with other pedals.
As you’re unlikely to change these settings regularly, it’s not too much of a hassle that they’re internal switches.
The final feature to mention is the blend knob. Think of this as a mix knob you see on so many other effect pedals. It allows you to blend together the compressed signal and the dry signal.
This is also called Parallel compression or New York compression and it’s often used on drums (but can be used on guitar with great results).
Check out the full details and price of the SP Compressor here.
The blending of the compressed signal and the dry signal means you get the punchier, thicker tone of the compressed sound, but you also have some of the dynamic range of the dry signal.
You can tweak the blend of the two signals to find the perfect balance between dynamics and the compressed sound. It’s a fantastic feature and something more guitar compressor pedals should have.
The only other pedal on this list that uses a blend knob is the Wampler Ego.
Pros: good amount of flexibility, high quality and good value
Cons: the three-way toggle may not suit all guitarists
Check out my review of the Xotic SP Compressor for more details and sound clips of the SP in action.
Keeley 4 Knob Compressor C4
The Keeley 4 Knob Compressor C4 is one of the highest-rated guitar compressor pedals available today in terms of sound quality. The four knobs give you plenty of control over the compression.
It does come with a higher price tag, so your choice should be between whether you need the extra flexibility or quality the Keeley offers or whether a simpler pedal such as the Dyna Comp or Xotic SP would suit you better.

The Sustain knob is similar to the Sensitivity knob on the Dyna Comp – it sets the overall level of compression. So think of it as a threshold/ratio control. The second knob is a level control just like all other pedals.
The third knob adjusts the attack time. Remember that attack is how long the pedal waits before it applies the compression after the volume reaches the threshold.
So this is a great way to get the initial attack of the note to punch through before it is compressed. This will be handy for some guitarists while most guitarists won’t really use it at all.
The unique feature with this pedal is the clipping knob. The simple way to think about this is that it mimics what happens with a tube amp – as a tube amp is driven harder and harder, it clips and breaks up.
The clipping knob can be used in a similar way. You can use it to achieve a more dirty tone or dial it back to achieve a crystal clear tone.
Pros: great quality and plenty of flexibility. Clipping knob is a nice feature
Cons: expensive
Check out the price and details of the Keeley 4 Knob Compressor here.
Wampler Ego Compressor
The last pedal we’ll look at is another high-end compressor. The Wampler Ego Compressor gives you five knobs to play around with and also has a reputation for high sound quality.
The five control knobs are: sustain, tone, attack, volume, and blend.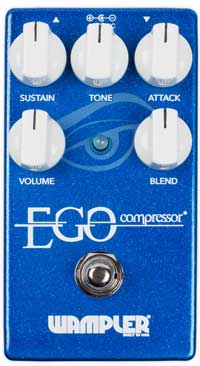
The sustain and volume knobs should be self-explanatory at this point. Like the Keeley C4, the Wampler Ego has an attack knob. The Ego also has a blend knob so it gives you the same flexibility the Xotic SP has in that regard.
The unique knob on this pedal is the tone knob. It’s a bit odd to see a tone knob on a compressor as a compressor doesn’t really change tone as an overdrive pedal does. The tone knob is basically a high-end EQ boost to give your compressed tone a brighter sound.
When I played around with the Ego I found I kept the tone knob all the way down but some guitarists may prefer using it.
When compared to all the other pedals mentioned above, the Wampler Ego has more flexibility and features. Keep in mind this does come at a higher cost.
Pros: plenty of flexibility and features
Cons: expensive
Check out the Wampler Ego price and details here.
My Personal Recommendation
If you’re interested in what my personal choice is with the four pedals above, it’s the Xotic SP Compressor. There are quite a few reasons why I feel it’s the best guitar compressor pedal available today.
Some guitarists may prefer the high-end Keeley or Wampler, but for most guitarists, the Xotic will give you the best results.
The feature that sold me when I first tried the SP is the blend knob. All the previous compressors I had tried didn’t have one so when I played around with it on the SP, it was immediately clear how useful this knob is.
The way I think of it is that it allows you to improve the sustain of your tone while keeping the dynamic range. That’s great for clean or dirty tones.
The blend knob allows you to take a distortion/overdrive tone and keep a lot of the dynamics while keeping a punchy tone. If you choose any other compressor pedal, I recommend finding one with a blend knob such as the Keeley.
I also loved the four internal dip switches because they are set-and-forget features. When I tried the Keeley or Wampler I didn’t feel having an attack knob was very important because once I found the right attack setting, I would just leave the knob.
That’s exactly what happened when I tried the SP – once I found the right attack setting, I closed the back and left the dip switch alone.
Of course, the right pedal for you may be completely different to what was the right pedal for me. So have a think about what features are important to you, then have a closer look at the above pedals to find the one that suits you best.
Guitar Compressor Pedal Placement
The placement of your compressor will also play a big part in the end result. As a simple way of thinking about it, the further down the line you place your compressor, the more of an impact it will have on the final signal.
If the compressor is placed first, all pedals that follow it have the freedom to affect the dynamics of your signal.
On the other hand, if the compressor is placed last, it means it takes the signal from all your other pedals and compresses it and that’s your final result.
Compressor first
The most popular choice is to place the compressor in the first position after your guitar (or after your tuner pedal). The reason many guitarists do this is that it will smooth out your guitar’s dynamics before feeding it to your drive pedals or other effects and the compressor won’t squash the signal of those effects.
Placing the compressor before any overdrive/distortion pedals mean your drive pedal will receive a thick tone with lower volume spikes. This can be great for sustain.
Compressor after drive pedal
Many other guitarists prefer to place the compressor after their distortion/overdrive pedal and before any other effect pedals. The reason for this is that the compressor will apply to both your clean sound and your drive sound and even both of them out.
Instead of the clean tone being compressed and switching over to an uncompressed drive tone, both a compressed.
The only way to find out which of the above two placements is right for you is to experiment! Place the compressor first and play around with both clean and drive sounds. Then place the compressor after your drive pedal and compare the results.
There’s no rule to say you should do it a certain way, so make your own mind up which you prefer.
Generally, you want to avoid placing the compressor too far down in your signal path. For example, if you place the compressor after a delay pedal, it can create a squashed mess of your tone.
So it’s generally a better practice to place it earlier in your chain.
To hear examples of a compressor in different positions and how it interacts with other types of effects, check out my Guitar Effects Course here.
When to Use a Compressor
Now we can look at when to use the compressor and when to not use it.
I recommend trying all of the following suggestions to see how you could potentially use a compressor. You will then get a feel for the way you prefer using it.
On all the time
The idea here is that the compressor is on all the time so it’s always affecting your tone whether you’re using a clean or driven sound. Many guitarists do this because the compressor gives them a thicker sound or adds more sustain.
Try starting with a subtle level of compression then gradually raise it until you feel it’s too much. This will give you an idea of how the compressor will affect your tone and find the right level for you.
Only during clean sounds
A compressor can sound great with a clean sound as it helps smooth out any high volume spikes that can sound jarring either at home or live. A live guitarist with a compressed clean tone will fit in the mix better with the rest of the band.
With this approach, you turn the compressor off when you switch to a drive sound because the drive will sort of compress your sound in its own way. Leaving the compressor off during your drive sound can give you more dynamics.
Try a subtle compression then try a full-on compression so you can get a feel for the level that suits the type of clean sound you want.
For example, if you want a really glassy clean tone, a high compression will help you achieve it. But if you simply want a smoother level in your clean tone, a more subtle compression would be suitable.
On as an effect
Guitar compressor pedals aren’t usually thought of as ‘effects’, they’re more like a ‘utility’ pedal. But you can use the compressor as an effect. The idea here is to turn it on when you want to add to your tone more sustain or thicken your tone up.
This can be useful when you want to go into a harmony section with another guitarist, when you want to change the feel of your clean tone or if you want to switch between a driven rhythm tone and a driven lead tone.
There are so many different times where you could use the compressor as an effect so experiment to see what works for you and what doesn’t.
Extra lead sustain
The compressor does a great job of increasing your sustain. So using the compressor during lead sections is a very easy way to add that extra bit of sustain and thickness to your tone.
It’s a very easy way to add a bit more sustain to your tone at home at low volumes – you don’t need to crank the volume up to assist your sustain, the compressor does the job well.
Live acoustic performances
If you play acoustic guitar live, a compressor can be used to give you a consistent volume level throughout your performance. It can be used to balance out soft fingerpicking sections with harder-hitting strumming sections.
Check out my guide on Essential Guitar Pedals for Acoustic Guitar to see why a compressor is so useful for acoustic guitarists and for other recommendations.
When Not to Use a Compressor
It’s equally important to think about when you shouldn’t use a compressor. There may be times when your tone will sound better with the compressor off.
Let’s say you want to play a soft fingerpicked section during a song and gradually build up the intensity. If a compressor is off, the soft fingerpicking will start off with a low volume and as you increase the intensity of your playing, you will hear the dynamics in your tone.
If you have a compressor on, the soft fingerpicking won’t sound natural – the volume will be too high and as you increase the intensity you’re not going to get the full effect as the volume will stay consistent.
Steve Vai is an example of a famous guitarist who uses a lot of compression. Many guitarists love his tone when he plays live while other guitarists walk away from one of his concerts disappointed by the overly compressed tone they heard.
The compressors he uses does help him achieve his very sustained tone, but it also takes away from the dynamics he can produce. It would be interesting to hear one of Vai’s songs such as Whispering a Prayer with and without compression to hear how turning off the compression would affect his dynamics.
The point I want to leave you with is that compression can help you achieve a very different quality in your tone. It can give your clean tone a completely fresh feel, it can smooth out your volume to give you consistency or it can help you improve sustain.
But keep in mind that there will be times when an uncompressed tone will sound better. Experiment and you will learn what works for you.
Want to Learn More?
Learn how other guitarists use compressors as well as how to combine compressors with other effects by signing up for my email newsletter.
I’ll share with you advice, lessons, guides, reviews and any upcoming resources to help you get the most out of any compressor you get as well as any other gear.
Found this guide useful? Please share it on social media to help support this site (if you use Pinterest, please pin the below photo).