David Gilmour’s Guitar Rig
David Gilmour’s tone continues to inspire generations of guitarists and there’s a lot we can learn from his use of gear.
The challenge with writing a guide on David Gilmour’s gear is that his rig has constantly evolved and can be quite complex. There are entire websites dedicated to following the changes in David Gilmour’s rig.
To show you how complex his rig can be, here is a photo of his live rig in 1994:
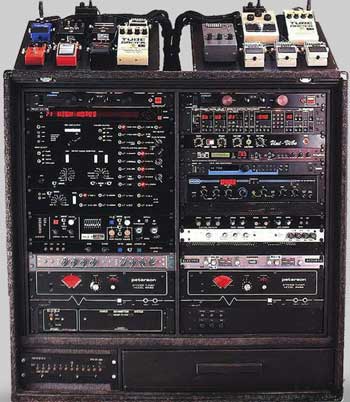
So if you’re reading this guide to find out how you can perfectly replicate David’s rig, then this photo should give you an idea of what’s involved.
The other issue is that it constantly changes. David switches in and out different pedals over time and it’s hard to find specific pedals that he uses throughout his entire career.
The goal of this guide isn’t to give you an exact list of gear David Gilmour uses so you can build your own rig, instead, the goal is to give you the key effects he uses and you can build your own custom rig based on what type of effects and tones you enjoy using.
Note: this guide is intended for beginners-intermediates who are just getting into Pink Floyd or David Gilmour. If you already know a fair bit about his playing or gear, then this guide isn’t for you. This guide is for somebody who isn’t sure what effects he uses and how to try and get a similar tone.
‘Tone is in the fingers’
You have probably heard this saying over and over whenever somebody talks about how a guitarist gets a certain tone. It can be frustrating for a beginner to hear this from more advanced guitarists because it isn’t practical or useful for a beginner (eg: you may not be ready to practice the type of bends that sound distinctly like David Gilmour).
While it is completely true that a massive part of a guitarist’s tone comes from how they play, it doesn’t help you when choosing effects or gear.
The reason I bring this up is that you will hear this phrase used over and over whenever somebody talks about David Gilmour’s tone. Somebody will ask ‘how does he get that tone in Comfortably Numb?’ only to receive the reply: ‘it’s all in his fingers’. That’s a cop-out answer and doesn’t help.
I’m not going to talk about ‘tone in the fingers’ because this is a guide on gear, not on technique. So keep this in mind if you build a rig with the intention of trying to sound like David Gilmour (or any other guitarist) – after you sort out the gear, you should then focus completely on technique. Gear will get you so far, technique will take you the rest of the way.
What Songs, Effects, Solos do you want to focus on?
Pink Floyd’s ‘The Dark Side of the Moon’ was released in 1973. ‘The Division Bell’ was released in 1994. David Gilmour’s solo album ‘Rattle That Lock’ was released in 2015. Listen to those three albums (and any in between) and you will hear very different tones and effects.
In terms of gear, a lot has changed from David’s early career to the present day. Gear that David used on more recent albums didn’t even exist in the earlier Pink Floyd days.
So your first job is to decide what type of effects and tones you like from David Gilmour’s large discography. Do you like the ethereal and atmospheric clean tones in tracks like Shine on You Crazy Diamond? Do you like the very early Pink Floyd fuzz distortion tones? Or do you like the warm and silky smooth tones heard on many of his later work?
This is important to think about because the gear you need will vary depending on what era of his career you’re interested in. It’s also why his live rig is so complicated – he needs to cram in a lot of different effects to cover his long career. So pick and choose the gear covered in this guide to go with the type of tone and effects that interest you.
For example, a fuzz distortion pedal is crucial if you want to try and replicate his dirtier tones, but if you’re only interested in his clean tones, you can skip it.
David Gilmour Guitars
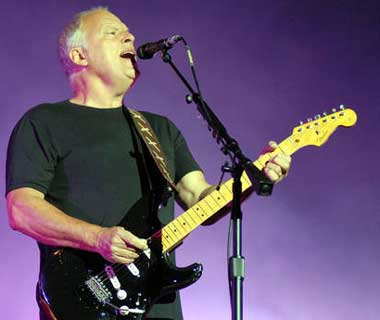
While you might occasionally see a photo of David playing a Telecaster or a Les Paul, he mostly uses Stratocasters. Just like David’s overall rig, his guitars experience constant changes over the years. David has played a variety of different Strats over the years and even when you look at one type of Strat, you will see he constantly changes necks, pickups and other features.
So my recommendation is to keep it simple and choose a guitar you love rather than struggle to find exactly what type of pickups or neck he uses.
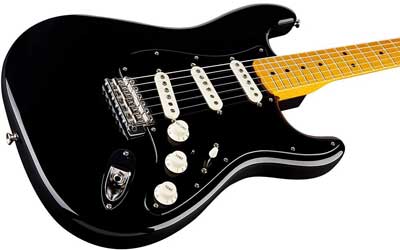
The two most well known and used guitars in David’s collection are a black strat (shown to the right) and a red strat (also with a maple neck).
Remember that essentially every single feature of his guitar have changed over the years: different pickups, different necks (even a rosewood fretboard at one point), different bridges, etc. David constantly experiments with different configurations so you can do the same thing.
My basic recommendation is to find a Strat you like the look and feel of with a maple neck. Over time you can change the pickups to suit your own preferences. If you’re on an extreme budget, all you need is a strat-like guitar that uses single coils.
It would be hard to try and replicate the majority David’s tones with humbucker pickups when he mainly uses a Strat with single-coils.
High end: If money isn’t a problem and you want the best, check out David Gilmour’s signature Stratocaster here.
Budget: While there are plenty of cheaper strats than the above option, if you’re on a strict budget, the below strat by Squier (click here for price, details, and different options) will give you the same style and basic features as Gilmour’s signature strat.

At a third of the price of the signature Strat, this is a great way for a beginner to get started.
Amplifier
David Gilmour’s main amp has been a Hiwatt DR103 100 watt throughout most of his career. But before you go out and buy a 100-watt Hiwatt stack, let’s look at why it’s probably not suitable for your needs.
It’s really important you choose an amp that suits your situation. If you only play for fun at home, then a high powered tube amp will not only drive your neighbors or family nuts, but it won’t sound good at low volumes. It won’t sound bad at low volumes, but you won’t get the warmth as explained later.
The temptation for most beginners is to buy a nice big amp because it looks great to have a massive amp against the wall at home. But when it comes to tube amps (the type of amp David Gilmour uses) at home, a small tube amp will work better.
The reason is that tube amps sound the best when the tubes are pushed really hard. Cranking the volume up will drive the tubes and as they warm up, you hear it in your tone.
A 15-watt amp doesn’t need to be pushed as hard in volume level to achieve the warmth needed compared to say a 100-watt amp which makes it much more suitable for home use. A 100-watt tube amp is overkill for most gigs and can easily drown out a small venue. Even a 20 or 50-watt amp can easily be overkill for some gigs or rehearsals.
Hiwatt Signature Series Little D Rig
This rig is based on the amplifier modified by Pete Cornish for David Gilmour. If you want the closest option to what David uses but one small enough to use at home, then this is the best option. It does come at a cost though so if you have the budget, enjoy.
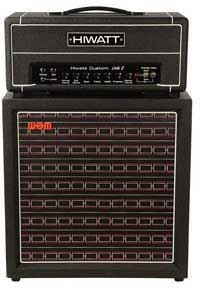
One feature worth noting is that you can switch the amp from 20watt to 0.5watt which is handy when you need to keep the volume down. Many tube amps have the ability to scale the wattage down so look out for this when checking out alternatives.
Check out the full details on the Hiwatt Little D Rig here.
Bugera V5
This is a great budget alternative for home use that’s still a great quality amp. 5 watt may not seem like much, but it’s plenty for playing at home. It has a 8″ speaker so it will have a different response compared to the rig above.
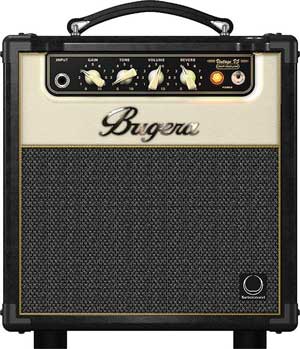
Check out the price and full details of the Bugera V5 here.
Fender Blues Junior III
This is a 15-watt combo with a 12″ speaker. It’s a nice mix of features and has a very similar sound to a Hiwatt amp. Still significantly cheaper than the Little D Rig, but plenty of power.
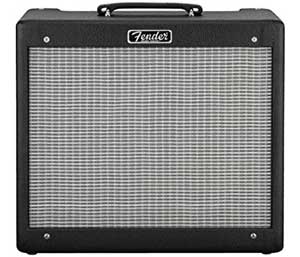
Check out the price and full details of the Fender Blues Junior III here.
Whatever amp you choose, the main point is that you want to find a tube amp that produces a nice clean tone. David Gilmour produces his dirty tone with pedals so focus on finding a good clean sounding amp.
Fuzz Distortion
Fuzz distortion is an important component of David Gilmour’s tone. In the 60s, fuzz distortion was common as there weren’t many distortion or overdrive options available. David started with a Dallas Arbiter Fuzz Face (as seen in my Jimi Hendrix guide) and eventually moved over to the well known Big Muff in the late 70s.
Vintage fuzz pedals can cause havoc with your existing pedalboard so while it might be tempting to look for vintage gear, I highly recommend using modern reissues or any other modern pedal.
There are countless fuzz distortion pedals available today and each one provides a different characteristic that you may love or hate. Fuzz distortion is a very personal choice and what might suit one person may not suit another.
Because there are so many different Fuzz pedals out there, I’ll list three options that losely match what David Gilmour has used over the years:
Dunlop FFM1 Silicon Fuzz Face Mini
David’s first Fuzz Face pedal used a germanium transistor (a germanium fuzz face pedal is available here: Dunlop FFM2 Germanium Fuzz Face® Mini Distortion) and switched over to a silicon transistor in the early 70s. There’s quite a difference between a germanium and silicon based fuzz face so if in doubt, try both out at a local guitar shop to get a feel for what you prefer.
The reason I recommend the below pedal is because it’s a mini version of the classic fuzz face. The smaller size means you still get the classic sound without it taking up a ridiculous amount of pedalboard space.
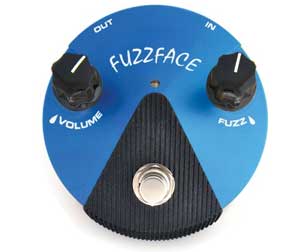
There are plenty of other fuzz face pedals and the other one I suggest looking at is the Jimi Hendrix version. If you’re also a Hendrix fan, it’s a nice option.
Listen to the tracks Time and Money to get an idea of what this type of fuzz distortion sounds like. David got a Big Muff pedal in the late 70s so his earlier work makes good use of the Fuzz Face.
Any songs before 1971 would have used a germanium fuzz face and anything after would have used a silicon fuzz face.
Electro-Harmonix Nano Big Muff
This pedal gives you the classic Big Muff sound that David has used throughout his career in a smaller casing. The original Big Muff is a massive pedal, so it’s nice to see a modern version with a more pedalboard-friendly size.
If you haven’t heard of the Big Muff before, you will gradually find out that a significant number of guitarists use one for some classic tones.
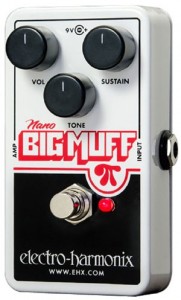
If you’re not sure which option to choose out of the three I’ve listed here, I recommend the Nano Big Muff (link to Amazon for price and full details).
You will start to hear the Big Muff used on records starting on the 1977 Animals as well as David’s first solo album in 1978.
ProCo RAT2
You can see the ProCo RAT in David’s live rig earlier in the top left section of pedals (to the right of the blue pedal). Many guitarists find that they can get closer to a David Gilmour tone when they use a ProCo RAT.
The reason is that the RAT has a filter knob which allows you to change the fuzz distortion in ways that aren’t possible with the Big Muff or the Fuzz Face. So from a versatility point of view, the RAT is a better option.
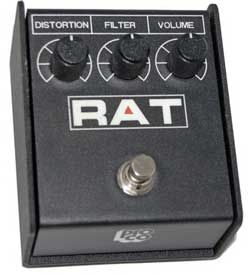
As mentioned, the ProCo RAT2 can be seen in the 1994 live rig for PULSE. A Big Muff is also included in that rig so you will hear a combination of both. I’m not sure of any specific albums or tracks that use the ProCo RAT.
So in summary, if you’re also a Hendrix fan, you might want a Fuzz Face. If you want a fuzz pedal with a bit of versatility, the RAT is a good option. If you want the most popular choice, the Big Muff is worth getting.
Compressor
Including a compressor in your rig is crucial to get the right tone whether that’s a clean tone or in combination with the fuzz distortion. A compressor will even out your signal, helps improve sustain as well as improve clarity or gain depending on how you use it.
If you’re unfamiliar with compressors, then check out my Ultimate Guide on Guitar Compressor Pedals. It will explain how compressors work, how to use them as well as compare the best compressors available.
David uses a MXR Dyna Comp and you can see it in his live rig photo earlier on the far left. The far blue pedal in that live rig is a BOSS CS-2 compressor.
When a compressor is used with a fuzz distortion, it smooths it out and adds some warmth. So if you currently have a fuzz distortion pedal and feel it’s too buzzy or fizzy, then adding a compressor is a great way to smooth it out.
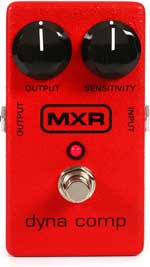
So whether you want to try to emulate David’s clean or dirty tones, a compressor is an important component. It won’t affect your tone in the same way other effect pedals do, but it can dramatically improve the overall quality of your tone.
There are plenty of alternatives when it comes to compressors and some you may find better than the Dyna Comp. A great alternative is the Xotic SP Compressor I reviewed here but for a full comparison check out my guide on compressors.
Modulation
You will hear a variety of different modulation effects as you listen through David’s discography. It’s an important component as it can give your clean or dirty tones that extra touch of color or magic.
David started off using Leslie rotating speakers and used them as part of his live rig. In the early 70s he started using a UniVibe pedal (the Jimi Hendrix guide goes into detail on UniVibe as well as good options).
Listen to the track Breathe to hear the UniVibe in action. Later in the 70s David started using a MXR Phase 90 and you can hear it throughout the album Wish You Were Here.
In the late 70s he switched to using an Electric Mistress by Electro-Harmonix and you can hear it throughout his first solo album. At the start of the 80s he started using a BOSS CE-2 and continues to use it today.
While all of the above modulation pedals are similar, they use different types of modulation. The MXR Phase 90 is a phaser, the Electric Mistress is a flanger and the BOSS CE-2 is a chorus. The UniVibe is sort of a mix of a chorus and phaser with it’s own unique sound.
So if you’re looking for one modulation pedal to cover all bases, keep in mind that these are all different effects.
MXR Phase 90
As mentioned, this pedal is a phaser or phase shifter. It’s an incredibly popular pedal and well known for Van Halen’s ‘brown sound’. For many Gilmour fans, this is a suitable modulation pedal and does a good job of covering most songs.
The only control on the pedal is a speed control so it’s an easy ‘set and forget’ pedal. The downside is that it only has one control – so you won’t be able to tweak the effect like you can with other pedals.
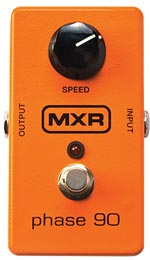
Check out the price and details of the Phase 90 here (link to Amazon).
A lot of guitarists love the Phase 90 and many hate it. I personally feel that the one control knob isn’t enough and you’re better off finding a pedal that allows you to adjust the effect with a bit more control.
The Phase 90 can do a good job with songs that did use a UniVibe as it’s a very similar effect. So if you’re not interested in buying a separate UniVibe pedal, a phaser like this one is a decent option.
EHX Deluxe Electric Mistress
Unlike the Phase 90, the Electric Mistress gives you more control over the effect. This is a flanger so you will hear a distinctly different effect with a more metallic resonance. It is twice the price of the Phase 90 or the BOSS below so keep this in mind when comparing the options.
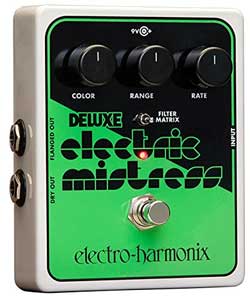
Check out the EHX Deluxe Electric Mistress here for full details.
BOSS CE-5 Stereo Chorus Ensemble
While David Gilmour uses a CE-2, the BOSS CE-5 is readily available. I recommend a stereo chorus pedal over a mono one because in the future if you decide to play around with a stereo rig (they’re great fun), a stereo chorus pedal will be a valuable component.
It’s worth mentioning that the CE-2 is very overpowering and David actually had it connect to a dedicated amp so he could blend the chorus amp with his non-chorus amp. Fortunately, the CE-5 has an effect level knob so you can easily control the level of chorus.
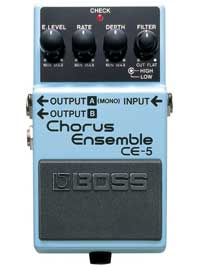
Check out the BOSS CE-5 here for full details.
It’s worth keeping in mind that while chorus can be a great effect when used properly, it’s sometimes used by guitarists in a way that makes their tone sound outdated or cheesy. So if you do get a chorus pedal, have a listen to when David uses it, how much of the effect you hear and more importantly, when he doesn’t use it.
Chorus, Flanger & Vibe all in one pedal
It’s really hard to nail the right tone when you have a chorus pedal and the song needs a flanger or vibe pedal. So as an alternative to the pedals listed above, I’m going to suggest an all-in-one pedal that contains chorus, vibe, and flanger.
The Nebulus by Empress is a high-quality pedal with a lot of different options. You can achieve rotary style effects, 60s or 70s style flangers or a few different types of chorus.
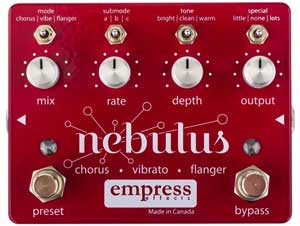
Check out the price and full details of the Empress Nebulus here.
The reason I highly recommend this pedal instead of any one of the earlier options is that it gives you flexibility. If you want to play a song from earlier Pink Floyd albums, you can set it to vibe mode and find the right sub-mode and dial in a great UniVibe/rotary speaker effect.
If you then want to play a later track, you can switch to chorus and find the chorus that best suits the song. While it is more expensive than the other options, it gives you a lot of control over the modulation you use.
Delay
David Gilmour tends to use delay in a way that makes it sound like reverb. The way the delays blend together to create a smooth atmospheric effect is the way to think about delay when trying to achieve a Gilmour-like tone.
David has used a variety of different delay units over the years and many would be hard to find today. Fortunately, the market is full of high-quality delay pedals so you have plenty of choices.
Whether you choose a digital delay or an analog delay should depend on what type of variety you would like to have available with your delay and the overall sound of the delay.
Check out my guide on delay pedals here to figure out what delay pedal would be best for you.
Budget David Gilmour Rig
Now that you have read through the different effects options, let’s look at a simple rig you can put together on a budget to start playing around with some David Gilmour tones. This rig takes the cheapest options above and only includes the bare minimum needed.
You can switch out any of the below with other options to suit your own preferences. It’s intended to give you a basic idea of the minimum rig with rough prices based on Amazon listings (prices may change).
Guitar: Squier Vintage Modified 70’s Stratocaster – $249.99
Amplifier: Bugera V5 Infinium – $199.99
Fuzz Distortion: Pro Co RAT2 – $69.74
Compressor: MXR Dyna Comp – $79.00
Modulation: MXR Phase 90 – $78.15
Delay: TC Electronic Flashback Mini – $80.24
All up, this entire rig would cost around $757 as of writing which is incredibly cheap while still using good quality gear.
If you have a bit more flexibility in your budget when it comes to the above rig, consider buying a higher quality guitar. All of the pedals listed as excellent quality so you will get the most benefit from upgrading the guitar.
Mid-Range David Gilmour Rig
Let’s upgrade some of the gear from the previous rig to achieve an overall better quality rig while keeping the total cost in reach of most guitarists:
Guitar: Fender Standard Stratocaster Strat BK/MN Duncan SSL-5 CS 69 Fat 50 Pickups BK/WH – $749.00
Amplifier: Fender Blues Junior III 15-Watt 12-Inch Combo – $529.99
Fuzz Distortion: Electro-Harmonix Nano Big Muff – $72.70
Compressor: MXR Dyna Comp – $79.00
Phaser: MXR Phase 90 – $78.15
Chorus: Boss CE-5 Stereo Chorus Ensemble – $99.00
Delay: TC Electronic Flashback X4 Delay – $249.11
This entire rig would cost around $1,857 as of writing which is mainly due to the upgrade in guitar and amp.
A more expensive delay pedal was included so you can have more flexibility in the range of delays but if you want to cut the overall cost down you can go back to the Flashback Mini. As the Mini includes the TonePrint feature, you can still access the entire range of delay effects at a lower cost.
I feel the Nano Big Muff and the ProCo RAT2 are around the same level in terms of quality so your choice should really be based on which pedal appeals to you the most. This rig adds in a chorus pedal so you can broaden the range of effects you can use.
High-End David Gilmour Rig
Let’s now look at the upper range of gear covered above and put together a rig that’s going to cover all bases. Keep in mind that there are more expensive options out there such as buying more expensive Hiwatt amps, but this rig should satisfy most hardcore Gilmour fans.
Guitar: Fender Custom Shop David Gilmour Stratocaster Signature Series – $4,640.00
Amplifier: Hiwatt Little D Rig 20W/0.5W Head w/1×12 Fane Cabinet – $1,999.00
Fuzz Distortion: Electro-Harmonix Nano Big Muff – $72.70
Compressor: MXR Dyna Comp – $79.00
Vibe: TC Electronic Viscous Vibe – $114.98
Phaser: MXR Phase 90 – $78.15
Flanger: Electro-Harmonix Deluxe Electric Mistress – $153.30
Chorus: Boss CE-5 Stereo Chorus Ensemble – $99.00
Delay: TC Electronic ND-1 Nova Delay – $359.00
This entire rig would cost around $7,595 as of writing which again is mainly due to the upgrade in guitar and amp.
This rig gives you possibly the best amp and guitar combination for home use and provides a full range of effect pedals to cover David’s entire career. You have access to a vibe, phaser, flanger and chorus pedal which means you can tweak each pedal and achieve the closest match to any effect you hear on early or late albums.
I suggest the Nova Delay pedal because it allows you to program it and save presets to the exact ms. This means you can save different settings for different songs and be able to dial in the exact delay settings you want. It’s a nice step up from the other delay pedals. Check out this delay time calculator if you’re interested in creating rhythmic effects with your delay pedal.
Keep in mind that David does use other effects from time to time so the above rig doesn’t cover every possibility. Again, check the live rig photo as a reminder of how complicated his rig can be. But the above will give you a good overall starting point to build on over time.
Check out more famous guitar rigs here.
Found this guide useful? Please share it on social media to help support this site (if you use Pinterest, please pin the below photo).